Trevor84
-
Posts
168 -
Joined
-
Last visited
Content Type
Profiles
Forums
Articles
Gallery
Downloads
Events
Everything posted by Trevor84
-
(call me CRAZY) It may be less efficient but my thought with this type of D shape is that one could sit it on bricks in different arrangements and use it like a mankel / armourers hybrid forge with a crane arm like Frosty's shop forge. I have not read much about this concept I'd like to hear your thoughts on an adjustable D shape forge.....
-
Nice start up kit right there. I'm no anvil expert but I do have the 110# version of this anvil and have been quite satisfied after I dressed er up a bit. From other reviews these anvils have intermittent QC so some have voids or bad/inconsistent HT but others are great. Mine is in between, 70-80% rebound on 3/4s of the face with one softer spot that's around 50-60% rebound. I guess this would be similar to the "Italian Pig" style anvil. Nimba makes their anvils after the same style FWIW so I guess these are kinda like Nimba nock offs.

-
Thank you for the compliments on the burner and forge build, I think you guys have put me at ease about what I thought was a bigger issue. If other forges get that hot on the outside I'll just lay down some gasket and use the heat to warm up my lunch. I was just surprised at the heat so my ADHD kicked in and I hyper focused on that point. (ADHD = blessing and a curse) I'll relax and BREATHE then put some miles on this in a couple days then report back.
-
Thank you I do appreciate your approval of the burner I definitely pulled it out of Burners 101. The unrigidized wool is sandwiched to the steel body so I'm kinda stuck with it for now.......oops I shoulda spent more time in Forges 101 I guess
-
Ya I figured that question would be about the same as "will this 3/4" burner work for my forge" without knowing whether the forge is 300 or 800ci. I used 400 mililiters of colloidal silica rigidizer from a pottery store. (what ratio they mix it at is unknown) The inside layer of insulation would be 10x20". I'll play around with this more in a couple days, see what the gasket does then trim metal off the bottom if needed. Thankfully I only have 4day weeks Thanks for you patience with these silly questions guys. I thought I was on track with this build until I got to here and ran into this heating issue and now I'm kinda panicking. I know exaust heats things up but this seems excessive, anyway I just need to BREATHE and work through these steps ONE piece at a time.
-
I guess that's a silly question because each forge will be different. Sorry typed before I thought.
-
I did not rigidize the first (outer) layer of wool or stick it to the body. I did rigidize the second (inner) layer though. How stiff would 400ml of rigidizer make one layer of wool? Say if I left a 1" tab at each end of the bottom lip should that hold itself possibley?
-
Ya my welds aren't the best, I've got no worries that I made a boiler if that's what you mean I just keep hoping that the steam is causing extra heat. But if that's not the case and the gasket doesn't work then I'll be trimming the steel. I would trim a big strip off the bottom lips but the thought of the insulation dropping out when I move it worries me.
-
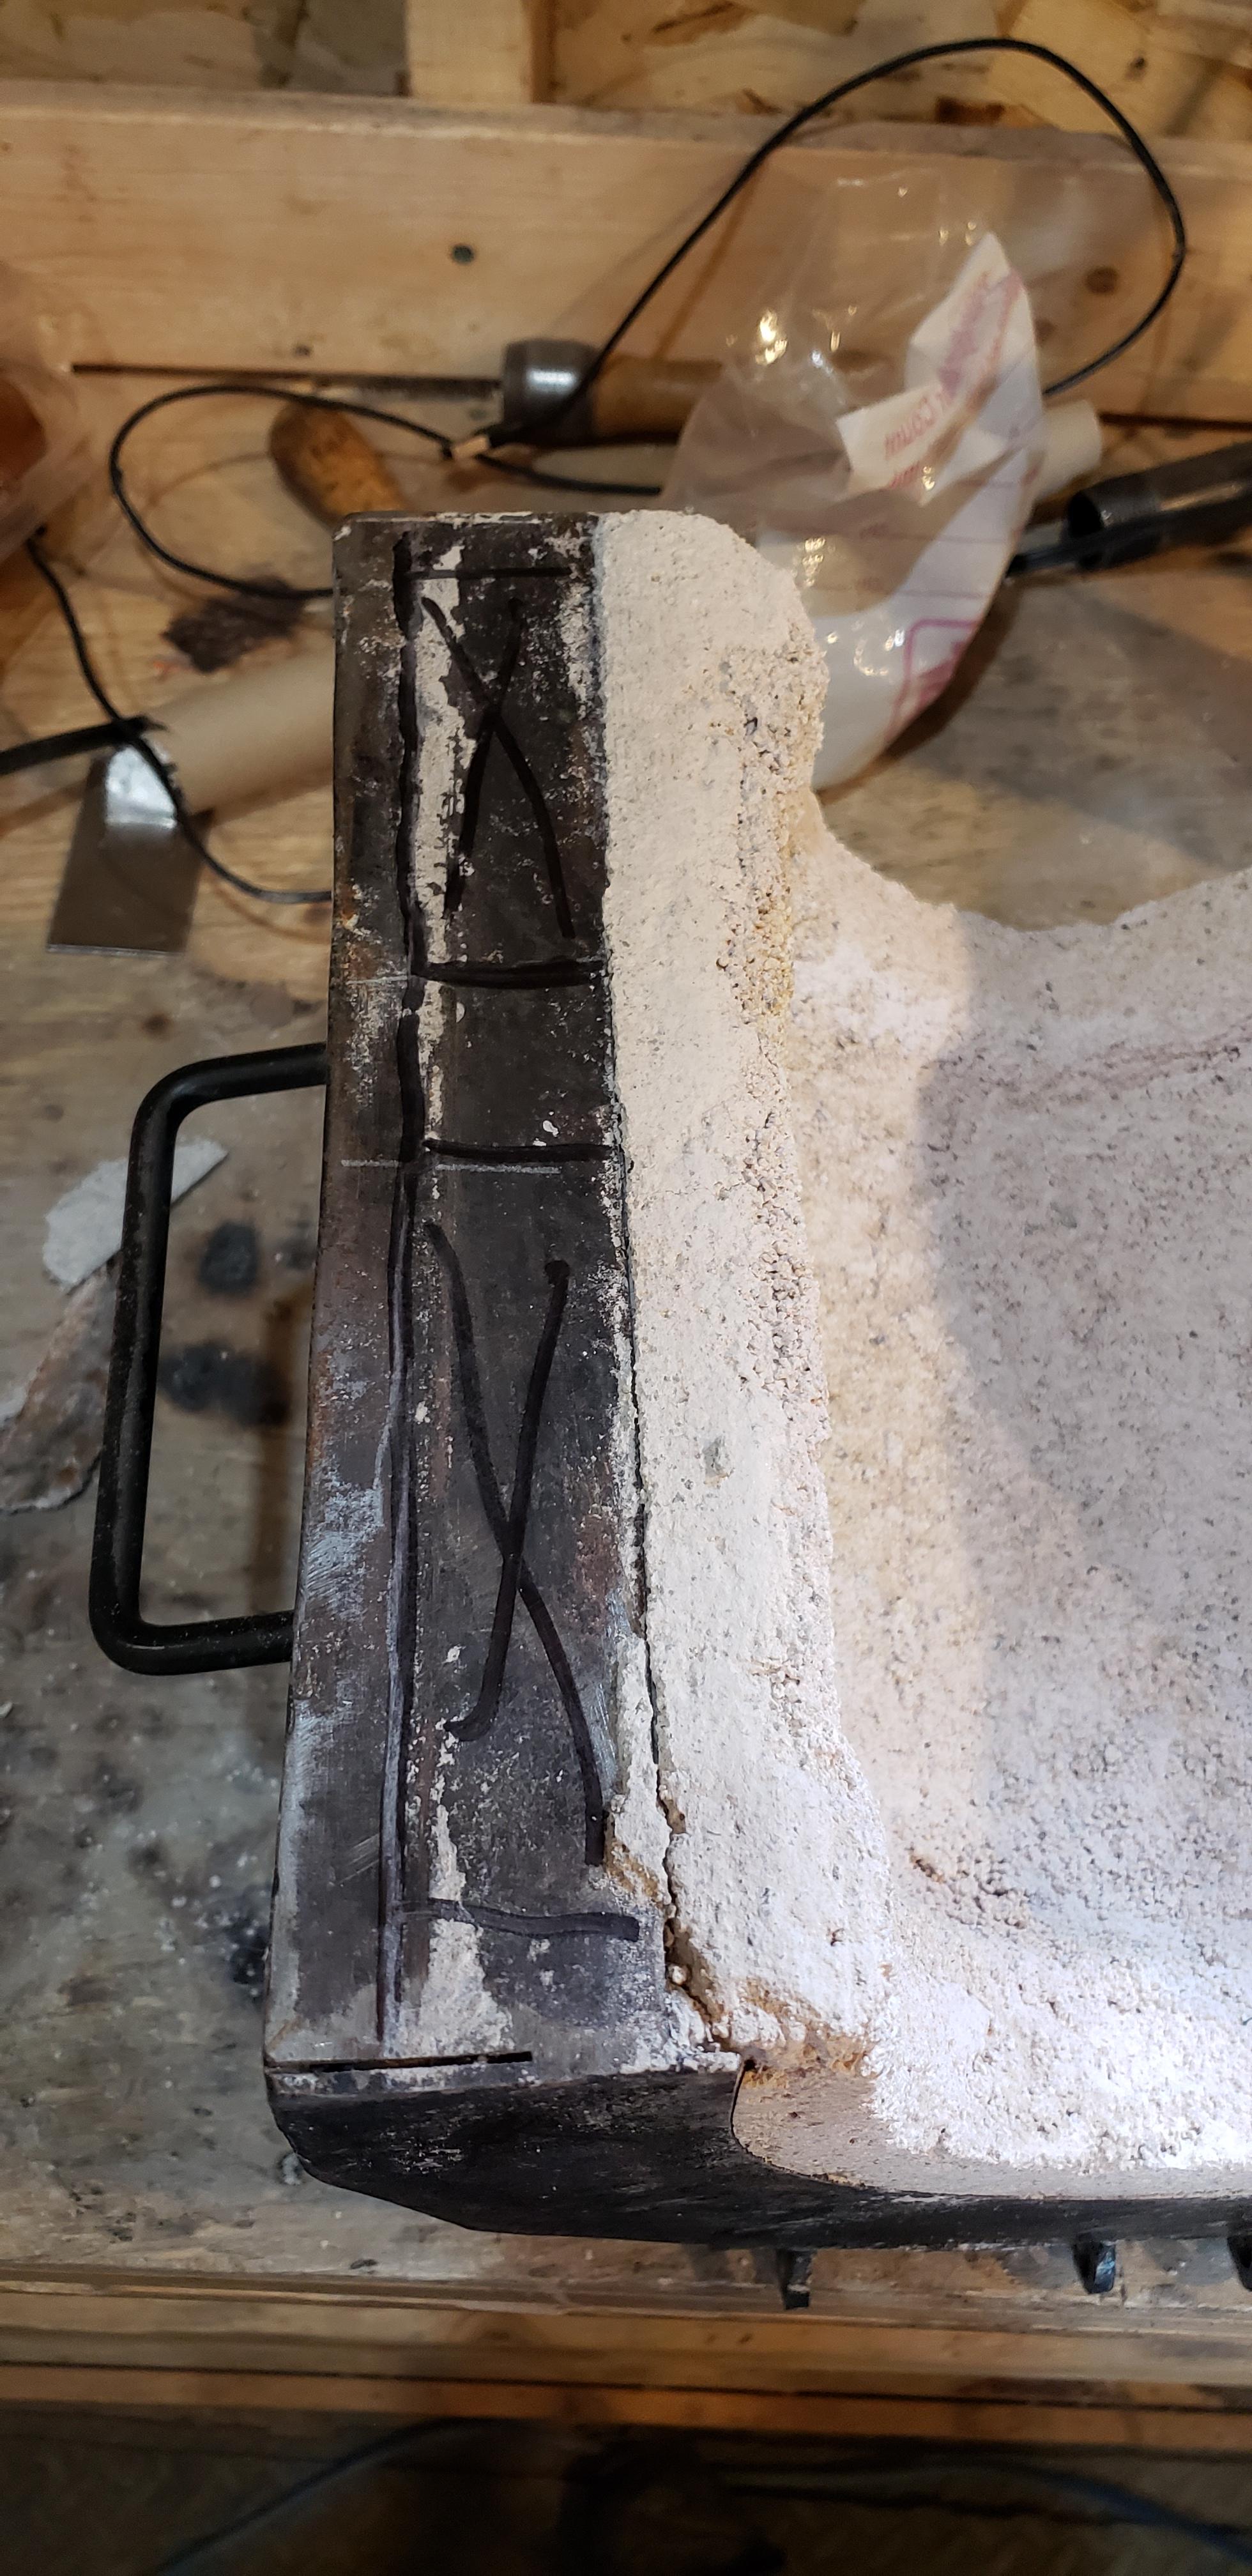
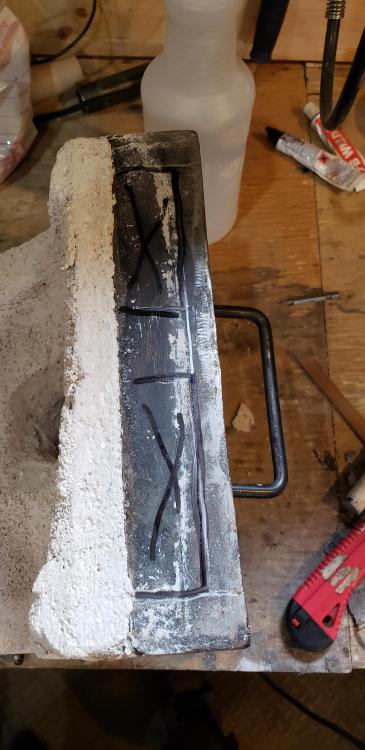
Thanks Buzzkill, that's what I thought. I tested a piece of steel in there and it scaled up so I'm a little lean. Thanks MCalvert, ya a couple design flaws but that's par for the course for all my projects. I ran it for a half hour or so, the burners running lean and the outer body is still heating quite a bit. I can't feel heat coming out the gap where the upper meets the floor and no burnt paint yet. I did note steam escaping from a couple holes in the welded seems on the body plates (not sure how much that would affect the heat of the outer shell). My weekends over and I will try some wool as a gasket next weekend but if that doesn't help too much maybe I'll trim out these sections where the Xs are that will leave me tabs at the ends and one in the middle to help support the insulation and again use a gasket. Thanks for the pointers thus far.

-
Mikey, I was worried about the steel lips being over heated, I will try the gasket of sorts (wool or rope) and see how it reacts if that's doesn't cool it down I'll trim out some steel and get some wool exposed. I should have asked more questions earlier I'm fixing my choke so I can close it right off at shut down to hopefully reduce the chimney effect. I've removed the gauge and capped the pipe, what you say about the gauge makes sense. Ill shine up some steel later and see what happens. If it's rich I'll see scale build while in the forge..... I believe that's the typical test/reaction. Thanks guys
-
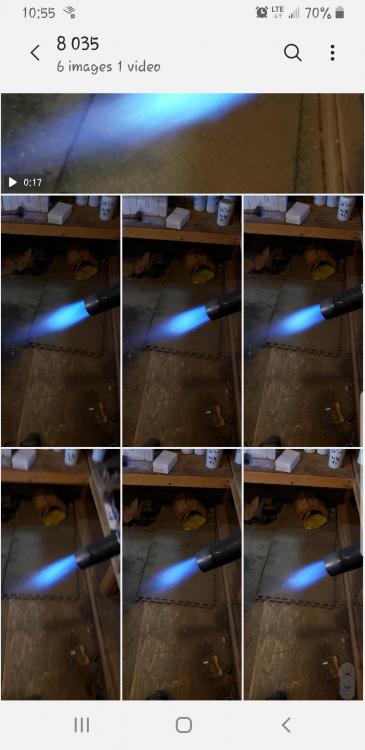
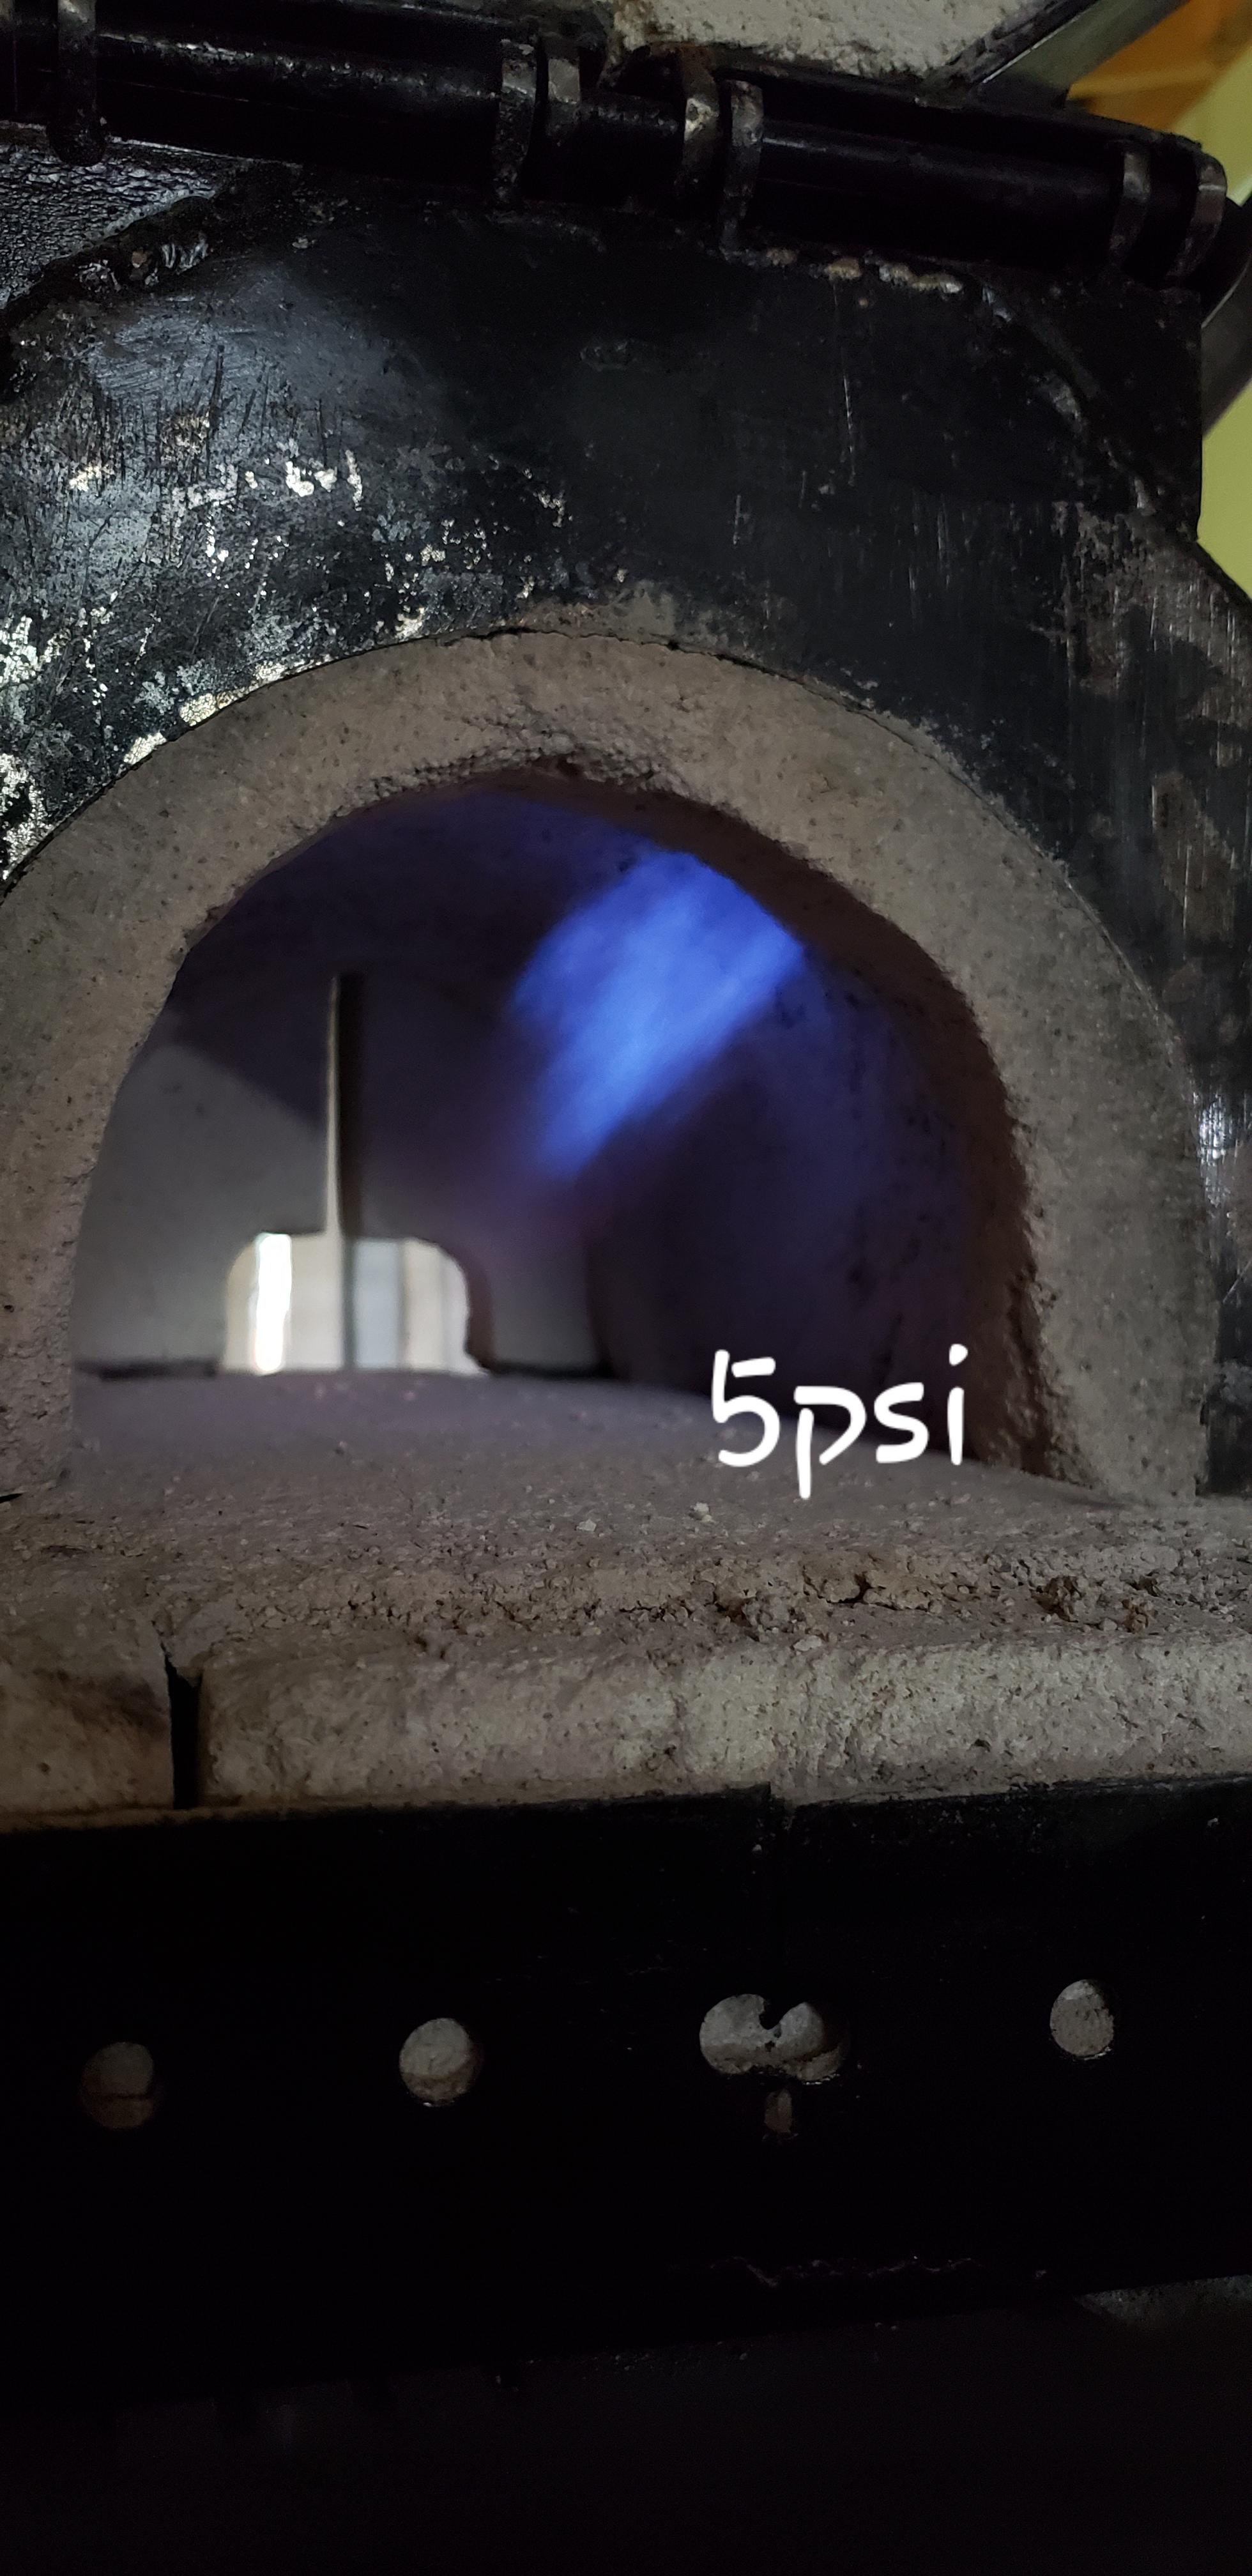
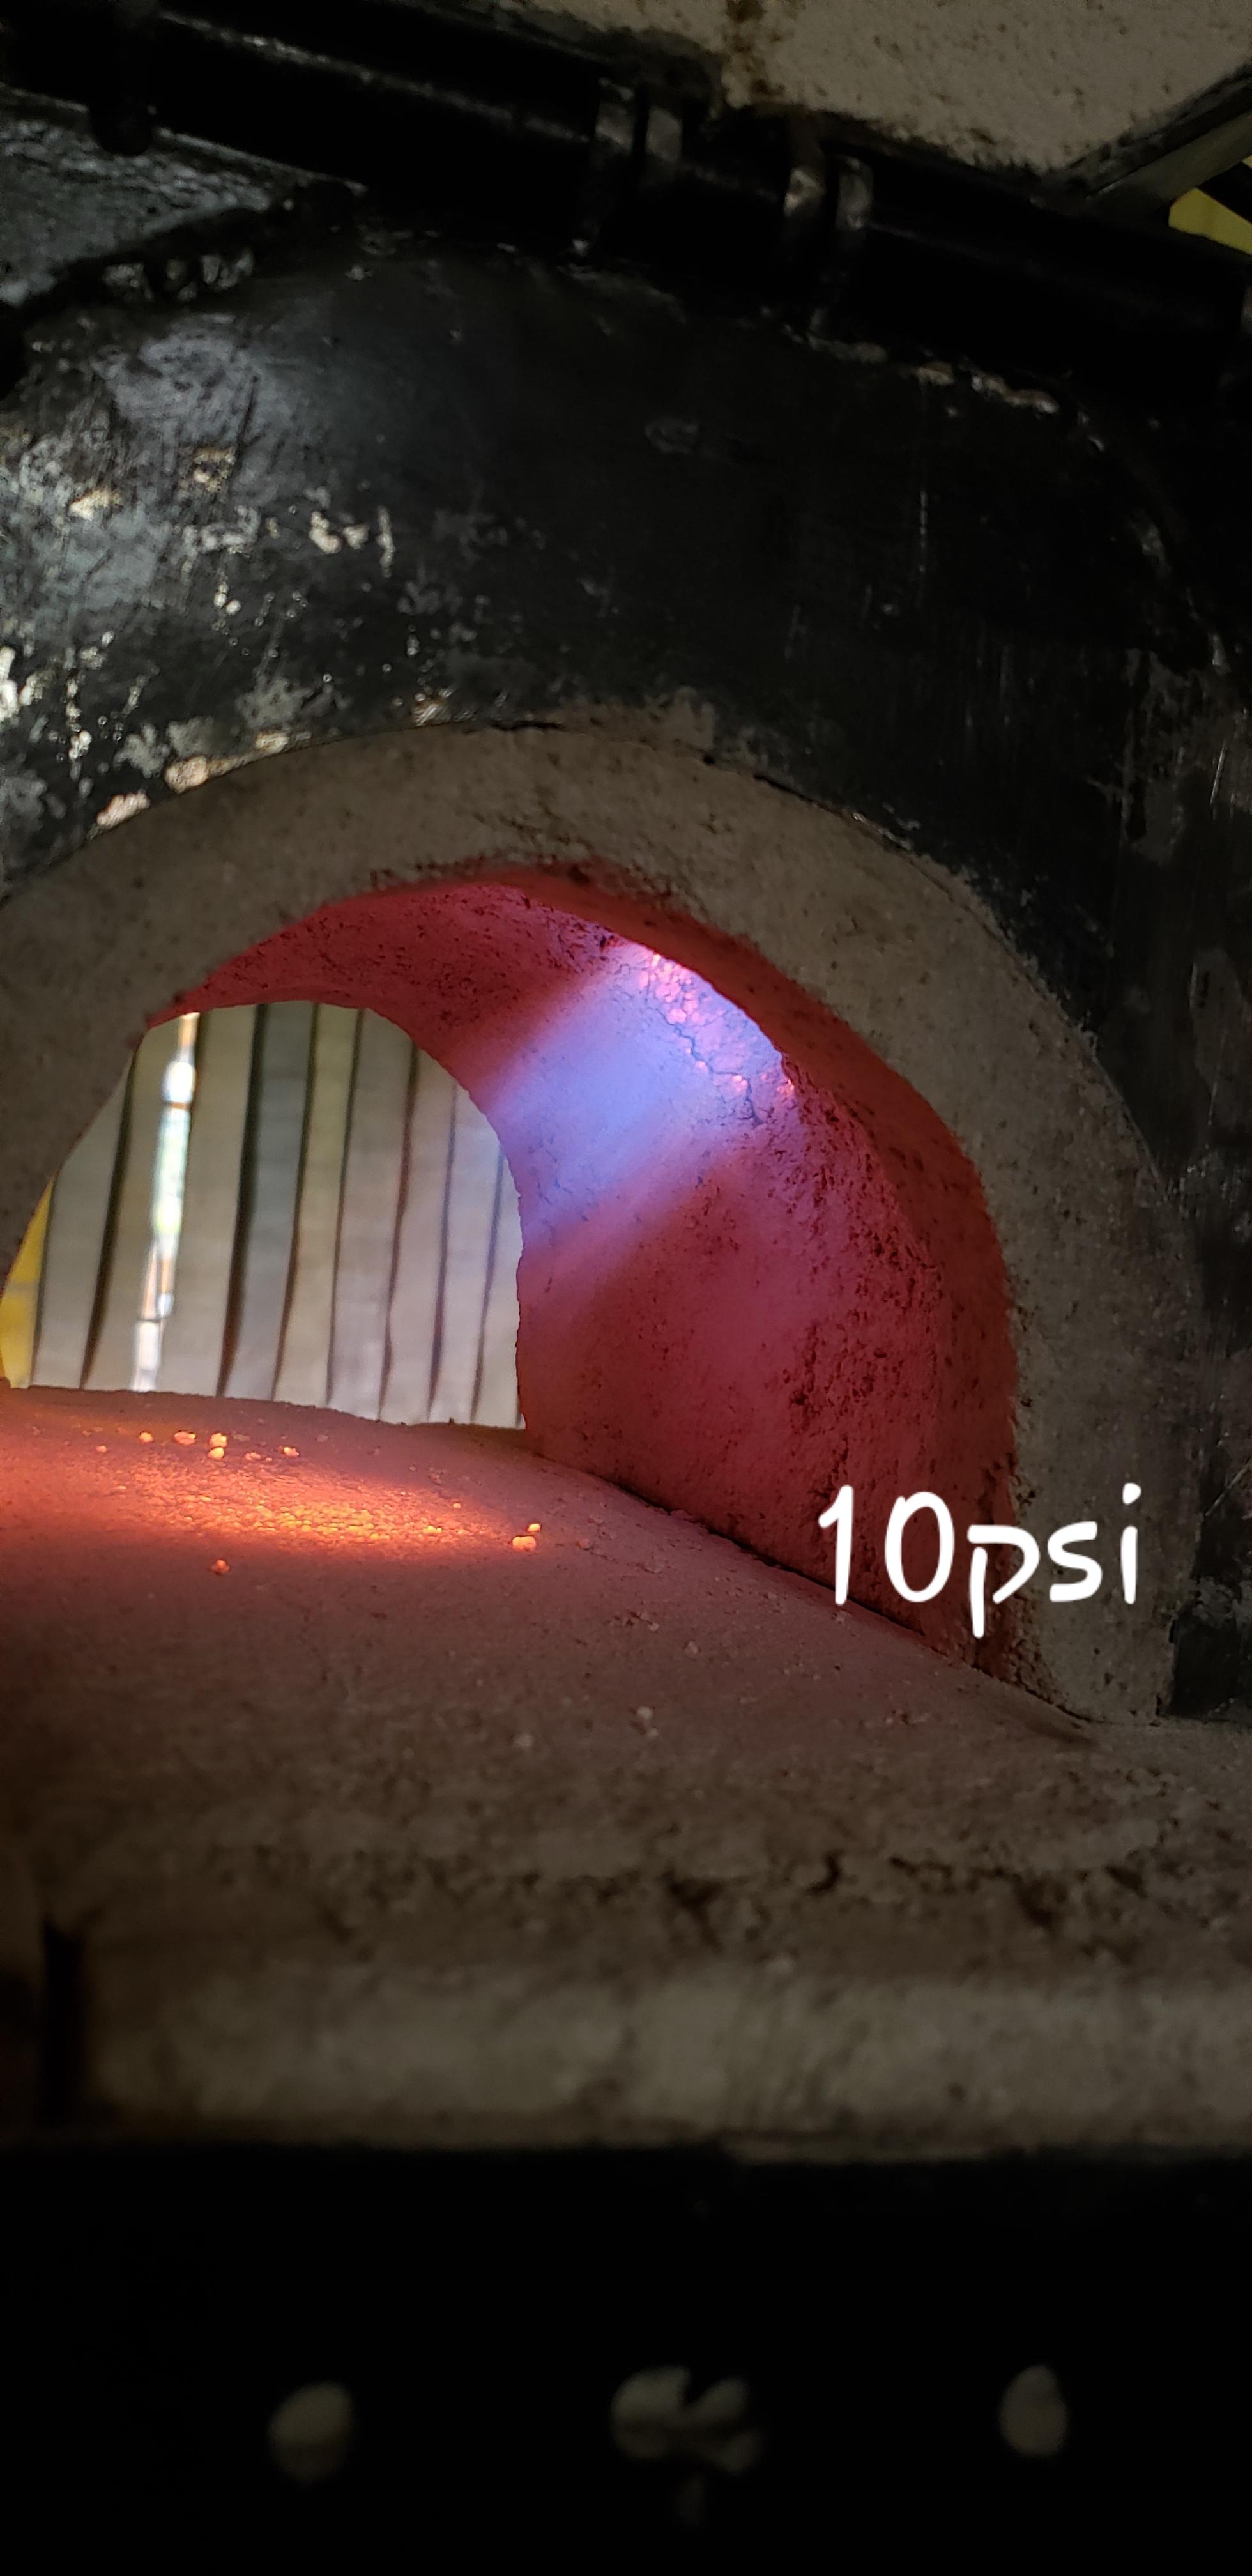
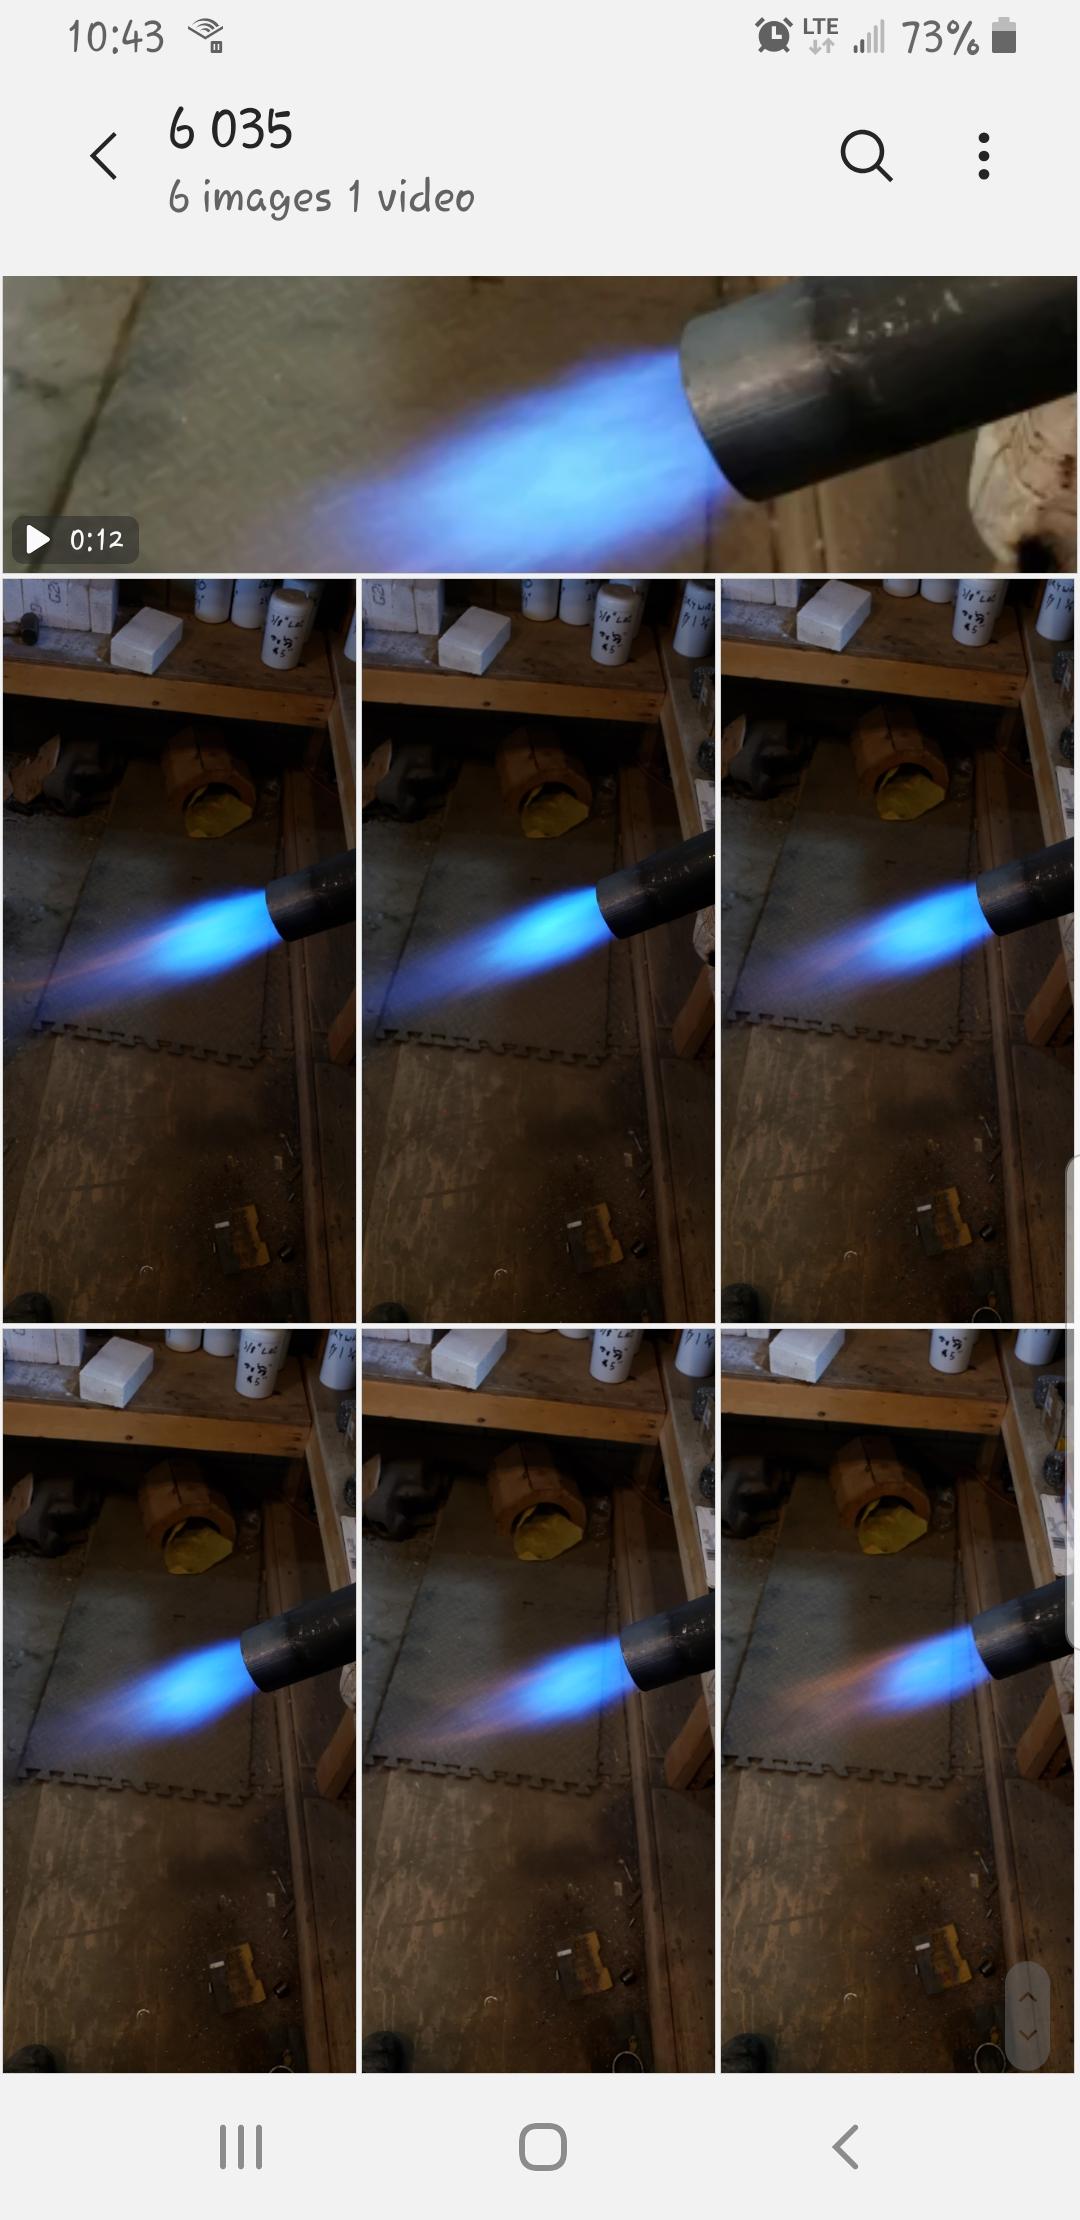
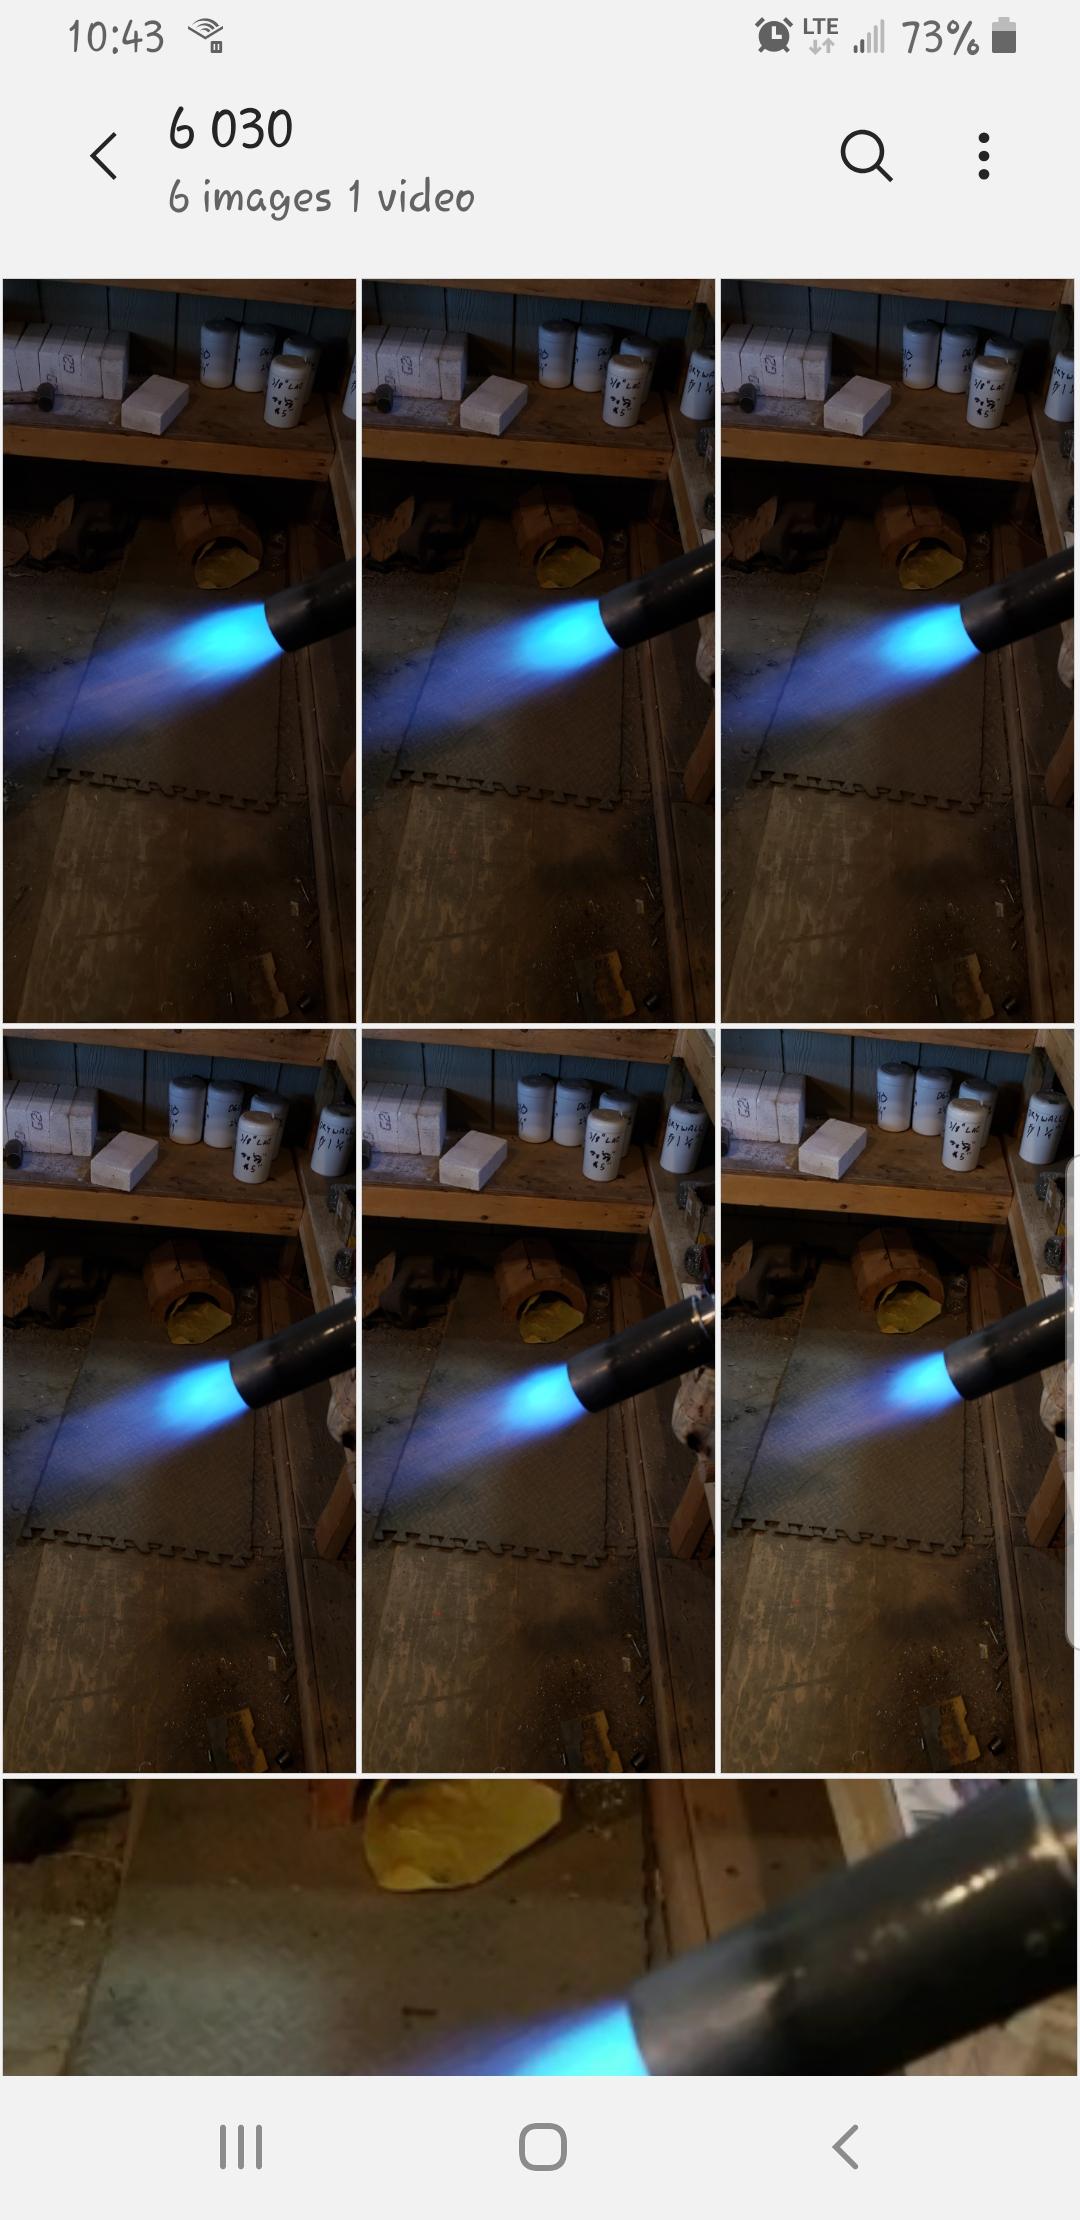
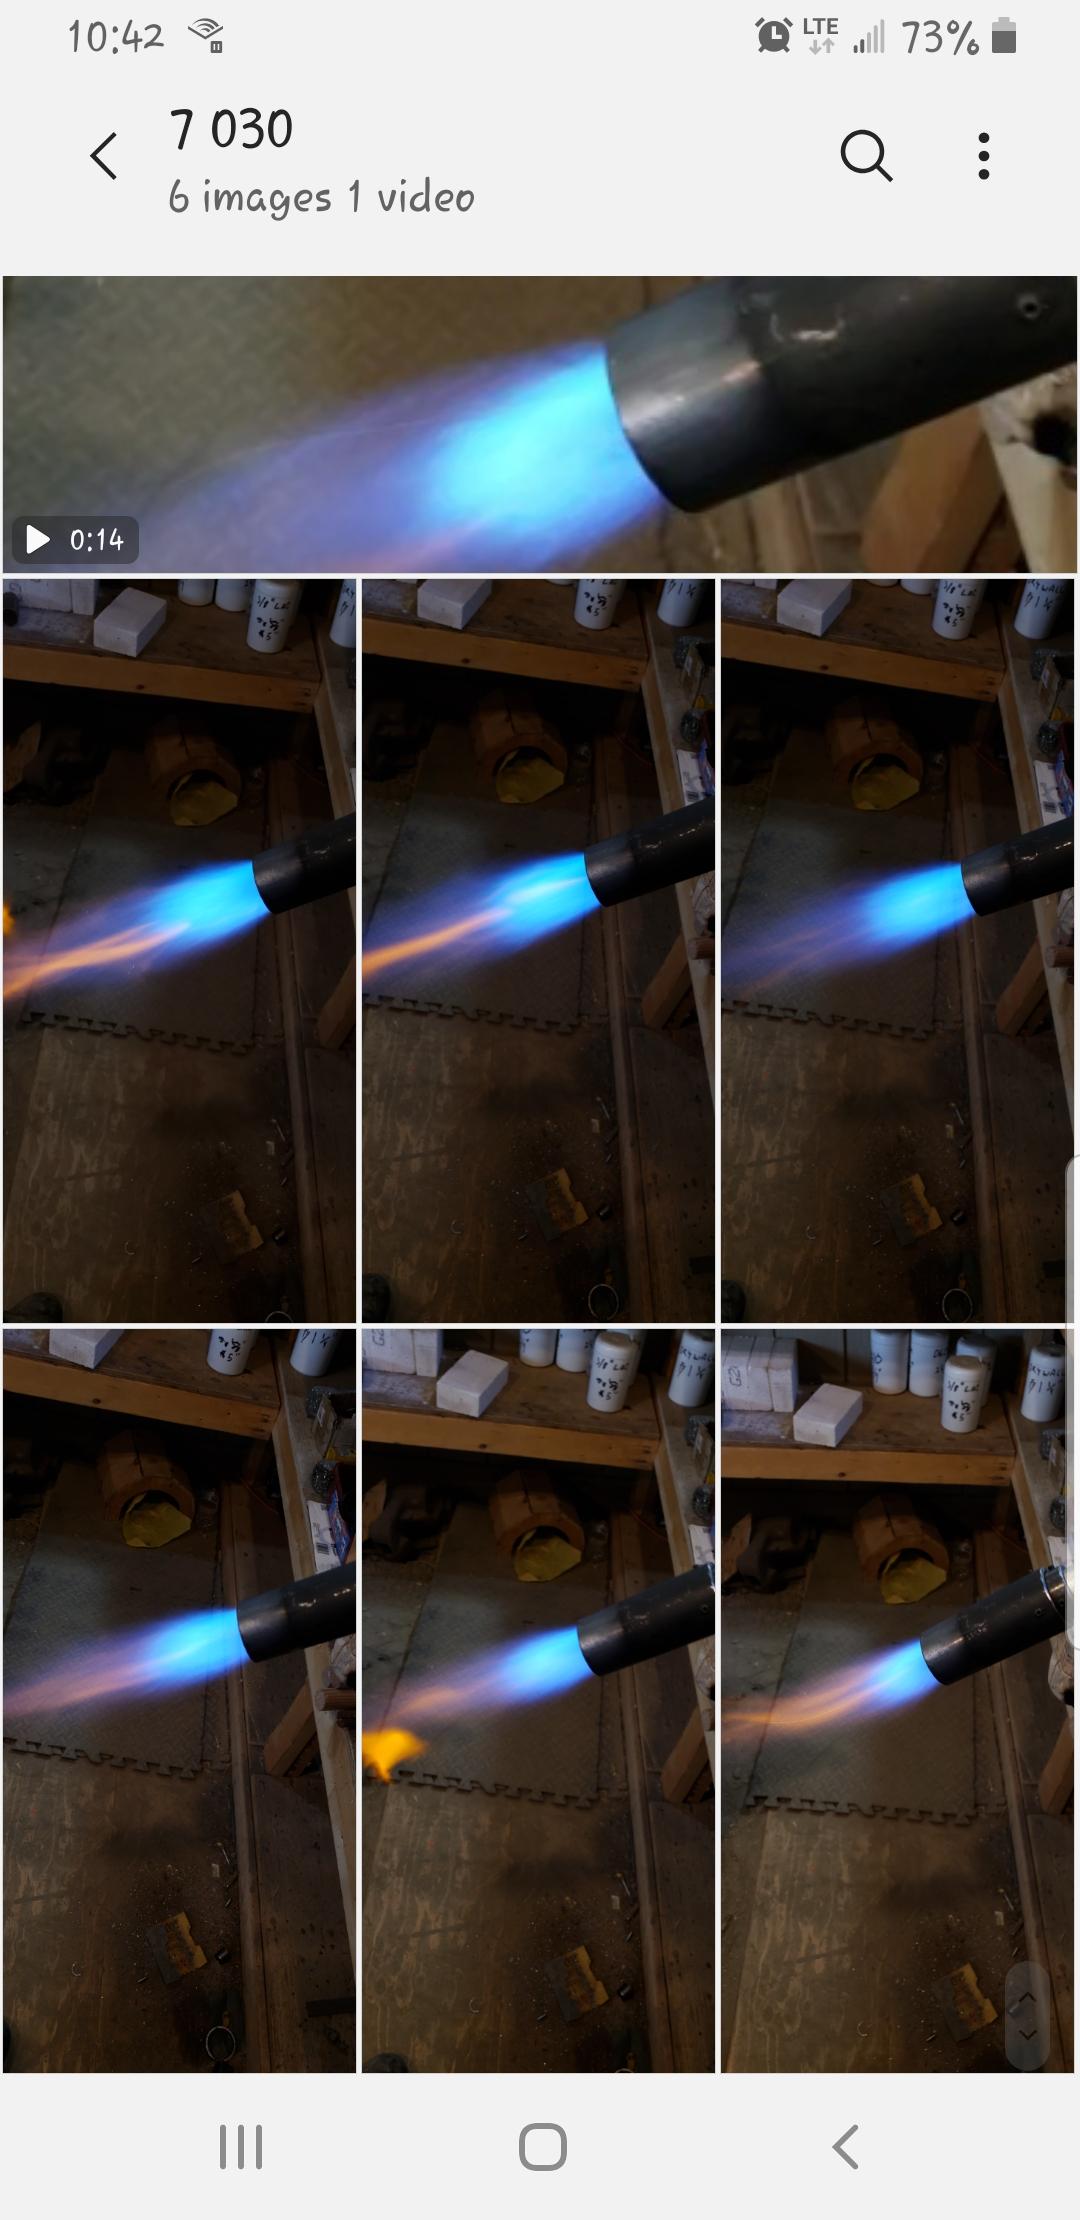
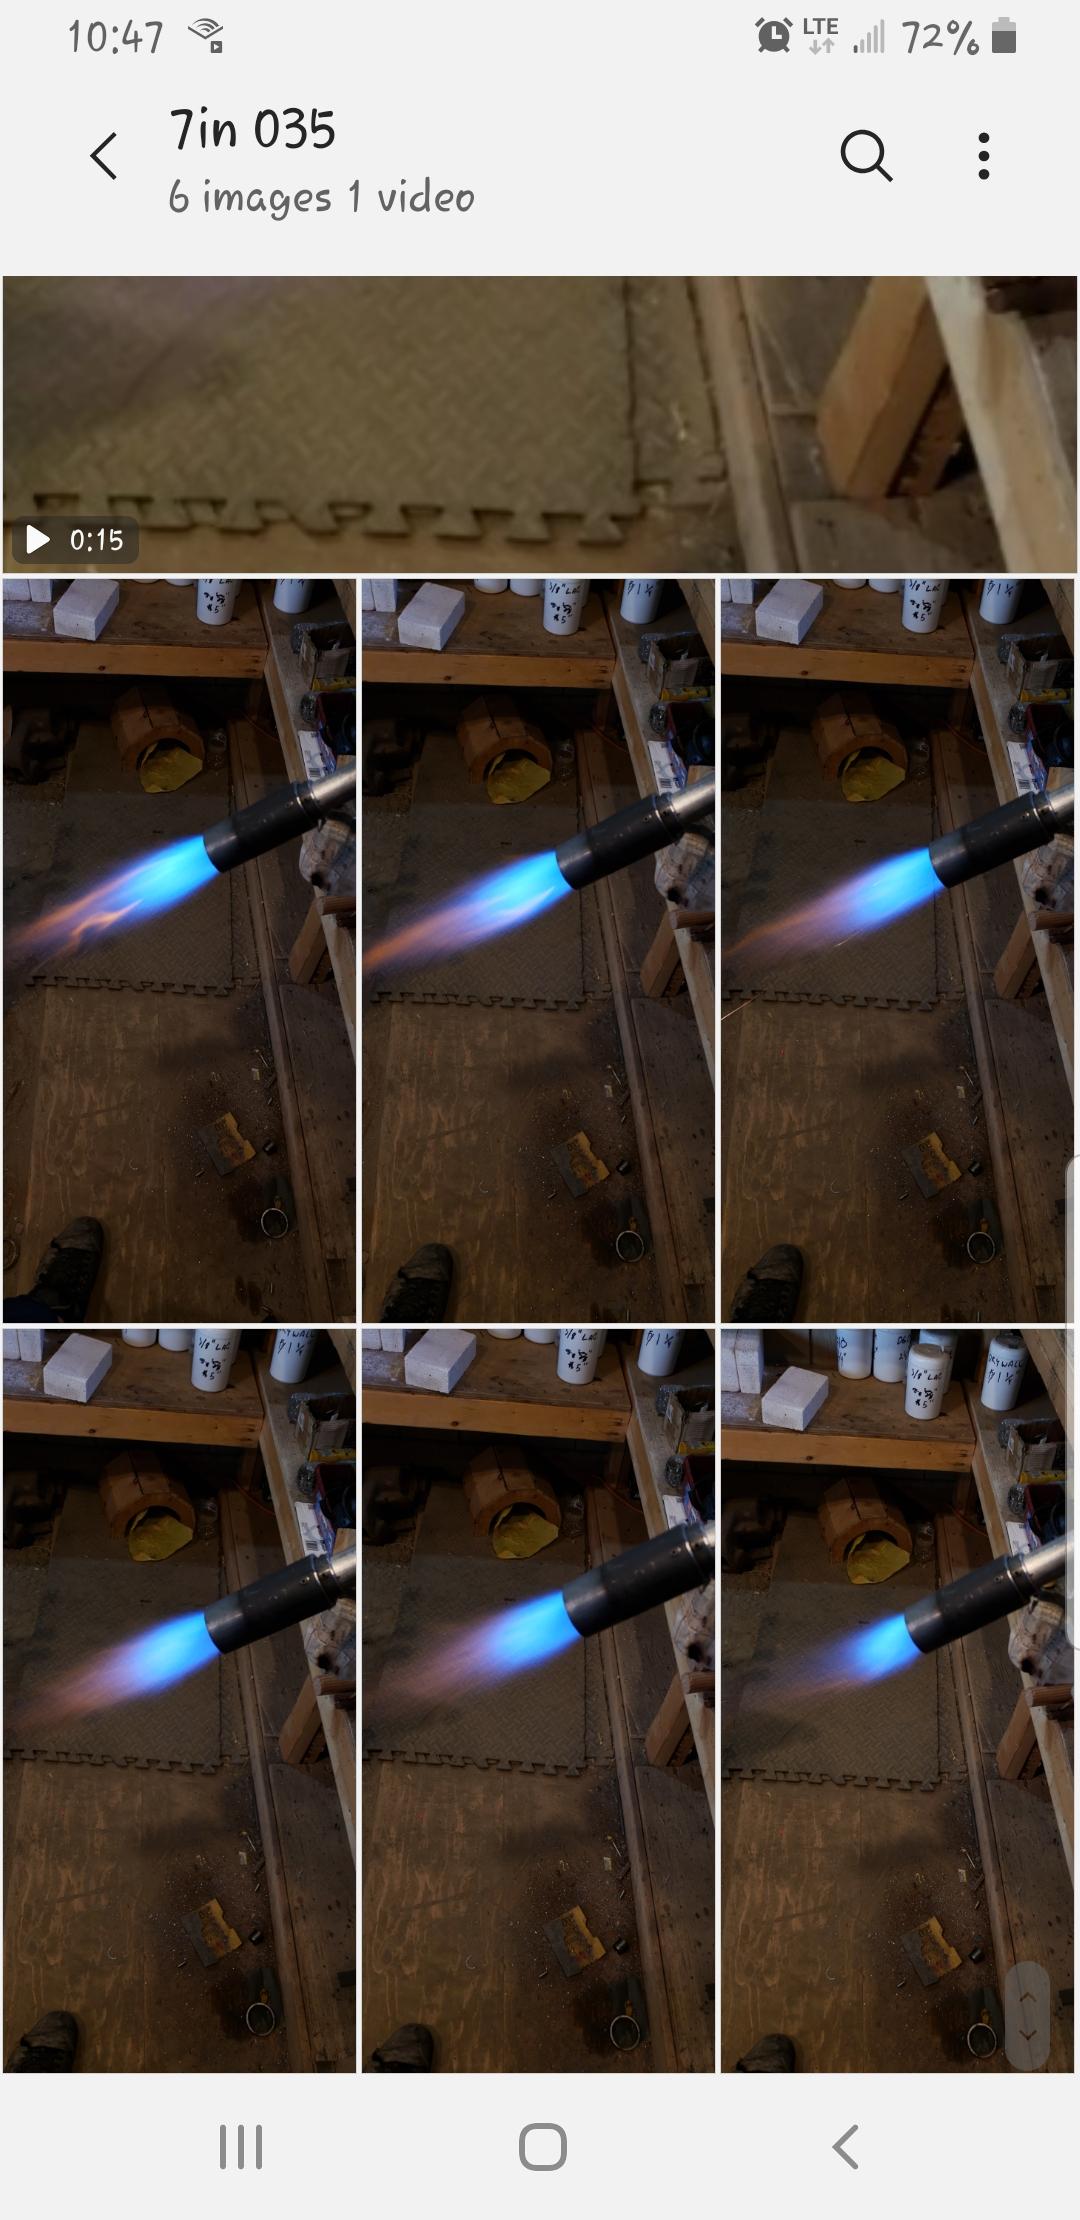
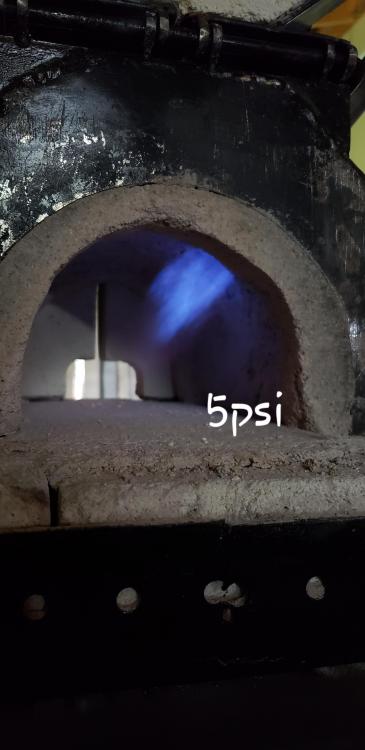
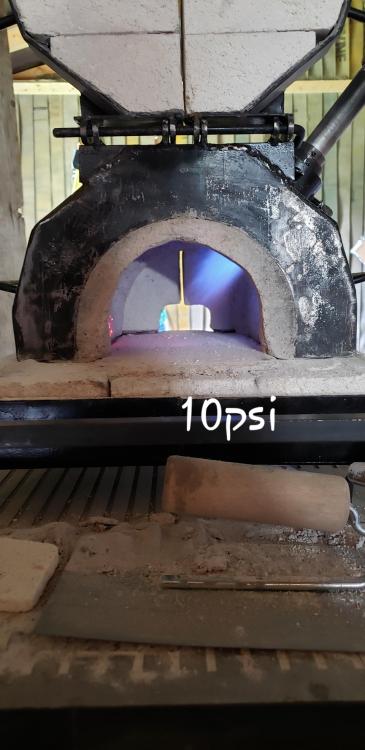
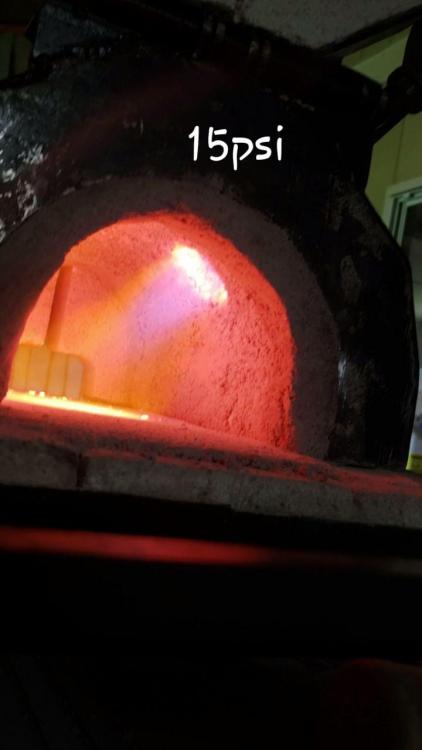
Hey thanks Frosty fire place rope makes perfect sense. I'll see what type I can find around here. I hear you on the gauges I really do I basically use it like you say, for refrence. Like the odometer on my old chev. The sound and vibration tell me when to shift but I do make mental notes on what rpm I happen to be at different speeds. (2100 is about 100kmh) I think I see what you mean, stating the psi in pics isn't really necessary due to each build being different. I just often read references to it. I do have a gauge on my regulator the one on the burner was an extra I had and thought it may be handy there. In all honesty though I'm planning on taking the one off the burner, without gas pressure it still reads 5psi so it's faulty and it just looks clumsy up there. I'm just going to cap that nipple off. How do my flames look? This set up is a 0.030 7"mixing tube. With this set up I assume I would do most of my around 5psib
-
Ya it's either where the forge meets the floor or steam or both. I'm thinking of adding a bit more material to the floor and let's say key the upper into the soft bricks a bit more or kinda dish the floor so there is more of an overlap. I probably have to run it for a bit and see just how hot it gets. And no you're not sticking your nose in that's what I wanted, I'm trying to get ideas.
-
Ya it's the temp of the outside of the forge I'm surprised at. My old Evey day forge was brick so I never really touched it or thought about it getting too hot aside from feeling my fuel lines. I keep thinking that there must be steam inside by the way it heats so evenly I'm just not sure if that's possible. No the paint isn't even burning at the bottom where it meets the floor. Thank you, I expect I'll be adding wood or something to the handles or keep a glove handy.
-
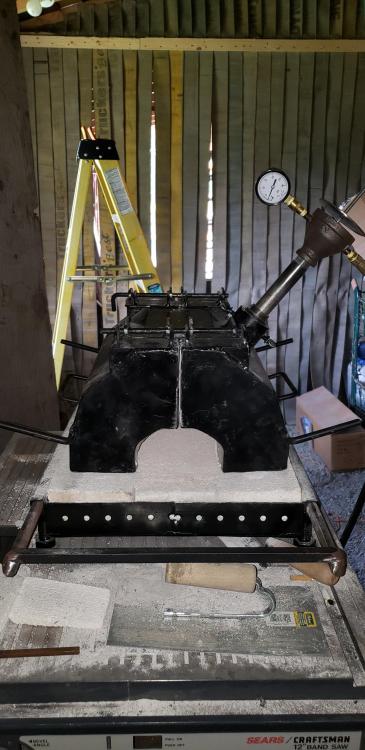
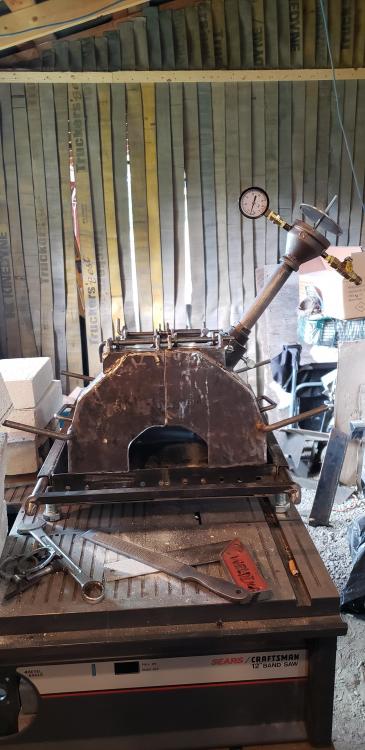
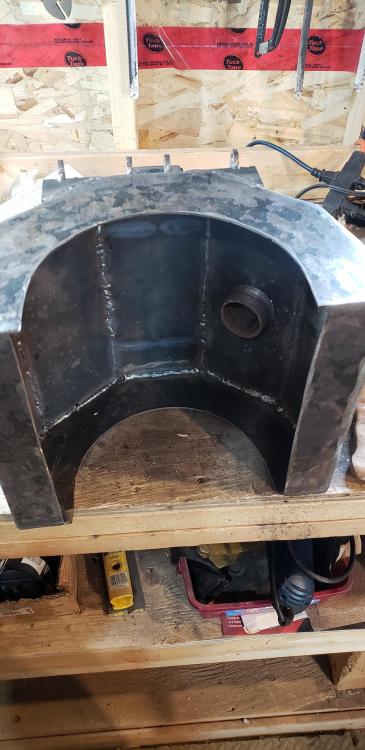
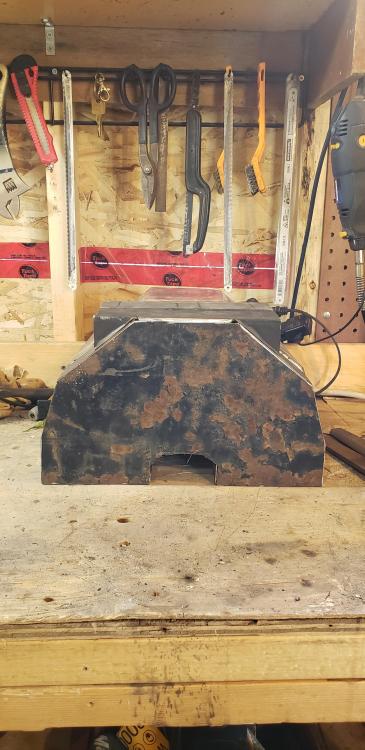
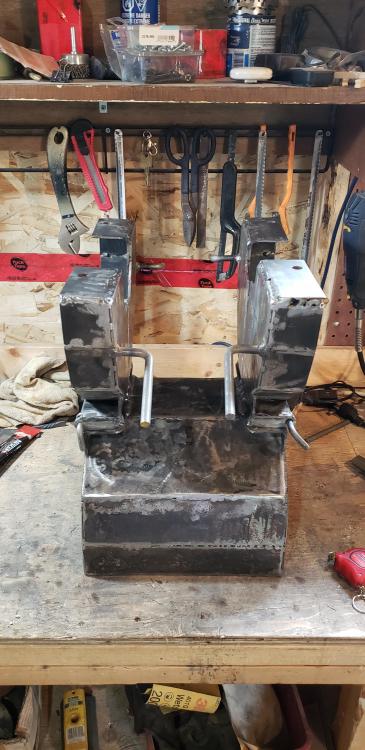
Hello all, my first post here. 3rd forge build. First was soft brick pile and (worked well) , second was the Zoeller "simple forge" (too big) I'm looking for some guidance, possibly too late unfortunately. I'll start with the description of my build as best I can and then ask a few questions. 1/8 steel plate for the body 2600 deg soft fire brick floor and doors Two 1" layers of ceramic wool 2nd layer Rigidized (400ml too much 1/4-3/8" kast-o-lite 30 let sit in wet bag for 24hrs (first coat) 1/4-3/8 kol flame face floor Apx 300-350ci and interior 3/4" Reil style burner with a mig tip mod I've only fired this up to dry out the Rigidized and to dry out(?) the KOL (at least I thought I dried it out) . I've dragged the forge back and forth to carve a groove for the base of the forge to sit in the soft brick floor to seal the joint. With the forge running I held my hand at the joint where the body meets the floor and feel no heat escaping through it. After running the forge for 5-10min in short runs at 2.5- 5-10-15psi the whole outer body has gotten almost too hot to touch evenly on both sides not just the side the burner faces. I have no dragon breath shooting out the ends, doors open or closed. I am at a loss to why this is happening the interface of the upper to floor does not seem to be leaking exaust. I only rigidized the second layer of wool but could I have over wet it so steam inside the wool is super heating the steel shell I used 400ml apx of the rigidizer? Should I worry about the flame heating the steel at the base of the upper shell that holds the insulation......? The paint on that part isn't even burning though. Should I gouge a deeper trough for the upper body to sit down into? With all this keep in mind I hadn't even gotten to full forging temp. I hope this makes sense and sorry for the length. I'll try to shrink the photos if possible from my phone. Not sure if these links will work, I'm new to you tube.

-
Ok name changed , check. I`ll leave my burner entry with a little wiggle room and add more refractory later if it's too loose, check. Sorry no pic small enough for an avatar yet but I`ll get'er figured though.
-
Sorry I just reread this. I don't know how to edit this in my profile but Trevor works.
-
I guess to simplify the question regarding gap between the burner and shell would be "how big of a hole do I make/leave" Once I have the insulation in, hole cut, ridgidized, coated with castable should my step nozzle JUST slip inside the hole or have decent wiggle room? I guess I over technicalified my question, I just don't want to line the forge and cast it just to find out I made the opening too small. Too large and I can always add a little more refractory I guess. The second question would simplify to "does the flame start inside the step nozzle or hang off the end" mine looked as though it started inside a bit, the depth changed depending on the mixing tube length and psi. FWIW I don't have a fancy calculator nor would I know how to use it yet. I've just been trying to ask my questions more technical so you guys don't have to try and guess at what my idea of "wiggle room" equates to that's all.
-
Kind of like I've read from you before when you said that nature abhors a vacuum so it rushes to fill it, in this case it does so with air. So instead of a stream of propane inducing air into the burner the burning gasses induce air into the forge body. I think I am starting to be able to get a good visual in my head with this stuff. Reading and following instructions is great but I like to understand first so if I run into a hiccup I can work around it. Both your points of view in this really compliment one another and make it easier to form an image even during the times you disagree. Two more questions both of which I have not seen a "measurement" for here. 1: After insulation, ridgidizer and KOL how much wiggle room should there be between my burner nozzle and the insulation/KOL. 1/16"-1/8" creating another "step" and then stuff the mounting tube from the outside with scraps as needed? 2: A nozzle is used to reduce pressure so that the gasses can slow down enough to not blow off the end of the burner when lit. This would cause the flame to burn inside the nozzle a bit "holding" the flame.... I believe I read that the flame starts inside the nozzle (somewhere here can't remember the page) but how far in should that be or should it be hanging off the end of the nozzle? Does the flame still technically start at the end of the mixing tube and the nozzle literally "hold" the flame in place and that's why nozzles become consumables?
-
I don't have any fancy words for this and you and Jerry have gone over this in depth. However could this be similar to how a backdraft in a house fire acts to draw in oxygen? once the fire has consumed all the oxygen the fire stops but the heating continues and will either burn out or suck in more oxygen. (at this point if you open a source of oxygen you get a boom) If the heat in our forge fully consumes the air induced through the burner then in those split seconds it needs a gasp of air to keep the flame itself going would that not cause the forge itself to draw air through the burner mount? I could be way off or just repeating what you guys have said. I have only spent moments trying to understand this small portion but it intrigued me. I just watched a documentary on blackholes and they were talking math way beyond my scope but I couldn't help thinking that there were similarities with how forges and burners move particles around. Now if only I could figure out how a black hole works I'm sure I can get this burner dun up good If this adds nothing to what has already been said there is no need to repeat what has already been said it is just how my brain wants to invision the mechanics of it.
-
Hey sorry, disregard my questions on baffled doors and exaust. I went back to the beginning of the thread and I think I have a clear image in my head again. FWIW
-
well I decided to attempt a Ultrox (zircopax) top coat as well as the above. I have a tub of Unibond 33, I'm going to try to add the zircopax to this and mix into a slip, test on some scraps then coat the old brick forge and see what happens. I'll update with results later.
-
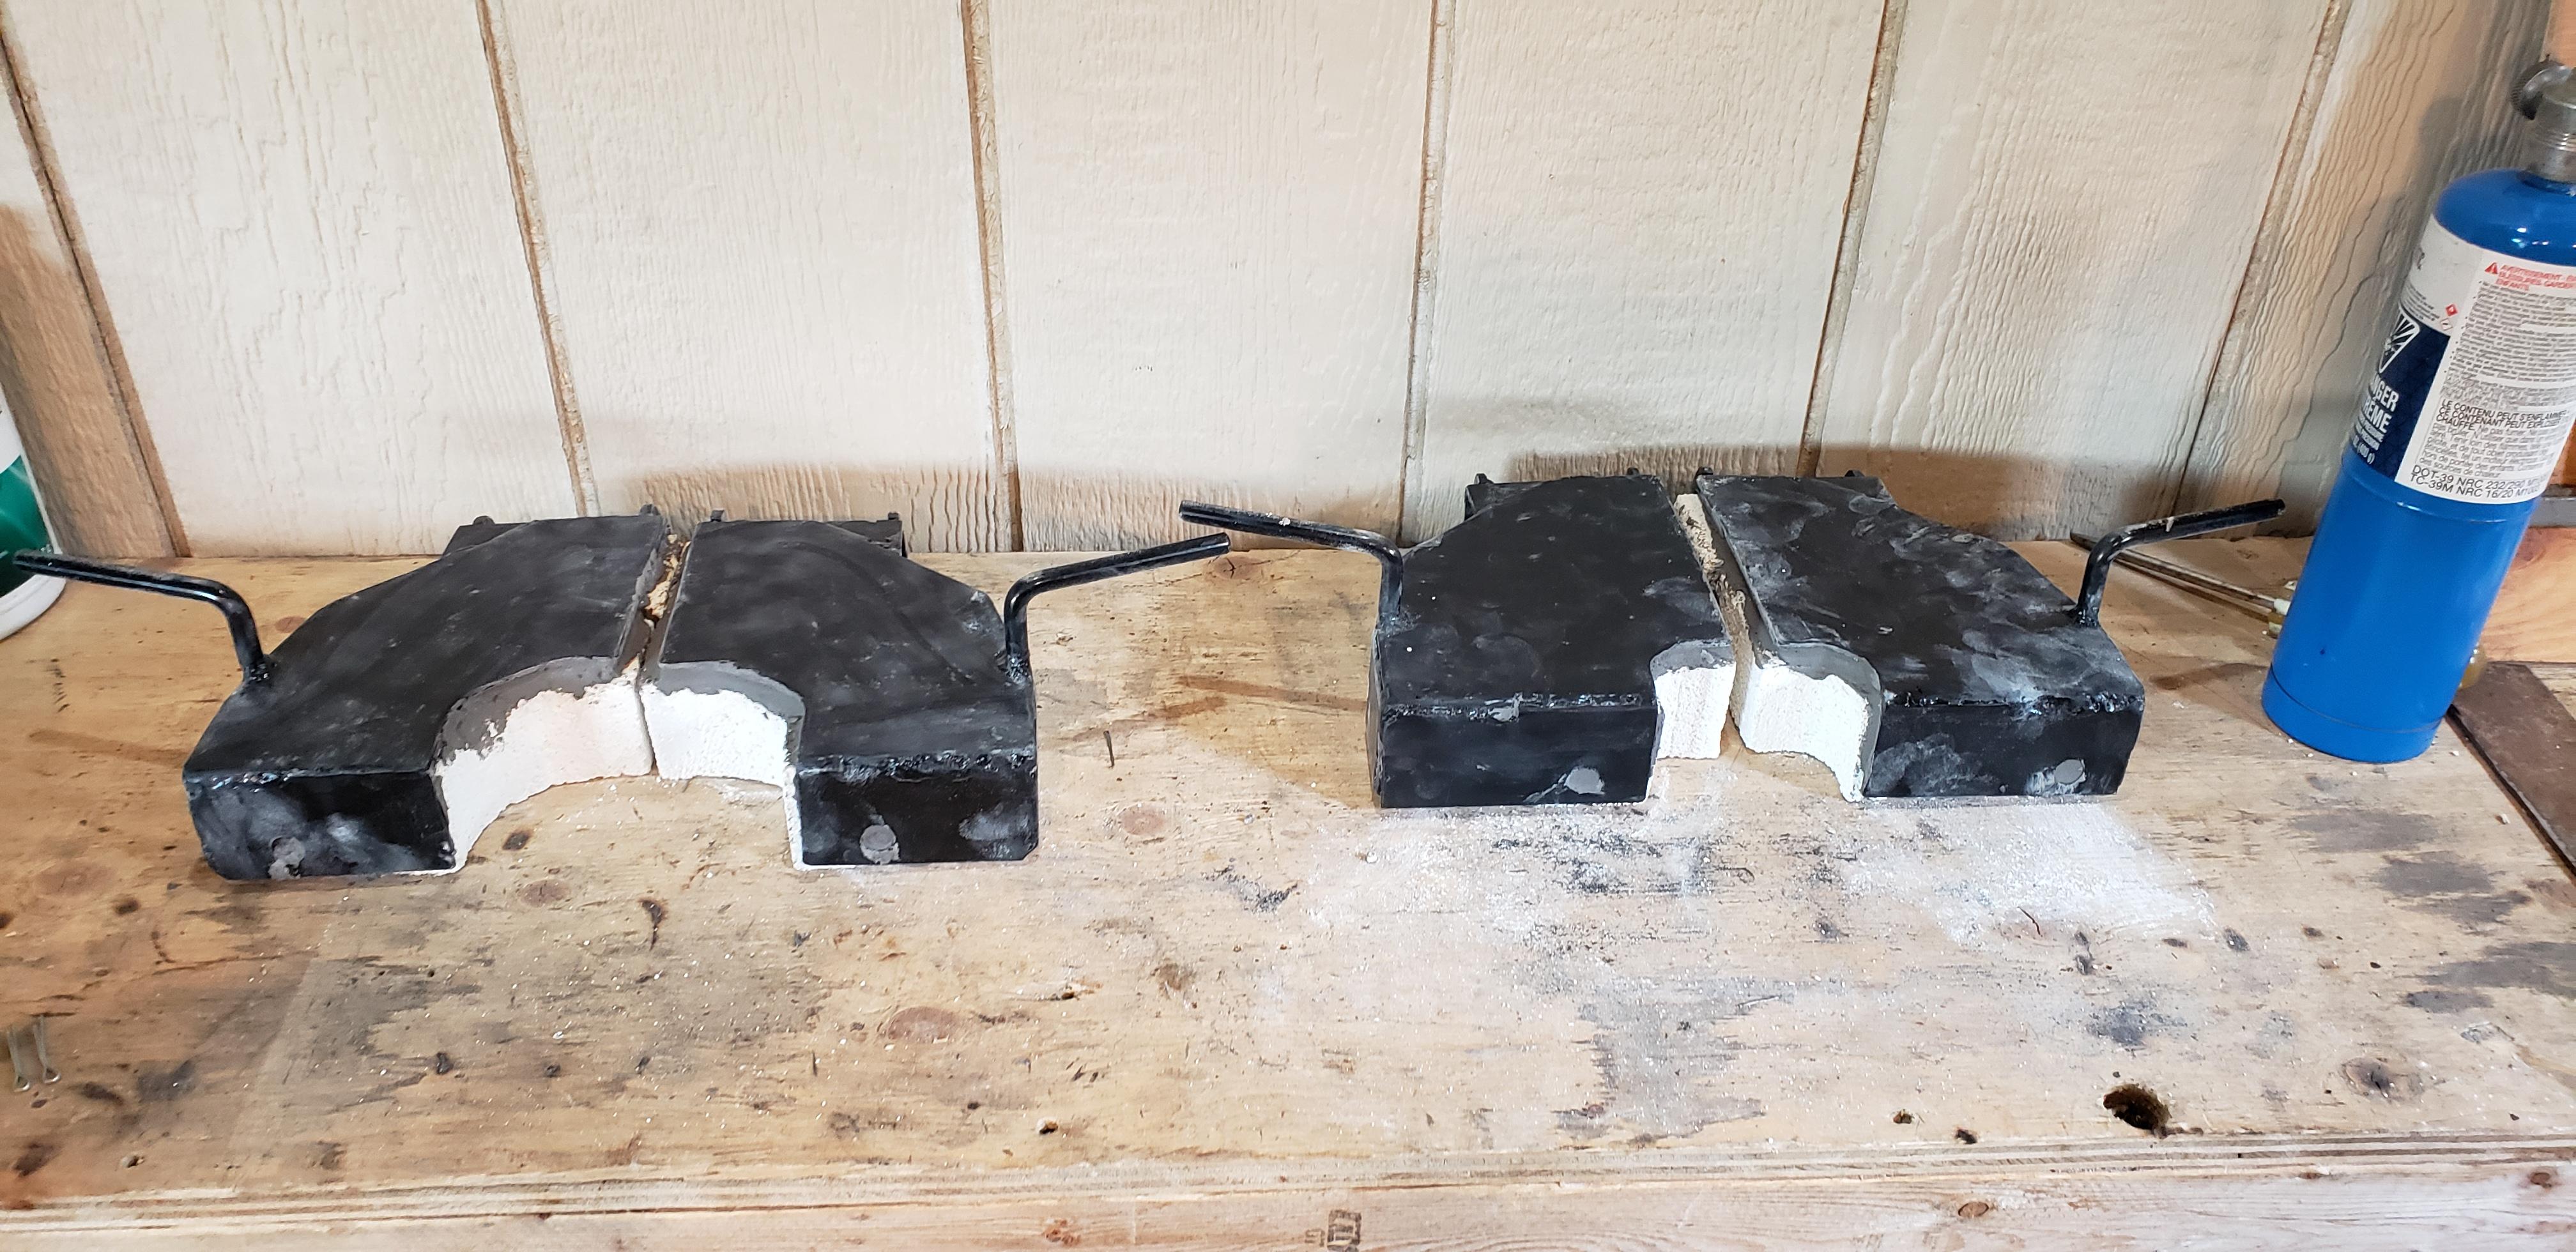
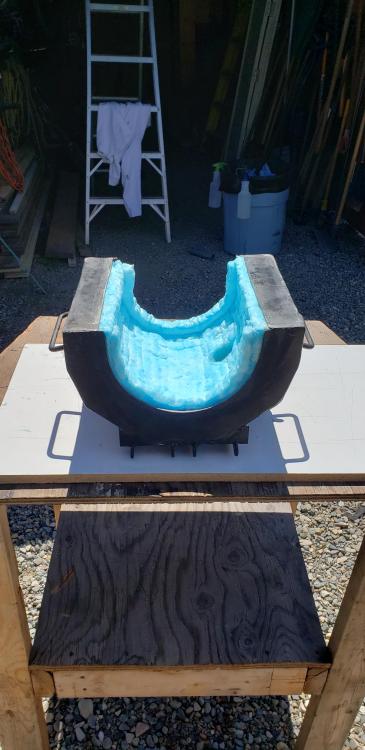
Hey guys are figured I'd jump in over here now. As you can see I'm almost complete on my "D?" shaped forge (1/8"steel body) . 2600wool, kast-o-lite 30 and ridgidizer is on its way. I'll be 300-350ci interior After reading through this thread I've got a couple concerns (maybe) Ill have two 1" layers of wool ridgidized and then kast-o-lite 3/8"-1/2" thick (of which I have 9#s coming) the floor and doors are 2600 sfb (not Morgan) coated with a layer of kast-o-lite for durability. The interior of the forge will have a 1"x1" lip/rib at each end where the doors meet the body. I was thinking of leaving the portion of the 1"lip that the door meets uncoated to create a gasket of sorts (?) (won't be exposed to normal operation only when doors are opened) After reading this I'm worried about: openings in the front and rear and how that will effect my exaust speed in relation to my NA burner. Mikey you speak about baffles and then doors to control exaust speed.... I am struggling to grasp the baffled concept and what it would look like. (you could say I'm baffled). Does it look like I'm going to run into an issue with my door opening sizes? If my description makes sense in conjunction with the following pics do any of you have thoughts on my build? I'm almost too late to change things now, I guess I could asked before building it to 90%. My doors will sit flat against the body and have that lip/rib as a gasket and aside from that it'll be brick against steel. With the 1/8" steel body and the insulation as described should I be worried about warping? Wow, these photos jump around on me when I try to upload them. I guess theres a bit of a learning curve here, I'm used to the face book format. Here's one I meant to upload it shows the floor.


-
That's sad news Jerry it's sad when the old girls go. And the new ones are nice but definitely a complety different animal. Ya, I'm good at watching YouTube just never made one. That's why I just screenshot the albums
-
Hahaha, no spiders. That was a fresh cut pipe so I assumed the sparks and flicker were metal dust stuck to that little oil skiff inside the tube as they do go away. The truck is an 84 frame up with a 76 drive train, still has the hi power orange paint on the block. It's not rebuilt but I have replaced most of the consumable parts she gets me around. Well burner's done then except adjustments inside the forge. Body of the forge is getting hi temp paint right now and insulation is getting ordered asap ;-)
-
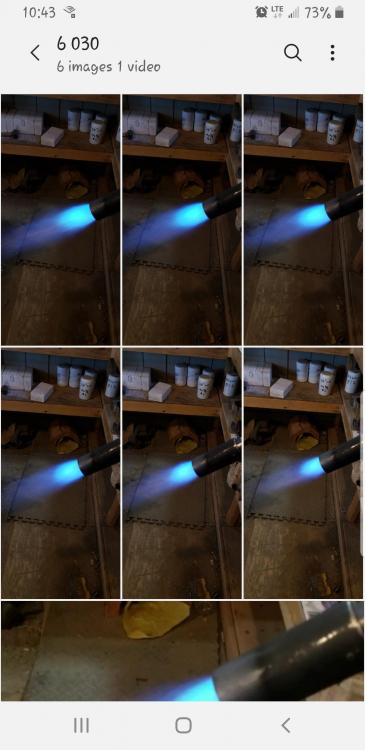
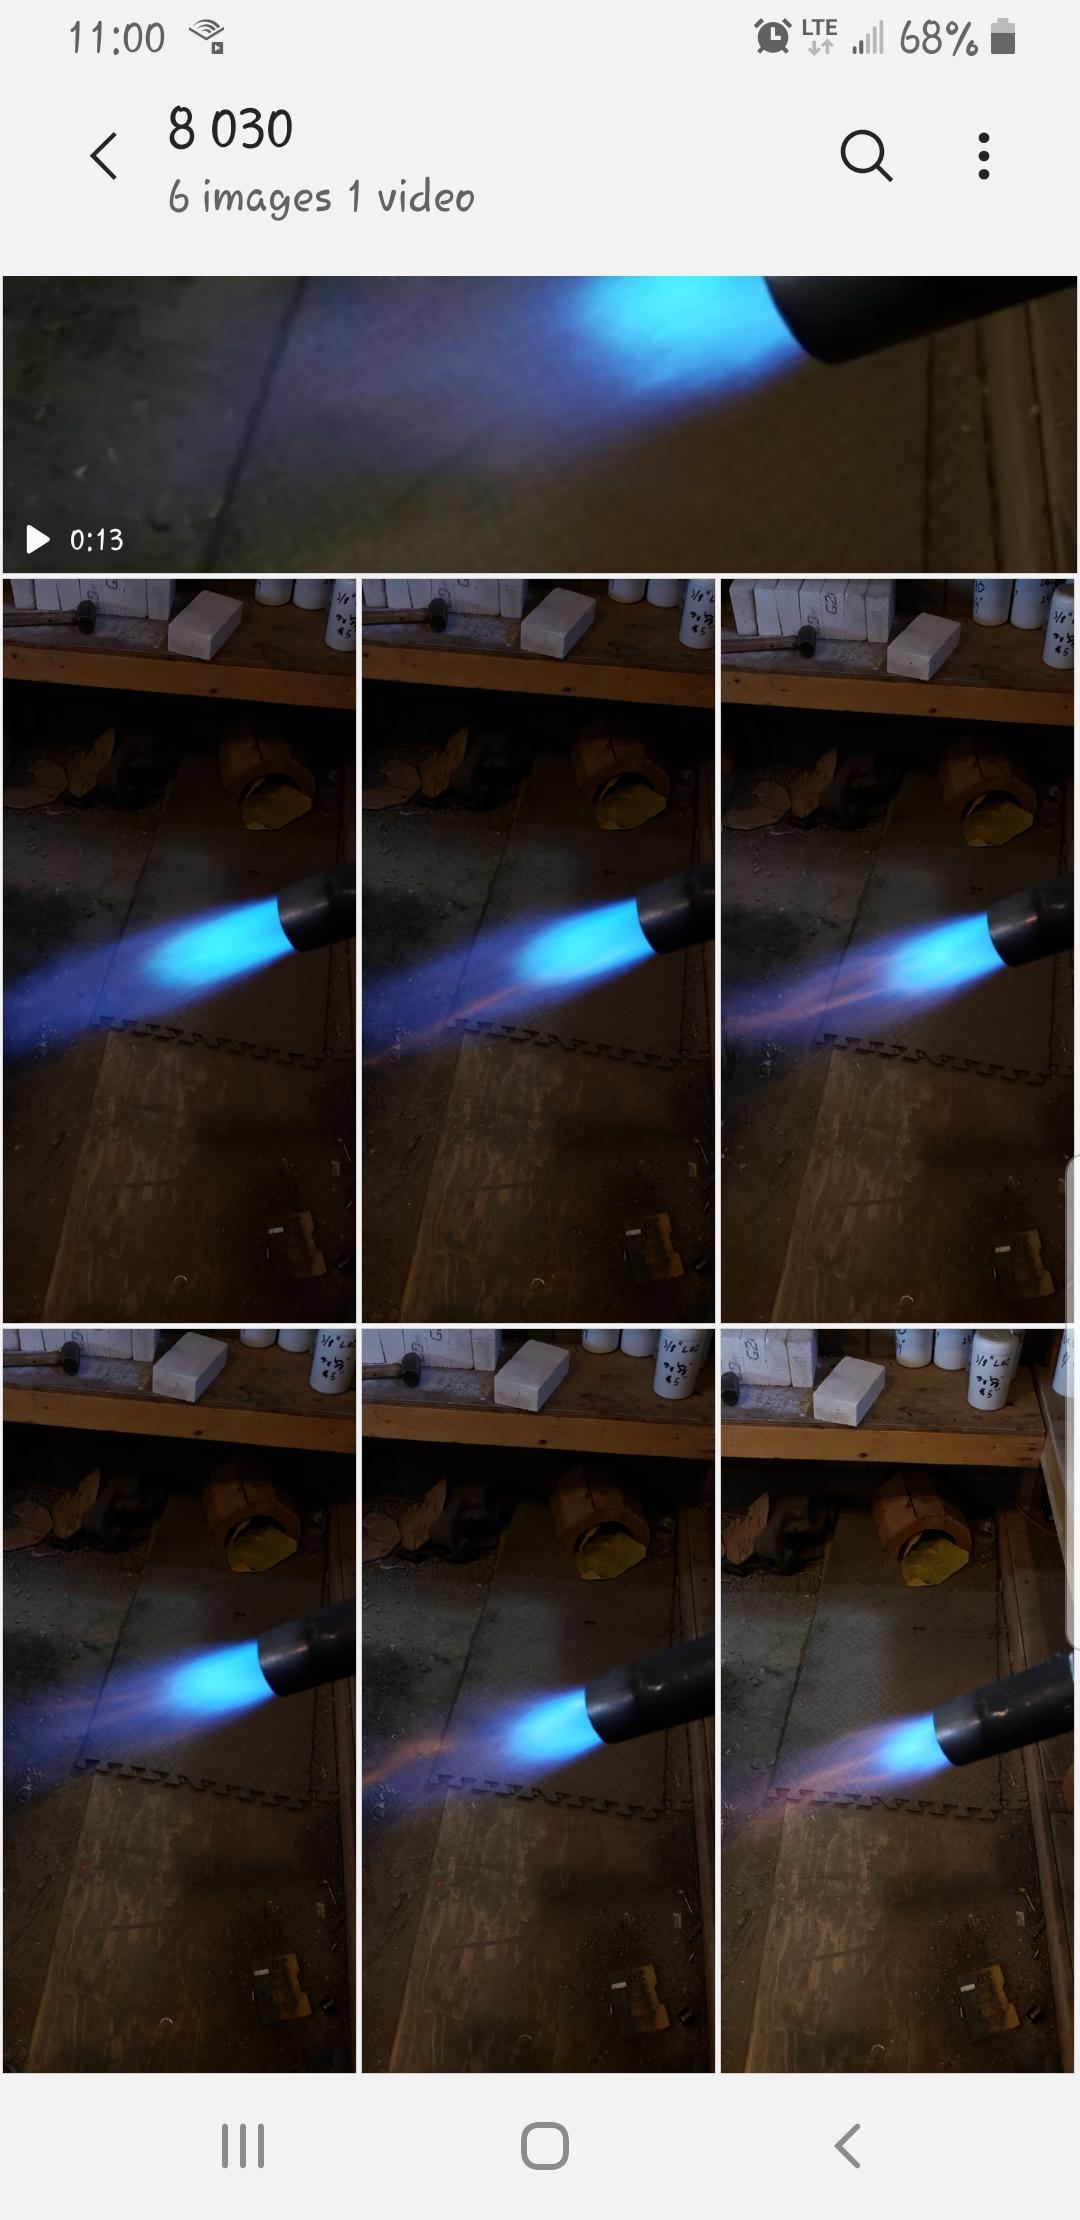
Blue goat is my old Chevy, my real name is Trevor. I'll update the profile, I always get lost when filling those out. Flame names are definitely confusing and I'm more of a visual guy anyways. I went through the length combos again and labled the pics. If you could give me an idea of the combo I should start with I'll set it up and leave it alone until the forge is lined. Pics are all 5, 10, 15, 20, 25, 30 and with this nozzle over hang I didn't need to choke at all. All these are 3/4" mixing tubes with the step nozzle at a 1 1/2" over hang. The photos still look a bit different in real life but are closer then my previous pics, I played with the light filter and ISO settings. I really appreciate all the advice so far and your patience.