the_sandy_creek_forge
-
Posts
430 -
Joined
-
Last visited
Content Type
Profiles
Forums
Articles
Gallery
Downloads
Events
Everything posted by the_sandy_creek_forge
-
There's one in every crowd..... -Aaron @ the SCF
-

What kind of tongs are these?
the_sandy_creek_forge replied to sstreckfuss's topic in Problem Solving
Got any pics with the jaws closed?? Have you tried them on lighter gauge material, like maybe 1/16 sheet or thinner? Those do have a beautiful pivot joint on them though, I always liked the pass-through type joint. -Aaron @ the SCF -
Crescent wrenches or adjustable spanners
the_sandy_creek_forge replied to Glenn's topic in Problem Solving
"Vise-Grips" is a big one. It's amazing how many genericized trademarks are out there. My day job is captioning and keywording stock photography, and we have a huge list that we gotta make sure not to use in certain instances. My personal favorites are Popsicle (frozen treats/ice pops) and Hula Hoop (plastic hoop toy). Back on topic: I've always been told the same as everyones stated above. Something about the fulcrum and the movable jaw being weaker. -Aaron @ the SCF -
My SB Shaper
the_sandy_creek_forge replied to aametalmaster's topic in Machinery General Discussions
Hey John. Thanks for answering the questions. As for the die block I am guessing you mean what can be done with the particular shaper shown here. I haven't tried it (and probably will never have a need to) but I am almost sure my 14" Walcott would handle a 12" long die block with a little patience on the operators part. I asked about the orientation, because when cutting die stock for my IrnSrgn style guillotine tool, I have the vise jaws parallel with the ram stroke. I've been cutting 10" of 3/4x3" HR die stock at one time (putting more or less a tenon on each edge), as I find taking a 10" stroke is easier (and faster) than cutting each 1" thick piece separately. I then just chop off however much I need for a particular die from this longer piece. Anyways, I was worried that running the vise oriented like that might be doing some harm to the machine I wasn't aware of. But with the total area of the 8"x2" jaw bearing down on the workpiece, I think I have enough of a grip to prevent much . Thanks, -Aaron @ the SCF -
My SB Shaper
the_sandy_creek_forge replied to aametalmaster's topic in Machinery General Discussions
Nice grab Bob! Hey John, Just a few questions. 1). What's wrong with the vice in that orientation? 2). not being sure of you background with powerhammers, what is your definition of a "very small hammer die block"? I'd have to agree with Imagedude on a lot of points. For the 140ish dollars I spent on mine, and about 30-40 dollars worth of cutters from the 'Bay, I've got enough to cover probably 80% of the BLACKSMITH related machining I need to do. No I am not going to try to plane engine heads with it, or try using it to machine something with 0.0001" clearance. I am using/plan on using the shaper mostly for jigs, dies for my IrnSrgn style guillotine tool, stuff like that. For that stuff, 0.01" is fine, 0.001" is a thing of beauty. Imagedude: "blacksmithing levels of accuracy" Can I get permission to use that for my signature line? I love it. -Aaron @ the SCF -
Oxy - Acetylene Torch
the_sandy_creek_forge replied to John Martin's topic in Blacksmithing, General Discussion
I've got an old Harris torch and regulator set, and love it. We go through Airgas for my bottles. The way it works around here is you take a long term lease (like 99 years, you more or less buy the bottles) on a set of bottles, and then pay a set fee to exchange them for a refilled bottle when they run out. We just added another acetylene bottle to the collection. We now have two of each (a smaller set that's handy outside and a larger set for dedicated in-the-shop use). Kinda nice that way so if one runs out in the middle of a project, there's no mad rush to the store to get a refill. Without looking at the receipt I couldn't say what size the acetylene tank we just added was, but as far as price it was somewhere around 140 bucks. First fill complimentary. Not sure what a new Oxy costs. -Aaron @ the SCF -
Will snap a few this weekend for ya... Just don't mind the other,um... resources... or brush in the background of the images, ok? -Aaron @ the SCF
-
keith, can't really offer any advice as to which would be better. I've got a steel workbench set aside for the lathes when I get to actually setting up the "machine shop corner" part of the shop (number 10, 11, and 13 on the list right now). 3/8" top with storage compartments underneath. If your interested I could snap a few pictures/grab a few measurements for ya. It's still sitting outside right now so I won't have to move anything to get a good picture. -Aaron @ the SCF
-
Your Position on AnvilFire?
the_sandy_creek_forge replied to John Martin's topic in Blacksmithing, General Discussion
Personally I've never had a problem between blacksmith websites. There are some that I don't check as often, mostly because of the format they are presented in. Additionally I don't think I have ever run across specific instructions on any blacksmithing website to the effect of "don't mention other webpages." That being said... I always kind of assumed that linking to/suggesting forum B while posting to forum A is, while not necessarily rude, somewhat in bad form. Therefore I kind of picked up on a habit that I'd observed in others. Instead of referring to another website by name, I'll generally use the term "across the street." In my view there are generally three major blacksmithing websites, so it isn't too hard to figure out which of the other two is being referred to. -Aaron @ the SCF -
That 9x20 that Jr. posted a link to isn't to bad off a deal. We picked up the Harbor Freight equivalent that had been a remanned so we got a decent price on it. There are a couple of groups and webpages out there that are dedicated to the upgrading and accessorizing of those 9x20 lathes. One thing that I highly recommend upon getting one of these is going through and replacing as many of the bolts, nuts and fasteners as is possible with decent quality equivalents (grade 5 or better if possible). It seems the Chinese company that turns these out uses cheap mild steel fasteners that tend to wear out/strip out very easily. But, just for use making jigs, turning jack-shafts, etc. it's not a bad little deal. And making some of the mods to improve the lathe itself are great learning projects. -Aaron @ the SCF
-
I will probably get more than 600 back. But it's already spent on the property taxes. (Ain't it funny how THEY end up getting it either way?). BUT, if it wasn't going to that... I'd probably sit on it until I found a nice huge chunk of scrap. I'm thinking somewhere around 6 inches square and about 7 or 8 foot long. That'd make a nice anvil for an air hammer AND treadle hammer. Or I'd put it in the get-a-bigger-anvil fund. I don't really need a bigger anvil... but... bragging rights and all that. -Aaron @ the SCF
-
Hey Chris, Let me frame this comment by saying that I DO NOT own a power hammer at this time, let alone one as large as the 3B. That being said, I am in a somewhat passive planning/scrounging stage for building an air hammer (actually once I find a suitable chunk of anvil, the dirty work will get underway.) During this planning phase I've had time to think about a suitable foundation. What I think I've settled on is, for lack of a better term, a big wooden block type foundation. We've got plenty of hedge (that's osage orange for some of ya) rows on the farm. I plan on cutting a couple good sized hedge and squaring up the trunks with a chain saw. These logs will be cut into 2-3 foot length and will probably end up somewhere around 5x5 inches or 6x6 inches square. I'm gonna join these all together into a block the same size as the base of the hammer by the aforementioned 2-3 foot thick and dig out a hole big enough for it. the hammer base will mount directly to this block. Should be relatively solid and rot resistant. I think this technique might be something to think about in your case, as the wood would do a pretty good job of absorbing the vibration. I'd think you'd still get some vibration regardless of what foundation you use, but this type might go quite a ways in cutting back on it. And, hedge isn't a necessity. Oak or any hardwood would probably work just as well. Just my $0.02 worth and something to ponder/discuss. -Aaron @ the SCF
-
Need help making a decision.
the_sandy_creek_forge replied to John Martin's topic in Problem Solving
really though, the name of the business and your name don't have to be exclusive. I always mark projects with my initials "ADL", or sometimes with "LINDSTROM" if there is enough room on the project for it. If it is something that was produced by way of connection with the Sandy Creek Forge, it also gets "SCF" stamped on it. Example: if I make up a christmas gift for a family member it will usually just get the "ADL" stamping. If I build a railing or a set of hooks or whatever for a paying customer they get the "SCF" stamp and the "ADL" stamp. In the case of a railing there is probably room for "LINDSTROM" so I'd use that instead of "ADL." So, in summary, I think it's very much acceptable to use both a "business" name and your own personal/artist touchmark. -Aaron@ the SCF -
Interesting find... inside my vise!
the_sandy_creek_forge replied to matt87's topic in Blacksmithing, General Discussion
Matt, At one point in time, on another board or forum or somewhere, it was mentioned that someone had thought about doing something like Anvils In America but for post vises instead. I believe the final verdict (and don't quote me as this is a kinda fuzzy memory) was that other than a rough cutoff date for the mounting style, the information was really not there for any extensive study. I wasn't privy to the details, but it seems that other than the BIG manufacturers (columbia, iron city, a few others that i can't bring to mind at the moment) there just wasn't a wealth of information (at least not a books worth) to be found. -Aaron @ the SCF -
Need help making a decision.
the_sandy_creek_forge replied to John Martin's topic in Problem Solving
that's not the ONLY problem with SCF. The other problem is that I AM SCF!!!! I thought the same thing when I chose Sandy Creek Forge.....but then I realized that even if I ever did find a place in town for the forge.... Sandy Creek Forge still has a nice rustic ring to it, whether it's by the creek or not. But yeh, like rainsfire said, it's kind of a personal thing. -Aaron @ the SCF -
It followed me home
the_sandy_creek_forge replied to Glenn's topic in Blacksmithing, General Discussion
any chance the big lathe is still lurking around somewhere at the scrapyard? I found an old LaBlonde once at the scrap recycling place in Eureka, IL. It was around a 12 or 14x36 or so and the guy only wanted 200 bucks for it. Only problem was that there was no tailstock and chances of finding one seemed mighty slim. It ALMOST followed me home:( -Aaron @ the SCF -
Lots easier to unscrew and swap the firring strips that support the rebar rack than it is to re-drill and re-brace for the legs, wheels and handles. The beer goes in the ICE chest... not the TOOL chest... -Aaron @ the SCF
-
How do you forge this detail?
the_sandy_creek_forge replied to fritzdecat's topic in Problem Solving
Pure and simple blasphemy!! I've found that while "upsetting can be upsetting" It's somewhat easier (at least for me, your mileage might vary) to upset in the middle of a bar. Not sure why, but the upset doesn't seem to have as much tendency to go all lopsided when done in the middle as opposed to the end. -Aaron @ the SCF -
Not to make anyone jealous.... I volunteer a week each year working at a summer camp on the campus of Eastern Illinois University, which just happens to be in Charleston, Illinois. Which just happens to also be where The Five Points Blacksmith Shop is located. I picked up my very own personally signed copy from Lorelei herself just shortly after it was published, and got to check out the shop while I was there. Wonderful lady to talk to, and a marvelous shop. "For Aaron- Thank you + happy Forging Lorelei Sims" :) -Aaron @ the SCF
-
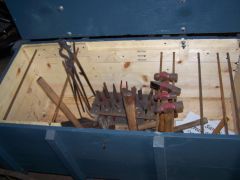
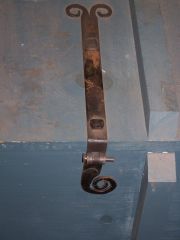
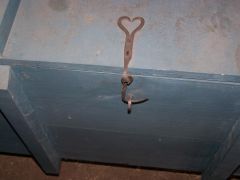
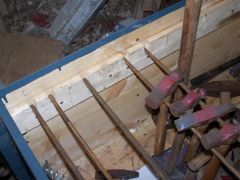
Hey M, I posted up some pics in my members gallery of my tool chest on wheels. the_sandy_creek_forge Gallery - Blacksmith Picture Gallery Nothing fancy, but it works. Don't mind the surface rust on some of the hardware, I need to pull it all off and give it a refinishing. Also, as I found out after the fact, those steel type wheels are actually NOT that cheep to buy new, and the price for antique ones on ebay are somewhat ridiculous (go figure! ). A couple of wheelbarrow wheels would probably work just as well, if not better. One other tip would be to put the hammer section over the WHEELS and NOT back by the handles. Keep the heaviest stuff up over the pivot point (in this case the wheels). One of these days I'll fix that. The nicest thing with this box is I can load up all my hand tools for a weekend demo, and roll it right up the ramps into the back of my truck (with a little help of course). As far as building this chest, it could have fairly easily been done all with hand tools. Would of been a lot more work, but it could of been done. I believe all I really used was a circular saw, drill, and maybe the miter saw for cutting the 2x4's and the 2x2's. My advice is build the bottom first, then work up from there. I prefer to use at least Quality grade lumber (as opposed to standard) as the edges are a little closer to straight for the most part. I could have gone with Select grade, but it probably would have cost me twice as much to build. AND just a little random fact (well...something I was once told anyways, it might just be complete BS). When people were traveling in the past, it was usually only the wealthy that could afford the rounded top steamer trunks/chest. Why? Because a rounded top chest would not be able to have another trunk/chest stacked on top of it. Less chance of damage to the articles inside from being at the bottom of a stack. -Aaron @ the SCF
-

-
-
-
-