

Junksmith
-
Posts
239 -
Joined
-
Last visited
Content Type
Profiles
Forums
Articles
Gallery
Downloads
Events
Everything posted by Junksmith
-
Alternately, you could construct a mount that attaches to one (or two) of the legs. This would be especially handy if you are looking for portability. One of my forges has a nice free-standing blower, but I eventually bought an old "all-in-one" solely for lugging to demos.
-
I agree. The pot would be a lot easier to move coal and steel in and out with it more flush. Other than that though, It's a beauty and the pot is an easy fix. I've often wondered why we haven't seen more brake drums used as a less expensive alternative to a conventional fire pot. That's what I'm doing next time!
-
Speaking of flux, I can't seem to get it in my head when to add it. When the metal is in the fire? If you do it before it goes in, it just falls off and I assume that after it's at weld heat it would be too late as the atmospheric contamination would already be occurring. Maybe pull out and flux before welding heat? I always seem to miss that part!
-
On a brighter note, people often ask if they can snap a picture of me working. I tell them "Go ahead, but watch your angle 'cause this anvil makes my butt look big"! That seems to draw a few smiles.
-

Art Nouveau Garden Trellis
Junksmith replied to freeman's topic in Blacksmithing, General Discussion
Beautiful. It will look good without without plants growing on it. Trellises should look good in the winter too! -
I've had the good fortune not to hear anything like that to my face (so far), but I have heard the "I can get it at Wal-Mart for ten dollars" before. I just agree and tell them I can't compete with a Chinese factory that turns this stuff out all day. The price is what it is and I'll probably be out of stock at the end of the year just the same.
-
socketed chisel set
Junksmith replied to Ed Steinkirchner's topic in Smelting, Melting, Foundry, and Casting
Thanks Matt (and Ed). I was just confused for a minute there! -
socketed chisel set
Junksmith replied to Ed Steinkirchner's topic in Smelting, Melting, Foundry, and Casting
Awesome chisels! One question on the tempering though. It has been my experience that leaf spring forgings crack if I try to quench them in water as opposed to, say, hot oil. Are you getting it red hot before the quench? Maybe the multiple normalizations have something to do with it? Just curious. At times like this I wish I more of a metallurgist. -
I see a trip to the old marble jar coming... Thanks for the idea!
-
Excellent tutorial Dave. I think a lot of us needed that procedure really spelled out. I know I did not too long ago. If I may suggest one more finishing technique to your repertoire, try using a hot cut or even an old hand axe to incise vertical cuts along the length of the cross. Repeated, random blows in one direction can give a nice rough-hewn wood texture without too much effort - and the brass brush really brings out the "grain". Here's a pic of one of mine for reference. Keep up the good work!
-

-
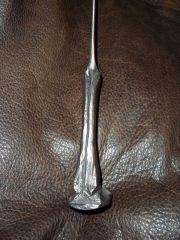
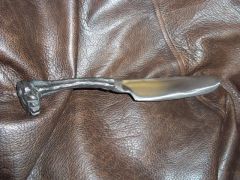 One of my friends wanted a spike knife with a little more evil, so I did some work on a skull pommel and a bone-style handle. Mostly just chisel cuts.
 -
-
Once I cut the convex bottom out of an old gas cylinder to use as a dishing swage. It bounced around and rang like crazy until I turned it upside down and poured lead into the bottom. Much quieter and more stable now!
-
And a fine shovel it is. That's the kind of thing our heritage is all about: Using what's around to make the stuff we need to make even more stuff! That's half the fun if you ask me.
-
Here it is! All clayed in and ready to go... I hope. I'll fire it up this weekend and report on shrinkage, cracks, etc. I've also attached a pic of the smaller forge I made with the remaining refractory. Cross your fingers!
-
For my money I would go with option 3 but add a hearth to make your fire and projects easier to manage. I've attached a photo I found online, but essentially drop that pot into a steel tabletop. The hole should be big enough that the pot can drop in and hang by its flange. That's what I'm doing next time.
-
Well, I used Frosty's forge clay recipe and clayed it in this weekend. I'm pretty sure the mixture was a little too wet but I tamped it down and scored it per his directions so I hope it will be OK. It looked dry the next day but it will be at least a week before I'll even have time to build a fire in it. I'll start with a small fire or two to make sure it's cured and let you guys know what happens. One plus: In trying to get the consistency right I mixed up WAY too much refractory so I went ahead and built another forge! Just a cylinder cut in half longways with a pipe going up the center. Very down & dirty, but it should make about a 12" long fire and be handier for knives. I'll take pics of that one too once I light her up.
-
Old Wrought Iron Bridge
Junksmith replied to CurlyGeorge's topic in Blacksmithing, General Discussion
If bridges were still built like that we would be IN DEMAND! Nice pics George. -
Clay it is then! I'll go look up Frosty's recipe! And thank you Thomas. I should have listened to you the first time but I like to get as many ideas as I can before I start. I didn't realize that the clay would not be permanently stuck to the pan. Firebricks are good too. Lighter. Even with the clay though, it will still be lighter than my main forge.
-
Thanks to both of you. Yance, I'm glad to hear the bearing race works for you. I was considering that as well. The original grate burned out and the previous owner replaced it with a flat steel plate with holes in it. I've got a slice of steel pipe that I could tack weld to that plate - or just let it stand free. My only beef with clay is that it covers the blower mounting bolts that may have to be removed for maintenance at some point. My main forge is a car wheel type with a shallow steel ducks nest and I've used it for 3 years now without a problem so that's familiar enough. The lever forge is so much lighter and I won't have to carry a champion 400 blower with it for demos. As I get farther into this, I'm definitely seeing the value of a smaller, lighter traveling outfit setup (smaller anvil & vise). It will be well worth the extra pumping and coal to save my back a little. Thanks again guys.
-
Last weekend I bought a rivet forge identical to the one pictured (this one is from e-bay. I haven't taken my own pics yet) for $125. It needs minor repair and I think I can handle that. What concerns me is this: I have since heard some folks rail against these forges as practically useless. I know they're not top of the line but I am planning to use it mainly for demos - maybe once a month - so I'm thinking this is a nice portable alternative for light work. Does that sound reasonable? Also, is it worth claying in for such limited usage? Thanks in advance. Joe
-
Speaking of cracks, I just got one of these that is not cracked. Would it be a bad idea to wet down the coals around the outside for banking? My other forge is heavy and doesn't mind that, but I worry that the relatively thin cast iron in this one would be prone to cracking if I wet it down.
-
Texturing a small Fredericks Cross
Junksmith replied to bsiler's topic in Blacksmithing, General Discussion
I just use a hand-held hot cutter (or anything with a blade I guess - maybe an old hatchet?) and hammer repeated vertical lines. Seems to make a nice woodsy texture. Then I hit it with a brass brush as it's cooling to bring out highlights. -
I don't know about the rest of you, but I'm jealous!