
P. Bedard
-
Posts
248 -
Joined
-
Last visited
Content Type
Profiles
Forums
Articles
Gallery
Downloads
Events
Everything posted by P. Bedard
-
 I ordered their Blacksmith's Helper two months ago, called him and he said it was "almost done". I had hoped that the unit would have been delivered by now but it's still not here. And now, I'm not getting any replies to my emails. Have I thrown $130.00 out the window? Anyone have info on this guy? Spike
 -
Texturing a small Fredericks Cross
P. Bedard replied to bsiler's topic in Blacksmithing, General Discussion
Using a cross pein hammer gives it a very rich look. I use two of them, one with a longer, broader face, and the second (lightly) with a thinner, sharper face. You'll have people wondering just how you did it and it's very easy. Good luck! -
The problem with making historical replicas, is that we are constrained by what IS available in the Archeological record. There are times when it's appropriate to extrapolate, but this sounds like the fellow is making direct copies of found items (IE items from the Mastermyr tool set) so in that case, it's not appropriate to guess. Just one of the fun things about direct historical recreation.
-
It's been said before, but it bears repeating; Soak it in water and spread it like "mud" over your fire (I usually make a volcano kind of wall around my tuyere). Works great and as it heats, it makes decent coke and heat.
-
You're very brave making it in steel. The original Tannenberg gonne is bronze as are most of the replicas I've seen and fired. Bronze will flex a bit instead of exploding. You DID proof your gonne first, right? I'd hate to see anyone on this board get hurt for no good reason...
-
Blacksmith shop for sale, Canada
P. Bedard replied to Sask Mark's topic in Blacksmithing, General Discussion
I emailed this fellow this morning and I must say that he doesn't seem interested in selling off parts at all. I asked him if he'd sell the anvil and he said "just buy the whole thing and sell off the rest" He could have just said "no"... And really, one anvil, a few vices, I don't see any hammers or other tools there. He says there is a "milk crate of hardies" but no photos. No wonder he says "I'm in no rush"... It's not worth the $10,000 he's asking, not even close. And yet, he's not willing to entertain reasonable offers. Meh, I say look elsewhere for your blacksmithing supplies. -
I was thinking that might work. Have it face backwards to the anvil. Just have to work out some sort of base for it now. Should work just fine.
-
I bought this at a flea market for $20.00. I'm hoping to make it mountable on my hardy hole or some other method so I can bring it with my travelling demo kit. Any suggestions as to how I could possibly accomplish that?
-
Two photos of a quick project
P. Bedard replied to P. Bedard's topic in Blacksmithing, General Discussion
Thanks very much everyone! I didn't use a sealer on this one, I just wiped it with some motor oil on a rag and then dried it. Bees wax is one of my favorite sealers too. I especially like the smell of it when you get "scrap" wax from Apiculturists that still has a bit of honey stuck in it. It started out as me showing someone different types of bar ends. The half-round bar that sits horizontally, has nub-ends that you can't see. I like them but they're almost invisible in projects. -
A hopeful future blacksmith
P. Bedard replied to tomcellwheel's topic in Blacksmithing, General Discussion
Hello Joe! Since no one else has suggested it, try and get a copy of "The Edge of the Anvil" I believe it's now called "the New Edge of the Anvil" by Jack Andrews. Massively useful book, though difficult to find these days. Be wary of old books though, they are good reading but most of the authors back then simply skipped over important stuff because of "everyone knew it so why bother saying it?" syndrome. Very frustrating. However, reading about blacksmithing is NOT the same as doing it. Find someone who is willing to have you come to their shop some afternoon and run you through the basics. Honestly, I wish I had had that opportunity when I started. Good luck to you and enjoy this new path! -
Hey all. Just finished this little wall-mounted candelabra and thought I'd share. Very quick project, start to finish was about 2 hours. I wanted something with sort of a "castle" sort of look to it. Hence the chains. And with lit candles added; I'm thinking of adding a two armed hook at the top to replace the two simple nails in the wall. That will probably look a lot nicer than it does now.
-
One of the comments is very good though, why WOULD anyone bother to "dribble" their hammer on the anvil? It seems to me that the anvil is a tool face, just like the hammer is. And one never hits two tool faces together, do they? I have yet to hear a single, good explanation as to why some blacksmiths do that.
-
If you were going to England, I'd give you the name and address of the fellow who taught me. Great guy and always happy to see someone who's interested in the craft. All I can suggest is that you ask the locals. Many of them know the craftsmen or know of them. I'm sure they'll point you in the right direction. Have a great trip!
-
Has anyone else here ever used 29/9 dissimilar electrodes for repairing anvil faces? Two of mine got that treatment and they were, literally, brought back from the dead. I highly recommend them. No heating the anvil first. Get a welder who knows what he's doing though.
-
A few things I just finished.
P. Bedard replied to P. Bedard's topic in Blacksmithing, General Discussion
Thanks very much for the comments guys, I very much appreciate it (and thankfully, my wife appreciated the candelabra...) I have a few more photos of things I made recently here on my Photobucket page; http://s133.photobucket.com/home/Blacksmith42 -
Well, this is hard for me folks so bear with me... I started when I was 19, just small time stuff you know. I made a forge from an old cast iron water heater and an electric fan. I used to run it on charcoal briquettes back then. I had one anvil back then, a 75 pounder.. But then, it got a bit out of hand, 4 forges and 3 anvils now. Dozens of hardie tools, hammers, punches and other miscellaneous gew-gaws. I just don't know when to quit. I tried, I really did, but next thing I knew, I was back in the shop, heating a piece and working long into the night to get it "just right". Well, I don't have to tell you fellas that do I? Glad to have guys like you to talk about this with. And maybe, swap tools after the meeting?
-
Since I cannot figure out how to get more photos on my gallery here, I hosted these on Photobucket. First a Candelabra for my wife; And a bracket to hold up said Candelabra; A roasting fork with a bit of filework on it; There are others but I don't want to eat up too much space here. If someone would be so kind as to tell me how to get these pics on my gallery, I would be much obliged.
-
From the album: Just some stuff I've made
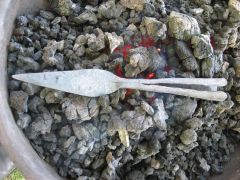
Here is the spearhead finished. The socket is now fully closed. -
From the album: Just some stuff I've made
I've never made such a long socket for a spearhead. It turned out rather well and looks just like many of the spearheads I've seen in museums. This photo was taken just prior to closing up the socket. -

From the album: Just some stuff I've made
I made this on the weekend at a medieval event. I had very few tools to work with, fortunately, I brought some hexagonal tool steel with me. I made the tool that the spearhead sits on. It helps true up the socket. This is rough from the forge, after cleaning and polishing, it will look a lot better. -
Looks to be in fairly good shape, if a little rusty. And that's not a problem unless it's rusted right through. It does look like it needs a new firebox, unless the one in the photo is just really dirty. Do you have a blower and a tuyere for it?
-
Hey there. Society minimum for helmets is 16ga. So when sinking your 12ga parts of it, not all, will thin out to close to 14ga. Still well within society rules. Of course you are work-hardening it too, so, even though it will thin out to 14ga, it will be at least as strong as 12! If you want to lose less thickness, sink it hot (using a steel form and a lead hammer). If you are able to raise a helmet bowl, then that's even better though you have to anneal your steel after a few passes. Hot raising is yet another method and gives very good results once you're used to it. Good luck!
-
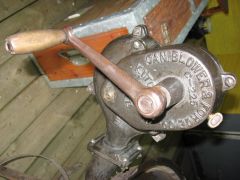
Found at an auction by my wife's uncle for $20.00. I guess it had that look that told most people "stay away, I am dirty and broken" I guess that's why it went so cheap. An hour or so of clean up and oiling and voila! Other than a bit of rust on the legs, it's is great shape! http://www.iforgeiron.com/gallery/showphoto.php/photo/17620 Here is the blower, it was encrusted in dirt/oil and cleaned up very quickly. It made a fairly angry noise at first, but after oiling/greasing the gears, it runs smooth and quiet now. http://www.iforgeiron.com/gallery/showphoto.php/photo/17621 So, the lesson here is, you never know when you might find a gem of a buy!
-
From the album: Just some stuff I've made
Crank handle was not included, it came off an old blower that I got that was totally wrecked. Can't seem to bring myself to get rid of the old one though. Works fine here!