easilyconfused
Members
-
Joined
-
Last visited
Everything posted by easilyconfused
-
My question would be: Why take the risk? There are other welding and fastening options that you can try while you're still alive that way.
-
We've clipped and branded through the hair and clipping makes it goe quicker and does seem to clean the brand up a bit. The more important keys however is to have a dry hide and keep the iron clean of the burnt hair and scale. Sand or gravel in a bucket seems to work good, especially for electric irons that need to heat up quick as the bucket and sand help insulate. Wire brushes work good too but not as quick and there's the greater risk of a burn. Another trick I've seen and used is to brand some wood before the run to make sure it's not too hot which leads to a bald animal. Another tip my dad can attest to, if you have a bar iron, don't weld a straight bar handle on it. Can get confusing as to which end is hot.
-
I'd hate to try it on a bandsaw considering what they do to my chop saw blades too. I prefer O/A if I have the torch topped up.
-
I'm waiting for a reply over what he wants for the W points. I'm hoping not a good point. The 3 on the other hand..... gonna be fun.
-
Not to hijack his thread but I figure it fits, I've got an order for an iron with a 3W. Should I forge weld and taper the point of the 3 to 1/8 like the rest of the stock or notch one side. Should I do the same for the W points? Our brand of a lazy D over J (AKA the umbrella brand) was so much easier......
-
Rustling happens up here in canada too. We have issues many years with our unbranded calves (born after turnout) going "missing" in the neighbours pasture. Another type of running iron was a curved piece of metal that would let you slide along. I think they may be illegal up here too still.
-
Very nice work!
-
masking tape and paper is the old stand by to keep paint off areas you don't want them. If you use wide tape, you can lay it on the metal and trim it to the edge to keep the paint off the rocks. Seems to me there might be something you can brush on and peel off which would be easier. Might be my imagination/ wishes though.
-
Up here in saskatoon, she gets down to -30 celcius commonly and I've never bothered warming up my anvil. Sucks the heat out a bit faster but if you watch your heats and are smart it works fine. IMO it would take much longer to properly heat an anvil without introducing stresses than it's worth. Of course I only use a 2-3 pound hammer on a 128 pound anvil. May want to if you're striking. As to ways to, many heat up a sheet of metal in the forge and lay it on there while getting organized. There's a thread on it if you search.
-
I had an old pallet I just kept splitting the slats from for a couple days of lighter forging. Needed radiant heat and was getting behind of charcoal stocks so it worked well. Was easy to split and use.
-
Another one that's quick and easy and popular are steak turners. Once somebody tries one, the want some for gifts. Only spot I've seen them is from a blacksmith.
-
I've done the wood to charcoal method this winter to help heat the shop. Lots of radiant heat given off. Works fine but as said before, lots of smoke at the start when you back off on the air. Also needs a deeper fire. There are some blueprints kicking around if they are up yet on different fire sources. Some people have tried cracked feed corn and I've heard, not seen pictures or otherwise, of people using things like chicken poop and the likes. Don't think you'd have much access to that though ;)
-
I'm in no way a professional as I haven't made a penny from this other than what a couple steak turners made the class in a silent auction. Not from no-one asking but from lack of time. However, since I have had a few offers, I suppose I could put in an opinion from what I've gathered and what I've done to wind up having to to turn people down. I would caution people to not step too big and overlook the simple things like word of mouth. The best way to get that is to get your stuff out there. A good way is Gifts. They save you mall hassles, money and best of all, get your work out there even if it's just family and work. Most people have friends over who like to help out their friend's family. Like ripples in a pond. Another silly thing would be to overlook free spots such as local classifieds websites, such as Kijiji and Craigslist, to get your local area aware of your forge. E-bay may be a good spot to sell the odd piece on. The more local buisness, the less lost to shipping costs early on. Craft fairs are definately a good way to sell things although many people I've talked to that do them usually find that they don't do as well as demos. People are usually more price-tag wary when they aren't awed by the show. A good quality video of you at work forging might overcome that. Relying on just big ticket items to me is also not the best way to do it IMO either. At least the little ticket items are more apte to sell between the big items. Remember, we're a niche market and trinkets/ souveniers are what the majority will spend on, especially at fairs and will get more people stopping and, once again, hopefully at least get word of mouth going. Before you know it, you're turning away people because you can't build something that big, etc. Advertising is important as well. Proper portfolios with good pictures and proper buisness cards are good ways to get your contact information out. Don't be stingy with the cards. They may cost money but generally less than the lost buisness. Try and get a spot on the local news while at a demo. Lots are willing to do things like that to help the community and showcase local events. While at demo's, remember that you're networking, not just making another project. If you burn the metal, pull it out and show the kids. Chat up the parents. Compliment them on their kids. Ask them what they do. As a few of my friends working in the sales industry call it, Work the "Shmoozing". And never forget, service with a smile. Always be easy to contact and as hepful as you can be. Bad buisness experiences travel by word of mouth faster than getting your name out there so don't ruin it. That's My $0.02. I'm sure others will dissagree but that's what I'd do at the start while testing the water rather than jumping with both feet in.
-
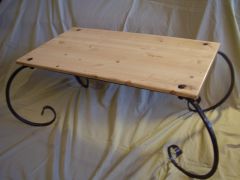
Most of my raw work is still hanging on my wall or at my friends house. They generally have to steal it before I let it go because I'm too critical of things. I'm definately wanting to get a good picture of the table though. My friend talked about making a soft box for lighting to take them last night. Would need a power hammer to be marketable. All in all, post planning stage took me probably 80 hours which could probably be cut down to 60 at the best by hand because most was heavy hammering with a 3 pound hammer and full body swings from tip-toe.
-
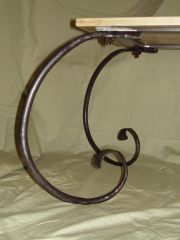
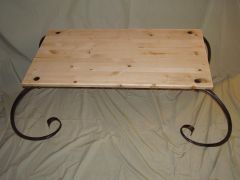
Thanks for the comments all. It's always a well needed ego boost. After spending all day 7 days a week studying in vet school, it's nice to actually finish a project. It's a weird feeling for a kid growing up on a farm and with a pair of craftspersons for parents to not accomplish anything you can touch and see as the completed thing. Start to feel like your just spinning your wheels after a while. I don't take any offence from the photography work, I know it's crap. It wasn't meant to sell the piece, just show off a bit . I think I wouldn't be able to enjoy the money if I sold it. It was a gift for my girlfriend we started in the summer when we decided to move in together and found our first apartment together so.... Ironically though, My crappy photography has garnered more interest from my classmates than I can handle at the moment....someone would buy a set of the leaf hooks I've made if I made more. That's how much time I have to forge.... If I was making a professional portfolio, I would spend a bit on a good set up. These were taken quickly to show some friends that wanted to see what it looked like as a whole. My friend is a pretty good photographer and I may get him to make a light box and such and come with a tripod. Might have to in the near future though. @ dablacksmith: The legs are held pretty tight with friction. The nice thing about wood is you can compress it under the bolt head and it acts as a relatively good spring. The mild steel strapping has also divoted a bit to cradle the harder legs. One moves a tiny bit if hit hard but it's easy to fix with a light tap from a foot when it does. May get worse with age but we'll see. All part of the testing phase . Originally I had planned on using copper tube strapping from the plumbing section behind the bolt but I fubar'd during planning. Didn't realize how much flex the table would have without the strapping frame under and cut off too much post-bolt so I couldn't attach it well once I made the frame. I thought about a second bolt but couldn't come up with a good way to position it that it would look as good to me. My uncle worked as a grain elevator operator and when they tore his down he grabbed the 2x12's from the grain chute that he offered me parts of when he saw the WIP. Haven't seen the boards but he said the grain sliding down it has left some neat grooves and patterns from wear. Been thinking on it lately and I may have to see what it looks like and make some end tables like suggested using it as the top.
-
I've seen that lots when I work at a slaughter plant. If you can't shave with a knife you're going to get sore wrists by the end of a shift. Also lets you get ready for going out after the evening shift. Just takes time, practice and paying attention to what the knife edge geometry should be.
-
Have you tried a google pic search? I found a few when I did one. Didn't post them since you're a better judge of what you want.
-
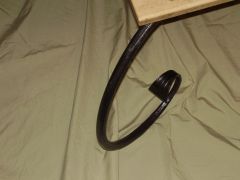
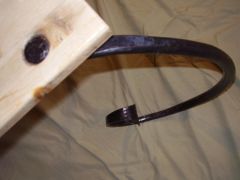
Finally got the coffee table finished from the summer for moving in with my girlfriend. Collaberative effort between the two of us. Pounding 3/4" sucker rod really makes a guy wish he had a power hammer let me tell you. Top is just simple pine laminate shelving sanded with a satin varathane. Bolted to the frame with carriage head bolts textured to look like rivets and nuts from an old diamond harrow for the old square nut look. Wanted to be able to change the top if we found something better but it turned out better than we thought at the start.Looks great, especially for a prototype. Only thing I'd say, from a design stand point in my opinion, would be to refine the head a little more around the muzzle. It definitely has huge potential as is though. While looking at it, I got the idea for a friction hoof pick of the same design. Something for people to pack into their pack for an emergency on a trail ride or such without worrying about the pick poking into things.