Bmallen77
-
Posts
48 -
Joined
-
Last visited
Recent Profile Visitors
2,183 profile views


-
Good luck to you sir. I apologize again.
-
I am an idiot and definitely made a mistake John b please feel free to kick me in the xxxxxx if you ever meet me . Just realized what he is saying and you are saying about the chuck.
-
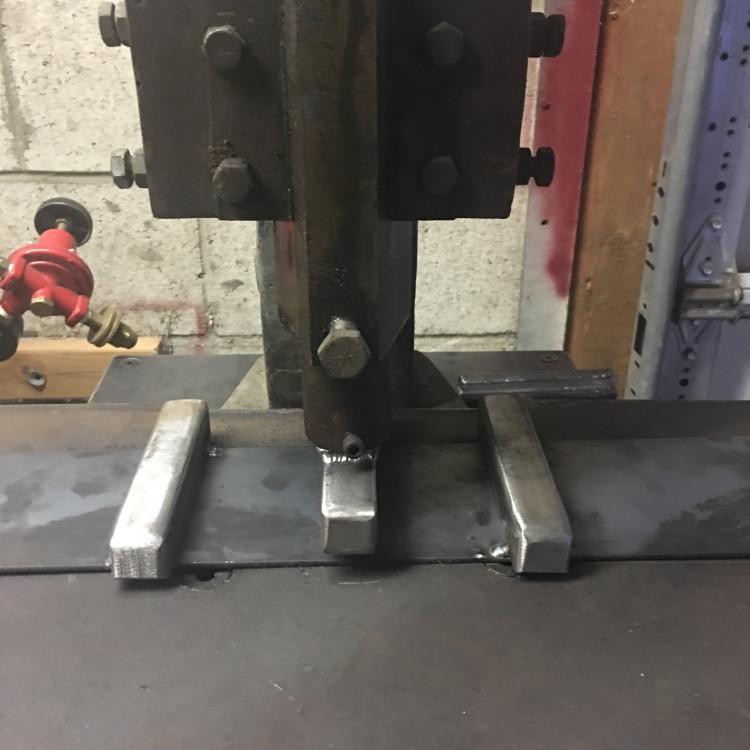
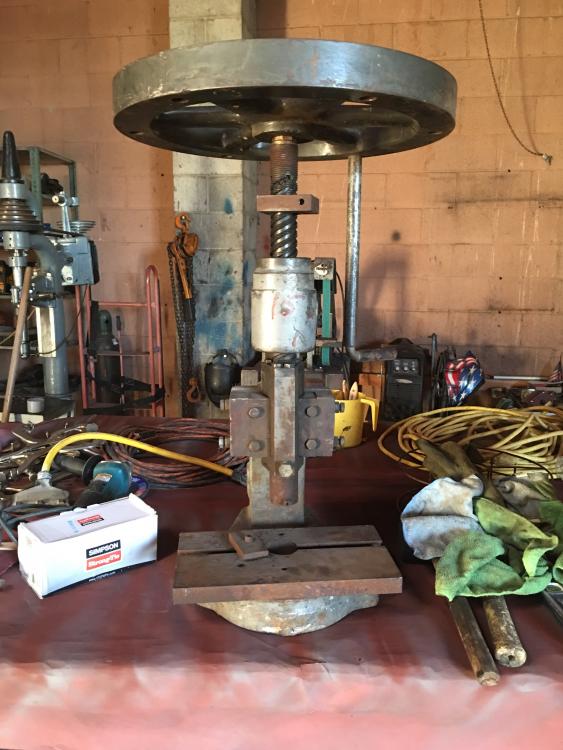
Thanks for the advice from all of you. Mr. John b I also appreciate your advice and I mean this very respectfully as I'm sure you have a lot more knowledge of fly presses and blacksmithing than I do. But I have worked in ornamental shops the last ten years of my life, and now have owned my own shop for almost 2 years now doing architectural ironwork and fabrication. I also worked for a very well know smith here in California. All of the shops have had fly presses and were used often. I personally have bent thousands of feet of bar with a fly press, slit and drifted literally hundreds of holes with a flypress and punched a few dozen as well. Not to mention using it for texturing and dishing material. I do not know the history or the original intent of the flypress but I sure as hell know how to use one. The pictures I put up were of the press the day I brought it home. I am attaching a couple pictures of where the press is at now in its process. You can see from the picture I am using 1" pins under the press. There is a piece of 5/8" roundbar in between the pins and the stop still has almost 3/4" of gap between the last thread and where it would bottom out. Meaning that there is no way to set a stop for repeated bends on that material. I am not sure I am explaining this well. I am no wordsmith. Hopefully the pictures make what I am saying more clear. Normally you would put your stock on top of the bottom pins. Then let the screw lower until your top pin rests on top of your stock material. Then you screw the stop down til it bottoms out there. Then you let off on the stop a half a turn or so at a time to effect how great or little your bend will be. In this case once the top pin bottoms out on the stock material, the stop has no more threads to bottom out to. That's as concise as I can explain it. I believe Thomas powers suggestion of the kiss block will work, however I would like the press to function as it should. I also know this isn't a large fly press and isn't designed for bending thick material cold. 90 percent of what will be bent on this press is 5/8" bar and smaller. It would be great to have a larger or hydraulic press with a longer stroke but like I said I have only had my business 2 years and obviously money isn't just rolling in to go invest in an awesome tool like that right now. I do not believe in putting myself in debt so all my tools are paid for cash. So for me I am trying to make do with the tool I have. I appreciate the advice and hope I did not come off disrespectfully. I do not think I'm some amazing smith or anything but I am definately not incompetent.
-
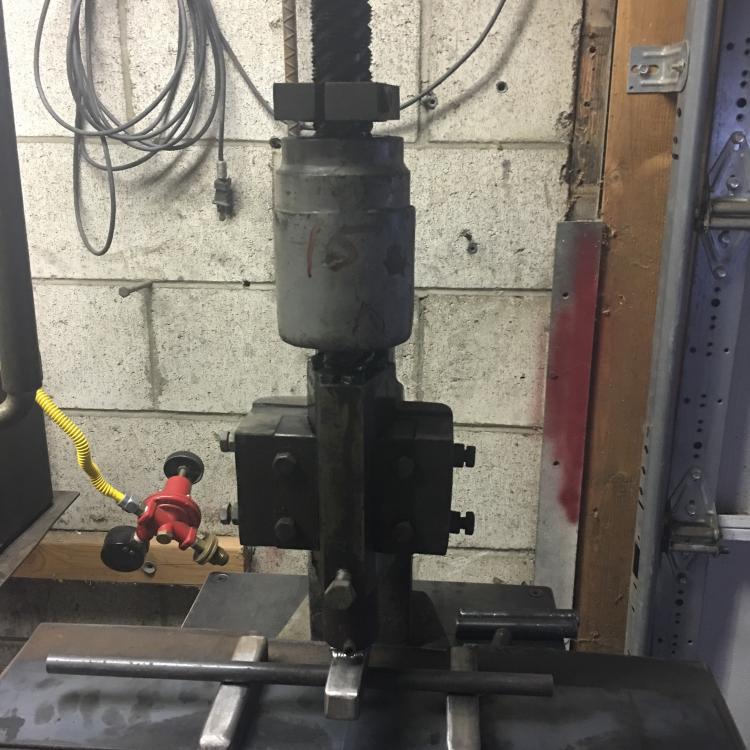
Great idea I appreciate that. Do you think bringing the screw to a machinist and seeing if he could add another 1" of threads is a bad idea?
-
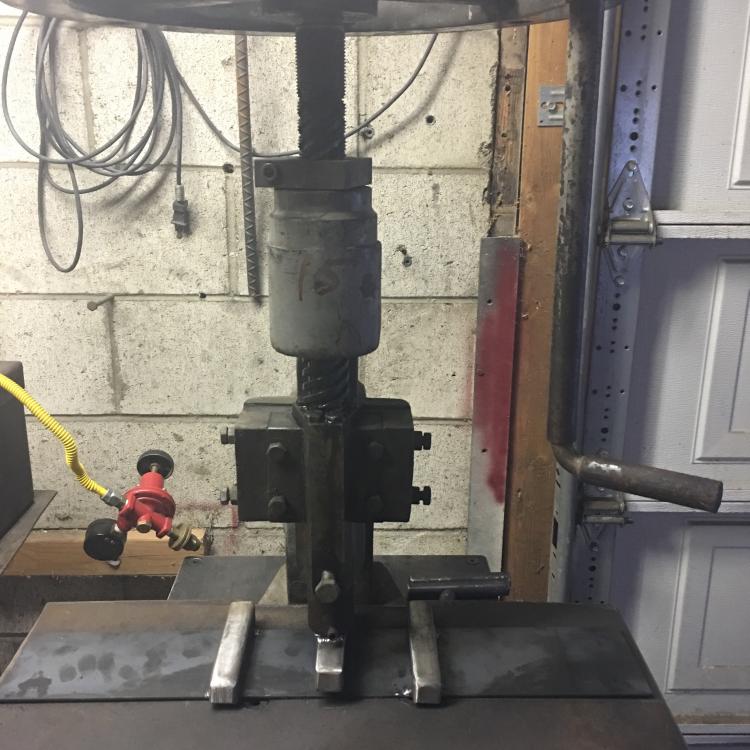
Yes at maximum height there is 4" of distance from the bottom of the screw to the top of the baseplate. When the stop is all the way bottomed out on the threads there is 1" of gap between the 1" pin mounted on the 3/4" shank and the 1" pin fastened to the baseplate. If I raise the stop obviously I can bend smaller material than 1" but with no way of setting the accuracy.
-
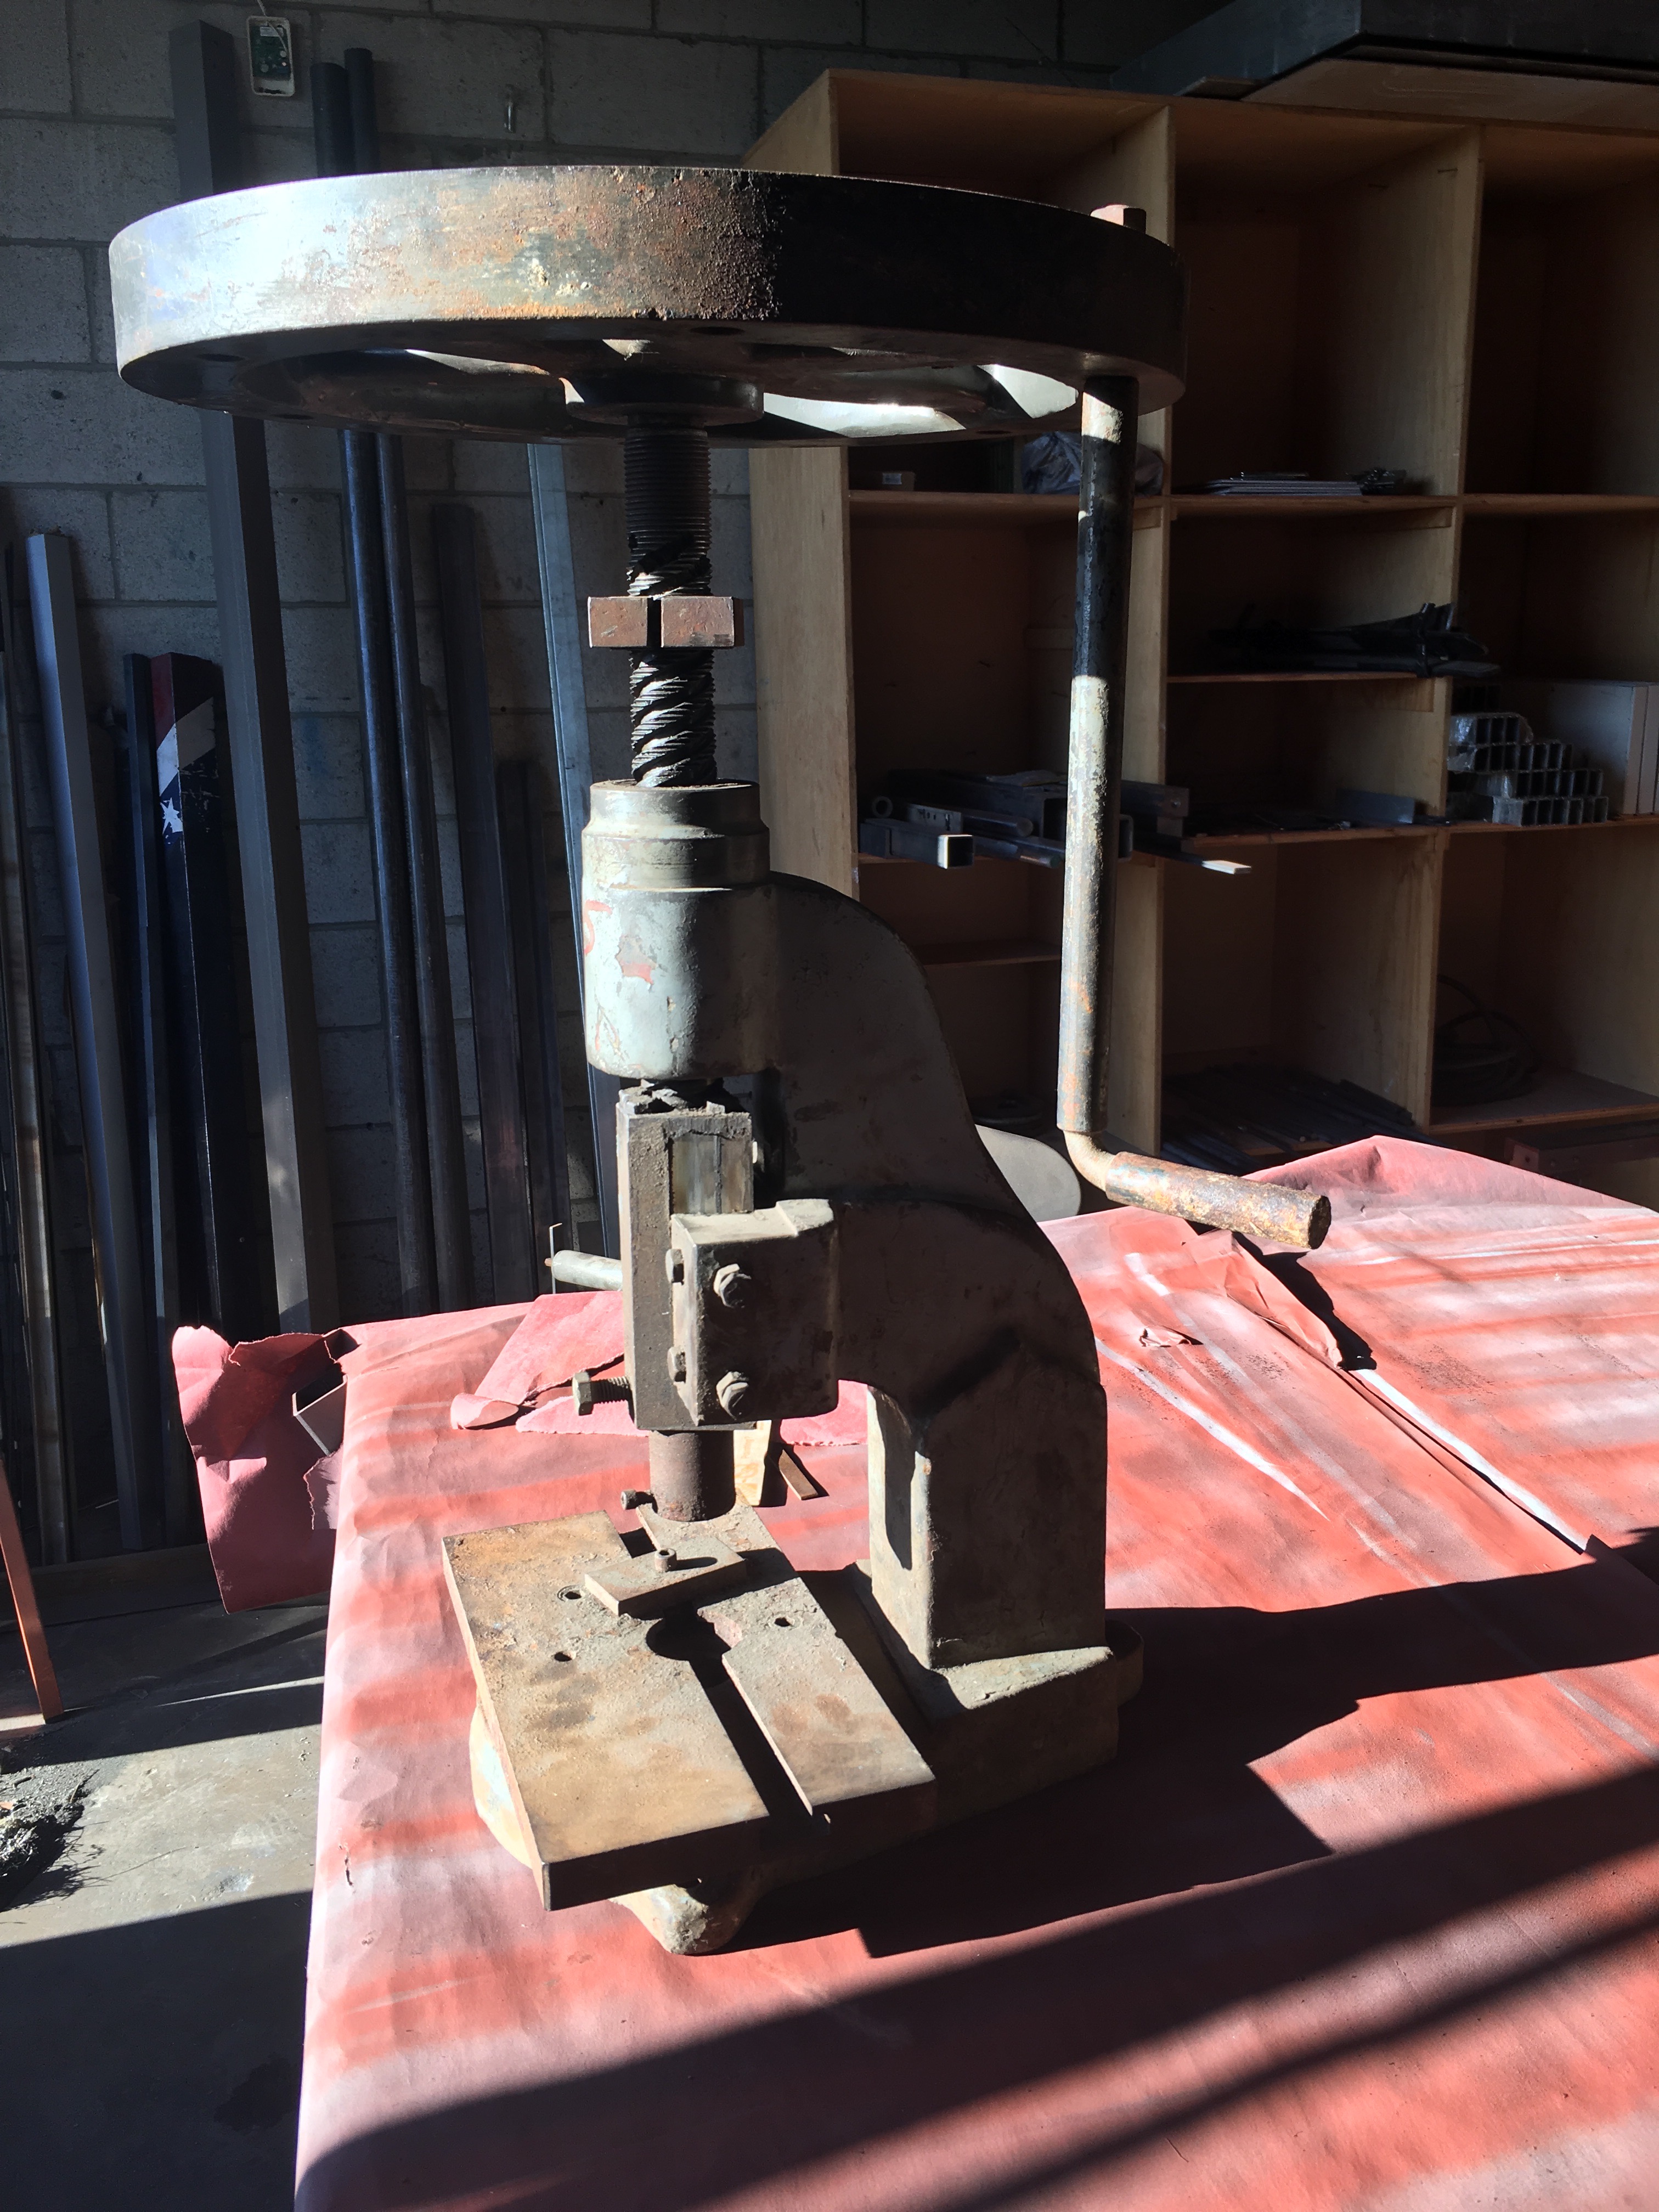
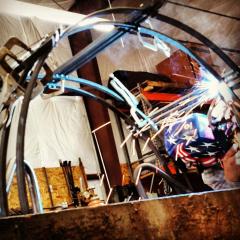
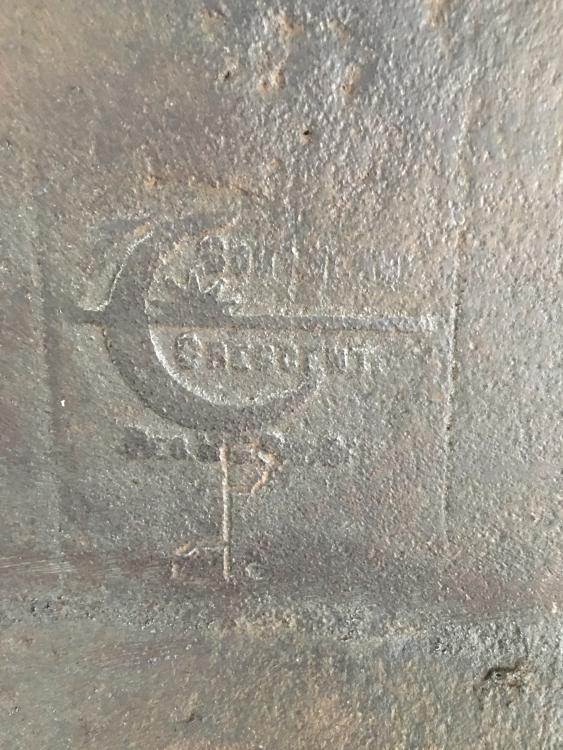
Recently got a total score on a fly press for only $50. Brought it back to my shop cleaned it up oiled everything up and built a stand for it and got it anchored in the concrete. Started building some tools for it and realized that I have an issue I can't figure out how to solve. i was making some pins for bending material out of 1" stock and went to set the stop on the screw so I could get a consistent bends for multiple pieces of material and realized that the threads for the screw do not go down far enough to set a stop for any material less than 1" thick. The only solutions I can see would be raising up the pins on the baseplate, but the problem with that is its only a #2 press and the travel of the screw is only 4" total and I already have a 3/4" baseplate then lose another 2" from the 1" pins, so that gives me only 1-1/4" of travel so raising higher is not an option. The other solution I could see is having a machinist try to thread the screw deeper so the stop can go down a little deeper. I am not sure if I explained the problem well enough but if there is any solutions or advice id greatly appreciate it. I will add a couple pictures of the press so maybe you can picture it better. Also if you have any information on the make of the press I'd also appreciate that. No markings other than the 2 that is an impression in the castings.


-
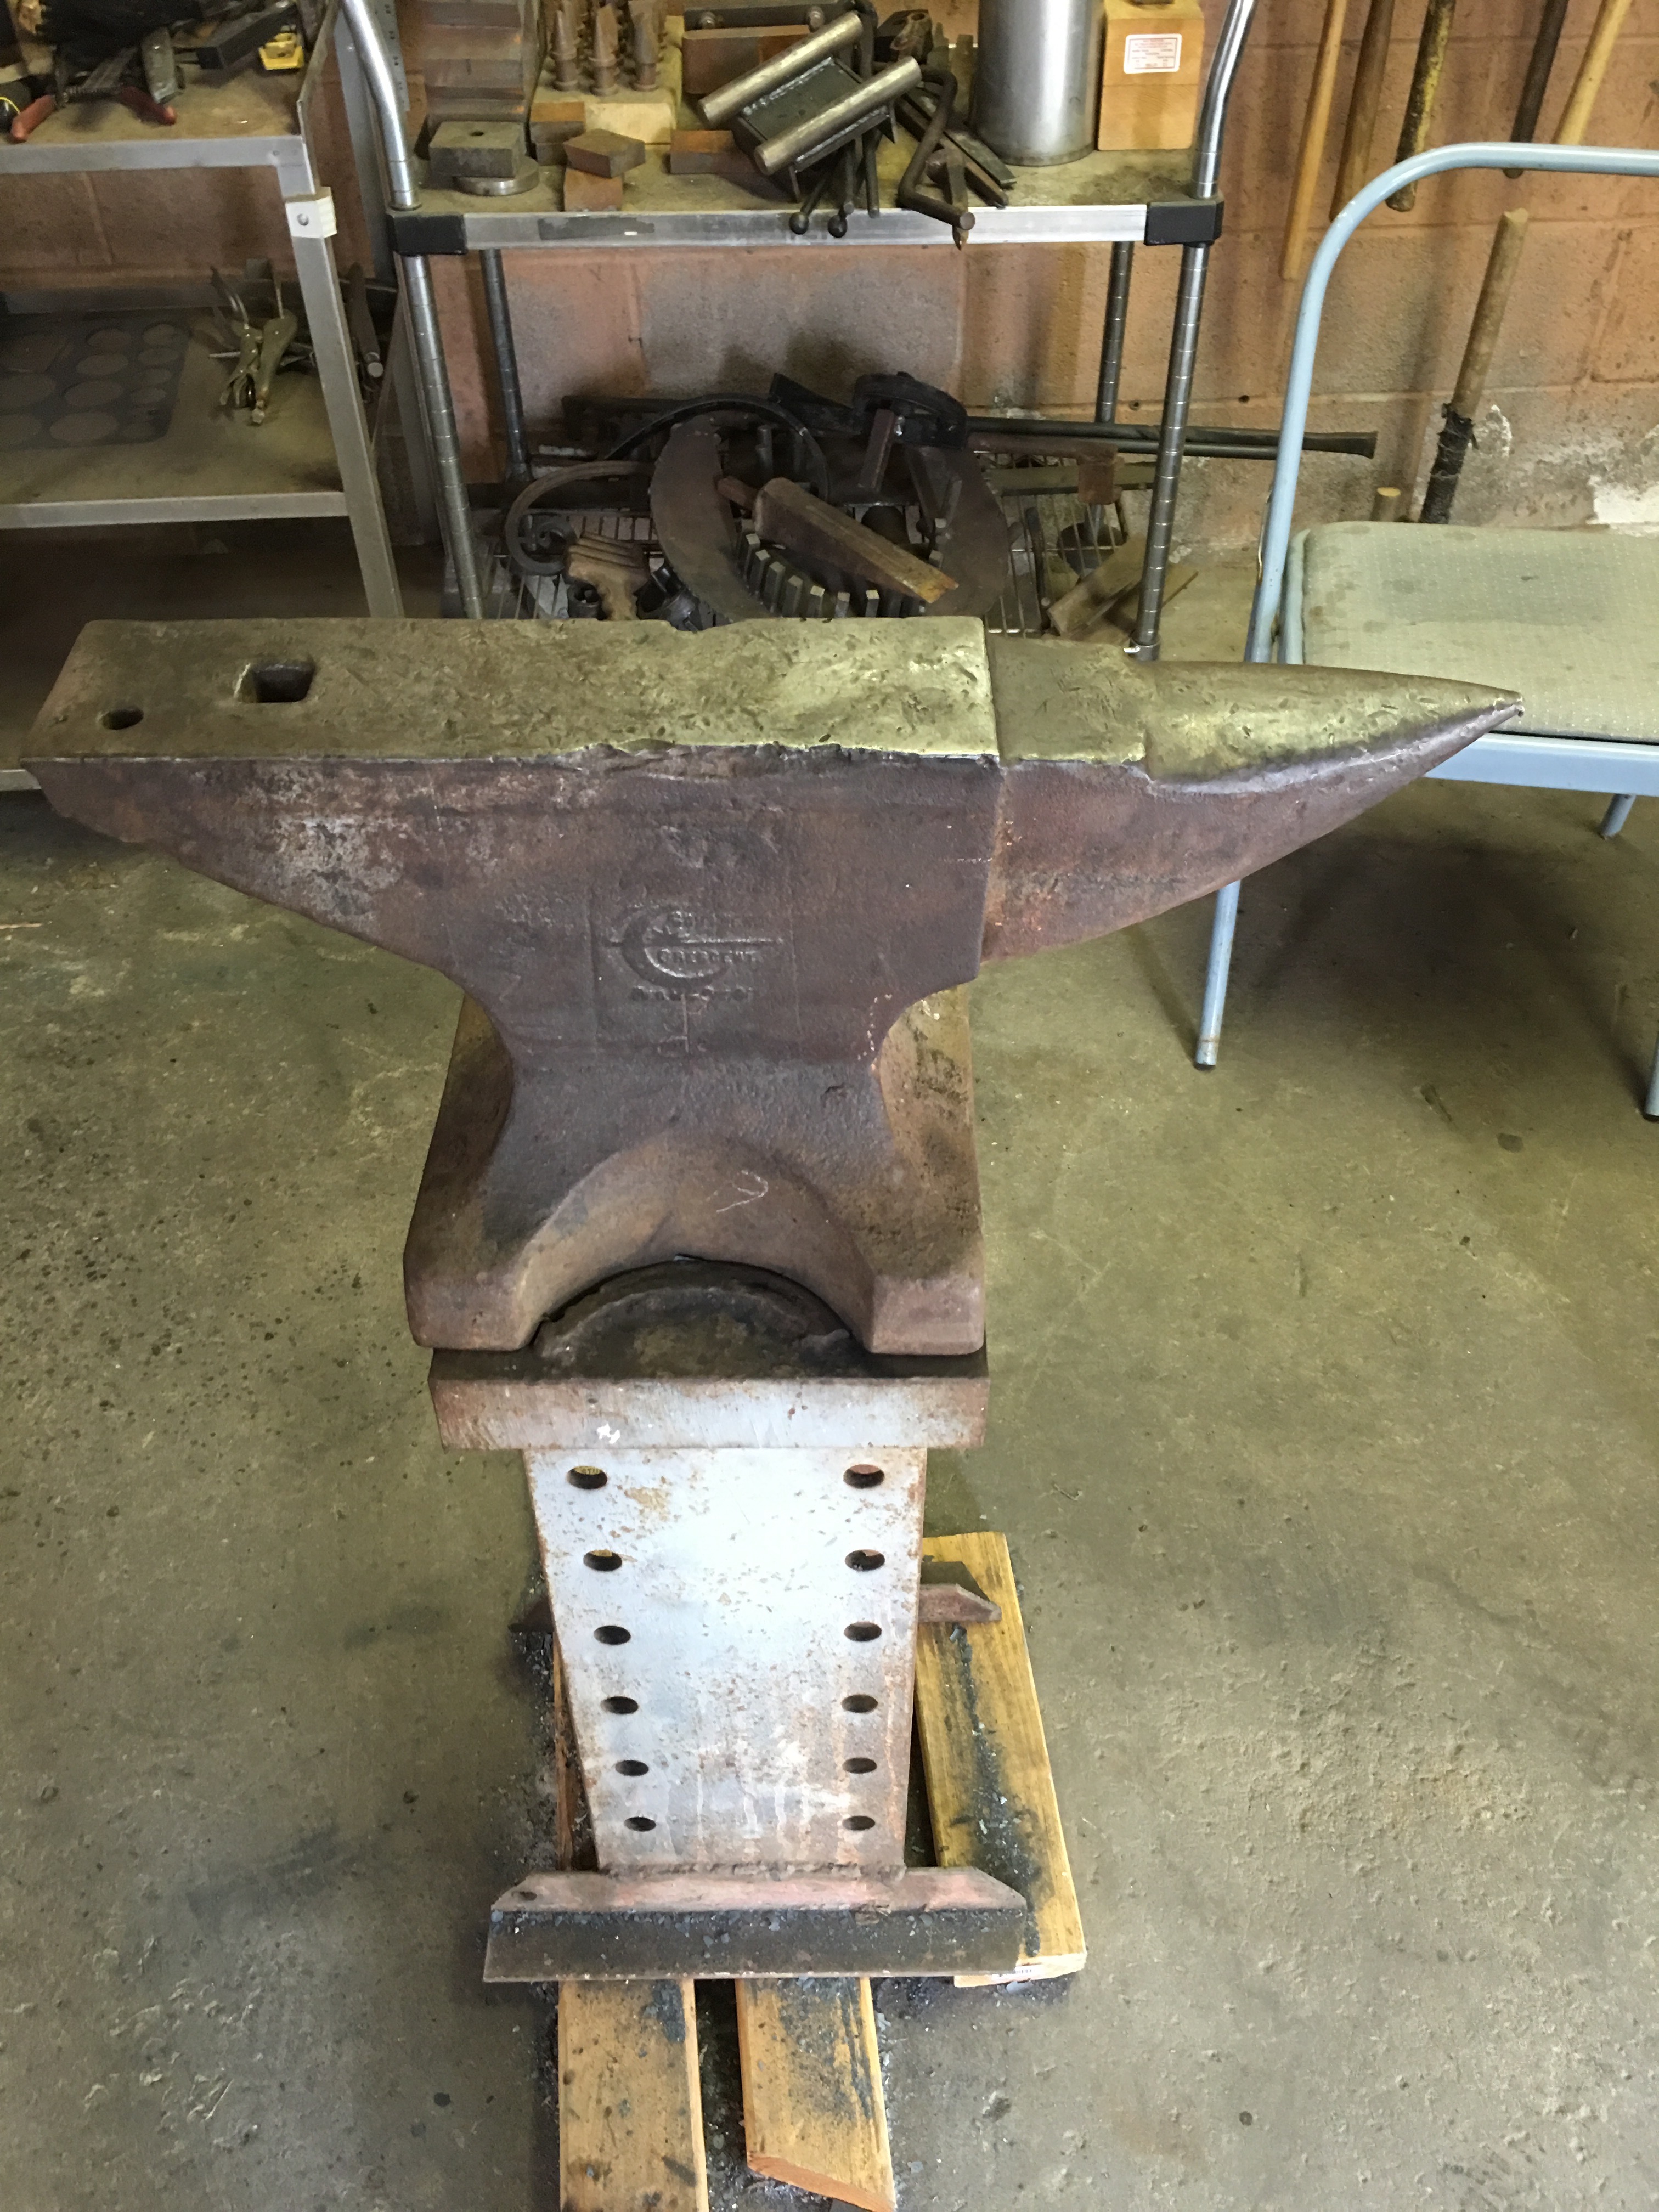
Anyone know what anvil this is??
Bmallen77 replied to Bmallen77's topic in Anvils, Swage Blocks, and Mandrels
Thanks for the advice. I used this anvil all day yesterday and I really like it. Really stout and like I said not nearly as Loud as my other anvil. It's so cool to take a tool over a 100 years old and put it to use on a daily basis. Makes me wonder about all the other people who have spent time using this anvil. Anyone know where I can find some more history in southern crescent?? -
Anyone know what anvil this is??
Bmallen77 replied to Bmallen77's topic in Anvils, Swage Blocks, and Mandrels
Thank you. That was easy. I can't find much on their history. Rebounds well. Needs a little work on the face but not bad. It's quieter than my other anvil as well not as much of a high pitch ring. -
Does anyone know what type of anvil this is? It's 150 lbs.

-
Determine post size and mounting a heavy gate
Bmallen77 replied to Bmallen77's topic in Blacksmithing, General Discussion
I definitely will tie the two posts together with something, I need to check my scrap and figure out what I can come up with. Thanks for all the advice. It's absolutely worth making some adjustments to ensure a great final product. Concrete and rebar are both cheap and worth the insurance. -
Determine post size and mounting a heavy gate
Bmallen77 replied to Bmallen77's topic in Blacksmithing, General Discussion
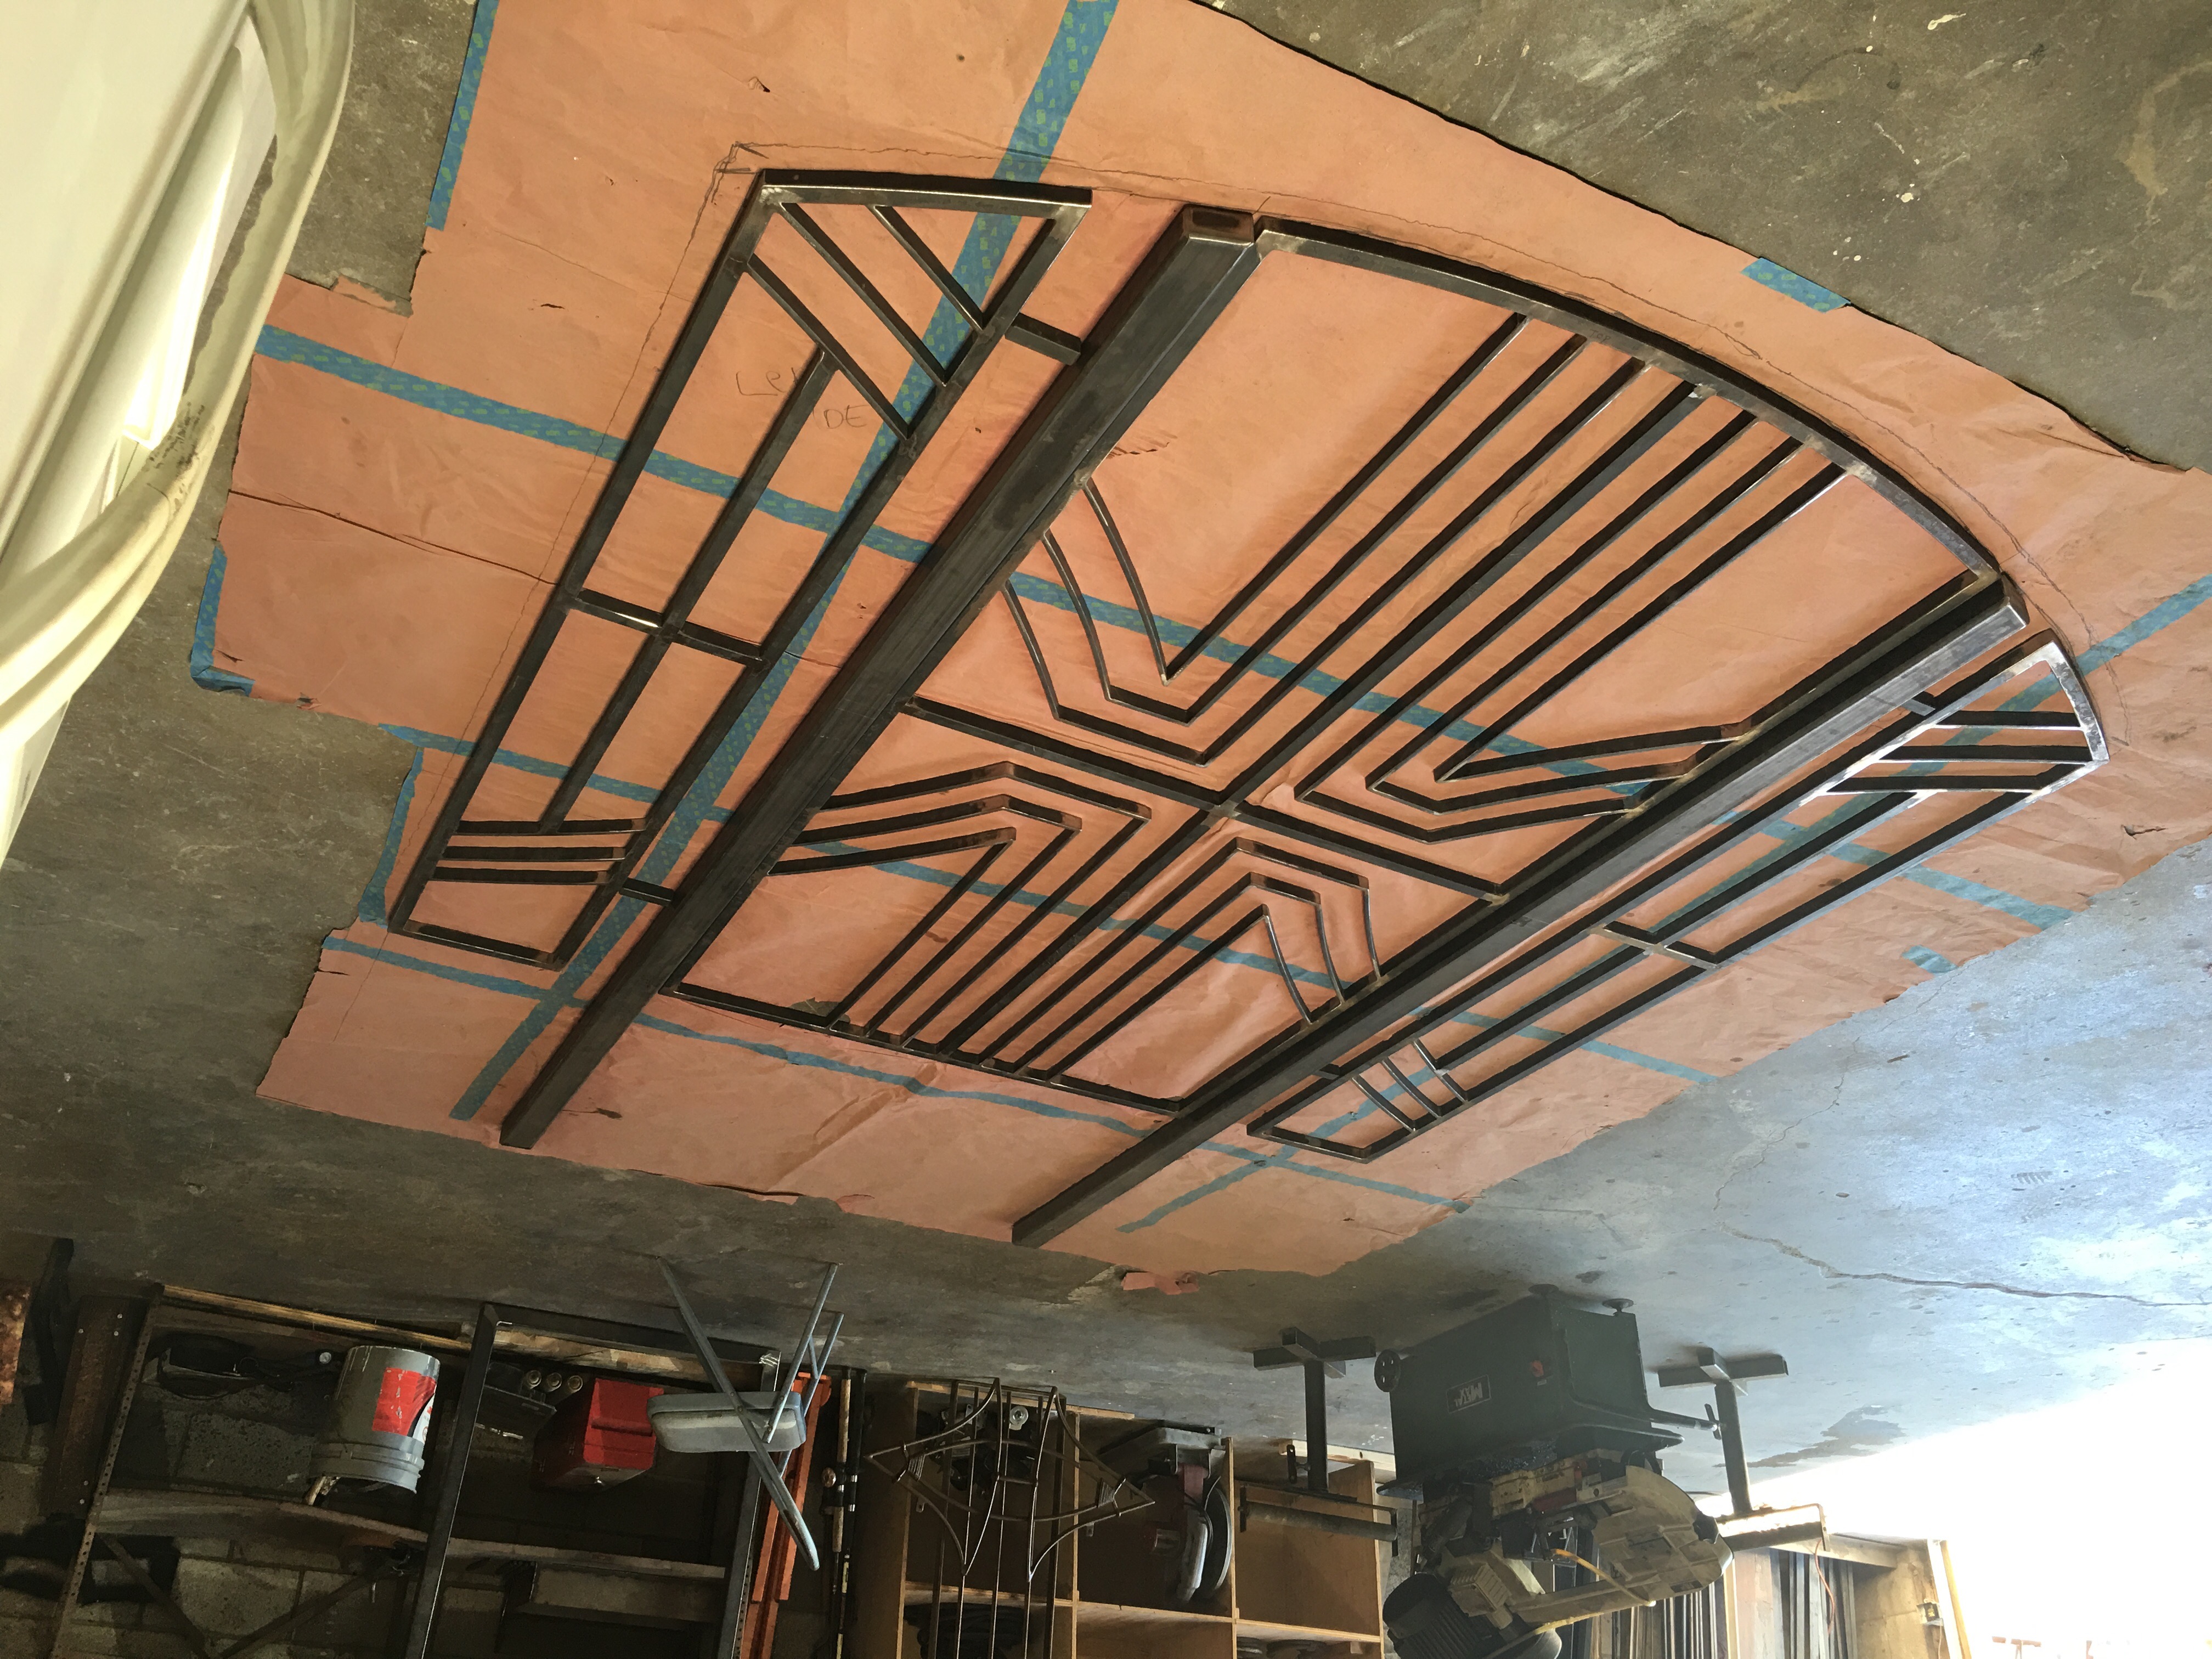
I appreciate all the replies and advice. The gate and side panels are made of 1" solid square bar for the frames and the inner sections of the gate are filled with 3/8"X1" flatbar. There is also some additional weight in copper paneling.In addition to the copper paneling in the side panels, all four open panels of the gate will have copper as well. I added a picture of the unfinished gate so u can get an idea of the weight and distribution of weight. from the specs I have found on the post, structurally the 2"x3"-1/4" wall thickness tube is plenty adequate to support up to 1000lbs with hardly any deflection depending on where the barrel hinges mount. In addition the post will be taking its load mainly on the 3" side of the tube rather than the 2" side. My main concern now is the footing. You see all types of stuff out there about a post being at least 1/3 of its total length in the ground. So for my case, the post is sticking out of the ground roughly 90" so that would mean I need a minimum of 30" in the ground. But It doesn't say anything about that post being under a load of a gate. I really like the landing idea depending on how compacted the ground I'm digging into will be. I think that is definitely something worth adding at least for the shear weight of all that concrete down below for weight. and your absolutely right ironwolf, obviously if that post is not strong to support all that weight then I am SOL. I Guess when in doubt, "nuke it out." Is there no formula or rule of thumb for a foundation for a gate post? I have seen formulas for column loads, but that is only focusing on down pressure, it's not taking into account a heavy item swinging on it 4' away with all that additional leverage. Thanks for the information.

-
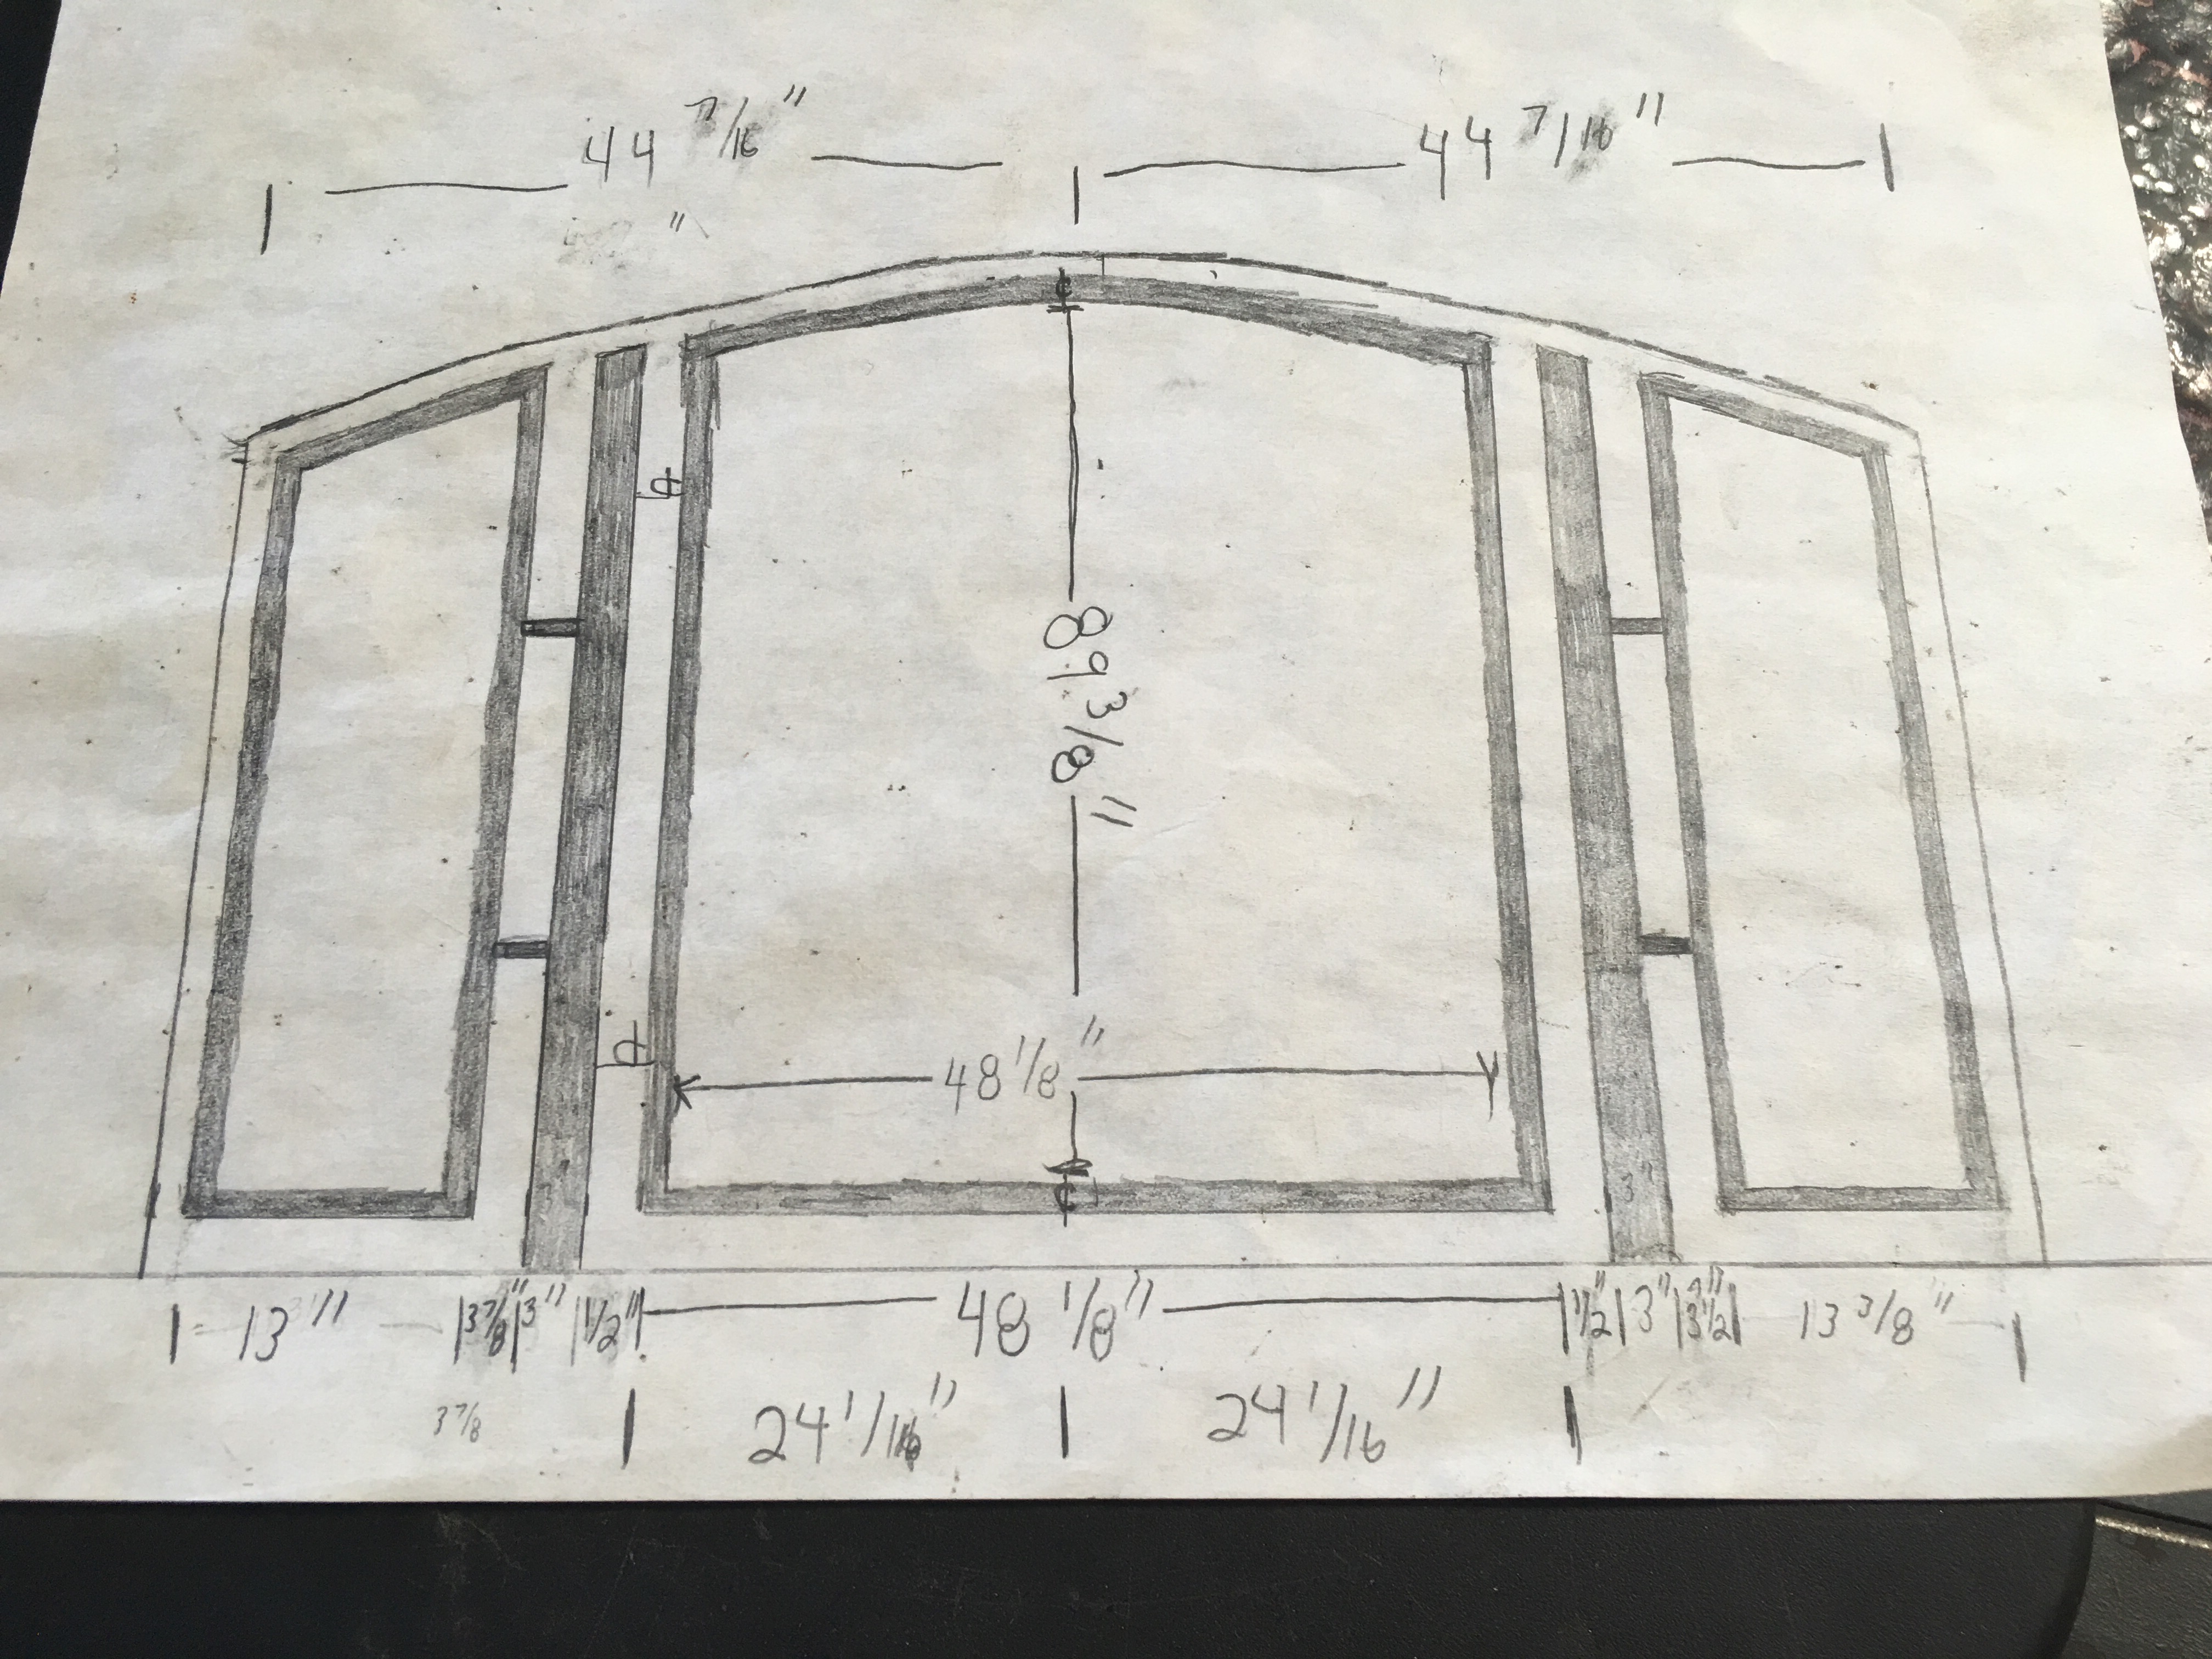
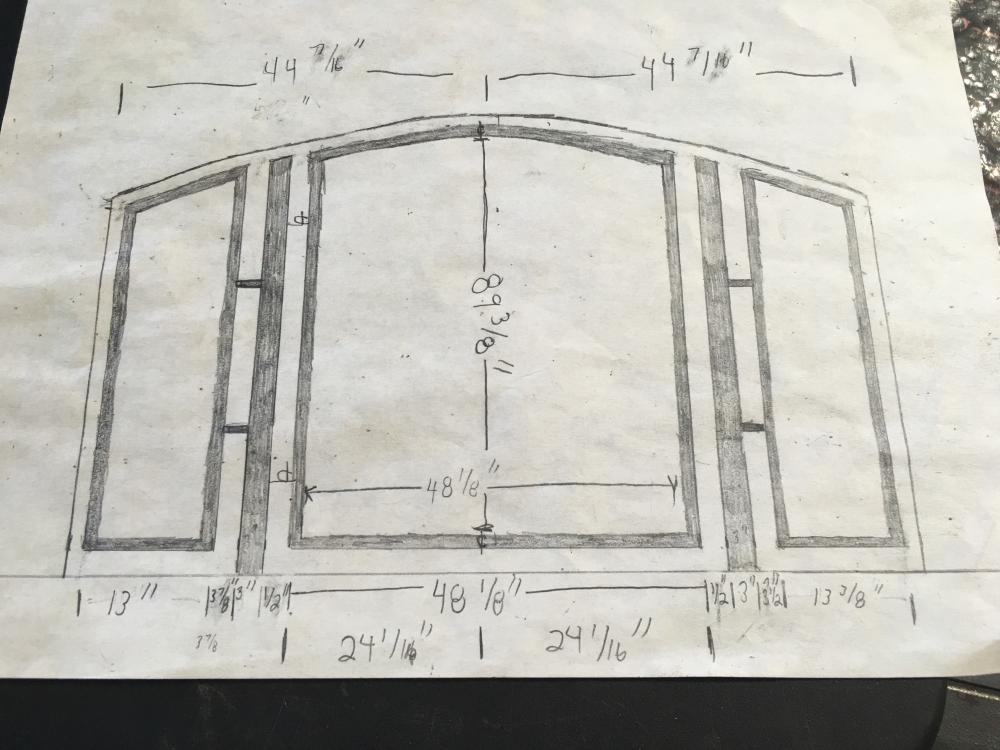
Gotta gate I'm getting real close to hanging and I am really struggling with whether I have chose the correct posts to mount to, and whether my concrete hole to support the post will be deep enough. I have tried a few post calculators online but can't find enough information to feel confident in my posts. The gate is 8' tall, 4' wide, and weighs almost 300 lbs. the post I chose to hang the gate on is a 2"x3" structural tube post with a 1/4" wall thickness. On the other side of the post is a 13" wide side panel also 8' tall that is welded to the same post. That panel additionally weighs about 85lbs. My initial plan was to set the posts 30" deep in concrete and hang everything off of the post without tying any tabs or anything into the building. It's a large archway and I'd really like it to be free standing without anything tied to the to the side of the archway to support the post when it's under the load of the gate. From what I'm describing and the pictures do you think I'm overdoing/underdoing it? Will that post set 30" deep in concrete be enough to support all that without sag?? You can see in the picture the posts. The left side is where I am talking. The post will have the gate and side panel mounted on the same post together.
-
Well I hope I didn't come off sounding like guys who forge and build things for fun, "do it yourselfers" I call them are not skilled or don't do quality work. That's far from true And not what I believe at all. I have met a number of hobby blacksmith/fabricators who are more skilled or creative than myself, I think to be a skilled professional builder it takes the combination of always pushing for accuracy and quality overall (you need to be somewhat of a perfectionist) but you still have to know your time constraints and realize it's a buisness as much as it is a passion and needs to be profitable. A lot of super skilled guys can't put out a product fast enough to make any money and then you have the hacks that it's all about money and don't care about quality. You need both in my opinion to really be something. my first boss was this little old tough Irish guy who loved to speak his mind, he told me my first week working for him, and I will never forget, "if the tenth time you do something, your still doing it the same way you did it the first time, then your f@&$:d up, and you shouldn't be a metal worker. You should always be figuring a way to be doing it faster, more accurate, and higher quality." That is something that has stuck with me cause it's so true.
-
I really like the handrail. Very clean work. Was that 1" solid for the picket? How much did that rail end up weighing?? Sorry just saw its 5/8" bar looks bigger in the picture.
-
similarly to the knife and sword making I have noticed the furniture market is in a similar way. I had a few carpenters I was constantly building table bases for. Through those guys I started building them for a couple interior designers, that was more than 50 percent of my income building table bases and tables. In the past year and a half that business has all but dried up. I still have the original carpenters I did work for cause they, as tradesman, they understand quality precision work. They are willing to pay a little more for quality and loyalty. But interior desigers, a lot of contractors, it's all about the bottom line, MONEY and who is cheaper. Not to go on a rant but it's because every guy with a garage bought a harbor freight welder and a chop saw and decided to start doing 'side jobs.' I don't think there is anything wrong with being a do it yourselfer, however I have spent the last 12 years of my life working my butt off in welding shops, metal shops, ironworks, black smithing shops to learn the skills I have and to attain the tools I have. Why is it that a guy buys a welder spends a year messing around on the weekends and now he thinks he's good enough to produce a professional product?? Partly to blame is the public though. We have let our standards of quality slip so much, and settle for cheaply made crap and think it looks good. The majority of people wouldn't know the difference between a high quality piece, or something that was done in a big production by unskilled labor. ( little side story.... Recently had a guy I went to high school with contact me about building some hardware and rollers for a barn type rolling door for a high end Marriott hotel. He was the carpenter for the job and had recently started his own business. He's telling me about all these high end jobs he's done and what not. He brought the two wood doors he had built to my shop so I could get some sizing and take some pictures of them. I started measuring them up and saw none of the measurements were the same. Everything was either a /16th or 1/8" off. Checked them for cross square, one of them was a half inch out of square, the other was 3/8" out of square. These doors were only 7' tall and 30" wide and nothing fancy. I never mentioned it to the carpenter guy from my high school but I started asking him about who he worked for before he started this business. The answer was.....No One.. He went to school for art and has almost no practical hands on experience. Yet he is doing work on a high end hotel. And he was charging ridiculous money for those doors. It just disgusted me. I would feel embarrassed to give another craftsman my work and it be out of square. I flat out wouldn't put out work like that. But he makes stuff out of "reclaimed lumber" and that is real popular right now so people will pay. It's crazy. I think eventually this fad will pass and the guys who don't know what they're doing will screw enough stuff up people won't hire them anymore, but it's just a sad state of affairs. The same deal is going on with knife making. There is nothing wrong with making knives and practicing and learning and giving them away to people, family, buddies, friends, but to start up a business and compete with the guys who have spent years of their lives learning and developing their skills is just dumb. Start at the bottom, learn from a pro, practice a ton and then start your Buisness. Maybe I have it wrong and am being too judgmental. It's just something I have become passionate about being a struggling buisness owner.