
brianbrazealblacksmith
-
Posts
1,683 -
Joined
-
Last visited
Content Type
Profiles
Forums
Articles
Gallery
Downloads
Events
Everything posted by brianbrazealblacksmith
-

Tools from spring.
brianbrazealblacksmith replied to brianbrazealblacksmith's topic in Tools, general discussion
Sorry, Keykeeper I'm a slow typer. That spring is about 9/16", but you can use other sizes. -
Tools from spring.
brianbrazealblacksmith replied to brianbrazealblacksmith's topic in Tools, general discussion
I was only going to make eye and nose punches to start with, but when I finished and photoed the first set I thought you all could get alot out of this spring. The first punch I made was the bob punch for making the eye punch. The eye and nose punches are just square tapers. The eye is taken a step farther by forging a depression in it with the bob punch. Then I grind or file the rest leaving two of the corners; this allows me to orient my punch using the corners as my reference. The small cresent is the nose punch. Next I made a square and round flat bottom punch, then a square and round punch like I usually use with the V grind. There are two slitting punches with the V grind, a chisel, and two fullers. -
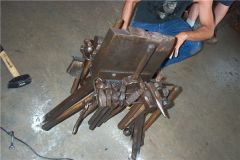
Another forge welded bundle
brianbrazealblacksmith replied to brianbrazealblacksmith's topic in Metal Sculpture & Carvings
I made a collar out of 3/8" X 1 1/2" to hold the pieces together. That wide piece in the middle is a spacer that gets the bird leg away from the cat tails, and it gives me something to hold on to while I'm forge welding it. I nicked that piece with a chisel at its base so I could break it off in the end. I'm glad you noticed! This is a very simple forging but alot of thought and consideration goes into making it successful. -
Tools from spring.
brianbrazealblacksmith replied to brianbrazealblacksmith's topic in Tools, general discussion
There are two slitters, one is a 5/16" slitting punch and the other is a 1/2" slitting punch. They are the ones with a V grind. The original hardy cut, cutting like Hofi does in his blueprints, sets you up for these slitters and the other round and square punches with a similar grind. Punches like these have alot less resistance going through metal than flat bottom punches do. -
Tools from spring.
brianbrazealblacksmith replied to brianbrazealblacksmith's topic in Tools, general discussion
Yes, I do harden and temper them. These tools are what I'd call small hand tools. They are for smaller stock and are not or should not be used in a manner where you would lose there hardness [this implies quenching in between the time it takes to get the work done] I am calling 1" and under smaller stock. I don't usually strike more than three times before it is time to cool the tool. I may cool it in the air or in water depending on what I'm doing, but if you try cooling this material in water after it has been left in deep hot material where it shows color, you will break it. I do not always harden and temper all my tools. It depends on what I am asking of the tool. They are both right! -
Tools from spring.
brianbrazealblacksmith replied to brianbrazealblacksmith's topic in Tools, general discussion
I really did enjoy doing it; I sang all day, but I really did not do this for me. I did it for you. I have more pictures from the day. I'd like to hear some questions. -
Here are some tools made from spring that I did because of the many questions I've seen about making some of your first tools. This spring ended up being 12' 6" long. I cut circles off it on the horn then straightened them in 3 heats being careful not to put any nicks or dings in the material. I then cut them on my hardy into 7" pieces. I forged the striking end first then then the working end. These are mostly one-heat square tapers, stop, or go to round in a second heat, or two sided tapers to form the chisel and fullers. I forge, grind, heat treat, test, and then it's ready to go. This would be a nice starter set to think about making.
-
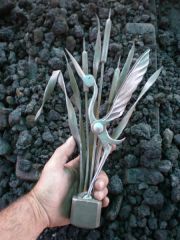 forge welded bundle crane in cattails
 -
Another forge welded bundle
brianbrazealblacksmith replied to brianbrazealblacksmith's topic in Metal Sculpture & Carvings
Here is another forge welded bundle that I've wanted to do for quite some time. It's a simple forged sculpture that I'd like to do life sized with a striker and then larger than life with a power hammer. -
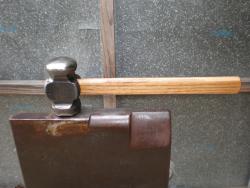
Just cut off what you need on the horn of your anvil with a chisel. Be careful not to cut all the way through and into your horn.
-
Avadon, That last anvil and stand was made by my brother, Ed, while I was In Europe. It is a box with a solid bottom. Ed used what he had on hand. There have been several people who have made a similar anvil and stand since we did ours years ago, but the most important thing to keep in mind is the mount. The anvil needs to be mounted to the stand so they act as one piece, and then that needs to be mounted to the Earth. I have my anvil at my shop here anchored into the concrete, and when I'm hitting hard, tools will jump off my other anvils and stands. My anvil should have its own foundation poured like you would do for a power hammer, but I travel with it alot, so I have different lengths of spikes for different soil types and that helps. I've worked on many different setups and the mount is more important than the weight.
-
 That was a picture taken at Austin Community College before we went to Europe. The anvil and stand were just anchored to the concrete not dancing across the floor, that's why you see the electrical cord and the concrete dust.
 -
Frosty has it figured out. That was a picture taken at Austin Community College before we went to Europe. The anvil and stand were just anchored to the concrete not dancing across the floor, that's why you see the electrical cord and the concrete dust. I'm sorry that I haven't been on the sight much lately, but I've been gone alot and our computer has been having some problems.
-
Exactly, I've been thinking about competing again in the forging contests that the farriers have and that heat source would be perfect.
-
Smithingman, One thing that I have not heard much about on this forum is dressing the hardy and pritchel holes. Dress them both first thing before you use them!. You don't have to do much, but do it.
-
Grant, How much does that unit cost? I just did a hammer making class and everyone made their hammer, but they spent alot more time than they should have just heating the piece up. If I had just one of those, I could have heated all their pieces up one at a time in a fraction of the time they took.
-
coal or propane
brianbrazealblacksmith replied to antigoth24's topic in Blacksmithing, General Discussion
I prefer coal and coke to propane for hand work because of the quicker heats and intensity of the heat, but I'll have to agree with Jymm Hoffman about the Induction heating. From what I'm hearing and have seen I don't think I can afford not to switch to induction heat. -
I just got back from an event, and it was good to see that Grant Sarver was on this sight. He wasn't kidding when he said those were just a "few tongs". He and his wife make them in his shop at their house. He has come up with the largest selection of tongs at the best price and quality of any other tong maker that I've seen out there. He also makes many other blacksmithing products. I've only ran across Grant a few times at different events, but I noticed his work immediately and there was more every time I saw him. I think he's a genius. I'm glad to see you here on this sight Grant!
-
1045 vs 4140
brianbrazealblacksmith replied to John Martin's topic in Blacksmithing, General Discussion
I use 4140 because I get drops of it for free in a large range of sizes, but for making hammers by hand with a striker I'd prefer to use 1045 because it yeilds to the hammer alot easier. -
Chris, I don't know how to draw on the computer yet. Give me a call anytime. 559-679-4106 The 1045 can work if you're making hammers out of 1045, but 4140 is tougher. I'd rather be making hammers out of 1045 because it yeilds to the hammer much easier than 4140, but I'd rather make the punches out of 4140 or 5160. Brian
-
They're just marks to tell me which pieces go together. The two wedge mounts are slightly different in size.
-
Here's my new traveling anvil and stand. I'll have to make new hardies for its 7/8" hole, and I'll make some hooks to hang more tools. The anvil is mounted like a post vice is mounted with wedges that I forged.
-
Hey all, this is Karen. Brazeal brothers, Brian and Ed, demo'ed throughout the Northern California Classic in Placerville, CA last weekend and I got some great pics! These blacksmith/farrier competitions have something to offer every smith. They are family oriented and very informative on shoeing and forging. We had a great time with some great folks and the boys forged and forged!
-
Peter Wright Anvil
brianbrazealblacksmith replied to tom6289's topic in Anvils, Swage Blocks, and Mandrels
It may be Frosty. They use it to adjust the pH in the soil around here. -
Peter Wright Anvil
brianbrazealblacksmith replied to tom6289's topic in Anvils, Swage Blocks, and Mandrels
I used about 2 cups of sodium bisulfate in about 30 gallons of water in a plastic trash can.