
brianbrazealblacksmith
-
Posts
1,683 -
Joined
-
Last visited
Content Type
Profiles
Forums
Articles
Gallery
Downloads
Events
Everything posted by brianbrazealblacksmith
-

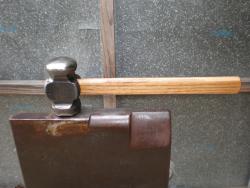
Dial a hole
brianbrazealblacksmith replied to brianbrazealblacksmith's topic in Tools, general discussion
Man, that's alot to respond to. I wish I knew how to work this computer better. I worked with Alfred from Aug. 2004- Jan. 2007. 6 months the first visit, 11 months the next, then 1 month. Most of that time was with Alfred. Forging is forging. It's just a matter of proportion. Proportionally, I move just as large amounts of material with my hand hammer in the same manner that I can with a striker or power hammer. Everything is basics. The metal can only do what you do to it. Taking the time to observe what is really happening compared to what we intend to make happen can help out more than anything. I've banged away at hot iron more than most for years and years, but I didn't really start learning as much until someone asked me how I did something and I had to explain it. That taught me so much more than just making things automatically. It is the thinking about what is really happening that this is all about and thinking about how to work with this material to allow it to yield itself to you. When the metal is hot and you touch it with whatever, it does only what you do, no more, no less. It does take practice to take a hand hammer and hit a determined spot, but if you understand from the start that a falling hammer [no matter which kind of hammer, that is your choice] hitting a piece of hot steel that is being backed by a surface of an anvil[your choice again] will only do what it will do, you'll go farther faster. Choose your dies. The hammer and the anvil are the top and bottom dies. -
Dial a hole
brianbrazealblacksmith replied to brianbrazealblacksmith's topic in Tools, general discussion
Bryce, I do not have a power hammer, but I wish I did. Hand work and power hammer work is really not that much different. You just put the material under the dies and it does what you do. How you hold it, how hard you hit it, and whatever surfaces you are hitting it with at the appropriate temperature all matter, and you can set up any situation of your choosing to make whatever you want to happen. It doesn't matter whether you're forging with just your hand hammer, with a striker, with a treadle hammer, with a power hammer, or with anything else. Forging is forging. I have been in other shops and had the opportunity to work with alot of different power hammers. There were times when I was alone at Tom Clark's school where I could use 5 different die set ups in 5 different power hammers. That was nice! P.S. I really learned alot from Alfred Habermann and consider myself very fortunate to have spent over a year working with him almost every day, except Sundays. He was always the same, always in a good mood, and always working. He was a pleasure to work with! -
Wolf Jaw Tongs - Which brand?
brianbrazealblacksmith replied to Greebe's topic in Tools, general discussion
I'd go with Blacksmith's Depot OC tongs. They are exceptional in quality at a very reasonable price, and they are made in America. They also have the most varied selection of other types of tongs. I've used them for several years and some of the others you listed, and Off Centered tongs is the best deal I've seen out there. -
Dial a hole
brianbrazealblacksmith replied to brianbrazealblacksmith's topic in Tools, general discussion
The different sized holes are mainly used for supporting your material better from underneath when you are drifting or punching holes. It can also be used as a heading tool for making nails, rivets, or bolts. -
Dial a hole
brianbrazealblacksmith replied to brianbrazealblacksmith's topic in Tools, general discussion
Yes, they are. They are made like Alfred Habermann taught us by hand with a striker. I have come up with a few innovations on my own in order to adapt the methods to our anvils here with smaller hardy holes, but the approach is basically the same. I'll be doing a class at Yesteryear School of Blacksmithing in Virginia in November on making hammers and the tools to make hammers. Once you get familiar with these techniques, top tools and hammers are a simple matter and can be forged in less than one hour. I wish I would have been exposed to this infomation when I got started. -
Making a Feather
brianbrazealblacksmith replied to brianbrazealblacksmith's topic in Metal Sculpture & Carvings
-
TV Tray
brianbrazealblacksmith replied to brianbrazealblacksmith's topic in Tools, general discussion
The main frame itself doen't weigh more than 10 pounds, but when I load it up with tools it gets pretty heavy. By the way, all those tools were made by hand with a striker or by myself. -
Making a Feather
brianbrazealblacksmith replied to brianbrazealblacksmith's topic in Metal Sculpture & Carvings
You're welcome Pete. I made the die by forging a piece of spring the shape of the quill, then I hardened it in oil, tempered it to blue, then drove it into a hardy blank I made while the hardy tool was hot. You could fold form the quill, also. -
Making a Feather
brianbrazealblacksmith replied to brianbrazealblacksmith's topic in Metal Sculpture & Carvings
You are welcome, Dick. It has been a while since I made any feathers. -
A couple of people asked about feathers, so here is how I make them. I'm starting with 1/4" mild steel for this one. I sometimes use copper or pure silver. First draw a short, sharp round taper, then draw only the tapered part into a 1/8" rod,[this is how I would start a cat tail,also]. Cut the amount that you want for your feather off then draw a short, blunt taper. Next, forge the feather into the quill die starting at the base of the feather. Put some heat back into the peice to relax it and straighten it then do the chiseling cold.
-
It can be hammered free-handed with no aids all the way into the crotch of the split. The trick is to approach it from the diagonals not the flats.
-
TV Tray
brianbrazealblacksmith replied to brianbrazealblacksmith's topic in Tools, general discussion
The leaves were fold formed. I don't have any pictures of feathers, maybe I'll do some today. -
TV Tray
brianbrazealblacksmith replied to brianbrazealblacksmith's topic in Tools, general discussion
Maybe it didn't, but yes, it does have a slotted hole on one side. It's just like a TV tray. -
TV Tray
brianbrazealblacksmith replied to brianbrazealblacksmith's topic in Tools, general discussion
Yes it does fold up just like a TV tray. I think this picture may show the catch mechonism. -
Is this a tool?
brianbrazealblacksmith replied to thesamanthahope's topic in Blacksmithing, General Discussion
It looks like a gas key. -
Asking For The Experts
brianbrazealblacksmith replied to Rattlecat's topic in Blacksmithing, General Discussion
Excellent points Thomas! -
Dial a hole
brianbrazealblacksmith replied to brianbrazealblacksmith's topic in Tools, general discussion
This one is made from 1/2" X 6" plate. -
TV Tray
brianbrazealblacksmith replied to brianbrazealblacksmith's topic in Tools, general discussion
That is for making feathers. It makes a raised quill. -
Here is another tool I just added to my shop. I got the idea from the WCB [World Championship Blacksmiths]. They just bought some wooden TV trays to throw their tools on while they are competing. I use it while I'm on the road doing the hammer making classes and in my shop where ever I need it. I can put alot of tools on it.
-
Here is a handy tool that George Dunajski told me about a year ago that I just got around making. I wish I would have had this years ago! It is just a plate that pivots on a bolt that goes in the pritchel hole with different size holes that are centered over the hardy hole.
-
Tools from spring.
brianbrazealblacksmith replied to brianbrazealblacksmith's topic in Tools, general discussion
I used oil for these. I could have used water on those tools. My choice of water or oil depends on the tool and the material I'm using. here I am going to be talking about 4140 and 5160. I'll use oil for a larger bodied tool like a hammer, top tool, or hardy tool, and usually water for smaller profiles like chisels or punches, but when using water I take care with the length of heat I get and the length that I quench. I'll only bring about 3/4" up to heat then quench about half of that moving it slightly up and down. If you quench the whole heat it will break. I'll draw a temper with the remaining heat maybe up to 3 times quenching like above in between draws. I'll let the tool cool down where I can hold it then test it by hitting it over my horn 3 times. If I did anything wrong or if the used spring was already stressed it will break. The main thing when forging small punches an chisels is not to over heat, don't over beat, and be mindful of the heat treat. Most of the punches and chisels I make are done in one heat for the working end unless I am going to round. A one heat taper is so much stronger than a taper that requires reheating the previously forged start of a taper. I know this from experience, but Bill Bastas could explain this from the molecular changes that occur during forging. He is the only one I've ran across that will point this out. I observed this years ago mostly from making pritchels for horseshoers. The pritchel is a long narrow rectangular punch for punching out nail holes and is the most challenging tool I've ever made in one heat. -
Tools from spring.
brianbrazealblacksmith replied to brianbrazealblacksmith's topic in Tools, general discussion
Aeneas, It is spring steal. Spring is usually 5160. Someone gave me that spring and I cannot be positive exactly what it is, but it does harden enough for making chisels. You can use for drifts also, but I'll use mild steal for some drifts. -
Tools from spring.
brianbrazealblacksmith replied to brianbrazealblacksmith's topic in Tools, general discussion
I'm not sure what you mean by, "Not wishing to muddy the water," but the slitters I made are punches not chisels. I have made and used slitting chisels like the ones in that article. Alfred Habermann used slitting chisel like that also. I have not seen anyone else using a slitting punch like the ones I make unless they have been exposed to me. I've seen slitting chisels that are similar being used by Hofi, Tsur Sedan, and Tom Clark and the people who have been exposed to them. I prefer to punch clean slots. The chisels leave at least a rim or ridge inside the hole from slitting the rest of the slot from the other side of the material, and when chiseling larger stock, there are usually some pretty large cold shuts that are caused by the material stretching because there is no backing for the chisel when you chisel the other half on the other side. I posted pictures of different slitting punches in Slitter Geometry that cover this better. -
Tools from spring.
brianbrazealblacksmith replied to brianbrazealblacksmith's topic in Tools, general discussion
Thomas is correct, I was reading too quickly and mistook the words to mean the intentions that Thomas is referring to. -
Another forge welded bundle
brianbrazealblacksmith replied to brianbrazealblacksmith's topic in Metal Sculpture & Carvings
Dick, you really don't have to clean the pieces or wire brush them. The borax floats the scale away and cleans the surfaces. I flux only once. This is the easiest weld to succeed at because its easy to place exactly where you want it to heat it and the only parts touching your anvil and hammer are where you are trying to weld.