

racer3j
-
Posts
298 -
Joined
-
Last visited
Content Type
Profiles
Forums
Articles
Gallery
Downloads
Events
Everything posted by racer3j
-
You are both so right. Being able to hand a fine tool or the like to a younger person and seeing that look in the eyes, the protestations, the brief explanation and insistence from the coot and then the smile and cradling in those young hands. Doesn't get any better.mike
-
By the way, what is the threshold for "cootery?" I'm not sure how I would feel being included. Around here we joke the "coot-shooters-" taste fishy, the coots that is, so they end up being cleaned down to just "Beaks and feets" in the waterfowl stew. My favorite waterfowl hunting foolishness as a gangly youth was to clip off a foot high up and take it to school- a tug on the tendon and the webbed foot would open and shut- really grossed out the girls in school. Funny, my sense of humor hasn't matured much.mike
-
Actually both of you have given real food for thought. I appreciate the time taken to give clear options.mike
-
A big thank you. The two stage cone process sounds ideal -basic to refined. It will be a long time for me to get to where I can do a one-piece socket chisel. I am a pretty well experienced O/A weldor, so mating the cone socket with a blade should not leave excessive clean up of that union. Along the fly press line of thought, would an Appalachian Power hammer swage orange O1 and/or forged cable damascus into a female die representing the shape of a bevel-edge chisel?regards, mike
-
That is the 2+2=4 I have been working toward in my questions about wrapping the coupon around a cone mandrel. To that end, I had asked about milling a tight groove along the vertical of a cone and using it to give the initial grasp of the coupon edge. In fact, I have a swage block with the half-depth cones, but these particular ones are too big. If I need to, I can get the block sawed down the lengthwise middle and have the open swage block.mike
-
Thank you, gents. The sockets are welded onto the blade. The blades would be of the bevel bench chisel type. The socket swage being made for me right now,is a chunk of O6 and two different size 2* and 3* tapered end mills and matching male punches. They are doing it out of past friendships and curiosity. Two holes of each size are not bored through to an opening at the bottom- one each size pierces through. Partly because I am not sure which will work better and also because I could make a socket a bit over-length if needed. Just picture a bar of steel with six funnels "drilled in it. lay a piece of orange steel over the hole, and swage down into it with matching punch. I have been advised that rolling one on a cone mandrel will take great skill-I don't have that.mike
-
For authenticity, how about a pin with ring and the pivoting wing style "lock" on the other end-just a taper pin would do it too-not like the smith would be short on hammers to drive it out.. They, the first described, have been around for a long time. I have no doubt that some smiths made quick change(replacement) hardy tools; the smith could make several hot cutters and heat treat all at once so a sharp one would be quickly available without all having shanks fitted up. Saving paying time to better afford lots of good sausage in the biscuits and gravy ins attractive to me, anyway.mike
-
A size recommendation would be good. The only comparison information I have so far is at Old World Anvils. I would be making tall skinny funnel-like sockets for socket chisels. The sockets are about 2 1/4" to 2 3/4" tall. I guess I am thinking that it would take the bigger types to do the sockets based on stroke; the dies would eat up too much of that vertical dimension-I think? And, what length die will work- if looking at the front of the press and thinking the length of the die set is perpendicular to the press body, how far side to side can the force be reliably expected to transfer? Thanks, mike
-
Is anyone here presently using a fly press? I am really seriouly considering one? My socket swage block of O6 and end mills were taken to machine shop today. I discussed making swage blocks for the chisel blades themselves- they think they can do a set at a bearable price. 1/8th" width to 1" wide by 8ths-from six to 7 inches long before adding the welded on sockets. I read what I could in links and sites. Thanks, Mike
-
Frosty- yes, I was thinking of a groove around 3/32nd" wide and maybe 1/8th" or 3/16th" deep-take my hot little fan-shaped piece of steel start it in the slot and hammer around. I envisioned holding onto the cone by the hardy shank, rolling it along on the tip angled down on the surface of the anvil, then laying the mandrel flush on the face and detail hammer around again, slide it up a bit and slightly rotate on mandrel so the inside indexing flange is out of the groove, probably a quick re-heat, and hammer blend the little flange left inside. On the same topic{quickie hijack} I now have two tapered endmills of proper diameter(s) and a bar of tool steel,annealed, to have someone plunge mill out my socket dies-two sizes for chisel proportion.mike
-
Thank you for the help.Mike
-
Today I went to the pain control doctor. Keep in perspective that this, unlike other worse things, won't cause my early demise. Besides low back, the right rotator cuff is well torn. And, a new discovery--- left is going too. Best we can figure it must have started with rattling around in a flipping sprinter. So, I am going to commit to be a student of the hammer and anvil, but a press is in my future. Hammer won't do- not my garage floor to crack and residential neighborhood. I had a very high quality air over oil tubing bender so I am at least familiar with the "circuitry." I notice power hammers covered nicely but no tutorials on press forging. Any good plans anywhere? And, I don't need huge, though I can always scale down. Thanks, Mike- PS- I still have not figured the blueprint workaround- can get to 200 and then only the 1000 series. The BP's are still being worked on and off line.
-
The groove- is this a groove from near the point to the base. I was planning on machining a groove in one of my steel cone mandrels- like a spring groove. -insert one edge of my coupon in groove, then hammer and wrap around to get those sockets I was discussing.mike
-
First-Gray- the suggestion of a blueprint from you is a recognition that you have valuable information to offer. Frequently, knifemakers are a bit more attentive to more sophisticated hardening and tempering and they often use more complex alloys that require greater precision to get a commercially suitable result for sale to the public. That still leaves great room for shade tree metallurgy.( As I have noted ad nauseum, I take greater pains because I built and drove, betting my life, the most deadly form of racecar extant) Second-rthibeau, all levels of sophistication benefit us, some do want more "scientific methods." Respectfully submitted, JET/Mike T.
-
Clay and sawdust!!! Verrry Interesting(deutsche accent required)mike
-
I am a big fan of Tempilaq- used it for stress relieving tigged 4130 tubular joins with OA. It is cheap for the relaxation and consistency it provides. One has to get pretty fancy to need hardening and conversion of austenites to martensites to standards that render it, Temp.., inexact. The crayons are one handed but the liquid with little brush is a better more even application. Using two temps can give that slot of confidence noted by GrayR---AND WELCOME!!!!mike
-
I have had Miller and Airco Mig and Tig(watercooled) I have the Lincoln SP170T and it is a good unit- It was the "take to the track for emergency repairs" welder and bounced around with a winged Sprint Car for a fair number of years and it is still going strong. I think you got a deal- enjoy it. PS- for serious 4130 welding it was Tig relieved with OA or just OA.
-
Oxy/AC tanks, hauling safely, and storage
racer3j replied to Glenn's topic in Blacksmithing, General Discussion
For me, never inside a vehicle and I treat Acet. like a refrigerator. Usually let it sit overnight. I keep a tote set so I am never out.mike -
Backwards it is, YESSIRREE! Thanks, it was grinding on me.Mike
-
I'll bet I put it together backwards. I'll check later- it is the kind of bonehead thing I would do - not always, but not a rarity either. mike
-
Thanks, I will try that-outside of the garage.mike
-
First time I tried to light the Baby to cook the ITC. With regulator backed all the way off and forge valve closed, when I crack the tank, it pegs the gauge and shuts down flow. The tank is fine with my bigger gasser. So, what's the deal here?mike
-
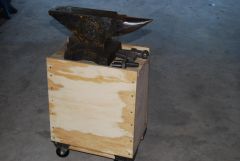
Ended up cleaning the garage shop- and with all of that room to move, got going and built the stand from Jock Dempsey's site. It came together nicely- has 4 heavy duty casters. I will be adding something heavy in the box - more to counter any top heavy issues. The Vulcan has really good bounce and does not ring to the extent it will drive the neighbors crazy. I plan on building another stand dimensioned for the V & B- heavier duty casters and a more spread out base. With the hardy now adjusted to properly fit the bulk of those tools I feel more confident and ready to heat and beat. I want to thank all for the good suggestions. I may still build a metal stand, but I had the 2 x 12 lumber and 5/8" ply . So I used it and freed up space at the same time.mike
-
 100 Pounnd Vulcan and Stand
 -
I ran out to HF and got one. It would barely cut the steel. So, out with the die-grinder and carbide burrs. My hardy tools slip in nicely now. Then I used the 1/2" belt sander to ease everything. I really wanted the anvil to be "right." I have heard that a few anvils have lost their behinds from forcing a hardy tool.mt