FieryFurnace
-
Posts
2,106 -
Joined
-
Last visited
Content Type
Profiles
Forums
Articles
Gallery
Downloads
Events
Everything posted by FieryFurnace
-
-
-

-
-
Dave's demo trailer
FieryFurnace replied to FieryFurnace's topic in Blacksmithing, General Discussion
-
-

-
-
Dave's demo trailer
FieryFurnace replied to FieryFurnace's topic in Blacksmithing, General Discussion
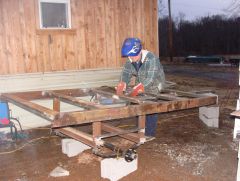
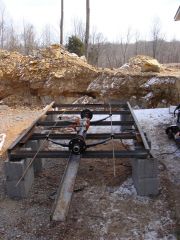
I finally got some pictures of the trailer! We got the axel mounted today. I had to go back to the steel warehouse and get some extra frame work in order to mount the axle. I also had to get some more flux core wire (My trailer ate the other roll!) and I went ahead and got the primer/paint. I bought the good stuff; the kind you put hardner in and put in the air compressor spray gun. Total bill for thinner, paint, primer, hardner and more thinner was $126! However, I bought a gallon of each paint/primer so I should have quite a bit left over! I'll post those pixs as soon as they upload! -
Dave's demo trailer
FieryFurnace replied to FieryFurnace's topic in Blacksmithing, General Discussion
AHHHH! Thank you! I feel SOOOO much better!:D -
Dave's demo trailer
FieryFurnace replied to FieryFurnace's topic in Blacksmithing, General Discussion
This figures! Ya know we bought the "no tank" wire (flux core) for our welder; well we got the plug hooked up and now we don't have any tips that will fit the flux core wire! It's .35 diam. and out of all the tips we have (5-6) they are ALL .30 or smaller! So, dad has gone to the store to get a bigger tip, another wire wheel, and I am going to work on cleaning the steel where it needs to be welded. (I'm on one of those unplanned, self made, water breaks right now!) Anyway, time to get back to work I suppose! Somebody feel sorry for me in my bad luck ok!!!!! Say something like, "happens to me all the time," "don't worry bout it," you'll think it was all worth it when you get it done" etc!!!:D -
Could you get a close up picture of how you attached the air pipe to the blower? Thanks!
-
I havent had a chance to work on the knife anymore. I'me trying to take advantage of the nicer weather here to do some outside stuff. I'll post updates when I get em!
-
Dave's demo trailer
FieryFurnace replied to FieryFurnace's topic in Blacksmithing, General Discussion
Those sleeves aren't anything! Or my more formal outfit! Got ruffles on that one! Couldn't move my setup at that event, or I woulda been facing the trees! "Murphy's law says wherever you set up, the wind will blow smoke/fire to you!" Evil master mine Mr. Murphy Anyway, supposed to start welding tomorrow still, if the weather is fine! -
Dave's demo trailer
FieryFurnace replied to FieryFurnace's topic in Blacksmithing, General Discussion
I'm didn't take it that way at all! Just clearing up why I was using unauthentic specs, and why I didn't want to use other unauthentic specs. I don't want put to much "drapery" around the edge! Ya know, an extra spark lands in the wrong place..... ....something like that on a larger scale!!!! The tire will be set back from the center, and the forge is to be moved forward to the very front of the trailer so that the tire cover will be well away from the firepot! -
Dave's demo trailer
FieryFurnace replied to FieryFurnace's topic in Blacksmithing, General Discussion
Picked up the axle yesterday! I went ahead and got a regular leaf spring axle as a guy in town here sells them real cheap! Also I don't need the trailer to sit lower because I would rather have the forge mounted directly on the frame. You see, if I was to lower the trailer I would have to raise the forge/blower to the right working height. I'm hoping that the axle I have is going to raise it up high enough so that I won't have to do that! Now I have to cut a bunch of 1" angle for the coal/forge box. Brilliant me got the lids cut the same size as the box...i.e. the lids fit inside the boxes! anyway I am going to add angle to the edges of the lid so that the lid won't fall into the box and it will also waterproof the boxes. (I was fortunate enough to trip across some "scrap" [they are actually ten feet long] that was free from rust, straight, and $.25 a pound.) I have a very little bit of some 1"+ by 1/8" that I'm going to try to make hinges out of. I've never done hinges before! Before I try, I'm going to make a little form to bend them around so they will fit the hinge pins! If weather permits we are going to start welding Monday....and there will be PLENTY of pix!!! Thoughts? Dave Custer -
Dave's demo trailer
FieryFurnace replied to FieryFurnace's topic in Blacksmithing, General Discussion
I do know that the whole channel steel frame, axel, rubber tires, diamond plate for the forge, etc. is unauthentic! However, a wooden frame with wooden wagon wheels would not take to the interstate very well. The channel steel frame will be covered with rough cut lumber painted olive green, the tires will be covered with burlap or canvas material, (and be under the trailer) eventually I want some steel/wooden wagon wheels to put on at the event. The diamond side of the forge plate will be on the bottom of the forge and therefore out of site. Basically the unauthentic specs will be covered! Otherwise I would have to build the wagon forge and then build a trailer to tow it on. That's why I didn't want jacks in the four (or two nearest the anvil) corners! It would be difficult to cover up and it would be extra stuff to carry around. -
Dave's demo trailer
FieryFurnace replied to FieryFurnace's topic in Blacksmithing, General Discussion
The anvil will be on a stump, (Not permanantly) not the trailer. I figure I won't have to worry about trailer bounce and I'll be able to work all around the anvil. -
Dave's demo trailer
FieryFurnace replied to FieryFurnace's topic in Blacksmithing, General Discussion
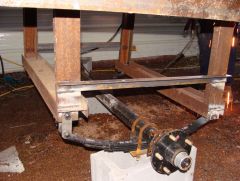
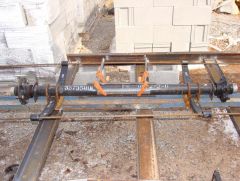
UPDATE: We have the plug for the welder...we just have to hook the plug up. I pulled the bandsaw out yesterday and cut all the channel steel for the frame. Here are some pictures! That is of course unwelded; just a rough layout. The frame will weigh somewhere around 200#. I increased the frame width to 4 1/2 ft. (My cross sections were all 4 ft 7 inches so I figured "Why Not?") I am going to get the five foot axel (3500# rating) and get it cut and rewleded to the exact size needed. I'm going to let the welding shop do the welding to make sure I get max penatration and strength! I'm going to go out now and cut the fire pot hole in the forge pan sheet. (1/4 diamond plate.) Thoughts? -
I've still got a couple of feet of the original rod. I like that idea about filing the tang down and then bending it down. I may try that! Thanks for the drawing!
-
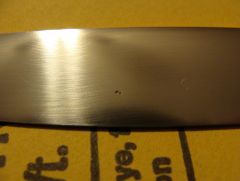
This is a spot on the blade: I think I hammered some scale in deep. There is another spot in nearly the same place on the other side of the blade. I could have filed it out but I was afraid I would take too much steel out of the blade. However the spot is so small that it is hardly noticable. Gives it, ummmm, "character"!:o Just kiding!!! Here is something I though about with the handle. Would it be possible to take some leather, lay it on one side of the tang, wrap it around the front of the tang, and lay it on the other side? Then rivit the whole deal to the tang with, say, some 8 penny nails. That would keep it even with the back if the blade. I could even layer the leather. Another idea is doing a pewter or brass handle. I could drill through the tang, melt the pewter/brass, and pour it around the tang in some sort of mold. This way I could set the blade in the mold so that the handle would be even with the back. I have no idea where to get pewter/brass or how hard it is to melt it and pour it. I also have no idea as to what to use as a mold. I have worked with lead (Molding .58 bullets) so if it is similar to that then I think I could manage. Or I could just cut a stick and notch the tang and put a wooden handle on as advised! Thoughts? Dave Custer
-
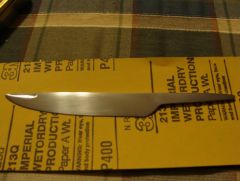
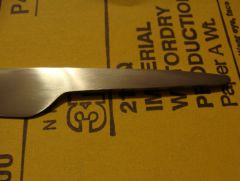
Here she is shined to a worn 400 grit sand paper. The blade is 4 3/4 inches long and the tang is 2 1/2. The overall length is 7 1/2. (1/2 inch is spent in transition from the blade to the tang.) Here is a question for the master minds! The tang is 3/8 inch at the widest part, tapers to an 1/8 inch, is 2 1/2 inches long and an 1/8 inch thick. What type of handle and what type of attachment method would be the easiest for a dumbo first timer like me? I would prefer a handle that follows the back of the blade if possible. Here is a picture of the tang. Question two: The cutting edge is still slightly over 1/32 of an inch thick. Should I sharpen now or heat treat and then finish sharpening? What do I use for sharpening? Tools avaliable: file, 220 & 400 grit s. paper, and a regular diamond knife sharpener. Will reg. vegetable oil work as a quenchant? What temper are we looking at for sucker rod? (Blade is 3/4 inch wide at most and 1/8+inch thick along the back.) The knife will be used for general purpose farm work. (Chisel, screwdriver, prybar!) Ha! Just kidding. Hay twine, rope, and maybe a squirrel or two! All help is greatly appreciated! Dave Custer
-
-
-