FieryFurnace
-
Posts
2,106 -
Joined
-
Last visited
Content Type
Profiles
Forums
Articles
Gallery
Downloads
Events
Everything posted by FieryFurnace
-
-
Dave's demo trailer
FieryFurnace replied to FieryFurnace's topic in Blacksmithing, General Discussion
I think I got it Frosty. It's a good idea and I wouldn't mess up the paint when I welded either! I don't have a tongue jack. I'm going to forge a by-pod with feet. It's what the artillery cassions use. (Chock the tires with 4x4's) I filled the coal box a little over half way today. I thought the box would hold about two five gallon buckets worth of coal. Well, it actually holds about 8-10five gallon buckets full! Shouldn't run out of coal! I know I promised pics. but I'm gona have to wait till tomorrow. Probably round lunch or so. Were having a family of 12 over (at least I think it's 12:rolleyes:) so it'll be pretty busy! Till then! -
Dave's demo trailer
FieryFurnace replied to FieryFurnace's topic in Blacksmithing, General Discussion
I'll post pictures later. I'm working on bolting all the boards down and then I will screw the boxes down. I'm going to try to fire it up tomorrow! Go ahead and send the scetch. I like the idea of having a stableizer and I'm going to cary a jack in case of tire trouble. (Although I don't have a spare!) -
Dave's demo trailer
FieryFurnace replied to FieryFurnace's topic in Blacksmithing, General Discussion
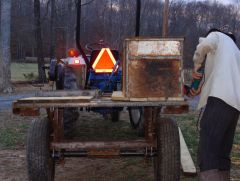
Sabre, I liked the idea of a weighted ash dump and I happened to stumble (literally) across that pipe in the coal basement where I get my coal from. Got all the right elbows and everything for free. Frosty, Not sue I caught all that, but I think I know what your talking about generally. Good idea, but I think it's a wee pit late to do it! We looked at where the vice will be and we are going to weld two pieces of channel in to mount the vice. I'll post close up pics when we do that. Here are some pics of us painting it. The primer is the gray and we are painting it black. I finished painting it today and I'll put the boards, boxes, etc. on tomorrow. I'll be sure to get pics. then too! Yes, I am wearing a homemade Rev. War tricorn hat in that picture! Yes, I know that makes me weird! No, I don't care! -
-
-
-
I'm no gasser, but I would think you need some of the insulation that goes inside of gassers. It's some sort of fabric or something. I've used gas forges before and all the ones I've seen have the insulation/cloth stuff inside of em. I'm sure someone on here can give you the tech. name for the stuff!? I would think of you got some of that it would help keep the heat in. You might do an internet search for "gas forge insulation" or something to that effect. Anyway welcome aboard! Dave
-
Dave's demo trailer
FieryFurnace replied to FieryFurnace's topic in Blacksmithing, General Discussion
OK I'm the only one posting on this thread! Anyway, we put the primer on today and also a coat of paint. Boy was that air powered paint gun a trick to clean! And I have about a gallon of paint, thinner, and hardener on my hands and arms. You know, if I ever move to California I'm gona have cancer! (Back of all of those cans it says "known in the state of Cal. to cause cancer!) I hope to put coat number two on tomorrow, and after it dries, put the boards on. After that I have to mount the vice and I'll be DONE! I'll upload pics tomorrow evening! Dave -
Is that a Champion number 40 blower you have? I have a number 40 and it works great. If you fix that ash dump lid then you should be able to bring your heat up high. I'm working on a forge that will run off of my number 40 and it has a fire pot depth of 3 1/2 inches +-. I tend to like shallow pots! Blow easy at first. When I was using my number 40 blower I'd blow too hard and little red pieces of coal would land on my hands and dig wells! Don't wear sandles! Nice forge; Hammer away
-
Dave's demo trailer
FieryFurnace replied to FieryFurnace's topic in Blacksmithing, General Discussion
I finished the paint prep. today. After I finished the prep. work, I wiped everything down with mineral spirits twice. I took the tires back off to make it easier to paint. If the weather man is correct we will prime and put one coat of paint on tomorrow. Wednesday or Thursday we will put the final coat on, then finish cutting the planking boards, and bolt them to the floor when the paint drys. The vice will be mounted on a 4x4 post and the post will bolt to the side of the trailer when in use. I'll post pics of painting, tomorrow or Wednesday. Can't wait to fire it up!:D -
Easy-to-make Spring Fuller (no welding)
FieryFurnace replied to GNJC's topic in Tools, general discussion
I have hand held one made out of mild but it's real thick! And I don't use it real often so it's held up pretty well. I think it's 5/8 or a little bigger! I'm gona try to pick up some thicker mild and make one of those; it's a real trick to hold the steel, fuller, and hammer all at the same time. Like most hummans I only have 2 hands! ;) -
Dave's demo trailer
FieryFurnace replied to FieryFurnace's topic in Blacksmithing, General Discussion
Not much doin'. We are having another spell of bad weather so I can't get the trailer out of the barn. I have another wire wheel but more wires have come out of one side than the other! The result is a realy rough working wheel!!! I'm going to try to hit a couple of open spots with it and then it will be all small wheels and hand brushes. Fortunately I don't have hardly any of that though. I hope to finish the prep stuff tomorrow if I can get the generator to the barn to run the power tools. This weekend/early next week is supposed to warm back up and painting is schedualed for then. I still have to dismount my vice from my current table and figure out how to mount it on my trailer. The picture on the website that Mr. Eddie said to go on gave me at least some ideas on an easier way to mount the vice. I'll just post pics. of how I end up mounting it when I'm done; instead of trying to explane it!!! Anybody have any thoughts on mounting it please share them! Thoughts??? Thanks!!! Dave -
Dave's demo trailer
FieryFurnace replied to FieryFurnace's topic in Blacksmithing, General Discussion
I did a lot of paint prep. today after we welded the brackets onto the boxes and touched a space on the tongue we had forgotten. (The brackets on the boxes are inside on the bottom. They are angle iron and screws will run through the angle into the wooden trailer boards to hold the boxes on.) My goal of being finished by the 21st should with the Lord's help be easily attained! I'm hoping to finish the paint prep. tomorrow, but we have company so I don't how that will work. Updates soon! -
Dave's demo trailer
FieryFurnace replied to FieryFurnace's topic in Blacksmithing, General Discussion
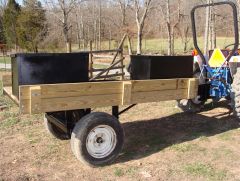
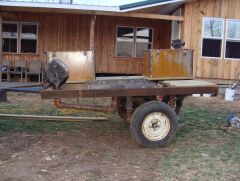
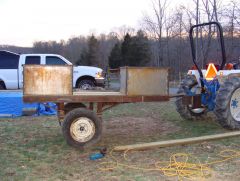
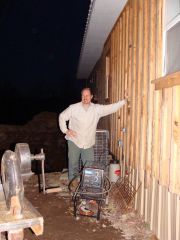
Here is the right side of the trailer. This is how it will look when finished, except that it will be painted! This is the left side of the trailer. The vice will be mounted on the back of the trailer after it is painted. Back view! The vice will be on the left. You might notice I'm missing a board in the middle; I have to rip that board so I don't have it up yet. As you can see I picked up some (used) tires/rims today! I think I mentioned it sometime, but the tire/rims, new, would've cost $120 A PIECE! NO! Not both, A PIECE! Well, I went to the junk yard and got the set, YES THE SET, for $60.oo TOTAL! The tires themselves are in fine shape with no dry rot or anything and the rims simply need a little TLC/P! The P meaning paint! I was kinda down under because I was rejected as a demonstrator at our biggest fest. this year; Bear on the Square, Dalonaga Ga. Somebody from John C Camble folk school has the blacksmith slot filled in already. I can still sell my work, just can't demo. However, my spirit was restored when I called an event I did last year and said I was the blacksmith, and the lady gave a sigh of releaf. Said she didn't know how to get in touch with me, but they were doing.............this year and she realy wants me there! -
-
-
-
What did you think of Eddie's shop? I've been to one OBG meeting (shortly before we moved) at his place. He demonstrated making rasp snakes and made me demo leaves! No pressure! Tell em I said hey next time you seem em! Dave
-
Dave's demo trailer
FieryFurnace replied to FieryFurnace's topic in Blacksmithing, General Discussion
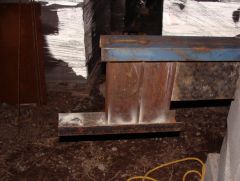
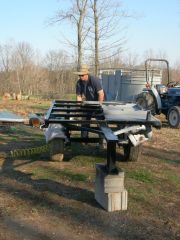
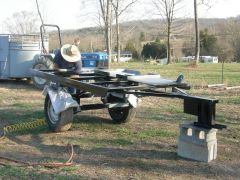
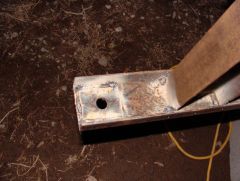
Here is the weighted ashe dump. The weight is about two foot of 1 x 1/4 flat bar rolled up into a lolly pop! A handle is also welded on as you can see. Here it is again opened! Here is the future tail light bracket. Happy welder (DAD) who is going to sleep well tonight. I was fortunate enough to be able to weld the air piping to where I don't need any rubber conectors or rigging. as of now the forge is READY to be fired up! I started cleaning the steel today and we hope to be able to get tires and move it into the barn Monday Lord willing. I'll finish steel prep and begin painting next week! I think the end of the following week is a reasonable goal to be done! I'm starting to get REALY excited now! As if I wasn't excited before!!! Sabre/Brandon, That's the way I am. I'll talk about a plan for a good while before I get to work doing it. Then it seems that after I get the "stuff" to do said project it's another good while before I actually start building or doing! Don't know that it' a realy good trait to have! I got to go clean the kitchen, finalize tomorrow's Sunday school lesson, and feed the dog! Not to mention sleep!!! -
Dave's demo trailer
FieryFurnace replied to FieryFurnace's topic in Blacksmithing, General Discussion
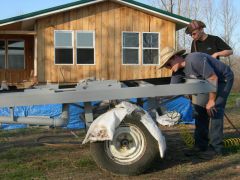
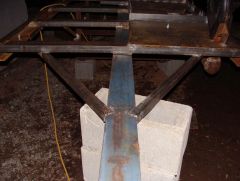
OK Picture time! We braced the axle off with some angle. Notice how we had to turn the trailer on it's side to weld. That was a trick! Ths is the completed tongue. We had to lower the tongue/tow point so that the trailer will tow level when hooked to the truck. In accordance with some advice given on chat and also a local trailer builder I braced the tongue with 1 1/4" angle iron. Here is the forge again with the "gates" that close the spaces left in the rim steel that goes around the forge. I welded some forged handles on the gates too. The back "gate" has a handle that is bent forward so I won't have to reach OVER the firepot to open and close it! -
-
-
-