
Nobody Special
-
Posts
1,606 -
Joined
-
Last visited
Content Type
Profiles
Forums
Articles
Gallery
Downloads
Events
Everything posted by Nobody Special
-
If you're talking about while forming, put the rod in a vice and do your work near the vice surface to minimize wiggle. If you're talking about still loose after formed, you can do several things. Let it set on that tray on bottom, you could put a pin through the bottom for the candle to sit on, you could rough the inside edges or make burrs to grip the rod/candle. Or after shaping, close the circle a tiny bit more so that it is fractionally smaller than the candle and the candle should push into it a little. Of course the last one only works if you consistantly use the same size candles. You could also form it around a tapered rod so that the bottom curl is smaller, giving the candle something to sit on, then gradually opening to the desired size.
-
Most of the bronzes I cast began to melt at around 1800, 1900 degrees, say the lower end of yellow, and was poured around 2200-2300. As soft as silicone bronze is, I'd stay well into the orange range or lower for forging. Maybe about a light red/dull orange to be safe. I have much less experience hot forging with it than casting or cold work. Try some and see, just know that if it gets to bright yellow, you're probably in danger of starting to melt it. Nice thing about silicon bronze is it's much safer than some of the "bronzes" containing stuff like zinc. Also, it feels a lot softer than what you'd be used to in steel, even worked cold.
-
For the curl on top, when you shape it, form it around a cold rod the same diameter as the candle. Like when you make a socket by shaping it over a mandrel or a drift.
-
Drewed, I haven't had anything turning orange with iron jewelry, what kind of finish are you using? Simple design, nice work, gundog
-
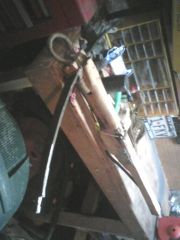 For the bow portion, or prod, I didn't forge this one, because two years ago, I wasn't good enough at heat treating to make a decent spring. I probably will on the next one, especially since I'd like to make one with more of a recurve. It's cut down and ground from a leaf spring. I did at least forge the trigger parts, but that was early into my forging. I also made a stirrup for it, and it cracked under stress (see, I told you I was bad at heat treating back then). The nut is a piece of hickory, with mild steel pins driven in where the trigger meets the pawl. I tried metal wedges, but they tended to come out or split the nut. They might have worked better with more pre-drilling before driving them in. I used some elements of earlier, primitive crossbows, like the lashing for the bow, and the tied in nut. Doing it again, would definitely add a proper lockplate with pins for the nut and maybe make a block to enclose most of the top. It was definitely the hardest part to make work right without slipping or breaking.
 -
Well, I did say over-simplified. Can't write an entire 20 pg thesis on a single forum post. I like lost foam method for a lot of things. Take insulating foam to make a form, bury in green sand in a cope, add gas vents, etc. And pour in the gate directly onto the foam. Burns out the foam as it takes its place. Heard that suzuki developed it while looking at different ways to make intake manifold parts. Also I have a cast aluminum hammer head I made as a kind of joke. It was from a melted down piston, and was just looking to make an ingot mold in a hurry. Pressed a hammer directly into wet sand.....and voila. Liked the look enough to finish it. It works fine on nails, but I don't really use it for fear of chipping it and having aluminum shrapnel flying off.
-
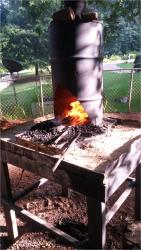
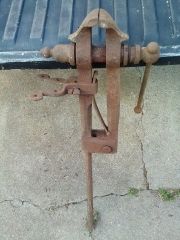
 A hunk of junk, but my hunk of rusted junk. On a cruddy makeshift stand I don't use anymore. That's the start of a spearhead on top. Old pic
 -
 A hunk of junk, but my hunk of rusted junk. On a cruddy makeshift stand I don't use anymore.
 -
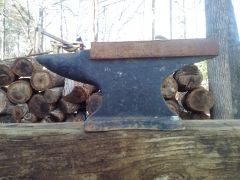
 A crossbow I made a couple of yrs ago from a piece of oak firewood and a leafspring. Rhettbarnheart wanted to look so posted here to show him. Only forged the trigger parts really. The plate in the middle is because I had to split the firewood to get a long enough stock. Next one will have more forged bits, maybe a proper saddle, and lockplate, etc. Hmmmm, sounds like an interesting project.
 -
A crossbow I made a couple of yrs ago from a piece of oak firewood and a leafspring. Rhettbarnheart wanted to look so posted here to show him. Only forged the trigger parts really. The plate in the middle is because I had to split the firewood to get a long enough stock. Next one will have more forged bits, maybe a proper saddle, and lockplate, etc. Hmmmm, sounds like an interesting project.
-
As a very, very short and oversimplified answer - Cast is easier to get the shape you want in a hurry, and produce a consistent crystal size throughout the metal. It also allows you to work in some metals that aren't normally forgable, such as cast iron which is hard, but ordinarily too brittle to forge due to high carbon content. Forging allows you to compact that crystalline structure, in order to create or manipulate a grain, which depending how it's done, gives it strength or flexibility. Besides that, it varies wildly from metal to metal and within differing alloys due to a number of physical and chemical differences. Look at the simple difference a tiny percentage of carbon, manganase, vanadium (or as a contaminant, potassium) makes in iron. Metals behave differently, because they are vastly different elements joined by a single common factor, sharing a "sea" of electrons, kinda similar, but not the same as covalent bonding. It's that bond that gives them defining properties as a metal, ductility, reflectiveness, etc. Heating adds energy that speeds up the movement of the electrons, which allows the atoms to move more easily when forged. For more specific answers, ask a real pro, or pick up a book on metallurgy. And try both if ya get the chance and someone to guide you. They're both useful and a lot of fun.
-
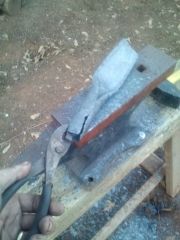
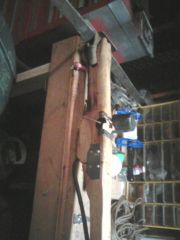
It followed me home..can I keep it? Got a deal for the area at $40. Needs taking apart with a little cleaning and grease, but I'm tickled pink. And I got a commission. Guy collects tools, and will take trade. Starting by making him a branding iron. Had anvil's at $1 a pound, and swages/hammers/punches etc. coming out his ear. The kind of thing that makes you a little sick that someone's taken so many good tools out of circulation, but still........... http://www.iforgeiron.com/gallery/image/37075-post-vice/
-
 It followed me home, can I keep it?
 -
Making a Hardie hot cut
Nobody Special replied to JMR's topic in Hot Cuts, Anvil devils, metal cutting on the anvil.
There's a nice video by Technicus Joe on this on youtube. Link is to first part of 3 on youtube. http://www.youtube.com/watch?v=qfC-MvxkVhE He's also on chat here sometimes about lunch time U.S. eastern time. -
Anvil stands wood vs metal?
Nobody Special replied to Everything Mac's topic in Stands for Anvils, Swage Blocks, etc
Personal preference. Just as long as it's stable and heavy. I like wood or a stump myself. -
Getting a handle on it.....
Nobody Special replied to Hilt and Hammer Workshop's topic in Hand Hammers
I've had good luck on all sorts of too with southern red oak. It takes a lot of abuse once it's dryed and hardened. I use it a lot because it's easy to get. Even the stock of that crossbow in my icon was made from a chunk of red oak firewood that had some time to season. One really good hardwood I've found for handles is pecan. It's very closely related to hickory. Very hard to split, cut, and shape, but once it's done it's one of the tougher woods I know short of something like locust or mesquite. (Don't make ANYTHING from mesquite by the way, unless you can afford the extra money for the sawblades and time re-sharpening your tools. The crookedness of the grain and hardness of the wood make it nasty to work with.) -
Bring a friend. Bring beer. Have friends bring beer. Don't drink said beer until said anvil is completely in place and stable. Failing that, use a cherry picker. and chains. Stabilize COMPLETELY, using bolts clamps, whatever before moving. Don't take a chance of having something the weight of an engine block slip and hurt you.
-
It's not the prettiest, but it's cool, well crafted, and I would be proud to own it, or have made it. If you change the handle, more of the red burl might be nice. The grain of the blade is nicely contrasted by the swirls in the wood grain.
-
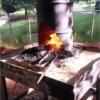
Interesting. I wonder what kind of results you would get with anthracite heating coal. Or if it would have enough of an updraft to even light well in a wood stove.
-
coal in georgia
Nobody Special replied to Rhettbarnhart's topic in Solid Fuels: Coal, Coke, Charcoal, Wood, etc
Huh? What? Where? You've got my attention. But............ I'm with Vaughn on this one, where are they located? No location or prices on their site. -
Well, think of it like this - if you're Galway, and you play in a world class orchestra, you probably won't be playing on a high school second knockoff of a suzuki or a yamaha instrument. You'll have the lovely gold, handtooled, custom built flute you require to make world class music. But if you want muck about and learn about making good music, the 100 dollar starter flute with leaky pads and a couple of bad springs that you got at the pawn shop'll probably serve ya just fine for a few years. If you want more of a hearth for a brake drum (and I like the shallower brake discs better), add something for a shell, and a little refractory or fireclay - an old grill, a lawnmower flipped over, or the ever classic 55 that Glenn designed. My first two knives (well, at my level then, more like letter openers) were made in a slit in the ground with a hairdryer blowing through a steel pipe over heating coal. I think my cost on the lawnmower forge I'm using now was about twenty bucks for pipe fittings, ten for a blower, (old hairdryer and rheostat), and about five or six bucks for the homemade refractory ingredients. You can always put about 30 bucks a month aside for blacksmithing tools, (like I'm saving for a post vice/better anvil, etc.) and if/when you get tired of the old brake drum, work your way up to a "proper" forge, then maybe even a brick and mortar type. That's about the cost of one good meal with a friend.
-
What is this thing?
Nobody Special replied to Bentiron1946's topic in Tools, ID, and pictorial reference
I THINK it's for planishing sheet metal. Shapes and smooths it. May have very fast hammer depending on type. -
making ali ingots
Nobody Special replied to grimme's topic in Smelting, Melting, Foundry, and Casting
Everything Glenn said, extra emphasis on finding a friend with a LOT of experience. Splashing metal from a mold or failed crucible HURTS. (Not that I'd know..........the scars have mostly faded, right?) That said, used to have good luck with casting ingots in green sand. In an absolute fix, wet play sand works too, to a point, but you end up with more particulate matter in the outside, and the outer surface is much rougher/more porous. You still want to find someone that's done this with green sand, (or play sand) so you learn to do this right, without getting flash burns from steam, metal spattering, etc. You can also (if you have a large enough container with water, preferably metal) pour it in slowly, with all ppe maxed out to make shot or streamers, but they're not regularly shaped. See above cautions. If your casting experience is limited, absolutely do not try without someone who's done it. I really wouldn't try some of the baking tray/muffin tin gimmicks I've seen. There's a number of problems with them, and even if it works, it can be next to impossible to free them from the mold after without wrecking it. Casting is like learning to play clarinet, any idiot with a plan can melt metal, but it takes years of practice and mentorship to become really good at it. -
What to do with Large Wine Jugs?
Nobody Special replied to CaptainBruno's topic in Blacksmithing, General Discussion
Well first ya take water, add honey and raisins, and bring to just below a simmer........... -
A Little Help from you guys that have been around the block
Nobody Special replied to jmccustomknives's topic in Knife Making
Look for it with uii instead of ull. Among other tidbits, it pops up that it's supposed to float, and i think the cap on the back of the handle comes off. Possibly threaded with a nut if that handle is hollow?