
Dogbyte
-
Posts
23 -
Joined
-
Last visited
-
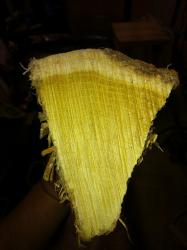
it doesnt take a great deal of time to dry hickory or other handle type woods from green all the way to workable moisture content. ~mid teens, and below even, 7 or 8% is attainable. 60 days from the stump it can be done with a home made hot box, powered by nothing more than low wattage light bulbs and a little shellac to prevent checking. like others have said, grain should more or less run the same direction the hammer or ax is in motion (both share the same plane), the wedge should also be oriented with the grain, not across it. On hickory, the outer layer wood is packed with growth rings. make a bunch of splits, shellac the ends (and the back if you debark), dry them out, cut to length, get a draw knife and/or hatchet, and go to town. :D of course there are many ways to go about it, this is just one way. this is some pignut hickory. some will be used as handles, some will be intended for use as bows...
-
i dont know anything about blacksmithing, but if you create a wedge or taper the ends and make them enter the wood more easily, you are more apt to split wood. if i dont want to split a board im about to drive a nail through, i dull the end of the nail, i want it to cut through the wood instead of wedging its way through, and maybe rub some wax on it if im close to a knot, or the wood is really dry, wet is better. I'd drill a pilot hole smaller than the spike, wax it up and drive it. Shouldnt have to taper the ends of the spikes for anything if you pre drill. Thats a small post to be driving a spike through, if you dont drill, make sure you drive it through the grain instead of WITH (or between) the grain. The spikes shouldnt ever pull out no more weight being hung on them like you mentioned. Will the beam be mounted horizontal? or vertical? If horizontal, i'd pay attention to how he mounts it to the wall, be better if its supported like a mantle, instead of bolted to the wall, again, depending upon the total weight he hangs on it. JMHO
-
i guess im gonna settle on it being GREEN as the name. at least that is supposed to be the name of a manufacturer. Ive looked at it til cross eyed, made etchings of it, but i guess GREEN is a good a guess as any.
-
yessir, i misunderstood someone explaining it to me, i didnt realize their hundred weight is 112lbs either. i finally got to beat on it a little today.
-
now that i look closer, it almost looks like it could be saying GOLDEN, and the O maybe looks like a wagon wheel, or an O with a cross in the middle. it weighs 93lbs, so maybe the middle number is a 4? and the heel weighed 21lbs? probably pretty close.
-
to me the middle number looks like a 5 or 3, because of that lower rounded portion, and the lateral straight line that you have in a 5 or the old style 3. it say 70lbs is very near the ball park. only thing i can think of picking up near that size is a bag of portland. i will weigh it later tonight.
-
hypothetical RR track question
Dogbyte replied to Dogbyte's topic in Anvils, Swage Blocks, and Mandrels
I believe Hanlon's Razor applies here. It wasnt intentional. :P -
cant make out the numbers, or letters. hard to get it to show on camera.
-
i literally asked almost everyone i have daily contact with, and it paid off. yeah, he said the things just been sittin in his wife's flower bed for years.
-
i'll know more when i get it this week, and im able to see it bettter, but is there anything i might be able to do for it with an angle grinder, to help dress it up, on the surface, ect...?
-
readin my mind. =P
-
although im not gonna keep it, since he says its been in his wifes family for 40-50 years, i am gonna see if its usable at least til i find a better one. sorry for the pics, these are the best i can do til i get the anvil and take better pics. its got part of it broke off, you guys take a look. right now since i have nothing, i figure this is better than that. and for no more than what i plan to do at first, i dont see why this wouldnt work.
-
hypothetical RR track question
Dogbyte replied to Dogbyte's topic in Anvils, Swage Blocks, and Mandrels
Hi Dan, yes i believe that will be the simplest way. i dont wanna let perfection be the enemy of the good, i just want to get started best i can, thanks. -
thanks guys. i found a blacksmith org here in arkansas, but their website isnt maintained, but from the look of the addresses of the officers listed, they are all from an area 3 or more hours away. still looking though. ive put an email to a local knife maker asking around to see if there are any in this area too. nice pics stephen, that looks like a lot of fun.
-
hypothetical RR track question
Dogbyte replied to Dogbyte's topic in Anvils, Swage Blocks, and Mandrels
i agree that it may just be easier, to mount like the far left pic, dress up the sides of the rail like the model on the far right, with the similar hardy hole config. i may could hew a good sized stump i have, and lag bolt the track vertically to the stump's hewed upright surface. if i take a case of beer to my buddy with a welder, i bet he can figure how to weld some cut sections of rail to the sides like in the far right pic, and then shape somehow...is there any danger of taking the temper away from the rail if you cut it with a torch ect? i know next to nothing about cutting up large pieces of metal and have them retain their purpose.