piglet_74
-
Posts
220 -
Joined
-
Last visited
Content Type
Profiles
Forums
Articles
Gallery
Downloads
Events
Everything posted by piglet_74
-
-
-

-
Ya know, I almost read it cover to cover on the website you linked. I found myself as interested in the mans thoughts about the time period as I was his conviction for sand as a flux!
-
Glad to hear it helped. I looked at their terms again and verified websites are OK for the cheap pics but if you wanted to use something as a logo for T-shirts that you sold or similar, it would be another story.
-
I've used some of the stock photo websites for some of that stuff. For a few dollars you can get some images royalty free. Just read the terms. For instance Photo: anvil Was the first hit from searching on blacksmith. I've bought photos from them before. I adjust them using GIMP and turn it into banners etc. I use fonts from font freak because they have a few hundred free TTFs.
-
Punch-Procedure's for Making a Punch
piglet_74 replied to Tom Lumpkins's topic in Slitters, Punches, Drifts, etc
Someone said on here once, run the colors a little further than you would think. Worst case you loose your edge or the punch deforms. Then re-heat treat and temper to a slightly lighter color. This way you don't loose material every time it breaks and you have to redo it. You only have to reshape an heat treat again. Rob. -
controlling and removing scale in a coal forge
piglet_74 replied to MADWORKS's topic in Blacksmithing, General Discussion
Here's one that lists a few good ideas. http://www.iforgeiron.com/forum/f11/hate-asking-scale-removal-8925/ -
controlling and removing scale in a coal forge
piglet_74 replied to MADWORKS's topic in Blacksmithing, General Discussion
I remember seeing a post about a deeper fire and putting the stock up higher in the fire. The idea was that more oxygen is consumed by the fire so it's a less oxidizing environment for the steel. I'll see if I can find the link though. -
Very Cool! I didn't notice any deviation, I'll have to look a little harder. How did you like the chain hold down?
-
Ahh thanks. I forgot that part. I'll have to use red and blue and see if those 3d glasses I've been hanging onto work. :rolleyes:
-
No I don't remember seeing them do that. They did seem to like filing though . Shelton was the striker and Steve had a hand hammer and they would pull the iron out and take a second to line things up then pound away. After they were done with one or two heats they would wipe or blow off the anvil. I didn't get any good pictures or Shelton's hawk head but it was pretty much the same process. Rob.
-
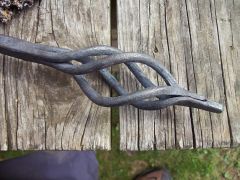
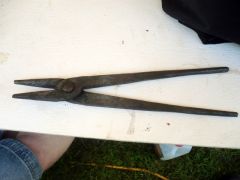
I was "Riveted" to my seat for two hours while two blacksmiths from Williamsburg forged out a pair of scroll tongs from a rock (bloom). The bloom was made onsite the day before. They worked the piece down from about the size of a softball or a bit bigger to a maybe 1" by 1/2" by 8" long bar. Then they forged the bits and bosses on the ends and cut it in half to draw out the reins. The first rivet was a little small so they cut the long rein down and used it as the rivet. It was amazing to see. One thing I noticed but felt too stupid to ask was why they never brushed anything. I don't think I saw them use a brush one time during any of the demos. I started thinking maybe they didn't do that back in the day. Any takers? (not trying to start a war) Rob.
-
Scroll Tongs make by Williamsburg Smiths at BSD 2009 BGCM
piglet_74 posted a gallery image in Member Galleries
-
Scroll Tongs make by Williamsburg Smiths at BSD 2009 BGCM
piglet_74 posted a gallery image in Member Galleries
-
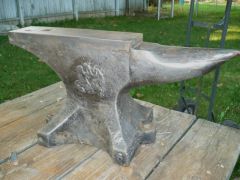
Thanks, yeah actually I didn't know she was getting it for me so I went and bought a 100lb Trenton a few months before. It had the serial number on the base and I liked the idea of knowing the age so I asked for the book from my wife. It turned out to be from 1924. It's almost like knowing the age puts a face on it or something in my mind I guess. unfortunately the Kohlswa only has the name and a faint marking. I may have to try Frosty's idea for anvil forensics. He mentioned using strong light from one steep angle and then the other and photoshop them together.
-
Do you have any pics of your anvil? If you can get any markings off of it I can look it up for you. The 18 may be part of the year. My mom knew I was into smithing and found an anvil for me for Christmas. She said it was pretty small like 50lbs but the guy she bought it from said it was good. When I saw it I realized it was a Kohlswa. I thought it a little heavy for 50lbs so I hopped on the bathroom scale with and without the anvil and it turned out to be about 70lbs. :-) Anyway, let me know and congrats on the find. Rob.
-
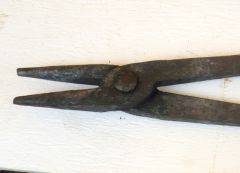
Cool, thanks. With those pictures I can see the boss much better. Also the 90 deg angles. They appear tapered. I think I saw that in a book once for making pintles. It made a pretty good corner without having to upset a lot of material to do it. Is this the same idea? Thanks again, Rob.
-
Quick question. I can't tell from the pictures but it appears the boss area is the same thickness throughout as opposed to being forged down in width. Is that the case and if so do you bend the reins and jaws to get them in alignment. TIA Rob.
-
Shop Talk. I have a delema. Kinda long
piglet_74 replied to Fe-Wood's topic in Blacksmithing, General Discussion
I have a friend who uses a Rotary converter. I played with it once when he first got it. Here are some examples. 3 Phase Converter Info It was a pretty neat unit. I couldn't tell if you had power or not at all out there. -
That's a really cool idea. Thanks. I ended up bending a 4 foot rod 10-12" up from the end and then tried to bend both in half to make 4 rods with a long piece for a handle. It did take some time to get things lined up. When I welded the rods to the 1/2" bar I actually didn't do a "drop the tongs" because I had the extra rod end but I did have to let go and pick up the hammer. I was amazed I didn't loose the whole thing into the grass. Using your idea I could do one hairpin and slide it down onto another hairpin with one long leg for a handle. I'm low on tongs right now but I have some jaws forged up. I just needed to learn to weld to get reins on them. Thanks again, Rob.
-
That actually leads me into another question. The welds where you cut partway through some stock and fold it over, I was wondering if you flux the two mating surfaces or if you clean them, fold them, then flux the outside of the whole thing. I've been toying with the idea of making a nail header by punching a slot 2-3" up a bar, then drift the hole open. Then cut and flop the end over the hole and weld it with a forge weld. Thanks in advance. rob.
-
Hmm Good point. I didn't think about that. When I welded the basket to the 1/2" I kind of took my time and was worried I was going to miss the opportunity. I don't like the condition of the metal at this point. I saw in the video Blacksmiths Primer that it's from the clinker. It didn't seem to want to clean up. Is there something that'll fix it or is it scrap? Thanks, Rob.
-
Finally tried to forge weld. It was a lot of fun. Mostly when it worked though I tried to make a basket and then weld it onto 1/2" stock and folded the end back to make a fire poker. I'm thinking 3/8ths next time. Anyway, first weld held up but as time went on the fire got dirtier. One of the pics shows a failed weld and the clinker I fished out. I've been saving coke for welding so next time I'm going to prep everything and then rebuild the fire with coke right before I weld. Hopefully that'll make them all stick. Rob.
-