
piglet_74
-
Posts
220 -
Joined
-
Last visited
Content Type
Profiles
Forums
Articles
Gallery
Downloads
Events
Everything posted by piglet_74
-
-
-
Ap man, thanks. My friends really enjoyed him. FrostyDivemike, double thanks!! I'm a little freaked about the linseed thing now. I have a pot of the mix about 1.5" deep that cooled into what looks like cold bacon fat. Is that stuff OK sitting around? A quick search on google seems to point to the rag insulating the oxidizing linseed oil and providing fuel for the fire. Thanks in advance, Rob.
-
Right on!!!... What are chasing chisels??? I'll look them up :-) We (the wife and I) did talk about decoration. She wanted to put little sports jerseys on them for friends favorite teams. The first one was supposed to be for her but a friends B-day came up first so she conceded. BTW made my first batch of BW, Linseed, Turp and Jap dry. Seemed to work pretty good. I was thinking about pouring into dixie cups for application in small batches as needed. What do other folks use? I am trying to get as much on the cloth as I can for just rubbing on the coating.
-
I finally had a chance to finish this last weekend. Didn't come out too bad I think. Legs were hard to make even so I think next time I'll bend them both at the same time, then splitt them apart.
-
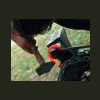
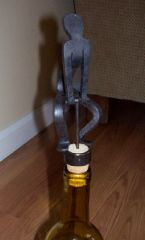 Man pulling out cork
 -
I don't know how many folks are familiar with the "thing a day" internet thing but basically for the month of February people create something each and every day and post it. While searching for slot punch pictures I ran across this Thing-a-day 2009
-
After you uncork a bottle of wine you put a tapered cork in its place until you're done with the bottle. It's easier to get in and out than the original cork. These guys will be welded to a small ring below their feet and then they'll be pulling up on a small corkscrew between their legs. It's a little bit of a departure from tab hooks for me.
-
Thanks. My wife loved them. Even more when I told her what they were for. They made me realize too that having only 3 pairs of tongs is not cutting it. I have a set of heavy flat jaw, a large bolt tong, and a smaller pair of long bit flat jaw tongs that I forged into small loop jaw tongs and then re-riveted. I can see why blacksmiths had so many of them hanging around.
-
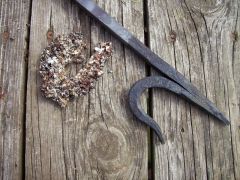
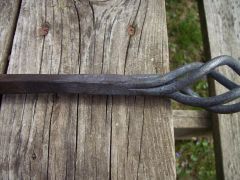
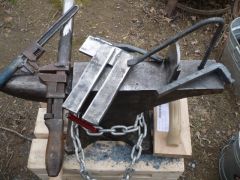
I decided to download and try to make the bottle stoppers in Blacksmiths Journal Issue 155. I made a slit chisel from and old chisel I found. I tried to harden and temper it and couldn't get a good read on how the colors were running. When I used it, the edge flattened as soon as it hit the cutting plate. So this time I hardened it and left it that way. I was using it and it was working well till the tip cracked in half. So I cut off the end and reforged the edge. This time I polished it up pretty good and ran the colors slower and it worked out pretty well. I used it for a while without it breaking or getting dull. I did however find it difficult to end the cut in the armpits etc. The second guy I decided to just use a hacksaw and it made it look cleaner. unfortunately his foot broke so I'll have to draw out that leg and try again. I hung on to the chisel frag. The grain structure was pretty cool. Anyway here's the start of them. Rob.
-
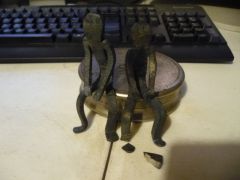 Blacksmiths Journal wine toppers.
 -
I was just at my first one a few weeks ago at our guild meeting. The way they did it was you gave them the iron and they would put a solo cup next to it. then you bought tickets say $1 for each. Then you could put as many in any cup as you wish. Later someone pulls the ticket for the winner of that cup/piece of iron. So the more you spend and the more you put in a cup the better odds you have.
-
My first one I put a left over piece of 1 1/2" square by about 10" long on the table. It was too big for me to do anything with but I'm sure someone with a power hammer had some fun.
-
Gerald, Thanks. I had no idea what they were called. I'll have to do a search now and take a look at some. Up till now I haven't run across any in my other searches of tools etc. BTW that gate is awesome. The horiz. member on the bottom looked like it took some work to go from the thick ends to the thinner middle section. Sorry about the chart Glenn. One thing you didn't mention yet Jeff but I thought was important was a good wire brush. I took everyones advice here and picked up a butcher block brush. The one I found has strips of steel pressed into the bottom that are real stiff. It's nice because it's 4"x9" and the handle is on the back. When I used a wire brush for welding, I would toast a finger here and there. I still find it interesting that my skin turns white-ish yellow and dry instead of red and blistered when I miss and come in contact Rob.
-
I've seen coil spring used. Here's a chart from anvilfire. Jock Dempsy has stated that no material from anvilfire can be copied and used on any other web site on the internet. The chart that was posted has been removed as it came from anvilfire. The chart BP0002 Junk Yard and Rail Road Steels was compiled by David Wilson of the North Texas Blacksmiths Association, and used on IForgeIron with his permission. These references for steels are only guide lines and may or may not be current with a manufactures choice of steels for a specific application.
-
That reminds me I wanted to make a punch for countersinking screws. I haven't looked to much into it but I think once you punch the hole you use a somewhat blunted center punch to counter sink it. I've seen that on a few pieces meant for mounting to wood. Might be the other way round though. The other thing is the blacksmith fastener website has square head lags that look good for mount stuff to wood.
-
I kind of started a post similar to this but I think folks missed the point of it. The best I can figure is once you have an idea of some basic operations that you want to perform. Find/make the tools needed for that operation. So for instance, I would rather hot cut than use my cutoff wheel for most things I do so that became a priority for me to make first. I like punching holes instead of drilling them so I grabbed a punch from the store but drilled some 3/8" plate full of holes to aid in punching. It also gets used for heading rivets since I want to make rivets instead of buy them. I like the look of twists so I welded a pipe onto the head of a flea market monkey wrench for twisting. I want to start making bigger holes next so my next job is making drifts. What types of things are you looking to make? Rob.
-
Minimum gear for a newb...
piglet_74 replied to piglet_74's topic in Blacksmithing, General Discussion
Spent today working on tooling. Welded some handles on twisting wrenches I had. Made a hot cut from a leaf spring that I got from the junk yard. A hold down from a coil spring. The L shaped piece is something I saw in a Bill Epps video that seemed to be very useful so I made one out of 1" x 1/2". The chopper,made from leaf also, needs a few holes for pivot bolts. Then I'm going to grind a square, angle, and necking spot on it. I still have a few more tools to make during my next free day and then I should be good for a little while. -
-
Minimum gear for a newb...
piglet_74 replied to piglet_74's topic in Blacksmithing, General Discussion
Ya that was kind of what I was thinking. I understand the thing about making tools and I think it's an important part of it. I guess what I was going for was like an essentials list, not bare essentials, but essential for the most common operations. This would be for someone getting started and wanting to make the most of their time. I think it came out of frustration the other day when I was trying to do something and had problems. I think hot cutting is a big one for me and if you don't use a hardy style then a plate to protect the anvil face and chisel would be the minimum. Then a good punch because after you make something it may need to be fastened. Anything that could be used for twisting would be good too. Oh ya... Fire tools. Shovel, rake, poker and water can. These are a few of the things I think having makes my time more enjoyable and effective and was wondering what other people would include. I probably didn't explain it right to start off. BTW Matt, surfing the flea market tables for usable old tools has now become a favorite of mine. Now if someone was getting rid of a thick copper plate at one of those ... Thanks, Rob. -
Good point. I let my nephew use the ball peen and some 1/4" sqr to play with. He had a blast. He mostly likes the fire though. :o
-
If this exists already, please delete... I'm thinking there's some minimum stuff someone should buy or make just to get started. I don't know if a top ten is the way to go or what but as a newb I find my self getting into problems when I try to do things. So if folks had some thoughts of what would be a minimum for a newb I would love to hear it. Assuming a large something to hit on and a hammer, what types of tools do I really need. Here's what I mean... I wanted to cut off some stock but I didn't make a hot cut hardy. I was making a scroll and needed to adjust it but didn't have forks. I was punching holes and had a punch and bolster so score! I tried to make a rivet and had a bolster/header but not a hot cut so fail. I did make a hold down and tried to use it once and realized the crotch method for punching works better. Oh ya, punches, drifts, and chisels. I understand it depends on the job etc... and at this point I know what I'm missing. But I'm thinking for someone just starting out, what few things should they make sure they have before even lighting the forge? Rob.
-
You guys are totally right. After arguing with the water heater today, I decided I was going to relax and play with some fire. The hammer just works right out if the box. I had a hard time leaving a mark in anything I hit. Very cool. I also tried to pay attention to my blows more. I tried to grip less firmly and start higher and let the hammer do its thing. This hammer seemed to make that easier to do. It didn't feel like I was going to miss when I started my swing shoulder or head high. BTW Jimbob, I think your right about the handle. It hit the anvil 3 or four times. I have to look into taking off a smidge. I made a better fire than normal today too. I had nice large pieces of coke making a "hive" and keeping everything nice and hot. I learned to crotch punch. I took some 1/2" sqr and punched a hole and drifted for 5/16 rod. Then I made a scroll on the 5/16 rod with a hole for a rivet and it lined up with the other hole in the 1/2". Hard to visualize. I'll post a pic if I get it together at some point. All in all a good day. Thanks again for the responses. Rob.
-
It all makes a lot of sense. I normally didn't use them until I got into this situation. I probably would have been OK with not choking up on the hammer so much too. My hand was about two inches from the head. Another thing I know I have to work on which you mention in your document is letting the hammer rebound and holding it too tightly. I think I need to try to take my time and use a few more heats if I need to. Right now I tense up and think I need to draw a taper on a 1/2" bar in one heat. Then do the rat tail on the second. So I tend to grip the hammer tight and force it down. At the same time I'm not comfortable using a high swing for fear of missing. I should take a heat, and using the proper swing, make few good blows and if I've lost my heat then go back into the fire instead of focusing on what I'm trying to make more than how I'm making it. Next time I get the forge going I'm going to have to make it a point to shift gears. thanks, Rob.
-
Having it as a reference is very valuable having just taken a class last year. Our booklet has tempering charts and internet links etc. Having it somewhere students can download it is also a great help in case they loose theirs. Ours had our projects in them and they gave the dimensions of stock to start with and different operations to perform like upsetting one end then drawing out the other etc. I was wondering about the glove on the hammer hand thing. Is that because it tires your hand more quickly or something else. I found that when I was working 1 1/2" x 1/4" flat, breaking the edge on the far side got my knuckles uncomfortably hot even with the glove. Also this past weekend we broke the edges on the 1 1/2" by 1 1/2" bar for the railing post. That was the same thing but it was pretty large stock for having only one week of forging experience under our belts.