

EricJergensen
-
Posts
206 -
Joined
-
Last visited
Content Type
Profiles
Forums
Articles
Gallery
Downloads
Events
Everything posted by EricJergensen
-
Greenbeast, No. Different fittings. Mine has a 5/8", 11 TPI "bolt", so the brush has a "nut" to match.
-
Greenbeast, Let me second what Fatfudd said above: angle grinders with wire cup or brush are very effective but a safety risk. I use a variable speed "sander/polisher" in exactly the same way but at a lower and safer RPM (still quite effective). Wire bristles will fly from time-to-time and slower means less penetration when they hit flesh. Eric
-

what's a reasonable amount of time to yellow heat?
EricJergensen replied to Adhamh's topic in Gas Forges
Thomas gave good advice. Another approach is to just see how it behaves in heat treating. Start by checking it with to a file. If it is hardened, the file won't bite into it, but will skate across. (Don't try very hard, you'll just dull your file.) Find some non-hardened metal to compare (some angle iron for instance). If it is hardened, can you anneal it? Heat it to orange and cool it as slowly as you can. I anneal in a 5 gal bucket of vermiculite (sold near potting soil). Leave it in for at least four hours. Check with file. If it is still hardened, you have some kind of air-hardening steel (examples: S-7, H13). Your best bet with this kind of steel is to not use it until you are more experienced ;-). But, you could go ahead and try. Cutting will be rough. It'll eat blades or take lots more hot cut work. Shape it, Grind it (filing will be nearly pointless, use a grinder). Use it. Don't quench it. Your main problem is that the hammering end is now too hard. You need to heat the hammering end to about 1300 degrees. Go for a dark-ish red. Air cool. Check with a file. Hopefully it'll feel softer (it won't ever be very soft like angle). If you go too hot, you've hardened it again. Hard hammering ends are dangerous: they can shatter. Hammering on metal is always a bit dangerous. Always wear protective gear (eyes and ears especially). On the other hand, if it is soft after annealing, now you can cut it will the hacksaw and go back to shaping it. Once you have the shape, anneal again. Then heat to orange and quench in canola oil (you'll need at least a half gallon). Temper to dark yellow. Better yet, read this http://www.bamsite.org/tips/heat.pdf All that said, my real advice is get known steel. If you need to go cheap, at least get something where you're kinda sure what it is. In your area of the country, you can consider sucker rod. You can probably get some 3/4" for $5-10 (they're 25' long, so it's a lot of tools ;-) ). You'll probably end up with 4130. You can water quench that and temper to a light yellow. (Actually, you can just throw them in the oven @ 400 for 45 minutes. I have a thrift-store toaster oven I use for that.) -
what's a reasonable amount of time to yellow heat?
EricJergensen replied to Adhamh's topic in Gas Forges
What kind of steel? If it's sucker rod, 5160, or similar, it will be harder to get thru at a given heat than plain hot rolled. Same thing applies to shaping it. It will be pretty hard to move. In any case, orange would be good enough for both. So, I suspect your wedge and screw driver approach. Go to the hack saw. (But make sure you don't quench the rod before you do. It'll eat up your saw blade. Let it air cool slowly.) My forge takes 3-4 minutes to heat up 3/4" from cold. The core temperature will not lag exterior by much. Given the small size of your forge, you may be losing a high percentage of your heat to the rest of the steel. It may heat much better when you have a hot-cut sized piece of metal. If you don't have tongs and want to leave the bar attached, just cut part way. Leave something like the equivalent of a 1/4" bar. That won't conduct heat nearly as much and leaves you a handle. Good luck. The "bootstrapping" phase can be frustrating. Best, Eric -
Yes, probably like 4140. And, after you've heated and worked it, it isn't very ETD anymore either. The composition specs at that URL above are almost exactly the same as 4140 at onlinemetals. Might have a few points more carbon. Range on the ETD is .39% to .48% instead of .38% to .43% but that's splitting hairs as far as blacksmithing goes.
-
Sure. Been done. Somebody linked to it on ifi a while back. Not terribly practical considering the size.
-
My wife got carpel tunnel from teaching with a chalk board. Her symptoms are contain simply by sleeping with wrist cuffs on (like the ones I use when I rollerblade). Don't know if that will help you, but here's hoping...
-
Yes, the more solid & heavy the base, the better. This is especially true for smaller anvils. (A 120lb anvil on a solid & heavy base is pretty nice for working with a 2.5lb hammer.) The rebound for a ball bearing dropped on the anvil depends mostly on the surface hardness (1/2" to 1" range). The rebound for a 2.5lb hammer swung by a smith is a different story. A 1" piece of hardened tool-steel plate sitting on a hay bale will bounce a ball bearing nicely. The 2.5lb hammer... not so much ;-). You need a lot of solid mass to avoid moving the whole mess. And, as you can image, hay isn't solid backing even if you have a 500lb bale.
-
Making hot cut hardy tools
EricJergensen replied to David R.'s topic in Hot Cuts, Anvil devils, metal cutting on the anvil.
Tool steel for at least the cutting edge. Many/most smiths don't heat treat since they'd pretty much lose most of the hardness from the hot stock being cut. Ideal tool steel is H13 or S7. Junkyard steels that may work include pavement breaker bits, axles, maybe spring steel. If you want to see a traditional approach to mild + steeled cutting edge, TechnicusJoe has a nifty set of three videos on Youtube. Video one is: -
The metal of the horn and heel do not contribute very effectively for work done on the main face of the anvil. So, your "hornless colonial" of the same weight would be somewhat more effective in that kind of work.
-
Go watch Daniel Lea My Forge on youtube: He's got what you describe (see about 1:38 in the vid). It seems to work. I'm with Frosty, tho on side-draft. Note: make the opening no bigger than the cross section of your ducting. You've got about 113 sq in to play with. Something about 10"x10" would work well. The reason for this is that you want a high velocity here to "pull in" the smoke. Eric
-
That's starting to look nice. Make two and send me one! I like the shift to side cut outs. Think about mounts for a hood. I use a "Super Sucker" side-draft hood. (google that, you'll find it). Even if you use this outside, having a hood with a 5' stack will help keep you from breathing nasty stuff. And, it means you don't have to be as concerned about being on the upwind side. Might save your life if you accidentally burn zinc off of something (galvanized stuff can kill). You'll like the slide out supports. You can always build some stand-alone ones later if you work with long / heavy stuff. Eric
-
Legs: 2"x2"x1/8" would be plenty (and go with just four legs, if the table needs more support just use the extra angle running along the underside of the table to stiffen it) cutouts: mine has cutouts on the side so I run long stock from side to side, not front to back. I have a hood at the back which would interfere. Remember that you don't just heat the ends of long stock. So, you need a cutout in the back or go to side cutouts. (Side cutouts are more common, since forges often back up to the wall or have a hood at the back.)
-
Comments and criticisms on my forge?
EricJergensen replied to m31desantis's topic in Solid Fuel Forges
Frosty: Yes, it dawned on me just recently that my inseam is the same as my anvil height because I hold stock between my legs (duh!). So, now I just ask my boy scouts what their inseam is when I want to know what height they will need for the anvil. The only problem is that most boy scouts don't buy their own clothes, so I have to ask their moms ;-). -
Cdworks: yes, in a long time. You'll likely clean off the oil long before it goes rancid. If you store it a long time (especially with moisture), it'll get a bit stale. You work with this like you would a cast iron dutch oven.
-
Made this today...
EricJergensen replied to Everything Mac's topic in Blacksmithing, General Discussion
Andy, Not sure about on your side of the pond, but here I can get 20 mule team borax at the grocer's or hardware store as a cleaning supply. Eric -
Safety glasses for forging...
EricJergensen replied to elkdoc's topic in Personal Protection Equipment
Both. Anything that is, say, 2000° F will emit the same spectrum of IR, light and UV. However, a furnace / forge is going to send a lot more to your eye because it will be a much higher % of your total field of view. -
How to make a weathervane?
EricJergensen replied to evfreek's topic in Blacksmithing, General Discussion
So, cold work the rivets to avoid burning off the primer? -
-
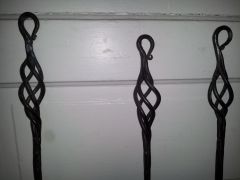
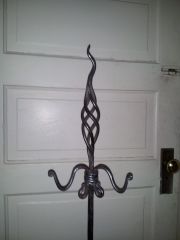 This is my favorite bit of the whole project!
 -
-
-
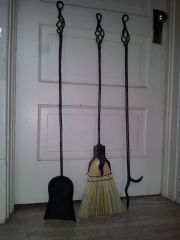
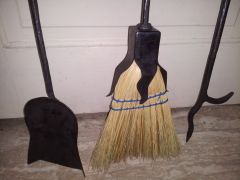 I call the broom a "whisk broom dressed for the prom". The shroud idea comes from Jock Dempsey. It gets great reviews. 16 ga sheet metal in a +, folded down and welded along the edges.
 -
-
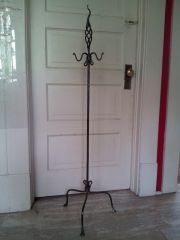
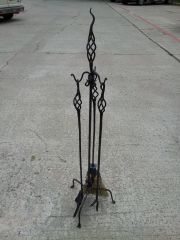
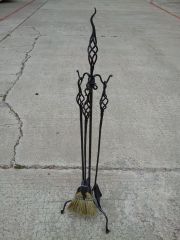 Firetool set completed 2013-5-5. My first large project. My first successful forge welds (and a few arc welds when the forge weld didn't get 100%). 50 hours or so and 150lbs of coal. The stand itself is the last piece done. It has the best faggot welds and basket twist. High-temp paint on the poker end and shovel. The rest is a combination of Johnson's paste wax (poker & shovel handle) and Krylon clear gloss coat. If I had it to do again, I would not use the paste wax (tended it cake in the tight spots and feels a bit tacky to the hand).