

EricJergensen
-
Posts
206 -
Joined
-
Last visited
Content Type
Profiles
Forums
Articles
Gallery
Downloads
Events
Everything posted by EricJergensen
-
Brass hammer is too hard. I don't have a wooden mallet, but a 12" leftover of 4"x4" against a stump works nicely (basically Gergely's suggestion). Use the wood long ways, that way you have mass behind the blow.
-
That looks really nice. 2 thoughts for you: You get less benefit from a 10" stove pipe when it is "squished" from circular. A 10" circle has an area of 78.5 sq in. An ellipse of 6 2/3" by 3" (identical circumference), for instance, is 62.8 sq in. I can't guess the dimensions of your exit, but it's probably actually an even smaller cross section to my ellipse. Your opening where the smoke is drawn in is 149.5 sq in. A typical design goal is to have the opening no bigger (in area) than the smallest cross section of your chimney. That keeps the draft velocity next to the smoke high to "suck" it in. A lazy draft may not pull smoke from the far side of the fire well and may fall behind temporarily when you add air to the fire.
-

tempering a splitting maul
EricJergensen replied to ranger225's topic in Heat Treating Knives, Blades etc
Ranger, Water quench is a pretty aggressive quench. There is basically no benefit to colder water. Water takes a great deal of energy (heat) to turn into steam. And, it conducts heat pretty well. Steam, on the other hand, doesn't take much heat to raise temperature and conducts heat poorly. Snow is not dense and immediately melts / steams away from the object and, having removed only a tiny bit of heat, is now not even touching the object. (Sorry, this movie trope tends to set us off here.) So, back to water. Did you swirl it around? I generally suggest a figure 8 pattern at about 1-2s per repetition. That helps you stay in contact with water, not the steam envelope you are creating. Did you quench it until cold? (Yes, you can use heat retained in the body to temper, but if you're trying to find out what 100% is...). A maul is pretty thick section relative to a hot slitting chisel, so the 10s ish that I use for a chisel wouldn't probably quite be enough to get full hardening. Non-magnetic is usually quoted as 1420°F. The ASME heat treating mobile app suggests 1580°F for hardening 1030. Too little heat will result in 0% hardening. One degree below austenitizing and you get no hardening at all. Too much heat makes for a less desirable grain, but you will get hardening. Not knowing what your metal is, I can't guess on cracking. Pretty hard to crack 1018. Still hard to crack 1045. If you really got it hot enough and it didn't harden, then you probably don't have enough carbon to crack. Given that you've done this with other mauls, I would suggest you just don't have much carbon in this one. If that is the case, it may simply be too little carbon to harden meaningfully. Super Quench as mentioned above (water with surfactants for improvement) is the fastest quench you can get cheaply. -
New Forge, black smoke, folly and success
EricJergensen replied to SRM's topic in Blacksmithing, General Discussion
Here is what I did with my firepot. Does make it a little awkward for raking coal into, but is great for working longer stock. Raises it basically 2" (as show by the square in the first image). http://www.iforgeiron.com/gallery/image/38062-2014-03-06-175747/ http://www.iforgeiron.com/gallery/image/38061-2014-03-06-175553/ http://www.iforgeiron.com/gallery/image/38060-2014-03-06-175508/ http://www.iforgeiron.com/gallery/image/38059-2014-03-06-175343/ FYI: the firepot is almost exactly 4" deep from the cutouts in the side to the opening at the bottom and that is exactly where the sweet spot of the fire ends up being. -
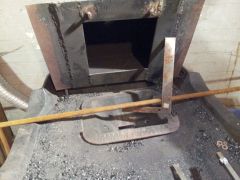 firepot height before collar
 -
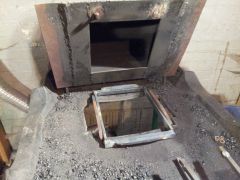 collar upside down
 -
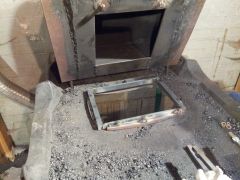 collar without firepot
 -
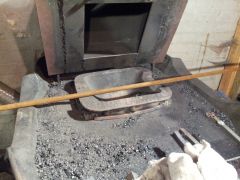 firepot with collar to raise it so the sweet spot is in line with the table cutouts
 -
New Forge, black smoke, folly and success
EricJergensen replied to SRM's topic in Blacksmithing, General Discussion
My forge is exactly that table. Mine also is on its second (or third or ...) firepot. It's a fairly nice table and will serve you well. Your firepot isn't great. From what I can see in the pictures, it's too boxy. It should slope to the opening at the bottom. The corners are just wasted space (and wasted coal). And, it may be *slightly* too deep (1" ish). Like mine, the firepot is too low for the table. This will not be a problem with small stock where you are heating the end of the stock or can lay it across the firepot down in the table. However, those side shelfs/cutouts in the table are so you can lay very long stock across it. That will currently result in the stock being so high above the fireball (described by Glenn above) that you will get almost no heat to the stock. I used my forge this way for 3 years, but recently built a collar to raise the firepot. I don't have pictures yet, but will soon. -
No smoke is good enough. Almost enough said, but... Two considerations: A side draft hood should have an opening no bigger than the chimney cross section. That way you get higher velocity (the chimney pulls the same volume, but when you widen the cross section that drops velocity). It "sucks" better. Looking at how your flame is operating, you're basically getting all your draft from the opening anyway. You could pull that hood off entirely and it would be about the same. Shrink that hood to just the dimensions of the chimney opening and you will get better performance (especially early on, when the cold chimney makes for a weak draft). The corner location is awkward for long stock. I have a fairly small "smithy", but my forge is in the middle of the wall and I can heat the middle of a 10'+ piece of stock.
-
You could also start with leafing hammer. Same procedures, but smaller project. Mark Aspery's Mastering the Fundamentals series volumes one and two detail building all of the punches, drifts etc.
-
IR reflector before mixing with water is very light. You could probably get it shipped reasonably. Wayne Coe sells some (google Wayne Coe blacksmith), might ship internationally. Also, pottery and glasswork face similar issues. Look for Kiln supplies and glass work supplies, you might find something.
-
Running low on mild steel
EricJergensen replied to rdennett's topic in Blacksmithing, General Discussion
Sucker rod is indeed really cheap metal for many. However, it's usually something like 4130. Usually stiffer than A36 and trickier to forge weld. The car parts Steve mentioned are medium to high carbon or high alloy parts. Plenty useful, but not generally in the low-carbon category. -
A little rich (i.e. yellow/orange), but only a little. So, the comment in the first paragraph is not saying to go all the way to a lean mixture. It's too rich, so make it a little leaner and it will only be a little rich.
-
Yeah, I've learned from a practical perspective: when I can see I've overheated the metal, stop the blast and leave it in the fire to cool down. Minimizes the O2 contact and how much grinding I'm gonna be in for ;-).
-
Consider using the stove pipe to get the exhaust gases away instead.
-
Trying to commercially make an anvil
EricJergensen replied to kawvalleysteel's topic in Anvils, Swage Blocks, and Mandrels
I would probably give you more for the rectangular block than I would for the cut out version! Some optimizations you could do: Cut them out as back-to-back T's with the alternating ones upside down. Actually, alternating trapezoids crossed with a T (i.e. T's with slanting ends to the crossbar part) would be the best use of your steel, if you want to try to get a horn and heel. Your horn is too broad. The top surface ought to be like a cone. I rarely use my horn as a "cone mandrel", so what's underneath could be left perhaps. Do *NOT* neck in the waist. That's just waste (unlike a cast or forged anvil, where the material doesn't go in a scrap bin). -
What is happening to the metal? Some kind of lattice change that only melting resolves? Can it become "burnt" in an inert atmosphere (is it oxidizing)? Does pure iron do it (or does it somehow involve the carbon)?
-
Yeah, if it doesn't look as white as it was originally in the visible range, it probably isn't as "white" in the IR range either...
-
Correction to the 1st paragraph in my previous post. I meant to say that 30% meant that the standard burner burned 77% of the propane that the hybrid burner did. That means that 23% of the propane that the hybrid would have burned is supposedly just wasted by the standard burner. My point is that this doesn't make sense. It seems implausible that any half-decent burner is throwing away 23% of the propane that some premium burner would burn. It's not that we don't care, but it is super difficult and super expensive to set up the experiment. Even if I do set up something that allows me to test one burner vs another, that only tells me about those two specific instances of the burner. If I want to know something about whether brand X typically outperforms brand Y and by how much, I need a large random sample of each brand of burner. 30 would be a minimum. Then what about testing a range of outputs? In wind? Each individual experiment answers one very specific question, so it would take tons of individual experiments to get a good picture. Or, perhaps all you want to do is know how your forge works. Well, that's easier. Build your forge. Buy a set of burners from several manufacturers. Install a set. Fiddle with it until it holds your forge at, say, 2400°F and then see how much propane it burns in a hour (doing absolutely nothing with the forge in a room carefully maintained at 78°F with no breezes and a constant level of O2). Now do the same for each of the other sets. But, I think you'll find fairly minor differences. The real payback is in stopping heat loss. Thicker/better insulation. Better IR coat. (Frosty, I think, noted that the performance of a fresh coat of ITC-100 is much better than an old coat.) Better enclosure (maybe options to open it up at need, but keep it to the minimum exhaust size usually). Recuperative forge. Or, make a natural gas powered blown burner. Much cheaper fuel per BTU. To answer your question about calculating savings: assume some amount of consumption reduction and then just take that off of you're cost of propane. If you can save 5% in consumption (my intuition here is that's pretty big savings for one burner vs another) on 100lbs of propane, that's close to $5 each tank (about $1/lb so $100 per tank times .05). If you use 100lbs per week, 50 weeks a year: $250 per year. I suspect very few folk use anything like 100lbs a week every week. But, maybe somebody else can offer guidance here. I have yet to spend $100 on propane, total, since I usually use coal.
-
I doubt those claimed numbers have been rigorously established. Do they define their test setup? They're basically saying that their standard burner burns 77% less of the propane going into it. Efficiency comes down to this: do you burn all the propane? For naturally aspirated burners, it basically comes down to mixing efficiency. If you get "complete" mixing of the optimal ratio of air and propane, you've gotten all the efficiency you can get. (You've got to get that mixture at the nozzle so the propane can burn before it gets too diffuse to combust. It won't burn well later, when spread out with all the waste gasses.) I doubt any of those burners you listed really is 30% more efficient than the "worst" burner at their respective optimal fuel consumption. Most of the difference probably comes down to operating range: the "best" ones can operate near their peak efficiency over a wider range of fuel consumption. Note: most people don't try to run burners at peak efficiency. They want a slight excess of propane to cut down on excess O2, so they don't scale the metal as much. If you hit 100% efficiency, there will be no dragon's breath. On the other hand, roughly 80% of the air you use in combustion is inert (almost all of that 80% is nitrogen). So, you do waste quite a bit of heat on bringing that up to forge temperature (and then lose it as exhaust). A recuperative forge uses exhaust gases to preheat the air (and usually propane as well) getting some of that lost heat back. That's not an option if your forge is very open. (And, you must use waste heat, I've seen designs that actually end up using forge heat instead of exhaust heat. That's a net efficiency loss.) All that said, if you burn a lot of propane, you'll eventually make up the burner cost increase even if it's only a 10% improvement. Also, you would get much more benefit from being as enclosed as possible (given the stock and enough opening that you don't end up with back-pressure on your burner).
-
The key is only heating the working end to the hardening temperature after you anneal. That way the struck end does not harden. You could just put the struck end in your vice and leave it until it cools (what Rich said). Temper right after it cools. Two tempering sequences is recommended. 1) forge 2) anneal (in the kiln) 3) grind, file, etc 4) harden working end 5) temper
-
Yeah, propane (& methane) have a flash temperature of about 1000 deg F. Not sure there is anything to try. Probably works better for glass, since they don't need as high a working temperature. The combustion gases cool the burner block enough for a kiln, maybe not so much a forge.
-
help me spend my money
EricJergensen replied to Pug}{maN's topic in Anvils, Swage Blocks, and Mandrels
Not sure the 120# Titan is enough bigger than your Fisher (about the same weight, but difference face shape). I work on a 120# Wilkinson. My plan is to save up until I can get something in the 250# range. My drool list includes Rhino (Incandescent Ironworks), Fontanini, and Nimba. I try not to think about Refflinghaus, but if money were no object... -
The color of fire
EricJergensen replied to Francis Trez Cole's topic in Blacksmithing, General Discussion
Incandescence is always the same color regardless of the material: iron, copper, soot particles, etc. That's why Francis Trez Cole's chart above about fire temperature (i.e. incandescent soot particles) looks very familiar. That's also why a coal fire with gentle air blast is a decent reference color for welding heat. It's a 2200°F-ish flame and when the incandescent steel is the same temperature as the incandescent soot it's exactly the same color.