RogueRugger
Members
-
Joined
-
Last visited
Everything posted by RogueRugger
-
-
Clare, did you get anywhere in finding plans, etc. ? Dave
-
Your family is in our thoughts Thomas. dave
-
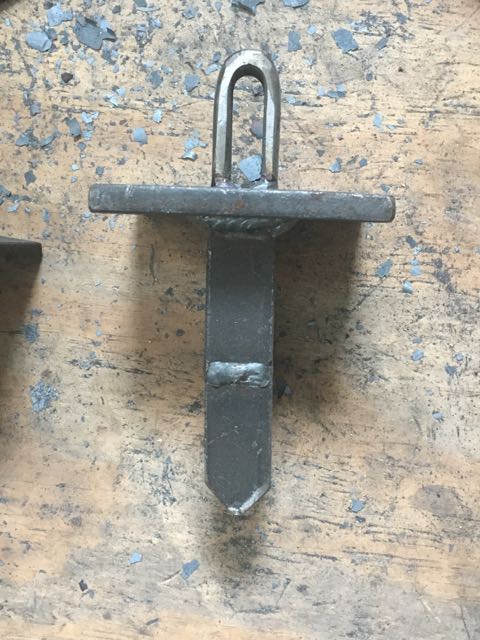
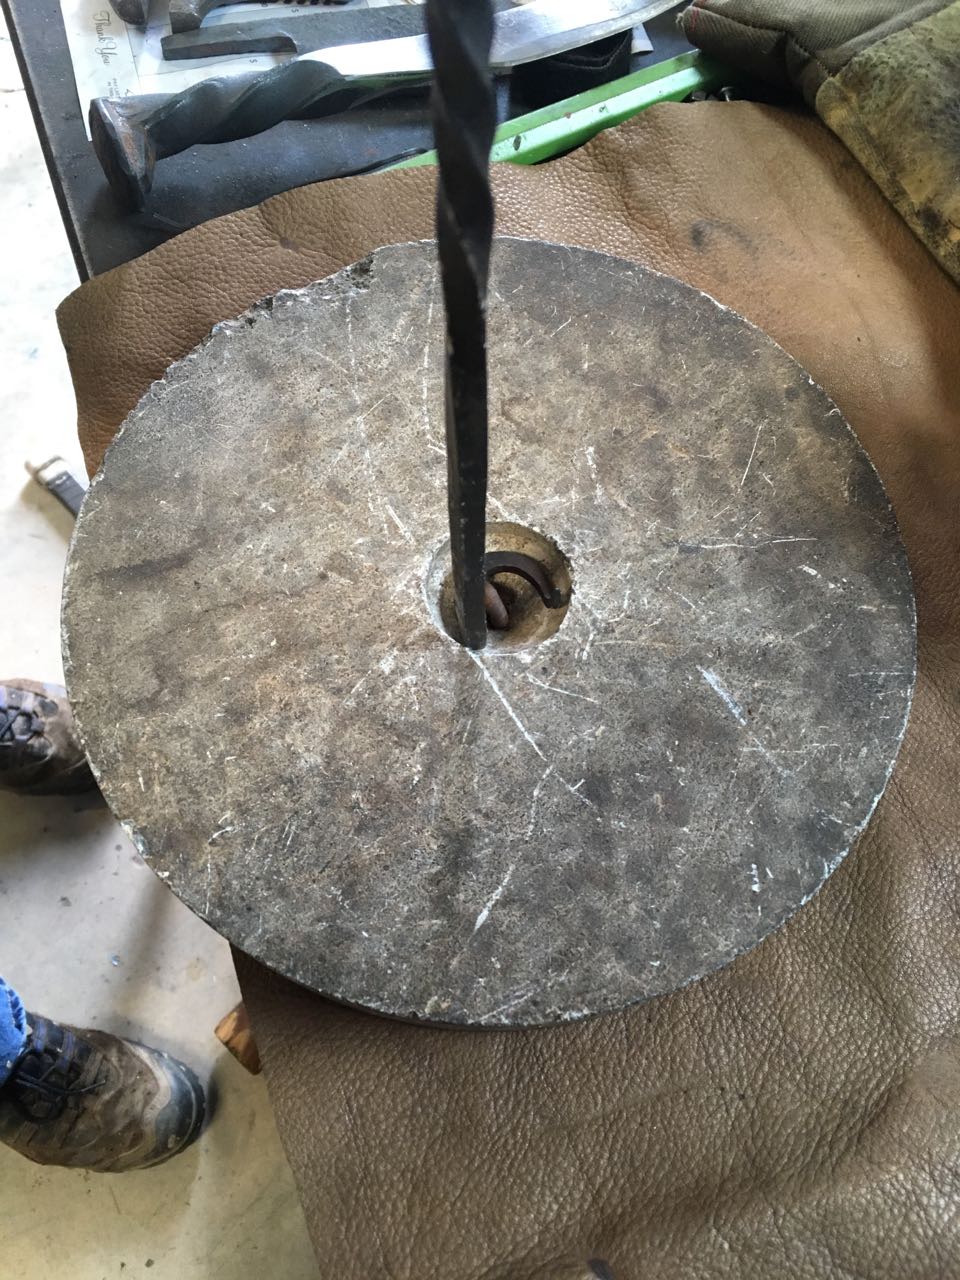
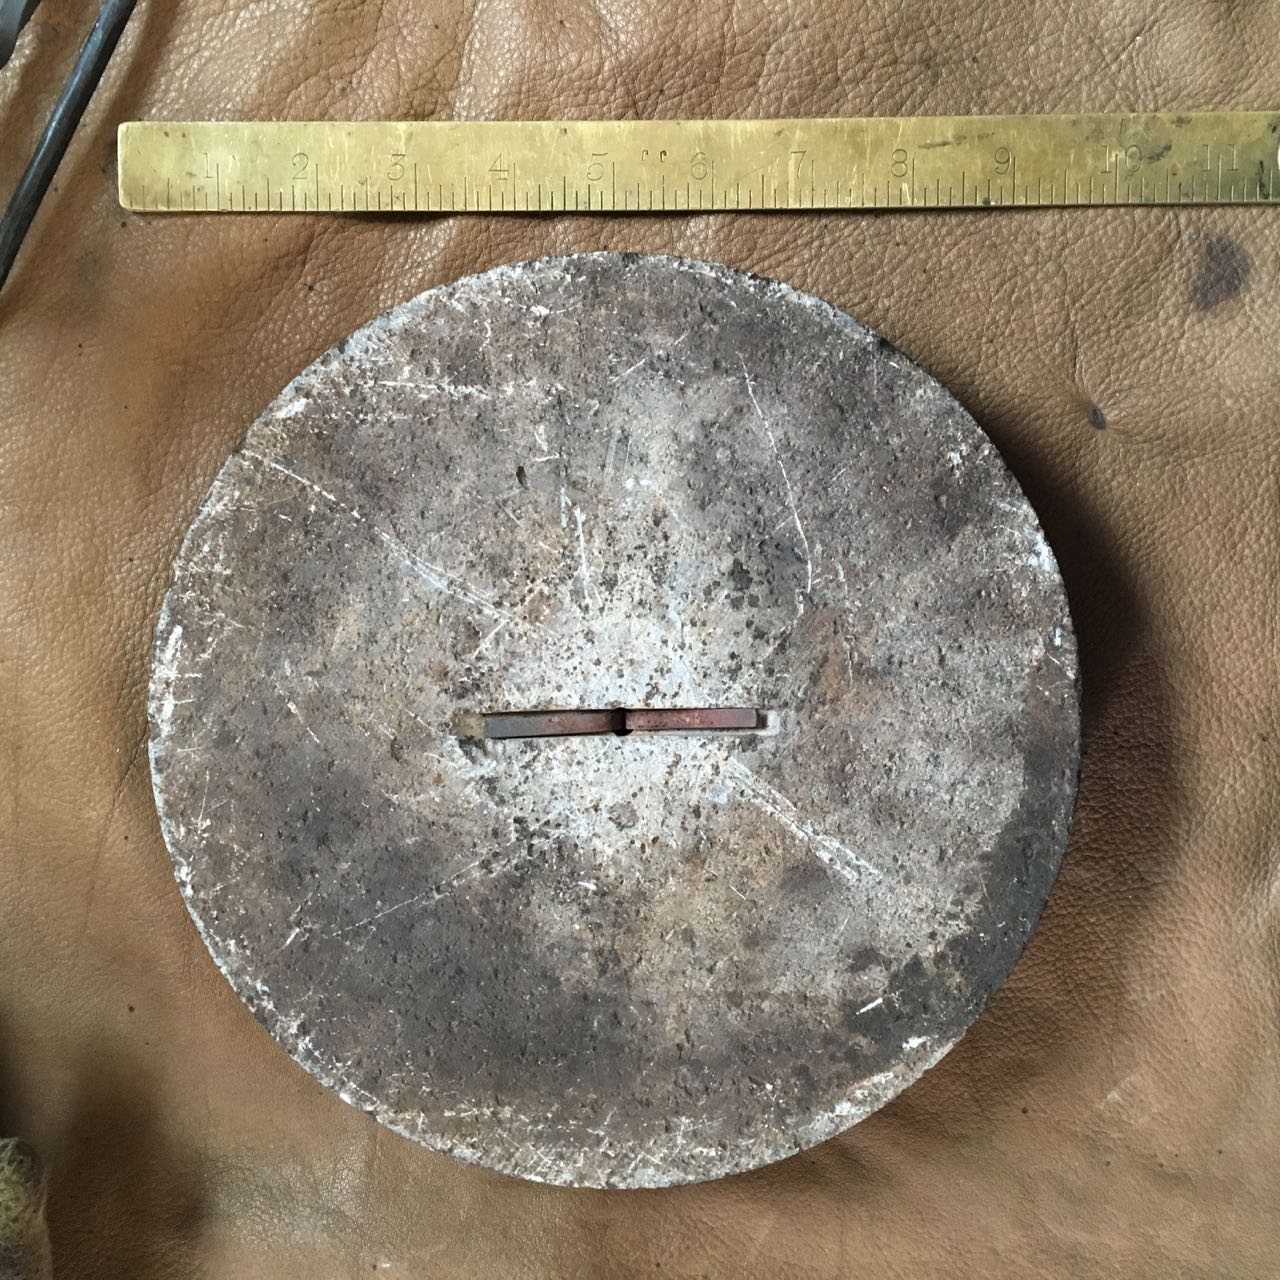
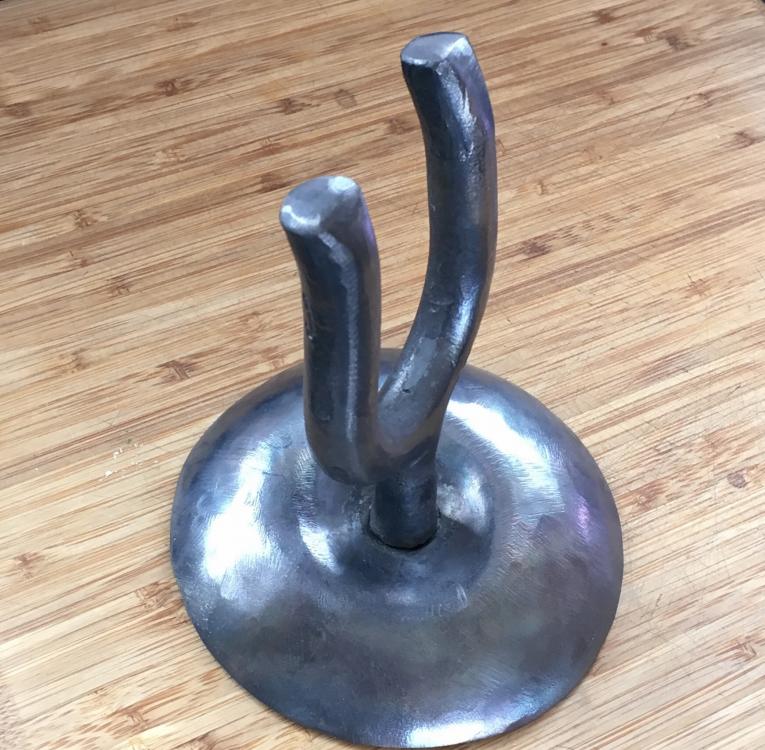
This is a cooking stone used for chuckwagon cooking around the turn of the century. The stones were heated in the campfire and then placed in a metal lined oak box, just bigger than the diameter of the stone. One stone went on the bottom, then the pot, then another stone on top. The cover on the box was latched down and the meal cooked as the cattle drive moved to the next location. I've been asked to forge a new tool to replace the missing hook. A design similar to a steak turner almost works, but because the box is narrow, the hook has to be slightly different shape. It's easy enough to make something that works, but I'd like it to be as close a reproduction as possible. Anyone seen one of these before? Thanks in advance, Dave Disclaimer: All of the info here is based on a discussion with the customer.


-
Thanks for all the suggestions. I probably should have mad early it clearer, but these are for inside the house. The search for such indoor barn door hardware was less successful than Mr Powers. Edit: I did find someone who sells just the wheels. Thanks again for the pointers.
-
I'm putting together a set of barn doors for my house. Currently have no clue where to purchase the wheels. Any one have any suggestions? Thanks, Dave
-
An update: spent a bit more and bought a Grizzly- nothing but regrets. Press came complety loose inside shipping box- as in no packing materials. No manuals. Chuck had been banged up pretty bad on receiver end. Laser light didn't work. They sent a new manual - for an old version of the press and not applicable to the new model. Promised a new manual - still waiting. Laser centering didn't work. They sent a new laser, but without manuals it was impossible to determine how to access. Support provided some help, but required disassembly of entire upper pulley system. Still haven't been able to remove all the pulleys. Still have to try and fix chuck. Piece of crap and lousy support from Gizzly.
-
Finally decided to spend a few dollars [~$300] and get a floor stand drill press. Mostly for mild steel, 1/2" holes. Haven't found anything used within driving distance. Any opinions on the drill presses available from any of the Big Box stores ? (Going to Albuquerque later this week and thought I'd shop around a bit.) Thanks, Dave
-
Wife came back from town to find a large cougar sitting in my shop door watching me bang away. I was completely oblivious.
-
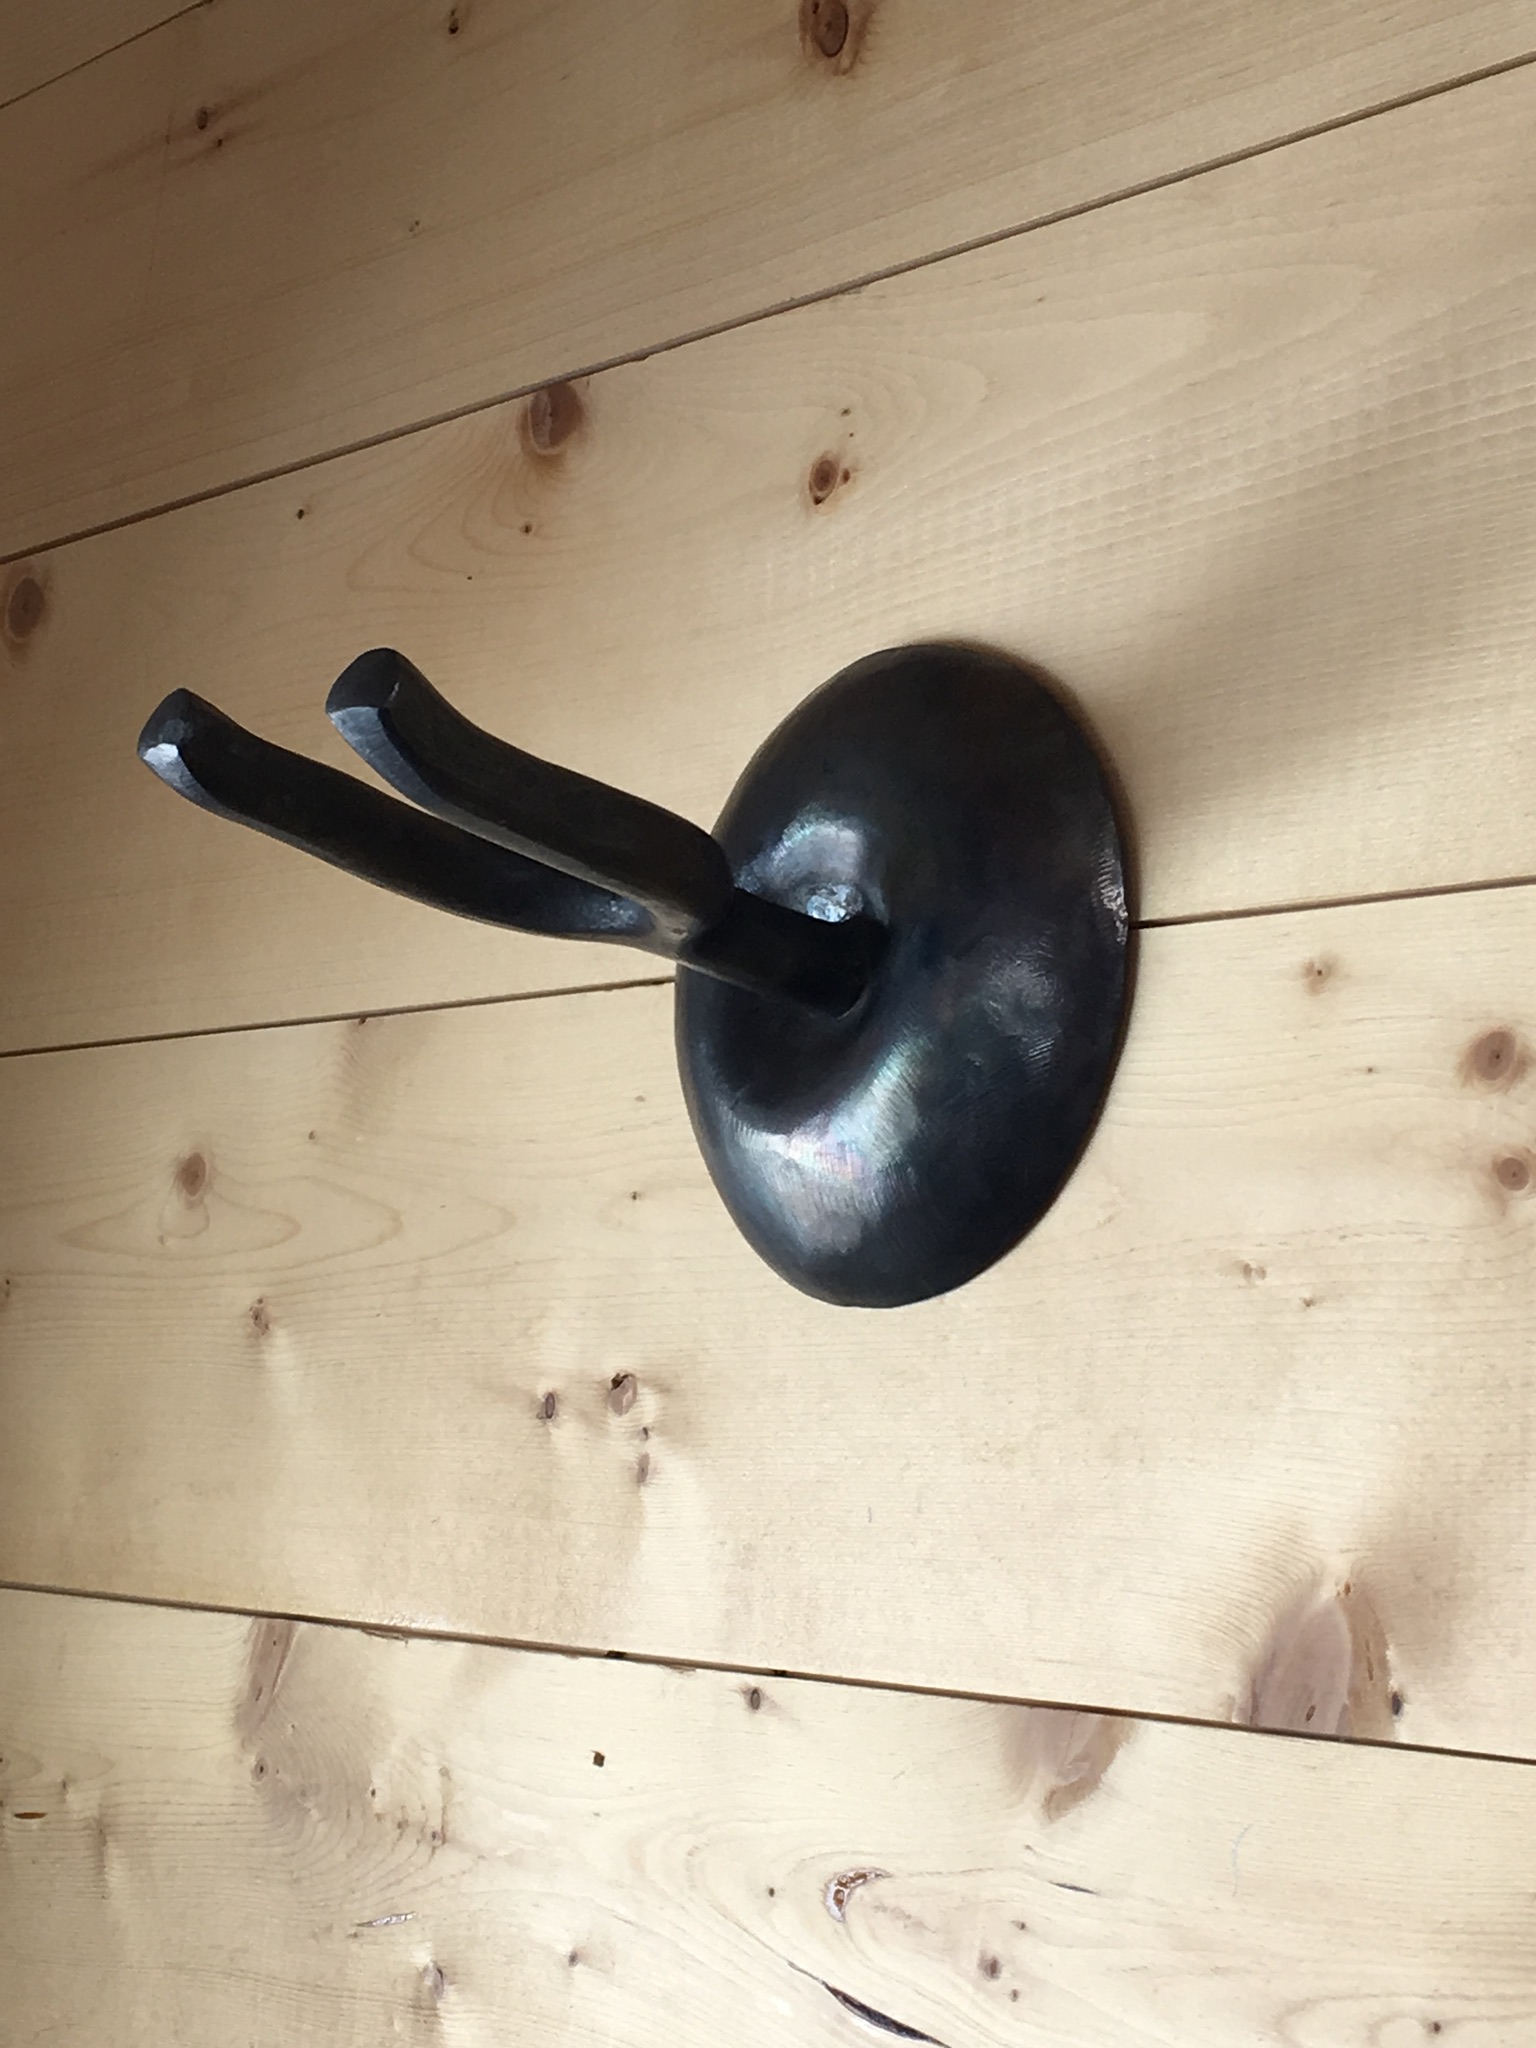
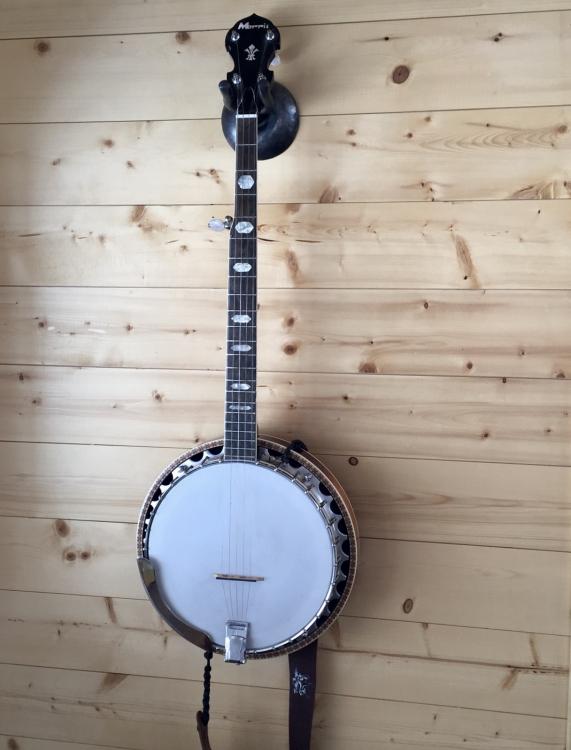
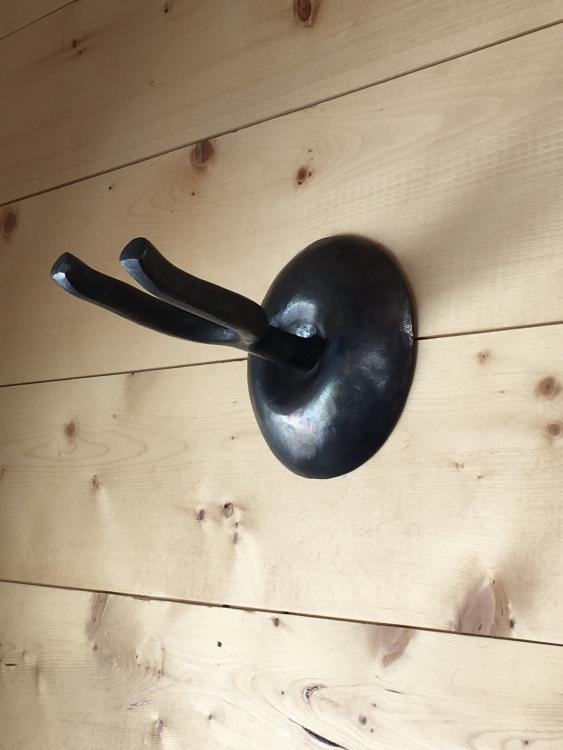
@rockstar.esq Thanks for the great suggestions. I decided to go with leather since it looks better than the rubber tubing. The wall bracket I put in will hold 240+ lbs; I actually did a pull-up using a dish towel hung from the hook. My banjo is sorta mid-priced but I'm not anxious to get another right now. The way the current backplate is hung, it is self centering, much the same way expensive pictures are hung. FWIW the next back plate will be mounted with (at least) two screws thru the plate. I'm not quite sure I have seen the mounting system you describe, but it might work for the next iteration; a pic or reference would be awesome. The next iteration is also supposed to swivel at the u-joint. I am a little unsure if I can get the tenon and drifted hole smooth enough. Maybe a black teflon washer as a spacer between the post and the u-bracket is all I'll need. Thanks again for the compliment and the suggestions!
-
Thanks. This one has a simple ring electric welded to the back (left over cabinet pull) that hangs from a wall hook.
-
Just a quick prototype of a wall hanger for my banjo. I was curious about how thick the back plate material needed to be, the diameter of the hanger posts, etc. The initial design seems to work fine (I did add leather pads on the hanger).
-
I currently follow most of the advice that Glenn provided. However, when I used to have to deal with the various self inflated egos of generals and politicians I used a product called 'Gloves in a Bottle'. I bought it in art supply stores where it is used by artists who work in graphite, etc. A quick web search revealed that it's now sold by everyone and their brother. Worked pretty good for me (in conjunction with the cleaning advice that others have provided). ....Dave
-
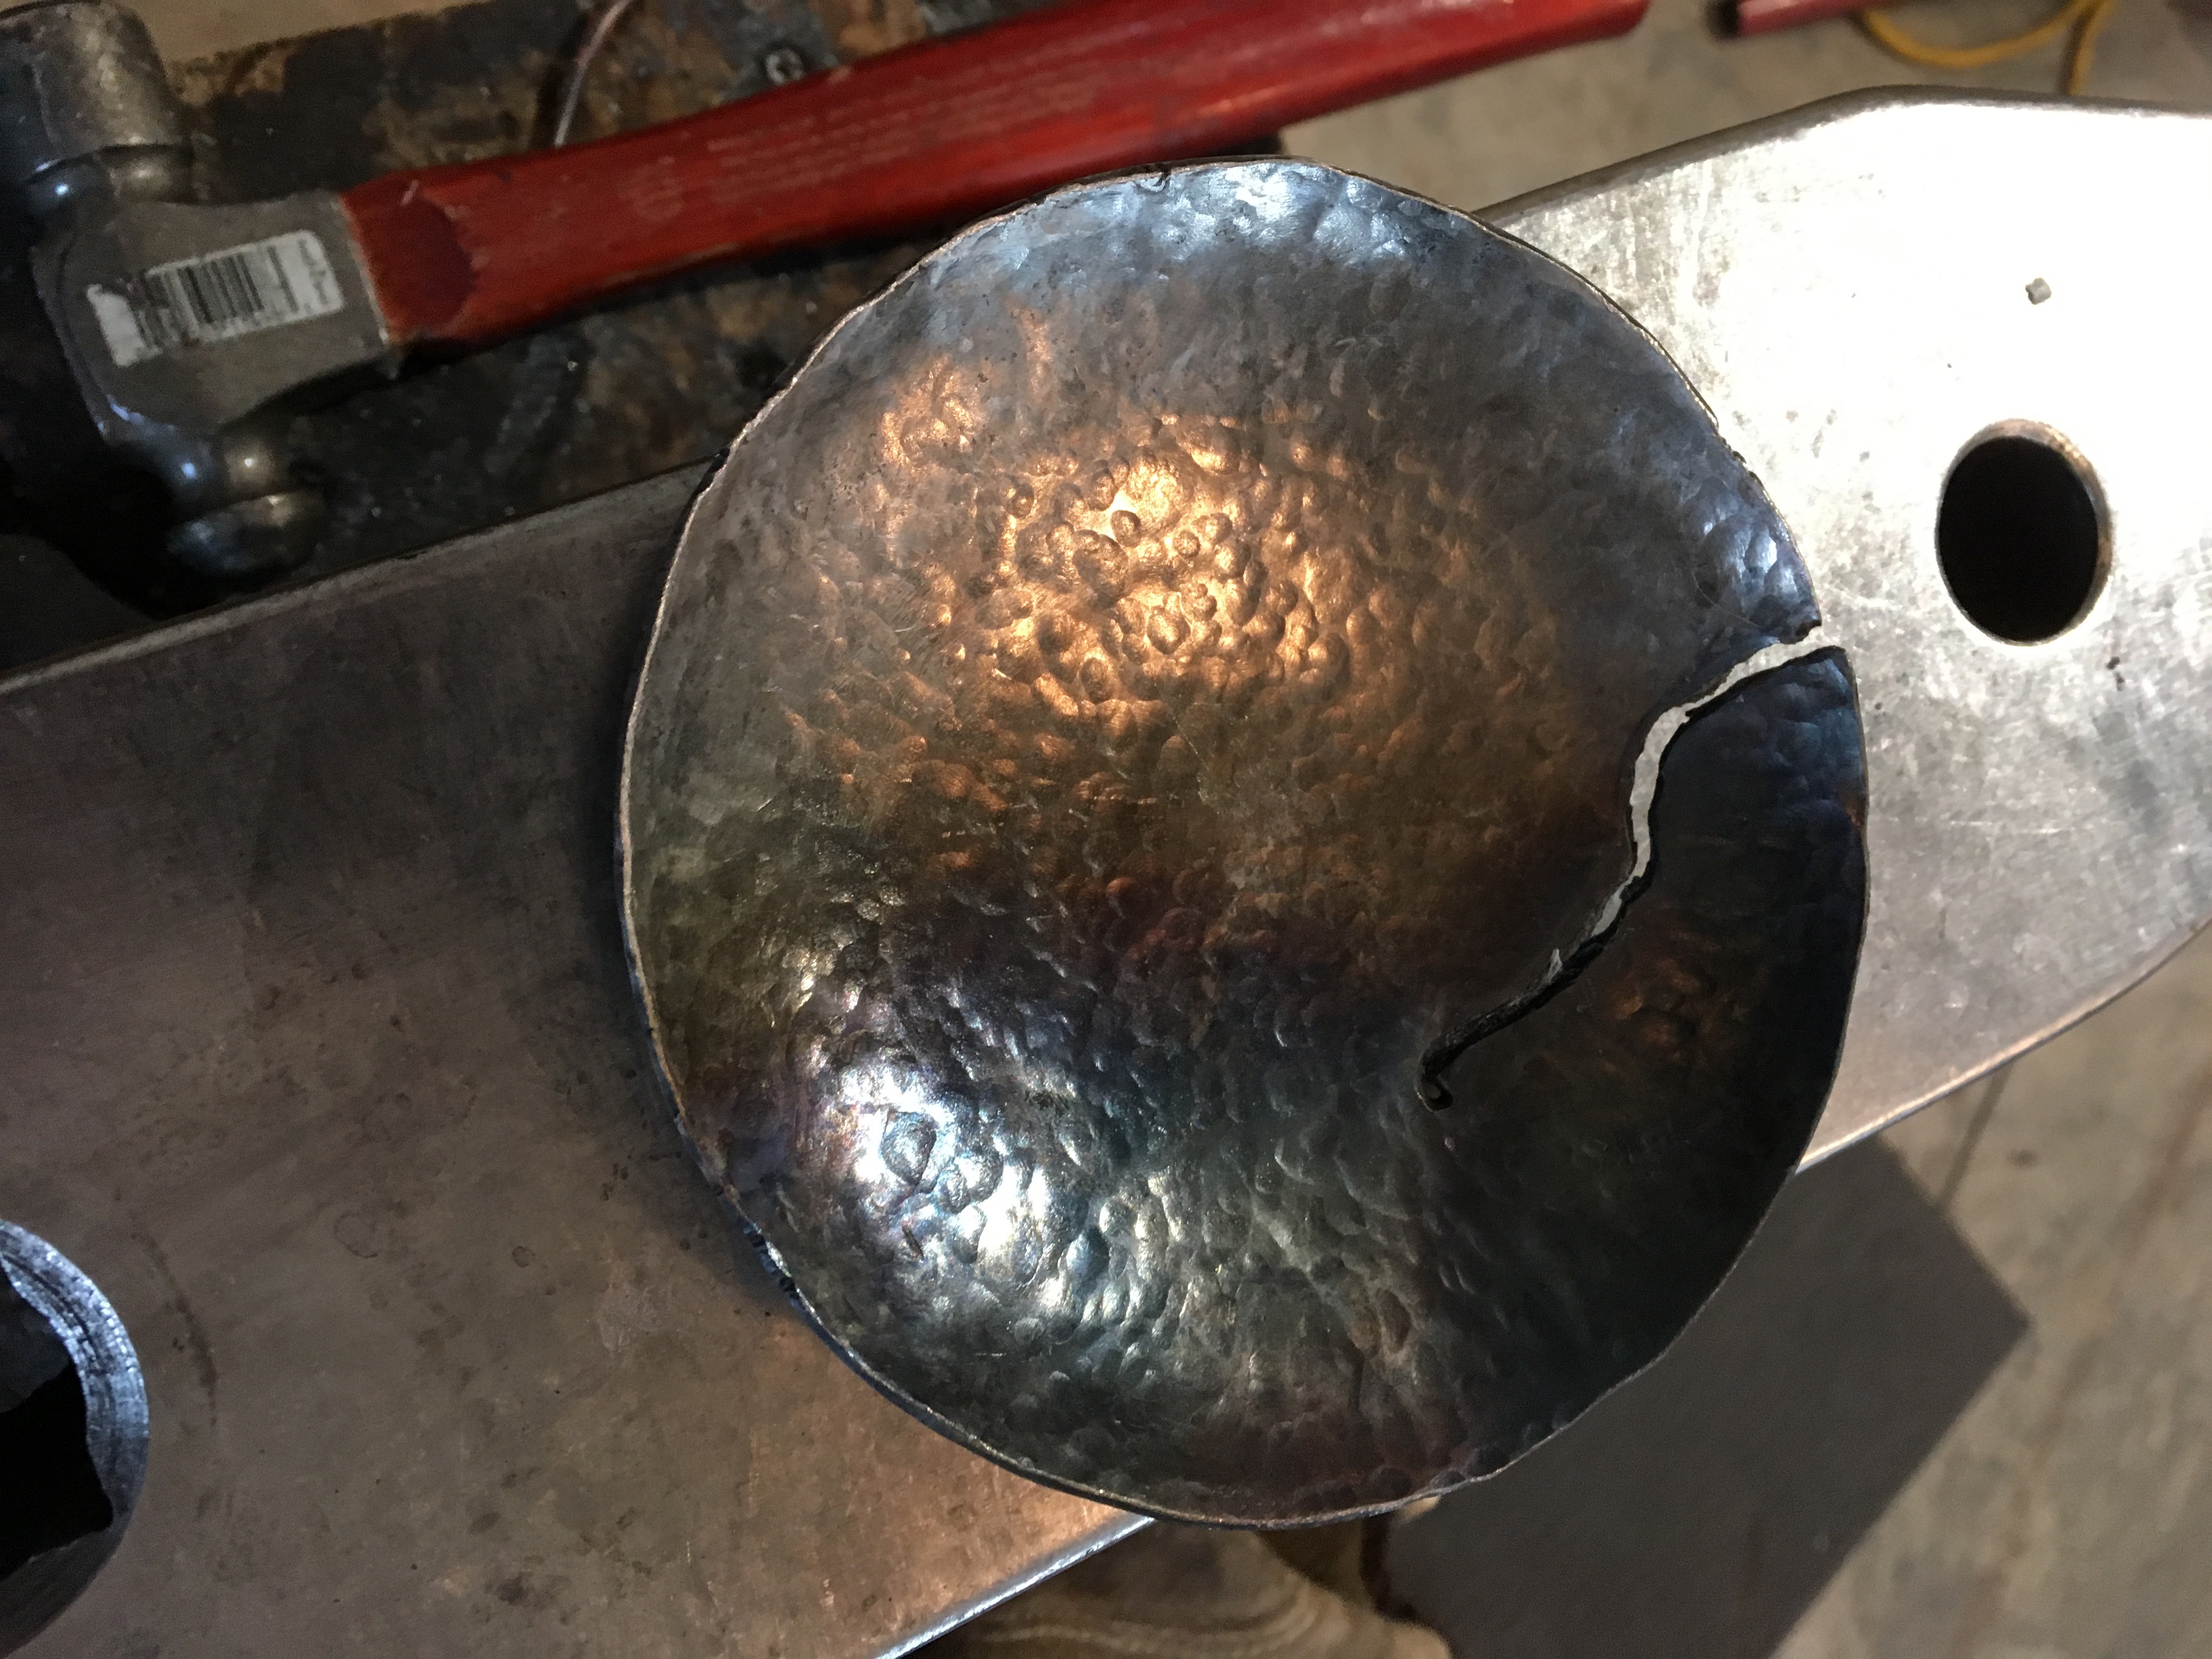
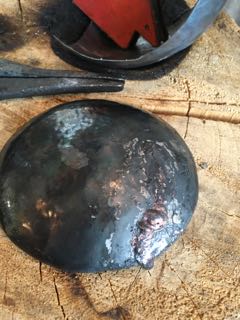
Okay, last post on this thread. Attached is the latest adventure - this involved the use of pewter as a fill. The fill went fine, but the contrast is not what i had hoped for. For reference, this is 11g, mild steel about 3in square - just a sample piece that can be used as a candle holder or something equally mundane. The piece was normalized and wire brushed. An old piece of dinnerware was melted and dribbled into crack. After some cleanup, the piece was warmed and something like Renaissance black wax (forgot the actual name) was rubbed on. Unfortunately, the pewter preferentially took the wax and I ended up with the dark crack instead of the silver/gray contrast I was hoping for. Sigh. Going to hold off any more experiments for now. May try the tin that Smoothbore suggested or possible copper powder...but not until i catch up on a bunch of other stuff around the house. Thanks again for all the suggestions. Dave
-
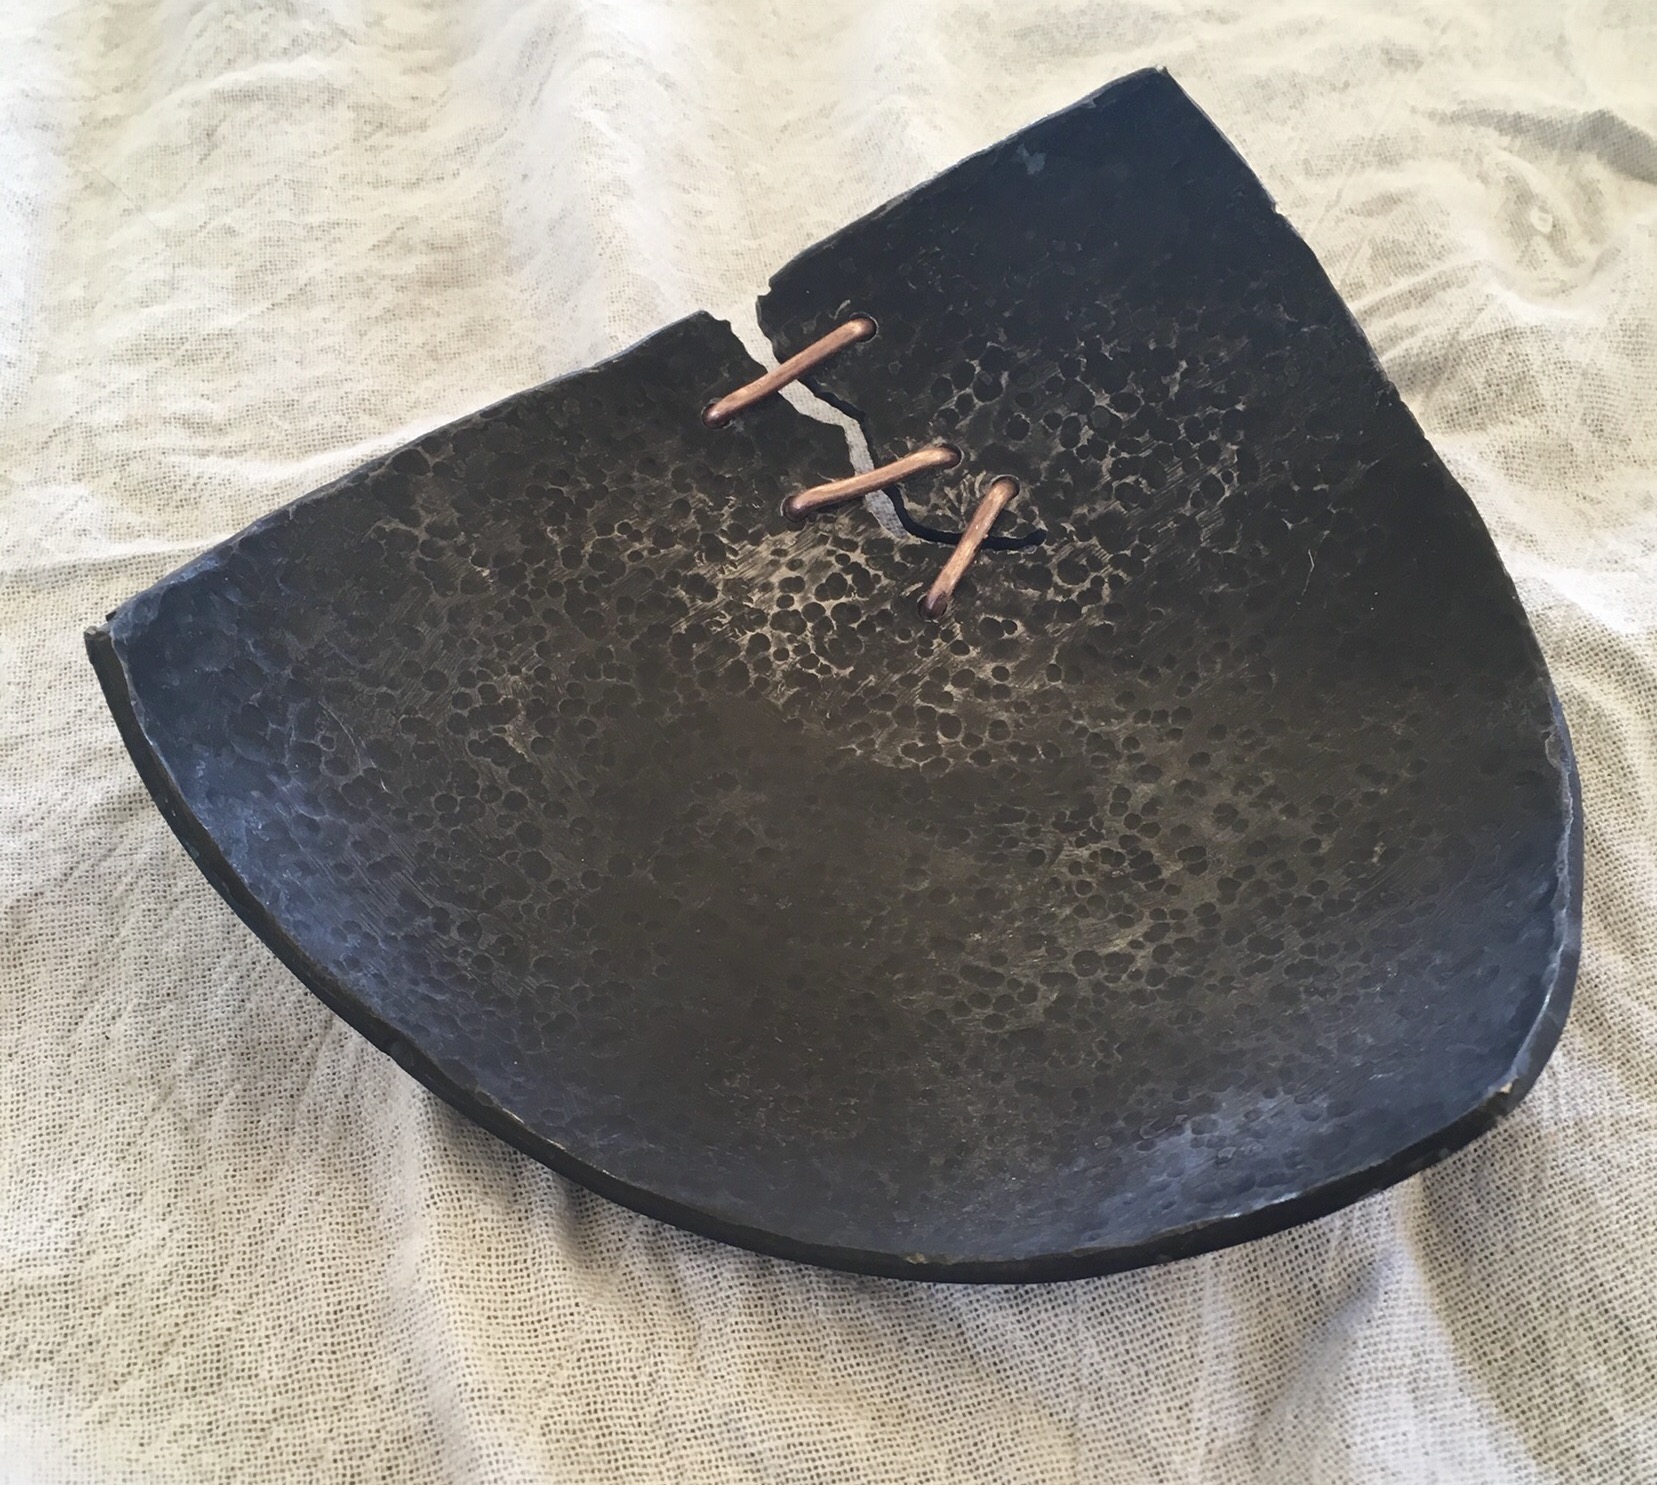
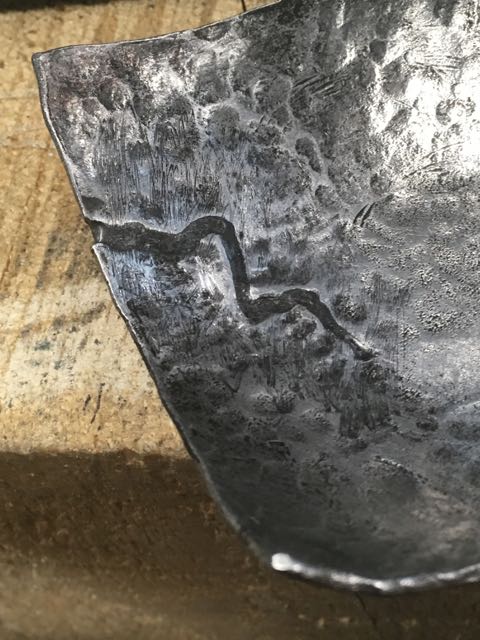
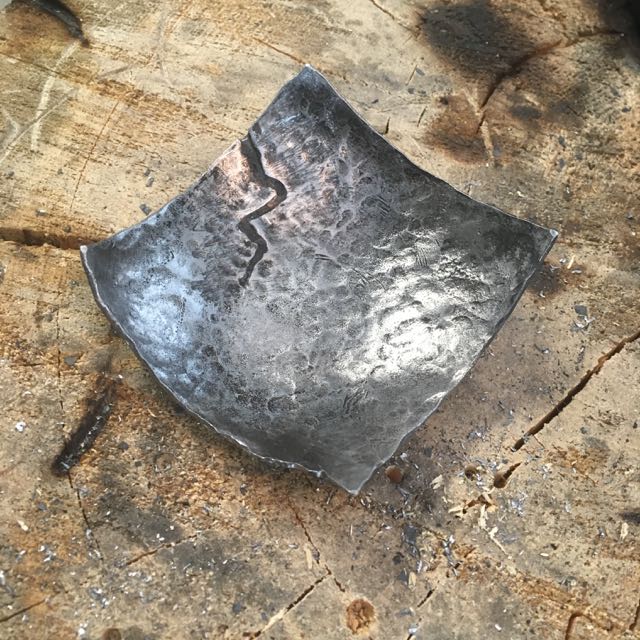
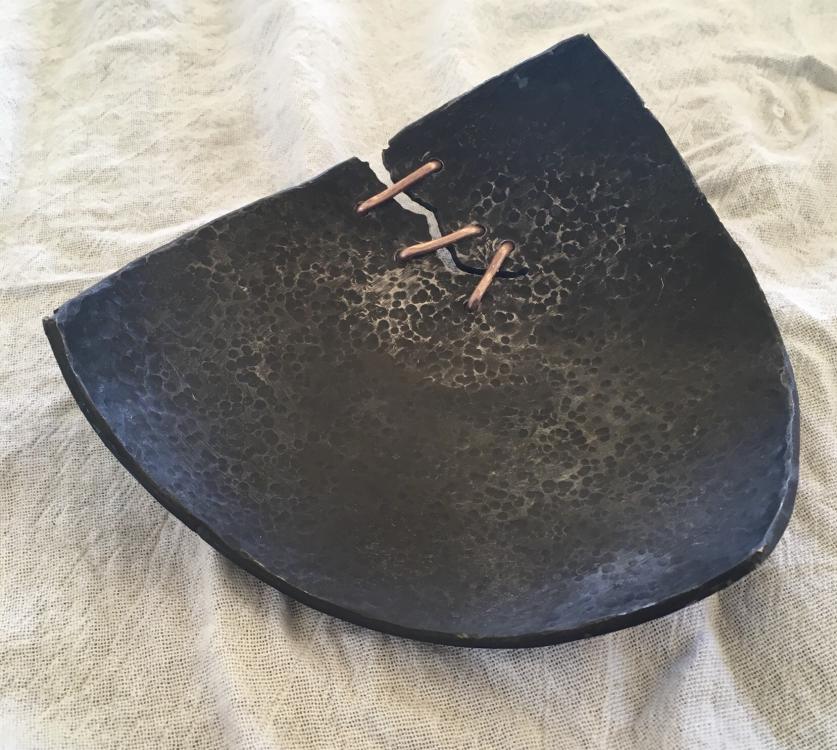
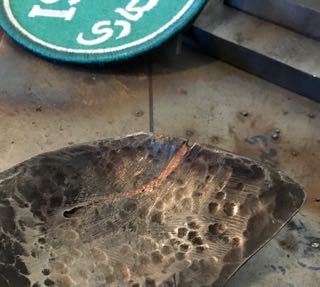
Thanks for all the suggestions. I did run into Robb Gunter and he pointed out that a contributing factor might be the very hard edges in the 'cracks'. These would be artifacts of the plasma torch pulling carbon to the edge. He suggested normalizing. Anyway, here's the first of three bowl 'patches'. Not the original intent but more on that later... This happens to be 11g mild steel (some drops from a local irrigation supply shop), w/copper wire staples. About 8" diameter(?) I always liked this shape- sort of a Celtic flavor.
-
Excellent! (Ex-AF Judo team so I can relate.) I forget what that method is called but working with a wood guy to do this on a cookie of old bristle cone. i have a piece of metal plate where I have tried this; the inlay kept squishing into the crack and the effect was lost. Probably mostly from my inexperience at anticipating where the metal was going to go after a tap. Great idea though.
-
Thanks, that really describes what this was about. Kinda describes a lot of the non-production stuff I like to do. (I was thinking of it in terms of the translation: 'empty mind' .)
-
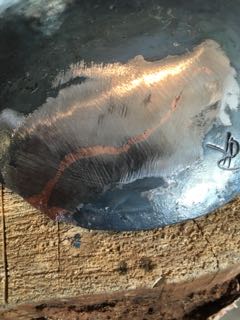
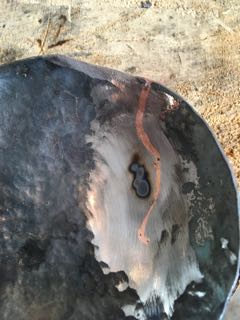
okay, made a little bit more progress today. gote: 'mu shin' - from my perspective, this is a bit of a pun since i'm working with 'no brain' on this ... I'm sure you meant it in the more positive sense I tried a couple of things today: -Tried the same size crack as yesterday and just smush the copper into the crack. Was hoping that if this worked I could justify getting a flypress . No joy. Tried brazing (for the first time). I had a package of flux coated bronze brazing rods (unopened). Seemed like it was working, but I had a hard time controlling the flow of the bronze. However, the dang stuff stuck all over the place so whatever the flux is, it worked great. I even ran some copper as filler over a few of the bronze voids. Real interesting color scheme that will be explored later - when I get better at brazing. Result was something along the lines of what GOTE was suggesting with the copper/solder. Then decided to start with a smaller crack (shorter and skinnier) and work my way up to something more serious. I crumbled the flux off the brazing rods and laid a short strip of copper wire on top of that. Worked fine, but clean up was tedious. The flux glass and copper stuck in a few places outside the crack. If the bowl were destined for a smooth finish, it would have been fine. I think I will get better at controlling the flow of the copper with a bit more practice. Unfortunately, the dimples on the surface make clean up difficult and then the retexturing brings a lot of stress to the copper. I annealed the copper inlay a few times while I was retexturing and I think that helped avoid some copper/steel separation. The figure below is the result. The right 1" of the crack is through the plate, while the remaining crack on the left is really more of a gouge. The copper wouldn't stick in the gouge. The flux from the brazing rod seemed to make a big difference. Thanks again for all the suggestions ... Dave Q: Can anyone suggest a stand-alone flux that would be similar to what is on the brazing rods?
-
It could easily have been either oxide layer or poor flux. I did peen the copper as it cooled, but it was mostly out of frustration as I watched it separate; obviously I need to peen sooner. Thanks again for the suggestions. (Thanks also for the additional info about the cast iron welds ... new to me, but makes sense.) Dave
-
Smoggy: i actually tried that after the burn through. Actually, I layered the bowl, copper sheet, and then a stainless steel sheet. I filled the burn hole, but as soon as I started cleaning up, the copper just peeled off the steel. it's likely a combination of some other issue, but i decided to just start fresh. BigGunDoc: Interesting thought about the pottery clay. I'm heading to Albuquerque in a week or so and can check out what Rio Grande Jewelry has to offer. Regarding the BeCu - I've never worked with it but have heard many horror stories. I suppose the usual advice of being smart about handling would prevail. Thanks for the heads up. However, are you suggesting that they be used more as 'inlays' in the cracks rather than brazing? Any thoughts on the possibility of using one of the metal epoxy powders? I've never seen it used on metals before. Thanks to both for the suggestions, Dave
-
Jim: forgot to add that I was already using a silver flux. The stainless steel worked like a champ. BigGunDoc: I'd rather have it flush. I'm trying to mimic the look of Kintsugi the Japanese method of repairing pottery. Smoggy: Thanks for the encouragement. I'm going to start from scratch and use what i've learned so far and take advantage of the great suggestions. So far I've only tried melting the copper wire - any thoughts on the advantage of brazing with a bronze stick? Unfortunately, it was a pretty cool looking bowl. For now, I have turned the recent experiment into a very nice spatula for my cooking disco . Thanks again to all... Dave
-
Jim, thanks, didn't think of the stainless; vaguely remember that from class. My micro torch didn't get hot enough, but will try again. Thanks again, Dave
-
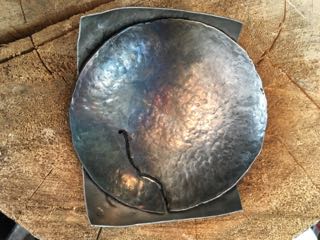
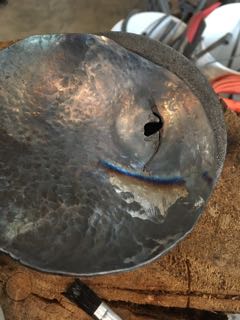
Thanks Smoggy, here's a quick look at the initial results. Figures 1 and 2 are the bowl and the backing plate I made. I put both in a hollow of a stump I used for making bowls. Lesson learned: wet the stump down before. Stupid... Figure 3 and 4 are the initial results of just melting some copper wire and letting it be drawn into crack. Pretty ugly, but as I expected. Figures 5 and 6 are after tackling the area with an old flap disk. Lesson: too much copper and had to be more aggressive than I liked to get the excess off. I thought the flap disk was at the end of its useful life, but it still had some bite to it. I was reasonably happy and thought it looked pretty good. Not real happy with the voids in the copper. Tried a few times to get the copper to re-flow and smooth out; also tried some flux. Finally gave up and thought that the voids would blend in after retexturing the area. Unfortunately, during retexturing, the copper pulled away from the sides of the crack. Figure 7 is what happens when I tried to re-flow the copper again. Burned. Through. #@$!*$@$@#$%@ etc. The retexturing had thinned out the metal around the crack. Sigh.... Any thoughts on what I might do different would be greatly appreciated! Meanwhile, I'm gonna go make something that I can beat up on the anvil ... Dave
-
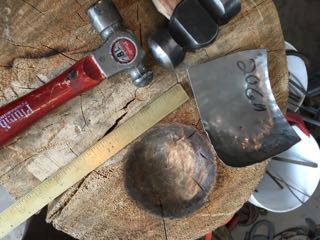
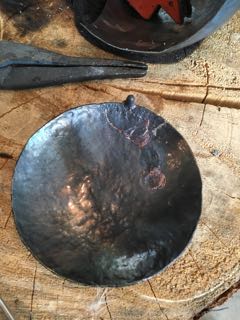
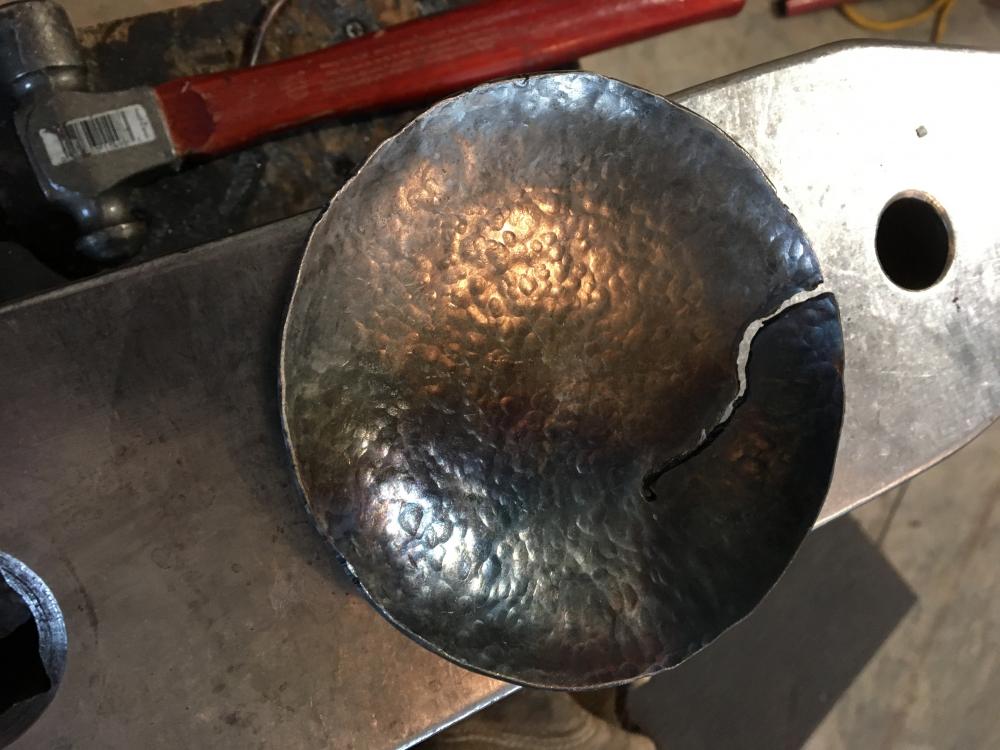
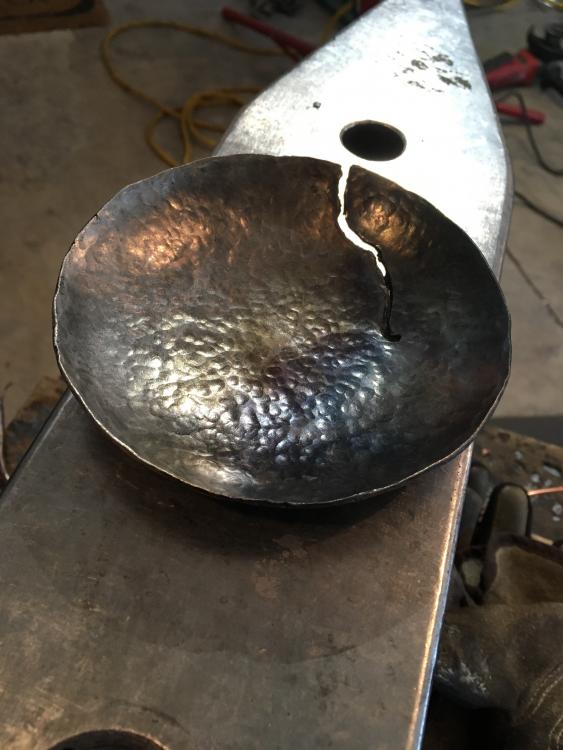
Attached are two pictures of the same small bowl. 5 in diameter, 0.75" deep, 14g mild steel. I have intentionally put a 'crack' in the side of the bowl and would like to fill the opening with copper (or brass). My first attempt at annealing a piece of copper wire and beating it to submission into the crack was unsuccessful. The next steps will be to fire up the ox-ace torch and simply melt/solder the copper wire into the opening. Probably assisted by some flux. Obviously there will be considerable cleanup afterward. (FWIW - I kinda like the way it looks now and I'll likely make a new one to experiment on.) Any suggestions about how to tackle this would be greatly appreciated! Dave Robinson
-
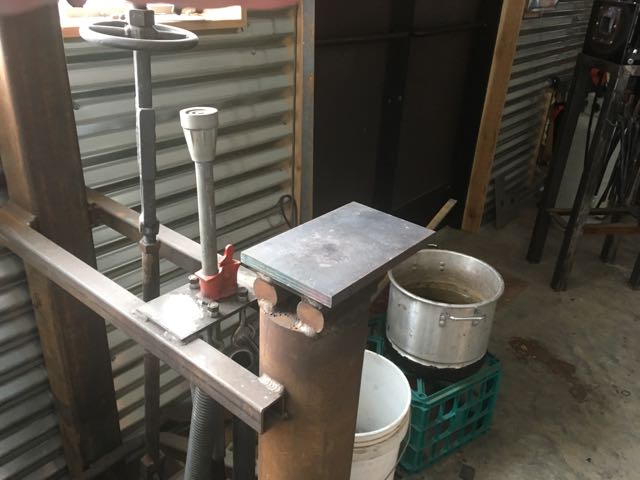
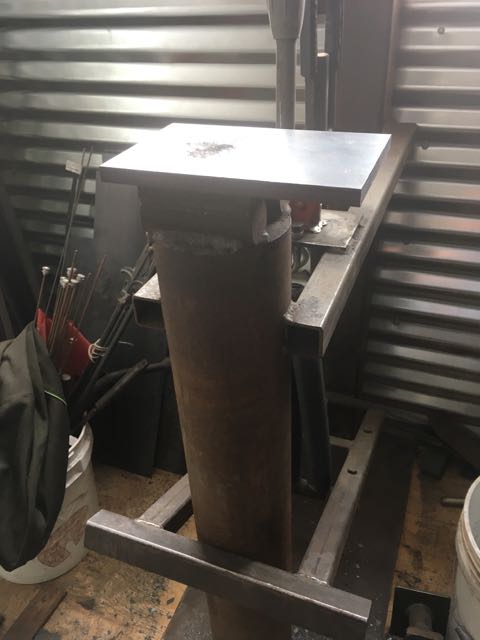
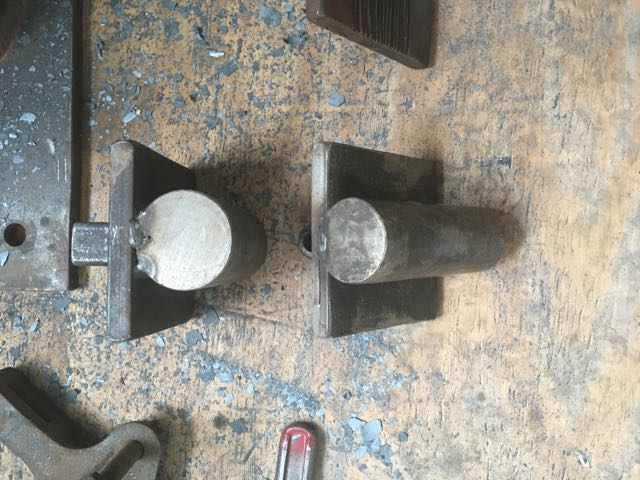
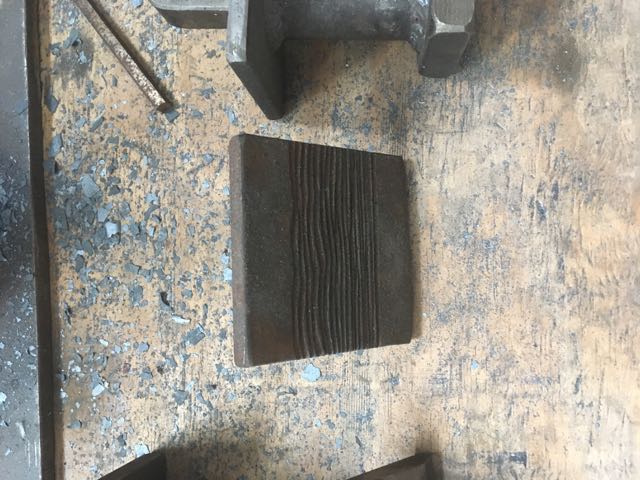
I'm still a bit of a noob and even newer at the treadle hammer, but here's my suggestions based on what I've used mine for most this past year. Since I didn't see most of these listed in the excellent sources already presented, I thought I'd add a few more. 1) make a safety stop. it's easy to make from a pipe clamp and a piece of black pipe. you might have to weld a piece of plate across yours, but beyond that, pretty simple. The first picture depicts the safety stop and the 2) hand rest. I plan on using my heavily for repouse type stuff. The extra wide plate provides a place to put your hand while holding the tooling (hence the safety stop) The second picture provides a different perspective on the hand rest. 3) drawing out dies. These are simple sections of round stock. I'm sure that the shape/style of those presented by Mr. Spenser are superior, but these are good enough for me. The bottom tool is presented in the third pic - there is a corresponding top tool that is a mirror image (slightly larger diameter) 4) flatter. The fourth pic provides a shot of a simple off-set top tool that is used with a flat bottom die to clean up my atrocious hammer control mistakes. 5) texture. The fifth pic is a shot of one of the texture dies. Don't use it much, but did once and it was cool enough that I'm sure I'll use it again. 6) top, bottom fullers. Picture 6. Don't use this much any more, but for large stock, I'll probably revisit it. FWIW - When I purchased my hammer a couple of years ago, it came with dies that no one seems to be able to figure out what they might be used for ... at least no one on this list, NMABA, nor RMS. Good luck and have fun, Dave