RogueRugger
Members
-
Joined
-
Last visited
Everything posted by RogueRugger
-
Thanks!
-
got it, thanks!
-
I think you lost me at step (2). I’m probably a bit dense and don’t understand where the folded material ends up. Thanks though!
-
Whoa! those are awesome! I was thinking really simple supports, but I'll likely give something like that a try. They look pretty straightforward to forge, but are certainly a step up in looks/finish. Thanks for the idea - okay to steal?
-
@ThomasPowers Thanks for the info. I should have worded the plea a bit differently: “What is your preferred method for attaching finials?” I have a variety of curtain rod sizes that are required (from 20mil) and would appreciate any insights. (Most are probably going to be just plain old 1” black pipe.) BTW - I’ll be seeing my daughter over the holidays and will let her know that in the (many) years since she asked a question at a blacksmith meeting Albuquerque, you haven’t changed. You made quite an impression on her and the guys she brought.
-
I'm on the hook to make some curtain rods for my wife (only been three years since the original request - is that too long?). I don't seem to find much in the way of descriptions or videos on this subject. The threads here seem to be a bit scattered on info (perhaps I missed something). There seems to be three somewhat different techniques on attaching the finials to the curtain rod: the finials are an extension of the rod material, the finials are inserted *inside* a hollow curtain rod, or finally, the finials have a cap that goes over the end of the curtain rod. Any pointers on the best technique for attaching the finials would be greatly appreciated. Thanks in advance, Dave Iron Rain Forge
-
TP, abrasion resistance is generally not an issue at the edge. Chasing tool edges are generally polished, eg finished on a 3M wheel, as a final step. Periodically touching up the edge on the grinder and polishing wheel is expected. I’m just having to do it too often so I want to get a better heat treat. Always trying to get better and there is so much room...
-
Thomas, My comments were really related to investigating differences in heat treatment of my thicker stock versus that for knives. The links and Steve's book (page 53+) has a great discussion but focused a bit on knives (and somewhere he clearly qualifies that point). After going through the links, the section of Steve's book, and going through some old manuals, e.g. NBS Monograph 88, and a discussion with someone who is writing a new book on heat treatment, I think I"m going to try a 400F soak for the last stage and see how the edge holds up. However, out of curiosity I called a couple of places and the largest industrial springs they had (Denver area) were 0.273 inches wire diameter. My rake tynes are 0.5" diameter. None of them had heard of door springs with wire that is 1" diameter as you suggest. Even my small rake tynes are 0.25" diameter. The smaller tynes barely work (tiring in the hand on these heavy bowls, slip under treadle hammer head if slightly off perpendicular, mushrooming, loss of edge, ...) If you'd done much heavy chasing you'll recognize all these problems. My 0.5" tynes rest nicely in the hand, and even when I screwed up the heat treatment, the edge held 'okay'. And they were free from one of my friends in NM who is pretty experienced in using the treadle hammer for chasing. David
-
Thomas Powers - yes, tried garage springs; work great for thinner materials. Not stout enough for what I’m doing. Even the thicker ones don’t hold up very well under the treadle hammer on 1/2” plate.
-
Thanks for the links. Making some chasing tools from old hay rake tines (1095?) and these answered most of my questions. Gonna dig your book out of storage and see it can fill in some gaps in my understanding that might exist between tools and knives.
-
My roommate from college was from Mancos (Whipple). My forge is small, but big enough. Always welcome to stop by or drop a note when you’re through and we can grab a beer.
-
Thank you. Yes, we live in Creede; well I suppose it’s more accurate to say we live in Mineral County just outside Creede.
-
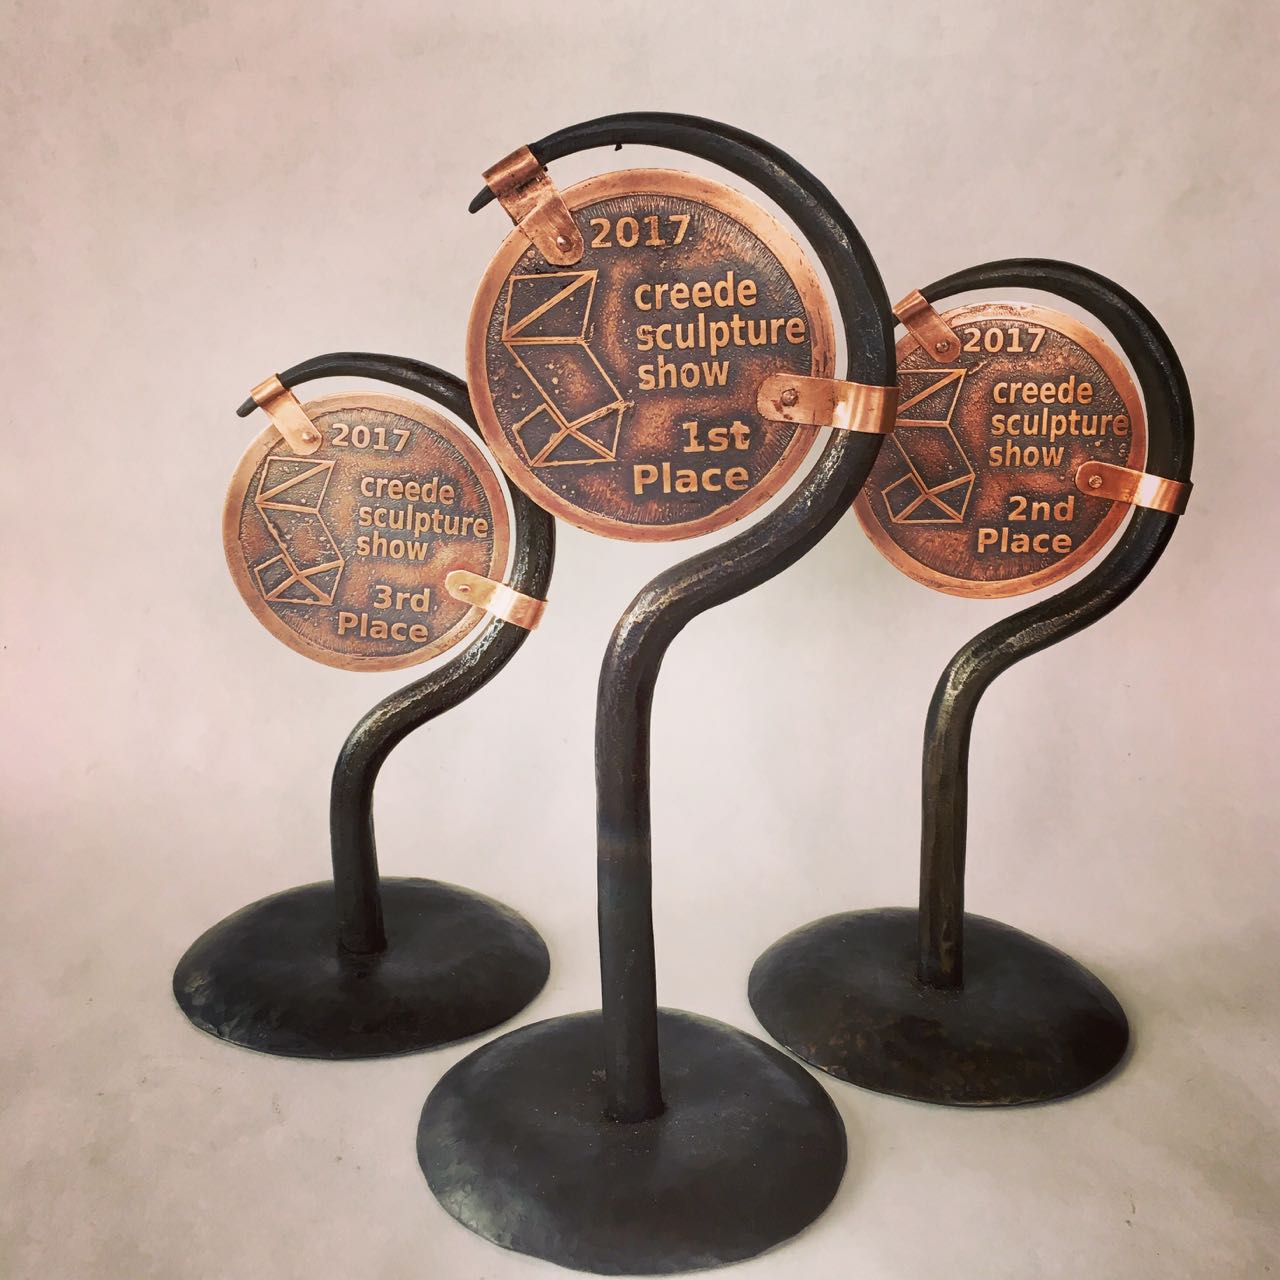
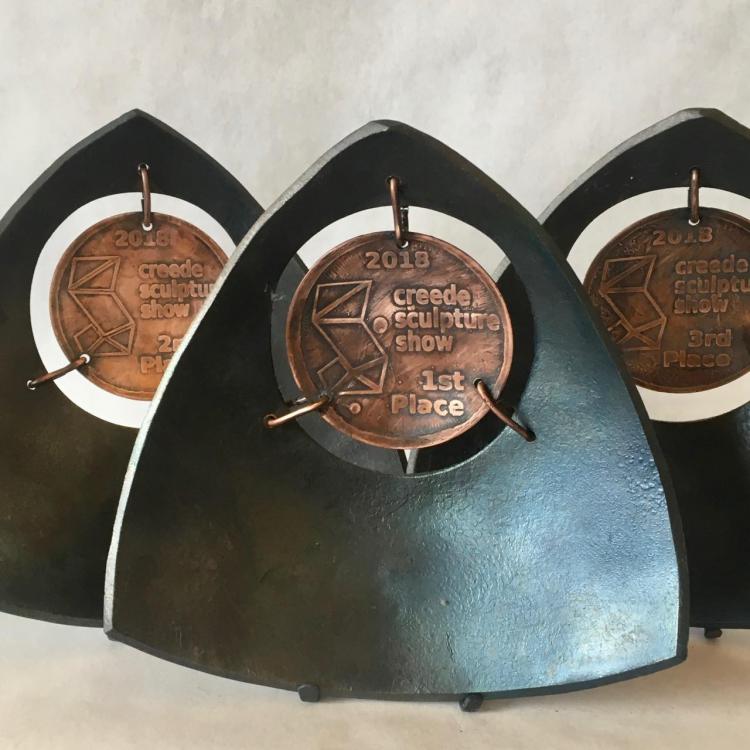
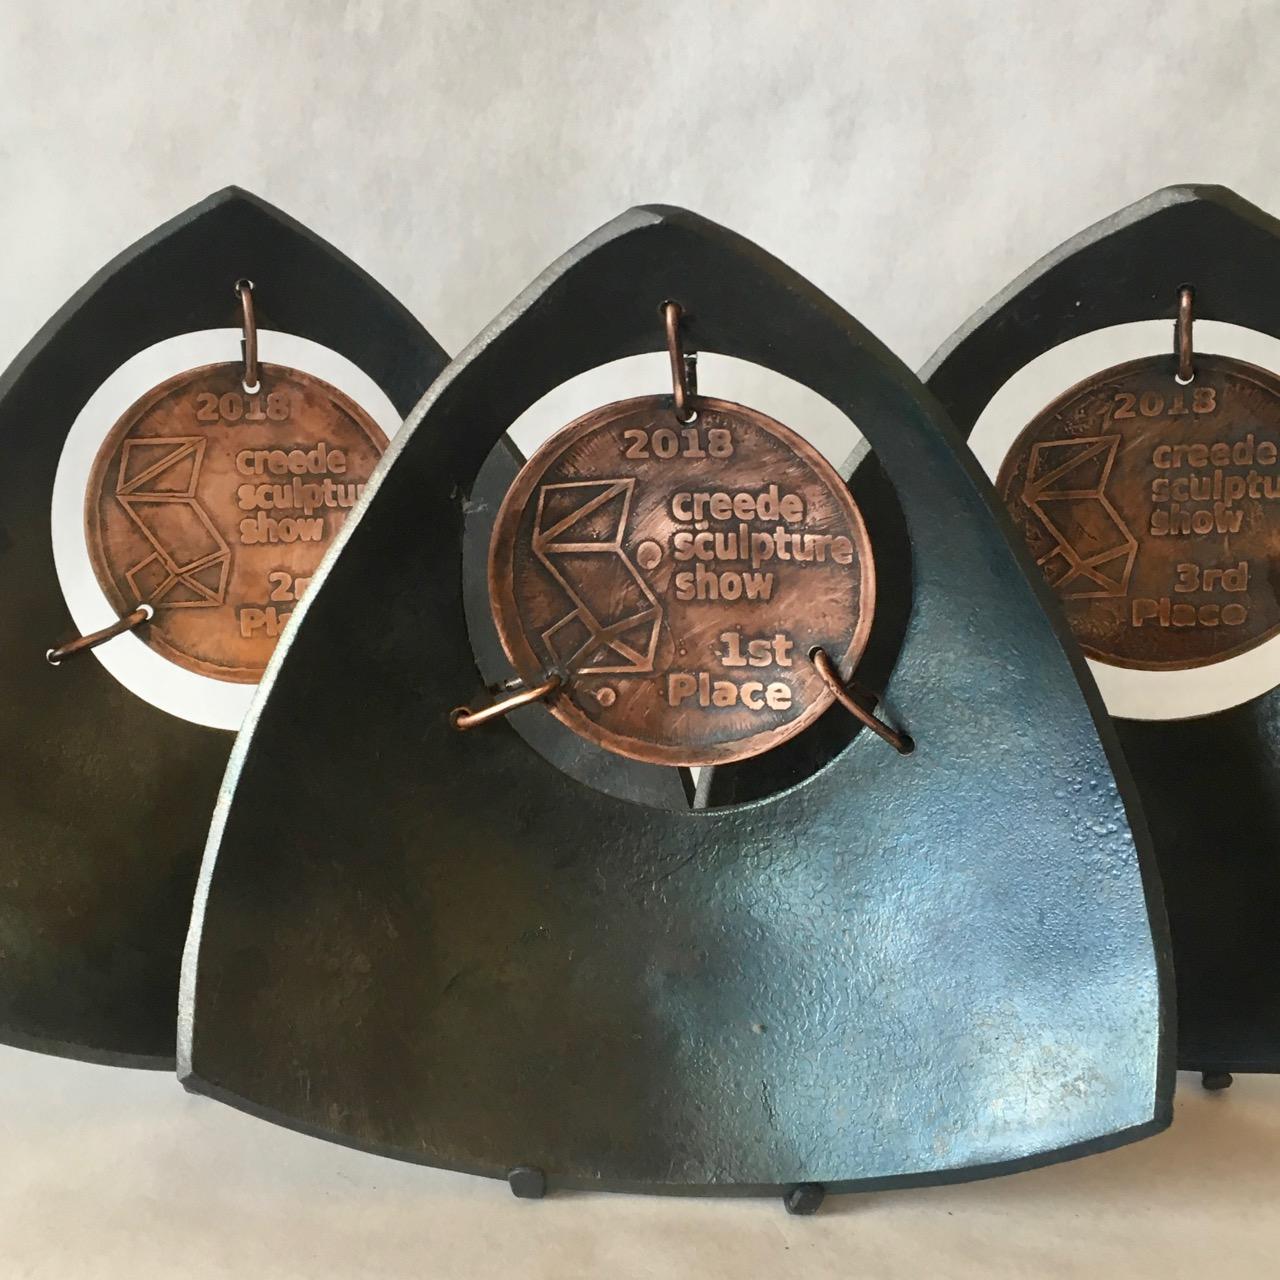
Thought there might be some interest in the final result. Ran into a time crunch due to a series of health scares, so i had to compromise on the design a little bit. Still reasonably happy with the results. FWIW - These are the awards for the Creede Sculpture Show this weekend.

-
Thanks to all for the suggestions. While the hole saw seemed to be the consensus as the easiest approach, it got a bit complicated when considering the safety aspects of drilling through the bowl. I almost tacked a couple of cross pieces, somewhat like the suggestion by +IronWolf. I should have kept the slugs for no other reason than I could have used them for something else; hindsight is always 20/20. I think the cross pieces would have worked pretty well. I ended up simply accounting for the differences in the expansion of the different sections and finished all three pretty quickly. Some selective cooling and heating. Not prefect, but pretty close. (someone suggested this was not possible and I don't understand that word as well as I probably should.) There still some clean up to do on the ironwork, the etching, and of course, the attachment. Thanks again for the great suggestions. Dave Iron Rain Forge www.IronRain.us [Edit: the large distortion of some of the holes in the picture is due to perspective.]
.thumb.jpg.1b73f766a3462ff6f7905161b3f59433.jpg)
-
yeah, I think this is what I'm going to do. Sorry to be dense, but any reason for the steel rod replacement? Thanks to all for the great suggestions. I actually had made a few blanks with and without the pre-cut hole. I hadn't expected quite this much distortion, and want to still figure out how to keep it from happening.However, running into a time crunch on this and need to get moving on this. Too many things in the queue. Any suggestions on a good source for quality hole saws? Thanks again for the ideas. Clay is always a great idea for stuff like this and I hadn't thought if it. Unfortunately a quick test didn't quite react the same, which I don't quite understand either. so much confusion. sigh. As you say, simple is good and am going to go with the hole saw.
-
The result of forge first then cutting looks like ... well, really bad even when done by a real pro with a plasma torch. Mistake? I bow to your superior judgement.
-
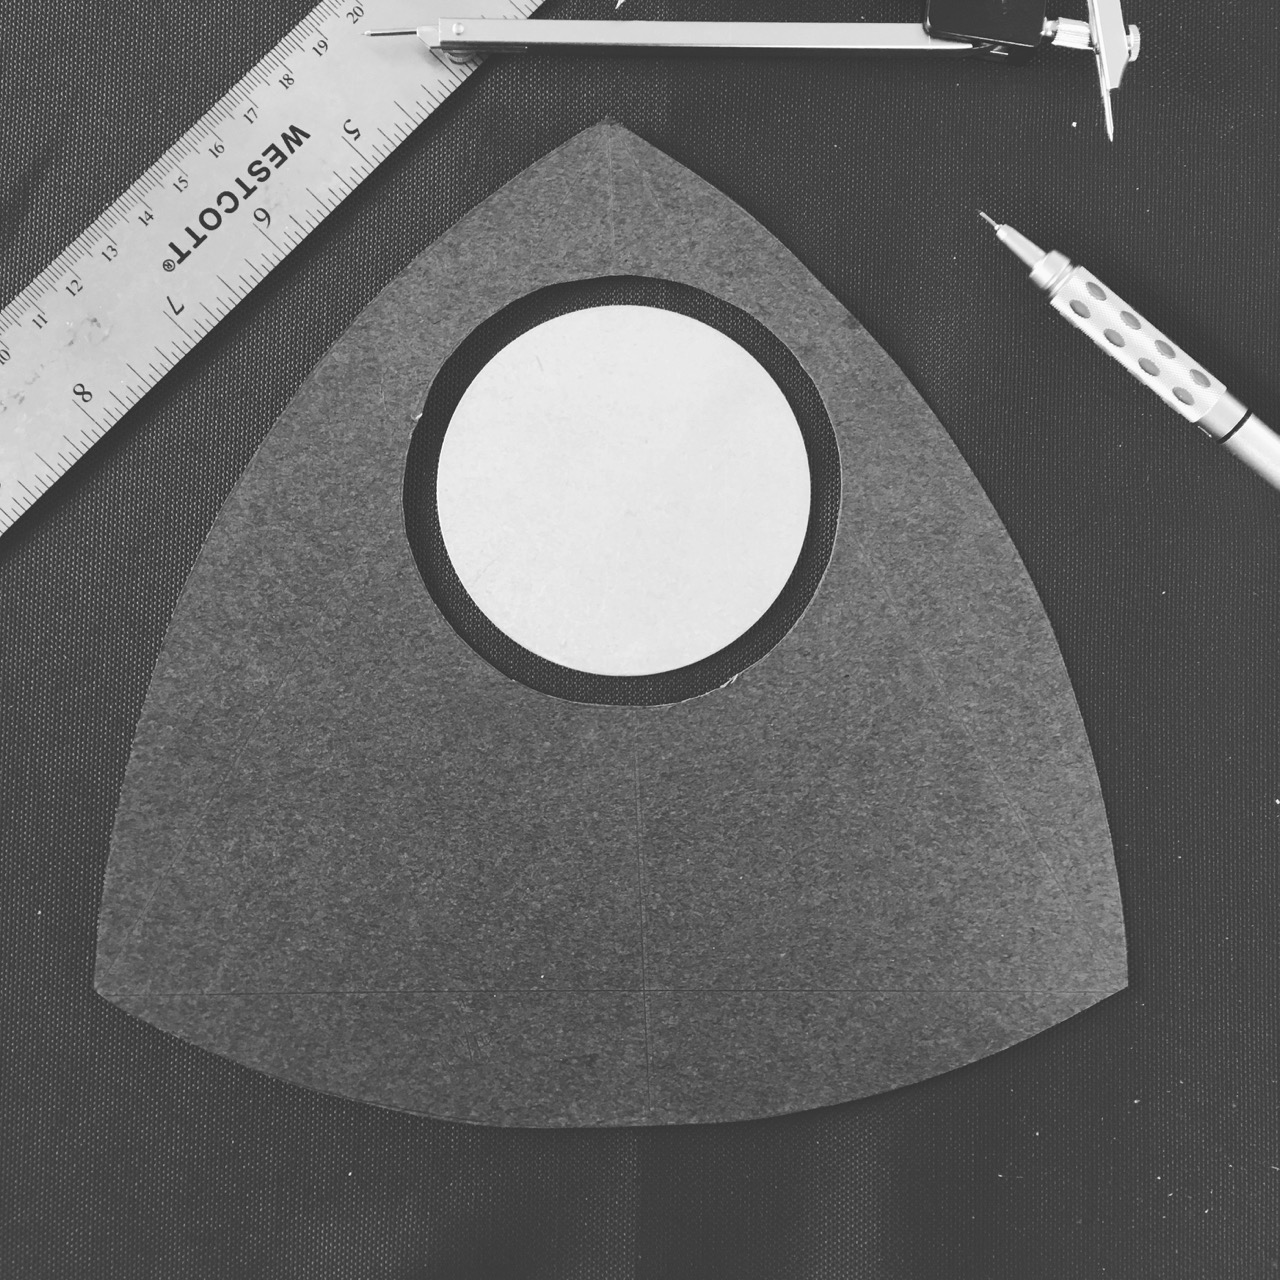
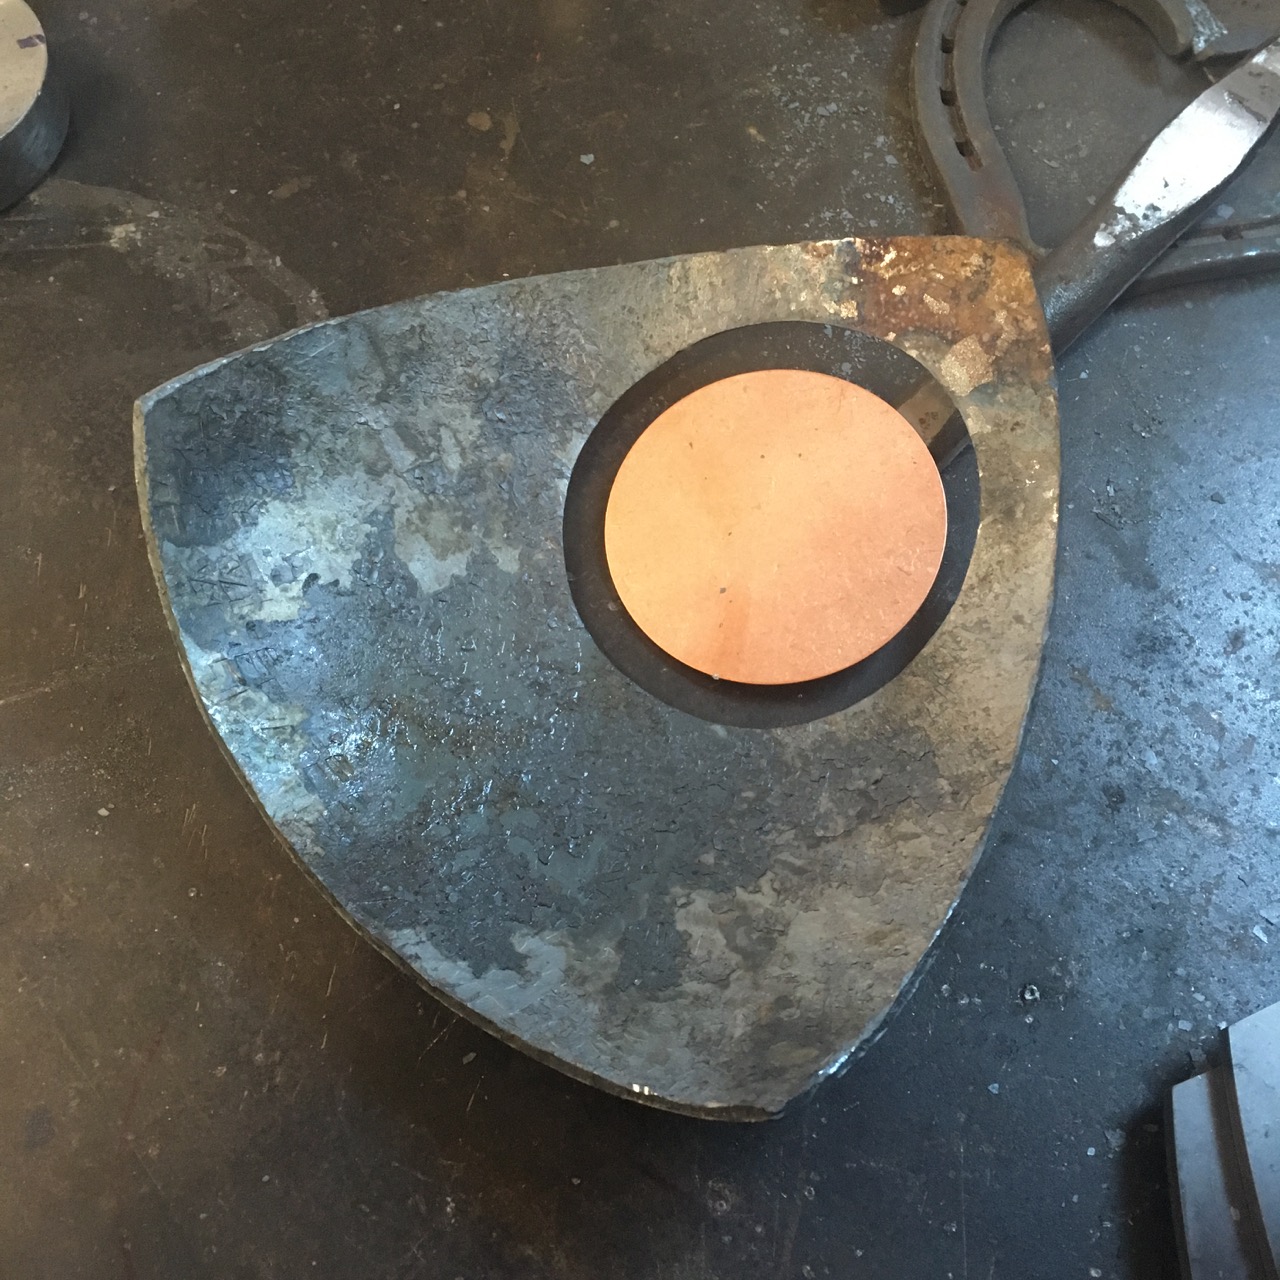
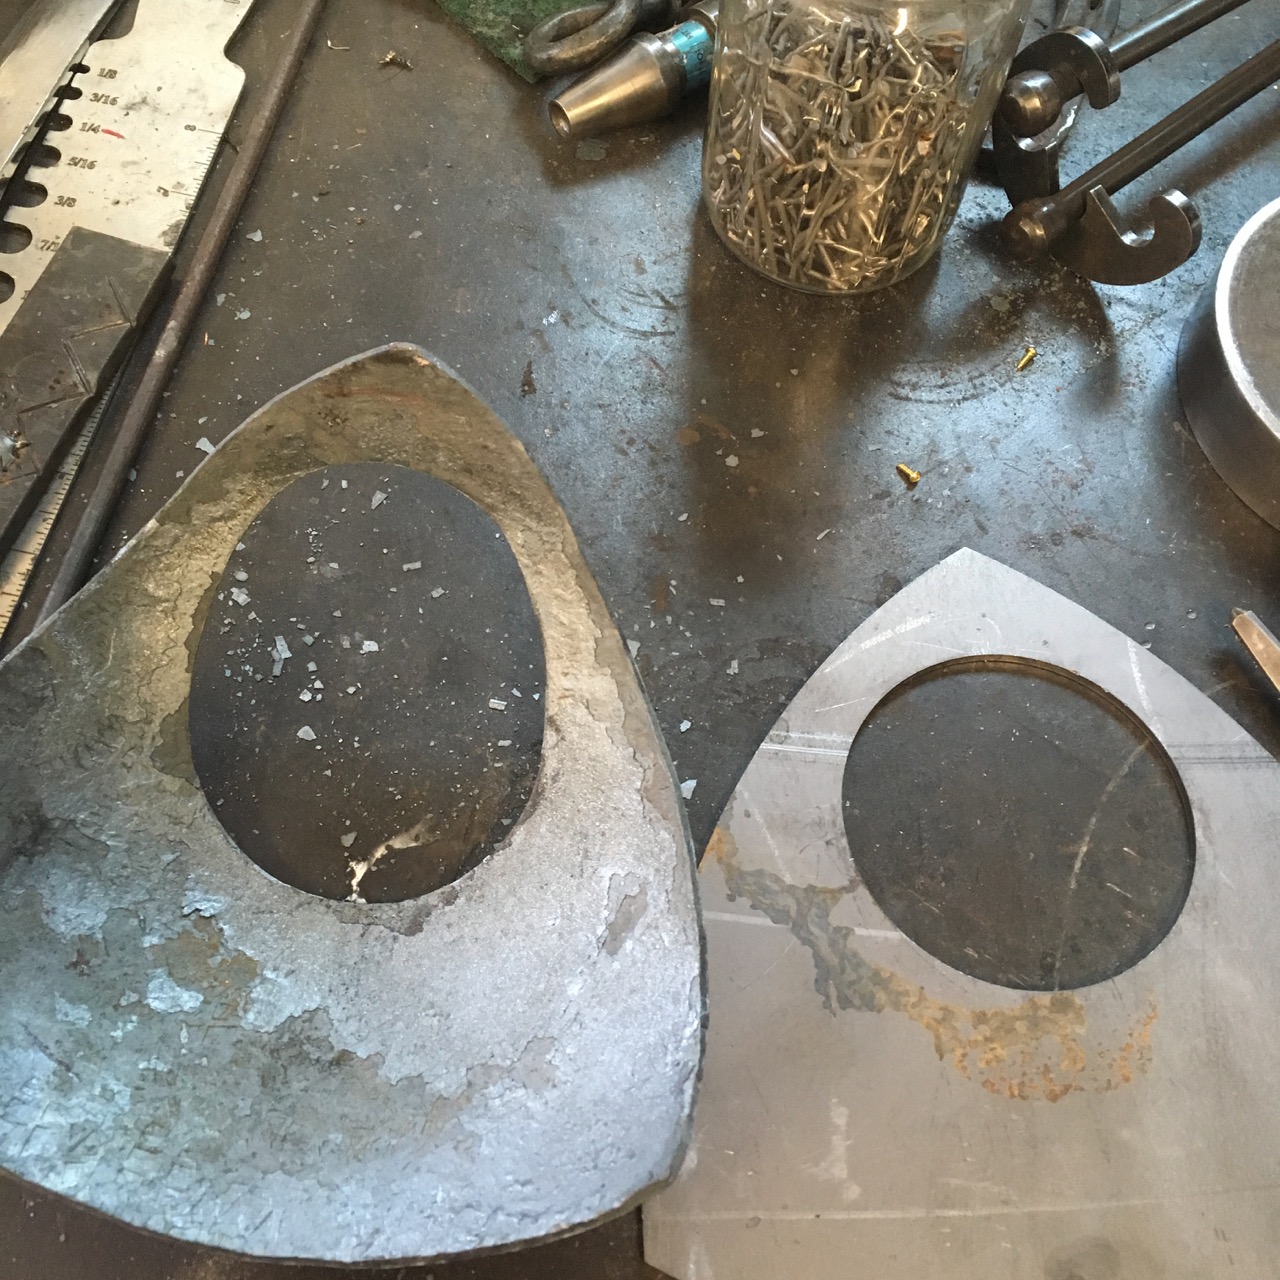
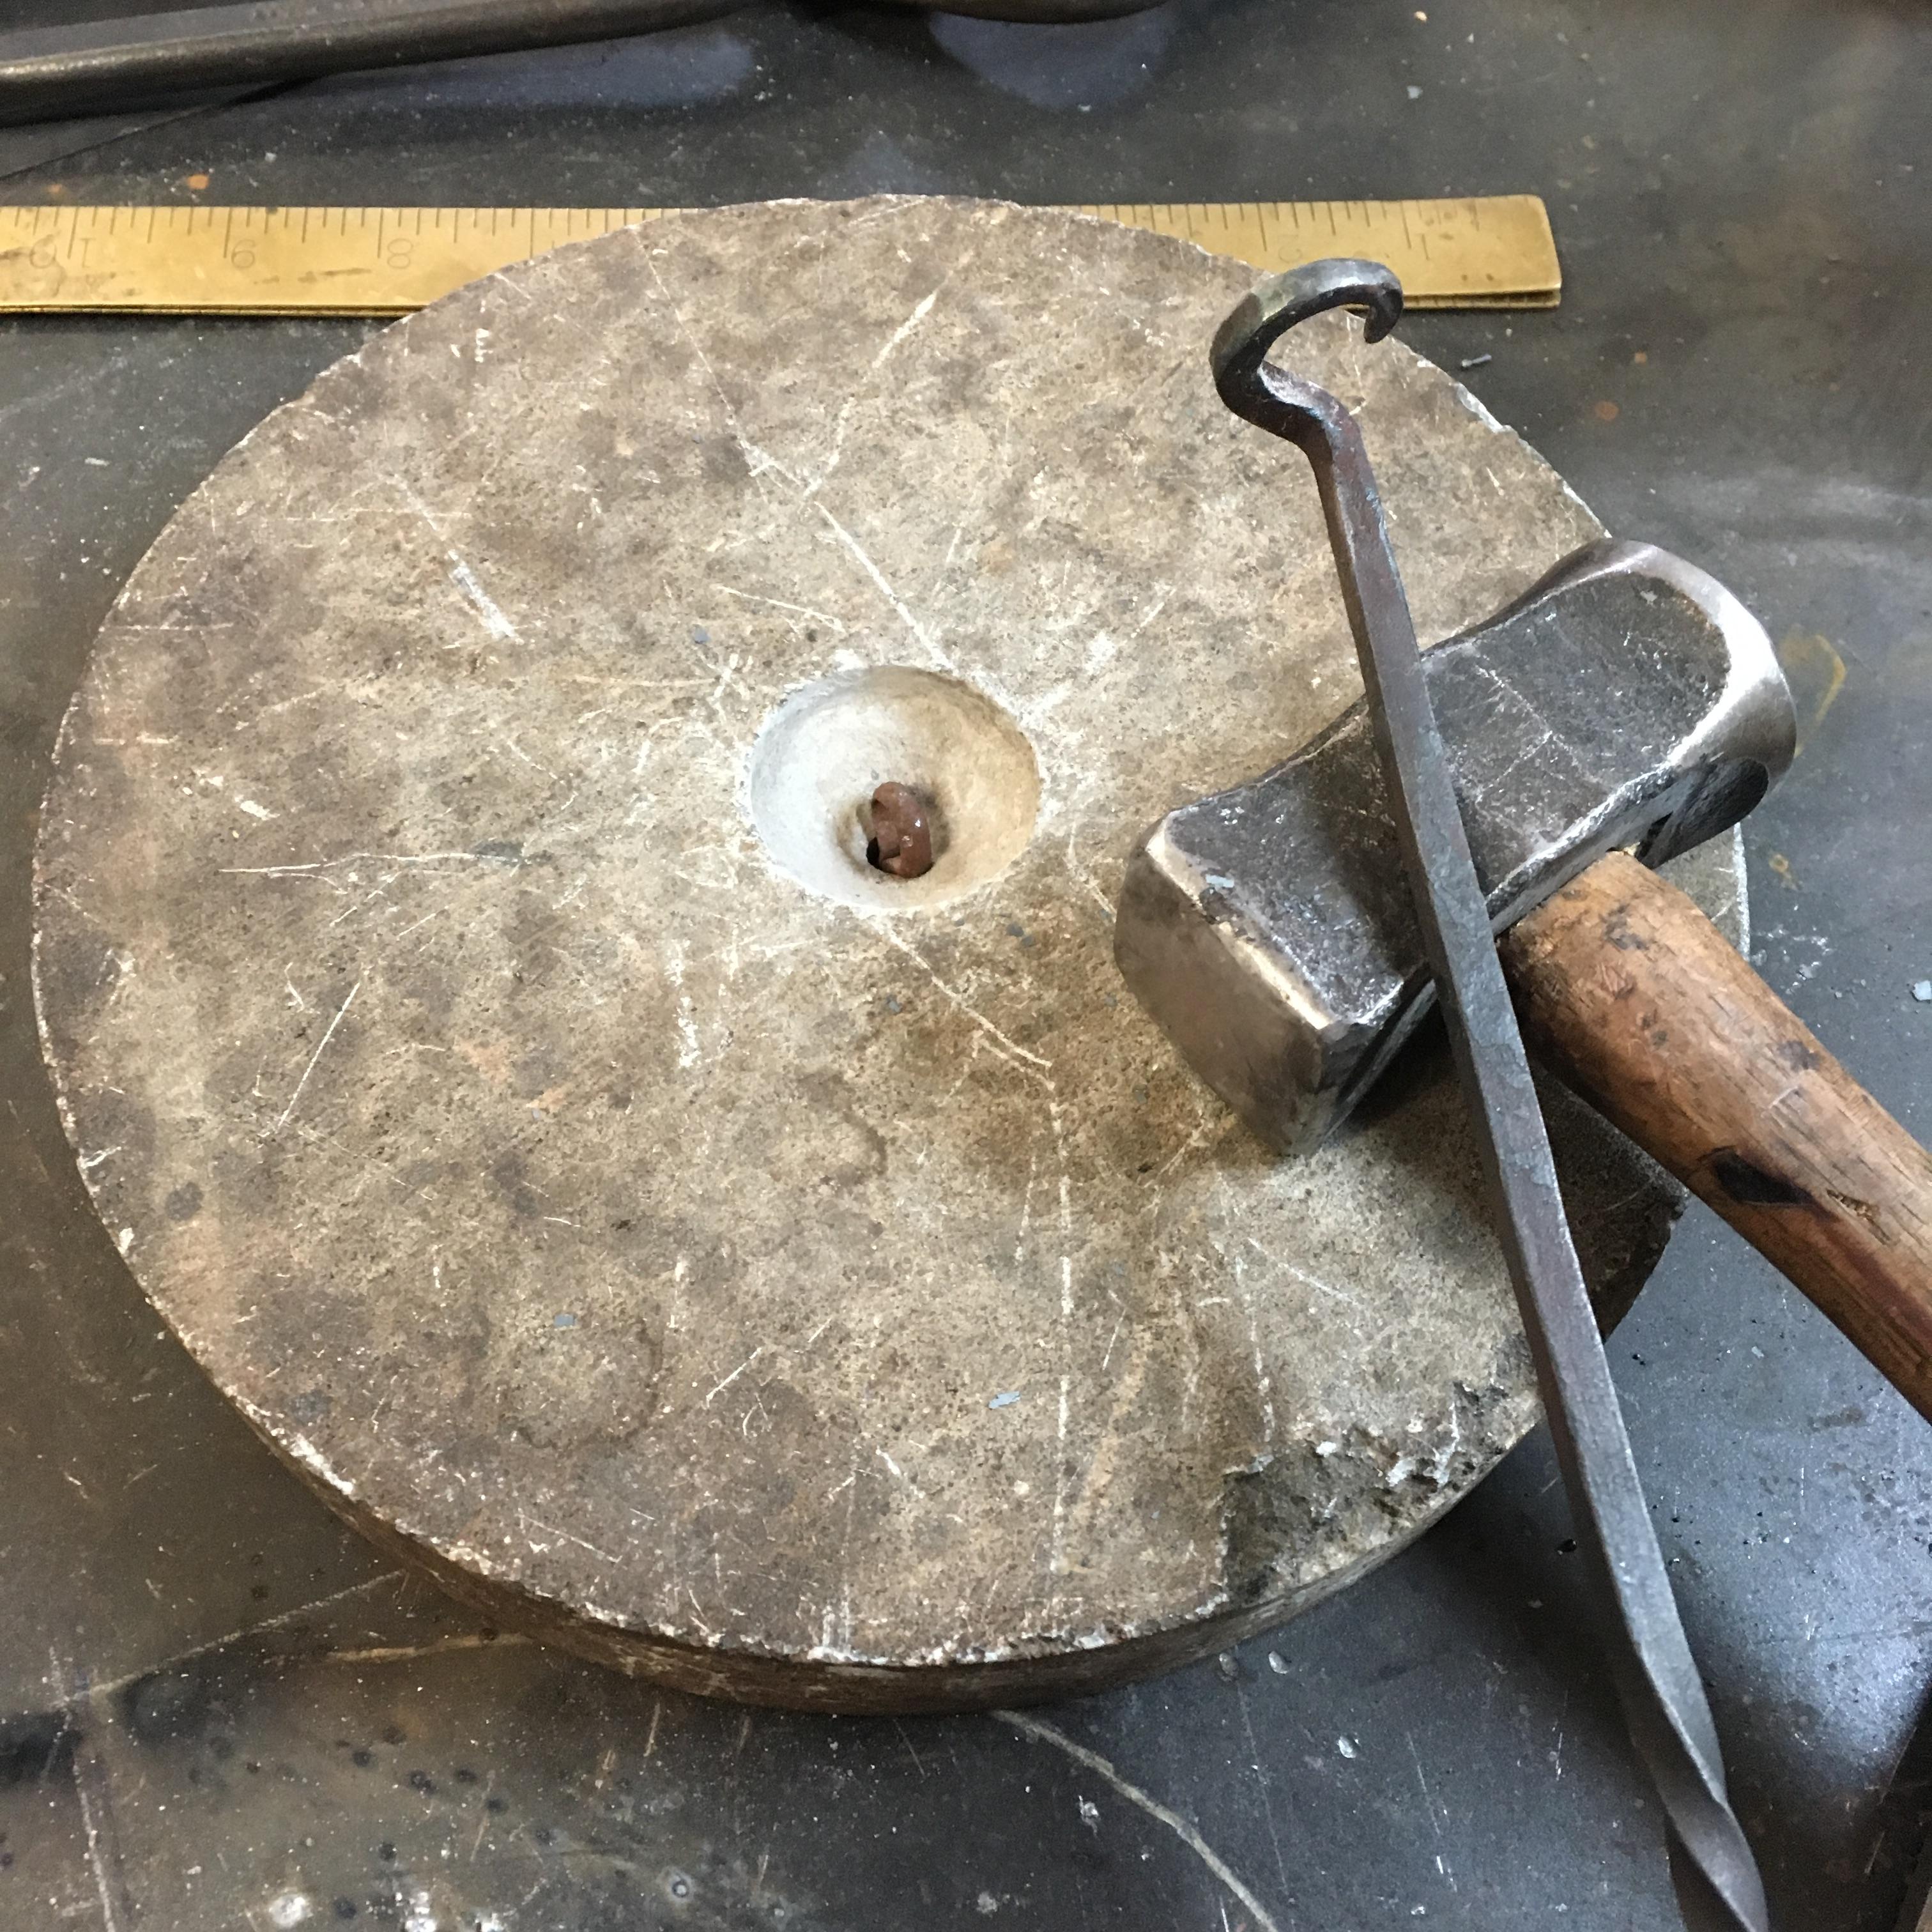
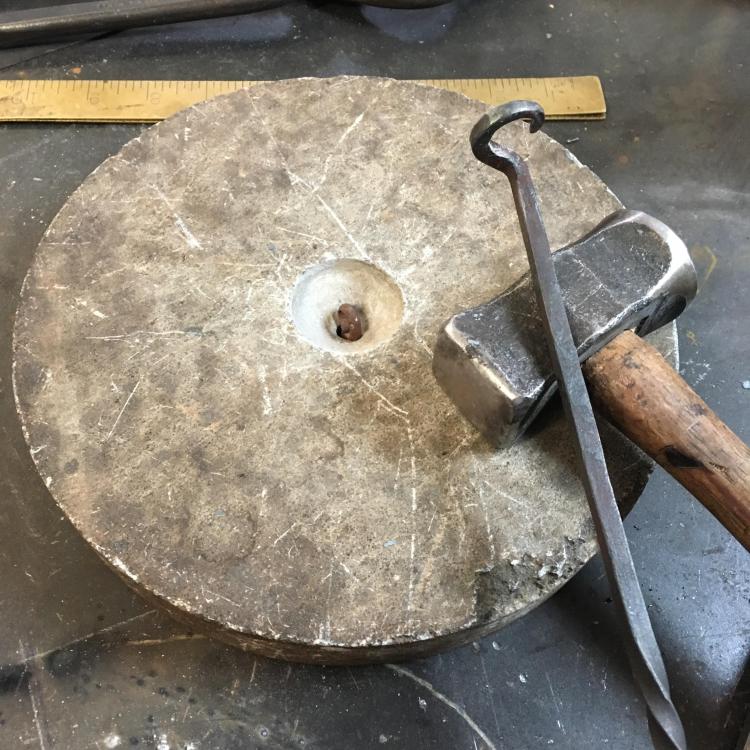
I'm stumped . I have a reuleaux shaped piece of 3/16" plate. The reuleaux is 8" on the side. There is a 3-1/2" circle cut with a bias toward one corner. I am trying to forge a bowl from the plate and then 'suspend' a 3" brass plate inside the circle in the bowl. Currently I am forging the bowl shape using a fly press and 'smushing' the plate between two bowl shaped swages. The result is a nice bowl shape from the reuleaux plate. The plate is heated thoroughly to try to keep the metal flowing evenly during forging. Unfortunately the original circular hole is distorted during the smushing. I'm thinking I might be able to reforge the hole if I had a cone. However, no one within 4 hours of me has a cone I can borrow. Short of making a conic section from some strap, I'm a bit stumped about how to maintain the circular characteristics of the hole. Is there any thoughts on how to selectively heat portions of the plate to recover the circular shape? Image 1 (far left, B/W) is the flat reuleaux plate with the brass disk. Image 2 (middle) is the best I've been able to achieve and the pic looks better than it is. Finally, the image on the right is sort of a before and after picture of a second attempt which ended up even worse. Thanks for any suggestions, Dave Iron Rain Forge www.IronRain.us [For the curious, these are awards for a juried sculpture show in our artsy little town. The brass plate will be etched with info related to the show, date, place, etc. and will be suspended in the hole using small copper loops.]


-
I know the conventional wisdom is to buy as big a press as you can afford, but I'd like to have some change left over for beefing up other parts of my shop. Is there a good reference for the capabilities of a #4? I'm willing to come down from the desired #6 if I can do some of the work hot instead of cold. bending 3/4" - 1" bar stock and 1/4" plate are my upper limits. Punch/drift 1/4" bar. Maybe punch/drift smaller hammer stock, but that would be on the dream side, but probably unlikely. I'm still working my way through this topic area, so my apologies if I've missed a related post. Happy Holidays to everyone, Dave
-
When you have a hammer everything is a nail. When you are a blacksmith everything is whatever the heck you want it to be.
-
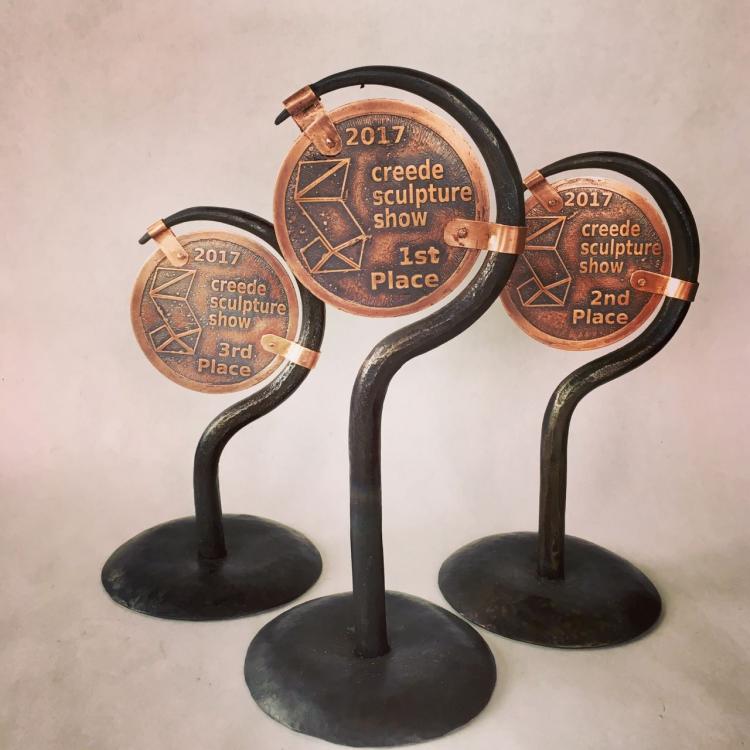
Really enjoy working with a mixture of copper/steel on a project. Offered to forge and donate the awards for the Creede, CO Sculpture Show this weekend (2017/8/18). A little intimidating making awards for a juried sculpture show. A few mistakes here and there, but still pretty happy with the way they came out.
-
Here was my take on the hook with only the customer description. Despite what the video seems to present, the hook can be used from a vertical position. There is a slight screw pitch to the hook. I was under the impression that it had to also be able to pick up the radiator from a fire. Which you would want to do from the side. IMG_7321.MOV
-
The customer has all the radiators, but I have a lot of scraps left over from our home soapstone stove (3k lbs of mass). I've been saving them for some sundials. Perhaps I'll do some experimenting. Ive gone all Polyphemus (lost vision in one eye) so it will have to wait for a bit until I get things figured out.
-
Lactating camels aside (I feel like I started a thread of the Telephone Game), I believe I found depictions of the hooks used for the stone radiators: Figure 11 in this 1911 document. Or the picture on Page 15 of this document. What I forged was a bit excessive in the hook and the handle was different. Mine functioned a bit better than the plain hook but would have been prohibitive for mass production. thanks for making a rather mundane post into something [whatever the opposite of mundane is]. Dave
-
-
So, just a bit more info from the customer: the stoves were touted as quite the labor saving device for wives in the early 1900's. Not just for cowboys! The stoves were called 'The Caloric Fireless Cook Stove'. Haven't had a chance to do much more investigation, certainly no pics of the stone handling tool.

.jpg.851a8301d0f3d6ba009a6b0c2a0f24cd.jpg)