Charles McDonald
Members
-
Joined
-
Last visited
Everything posted by Charles McDonald
-
Thank you! I did make the chains and I made the fittings and everything as well, Im sort of a nut about making things in their entirety ha ha!
-
Awesome Thor's hammer Chris! Very unique design! I make jewelry as well; here are a few Thor's hammer necklaces I’ve made and some other examples of my work.
-
-
Awesome! Thank you for sharing!
-
Rich: Ive accomplished a couple of forge welds, but havent worked on getting it down enough, and I need to! Its fun :) Macbruce: Ah so its just a matter of low quality I suppose, I thought maybe something else might be a factor. Im a bit irritated that I got two pieces this way. This tells me that might be a more common thing from the place I buy it... Thank you both!
-
Here is the stand I made from some left over lumber I had laying around. My issue with it is that it gets a little hot and so I placed some scraps of Duraboard underneath the forge. It’s pretty stable and it's worked well for me so far!
-
Hello there, The other day I was forging a bottle opener and a hook and after pulling them out of the pickle I use to clean off scale I noticed a small crack that ran along the length of them. I wondered the reasoning for it (perhaps it was my doing) and then I looked at the 3/8x3/4 flat bar I cut out of and noticed the crack ran all the way though it as well. I threw in my scrap bin, but yesterday I used some 1/8x1/2 flat bar and it has the same thing along the edges. I should mention that these cracks dont go all the way through but are only on one side. What could be causing this? Thanks ahead, Jake
-
Well I’m a bit late to respond to this post, but anyway, yesterday I took a 1250 gram little Peddinghaus sledge I had laying around and radiused one end, polished it up and made a new longer handle for it. I love this hammer so far! I was skeptical at first as the faces were already quite short, but it feels really balanced, and very comfortable to use.
-
-
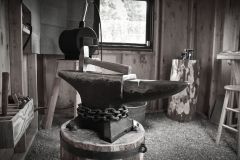 Thank you! My work area has changed dramatically, but Ive yet to figure out how to post new photos. It seems undoable at this point...
 -
 Thats a nice clean looking anvil! I wouldnt mind having one myself!
 -
Thank you! I didn’t make the hammer sadly, I’ve yet to make my first hammer, but hope to very soon! It's a Picard 1000 gram that I re-hafted and changed the face. ha ha! My anvil was feeling self conscious so I offered to help with the chain girdle. She had been jealous of all those slim farrier anvils for some time now...
-
-
Thank you! The bottom three definitely hang better on my tong rack! I think I might do some more like the top two, but offset the boss area so they don’t sit like a person trying to jump a hurdle. Practice and repetition yes! And it’s easy when a person really loves what they’re doing. :D
-
Take a 5 gallon bucket and tie thick paper (I’ve used Tyvek home wrap) over the top as tight as you can, and cut an X allowing for about a 2 1/2"-3" diameter hole. Hang some twine directly above this and tie some cheese about 5" above the X. Spread saw dust over the top of paper to camouflage the hole, and set up some scraps of wood etc. in order to create steps up to the bucket top. Very fast trap set up and it yields great results! I did this in high school and trapped about 6 in one night and threw them all live into a person's locker ha ha! They deserved it trust me ;-)
-
Steve H, Thank you very much for the complement! I definitely need to work on my timing with these, but I'll get it with practice. I have seen your work while looking on the web for different places that offer classes in the area; Definitely Impressive workmanship! I would like to maybe stop by sometime and discuss with you perhaps taking a class... I am so new to this, but I’m incredibly interested and want to build a good foundation to start off. Jake
-
-
-
Yes I actually traced the base of my anvil onto the stump and used a router to sink it in about 3/4 of an inch and then used those straps to lag bolt it in. I used this page as a reference ( http://www.blksmth.com/Anvi_base_preparation.htm ) It doesnt move between the anvil and stump, but at the base of the stump it rocks since I didnt burry it into the ground so I used three very long T-posts and drove them into the dirt and lag bolted them all into the stump. Sturdy and doesnt move at all now! Good luck!
-
EGreen, Thank you! I used 1 Part Bees Wax 1 Part Terpentine 1/2 Part Lineseed Oil I applied this with a large brass brush until the coulour I want is acheived usually brown and not bronze so I'll vary the brass coating by the heat of the metal or use a soft stainless brush to take it away as needed. Their actually more brown in colour then the photo shows.
-
-
Thank you guys for the great complements! Frank I was actually a bit worried about that, I havent put them to heavy use, but I though perhaps my bits were a little too long not allowing for enough leverage. I aim to pick up some coil springs soon and ill give that a go. Thanks for the suggestion!
-
-
Ah I tried to go to "edit" to re-upload the photo in a smaller size, but the edit screen doesnt open up for me. I think im just terrible at computers ha ha! I appreciate the suggestion though and I'll remember that next time I try to post a photo. Thank you Phil! Pug Man I sent the photo your way! Thank you very much for offering to help! .
-
Hello there, Im pretty new here and practically just as new to Blacksmithing. Ive been on a tong making spree since ive started and It's not going to end any time soon. Ive come to really enjoy making these and every pair seems to get easier and better, but I have a long way to go yet :-) Just thought Id share with you this first bunch and see what you guys think of them... hmm I tried to upload a photo but apparently im unable too...