

Kendall P
-
Posts
103 -
Joined
-
Last visited
Content Type
Profiles
Forums
Articles
Gallery
Downloads
Events
Everything posted by Kendall P
-
The bolster was made from pewter - and the handle is ash - And thankyou, I quite liked the leaf blade for a letter opener, seems to work in my mind.
-
Thankyou very much :D
-
 If i lived closer i would definatly be interested in a unpaid apprenticeship with Mr Bush.
 -
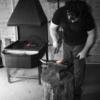
So - after getting involved in backyard forgeing for a few breif and fun months and getting the bug pretty bad, i had to hang up hammer + tong during a period of moving house and haveing my tools in storage ( for about 2 years) - now finally ive got them back out of storage and built myself a nice warm place to forge away from the rain.... Naturally i decided to test the water with a "letter opener" knife - out of mild steel - gotta keep things simple for the first timers am i right? So - in the lovely books i have read on smithing and blade smithing - their are allot of do`s and donts about foreing a blade and puting a handle on it. I pretty much broke / bodged all the rules - like a typical learner. But it is after all my offical "first go". Please feel free to critique my little working - it`s not great at all. Although like some bizzaro mom - im so proud of my baby. *grin* Here are the pics - ive waffled on for long enough. Thanks for your time and patience with yet another beginner on the site.
-
Lovely clean finish - great looking knife.
-
Not enough updraft on my chimney. Please help.
Kendall P replied to Kendall P's topic in Chimneys, Hoods, and Stacks
Who would of thought there would of been such an uproar about 8 inches being too small.. >.> -
Not enough updraft on my chimney. Please help.
Kendall P replied to Kendall P's topic in Chimneys, Hoods, and Stacks
Thankyou for all the kind advice gents - Ive had much more luck today with a carefull heating of the flu with some paper to get that warm air moveing , it seemed to do the trick and for the most part all the smoke went up the chimney - Im still getting a little excess smoke running off into the forge so ive decided to lengthen the chimney on the roof by another meter which should give me the updraft i need to keep this sucker working properly. -
Not enough updraft on my chimney. Please help.
Kendall P replied to Kendall P's topic in Chimneys, Hoods, and Stacks
Im sure the company i bought the forge from would love to know they had been building the hoods 8inch flu collar wrong for 20 years.. -
Not enough updraft on my chimney. Please help.
Kendall P replied to Kendall P's topic in Chimneys, Hoods, and Stacks
I dont surpose you could link that thread or perhaps post a picture of this draft inducing fan youve used? - it's exactly the thing im looking for. -
Not enough updraft on my chimney. Please help.
Kendall P replied to Kendall P's topic in Chimneys, Hoods, and Stacks
The roof is on a very slight slope - but their is only one slope - as in its pitched to one side - but the 2m measurement is taken from the highest point. - their is some hedging nearby that isnt helping too much with crosswinds but shouldnt interfear too much.. The most part of the build as been by myself over the course of last year - weve hit a few snags along the way, I was expecting something to go wrong last minute so this wasnt too much of a set back for me, just a kink to iron out. You might have hit opon something sir - ill try that tomorrow and see if it changes things noticably. -
Not enough updraft on my chimney. Please help.
Kendall P replied to Kendall P's topic in Chimneys, Hoods, and Stacks
The flu is a standard 8inches yes the chimney is roughly 2.m from the top of my roof the firepot`s hood sits 1/2 m above -
So - before im hit with 1001 safety firsts - This is a professionally built forge - with a professionally made flu installed. - The only issue is that their is not enough updraft from the chimney to pull out all the smoke - subsequantly smokeing out my forge. I am aware that an extra blower mounted to the flu can resolve this issue - can any one link / post some pictures / information that i can bring back to my expert who fitted the chimney so we can make the necessary modifications. Many many many thanks I also promise i will do a huge photo dump of the build and my shop when weve crossed this last hurdle of the forge to shop smoke infusion.
-
Building up a shop and skill, on video.
Kendall P replied to baker101z's topic in Building, Designing a Shop
It is a problem that these videos don't have people adhearing to safety measures whilst learning for themselves. I understand that it is really cool to watch somone "re-discover" blacksmithing however, it only adds to the thousands of other "blacksmithing" videos on youtube where kids doing the same stuff pass out allot of bad advice, dangerous tips and normally no real information. Document your startup forge by all means - Just remember that people like yourself who are keen to learn often use youtube as a resource for information and can find many of these videos miss-leading, often in dangerous ways. Glen covered nicely all the majour points ref the videos - but i felt it important to just add that although your videos may not be suddenly popular - dont think they arent being watched, just gotta take caution in that - a little knowledge can be a dangerous thing. When you learn more you will find yourself wondering back through you-tube and face palming at some of the videos "blacksmiths" on youtube put up. Allot are great and really interesting, some however are definatly not. -
New forge! Now, need to vent (CO1 issues)
Kendall P replied to Tom W.'s topic in Chimneys, Hoods, and Stacks
Glen and Ted really summed this one up well, a proper extraction system for your forge is really something that you should not try and save money on if you plan on useing it in a building. Sometimes you just have to bite the bullet if your serious about doing something. -
You havent grasped the magnitude or danger involved in your "Just melt some iron" idea. Please transfer that enthusiasm to teaching yourself by reading a few books and checking out some of the many helpfull websites and previous threads.
-
Help identify this anvil..
Kendall P replied to Kendall P's topic in Anvils, Swage Blocks, and Mandrels
I tried to gently take a small grinder to some of it to see if it was - its steel - just either very pitted - or roughly cast. -
Help identify this anvil..
Kendall P replied to Kendall P's topic in Anvils, Swage Blocks, and Mandrels
Im pleased knowledgable folks think its useable - ive only done some light forging on it - but with the bounce, ive been able to draw out fairly 'chunky' stock without much effort. -
Sorta a "If chuck norris was a blacksmith" moment... Chuck Norris has to use his left fist as an anvil - nothing else on earth can handle getting hit by his right...
-
Hi folks, i picked up this anvil from a scrap dealer relatively cheap - The condition is poor - some weld marks - all the edges are rounded off from use - the surface is dipped from wear, It does however ring at a deafening pitch for such a tiny anvil - and throws a hammer back at me like its trying to start a fight. - So i can see why it was clearly used allot. When i purchased this i took a wire brush and grinder to the sides to disern if what i thought was pitting was just built up muck on the sides - there where no clear makers marks and ive given it a coat in some hammerite to keep the rust from takeing back residence. - ive cleaned up the surface some and taken some pics with some measurements. Diameter of the face - 3.5 inches Lenght horntip -butt - 20 inches Dia of base - 8Inchesx9inches Weight - between 50/75lbs So - can anyone help me identify this please? - after a little image comparrison i have a suspision that this might be allot older than i first assumed - and could be a William Foster wrought iron - as the pattern looks very simmilar indeed. Any advice would be welcome ! - im loath to do much more heavy duty cleaning or re-conditioning untill im sure im not going to butcher a collectable. Copyrighted images have been removed
-
please help setting up a forge, wood fuel
Kendall P replied to Ironwolf159's topic in Solid Fuel Forges
It sounds like you need to hit the books / previous threads to learn what a forge is, how it works, and what you use it for. -
My first leaf key ring
Kendall P replied to Elemental Metal Creations's topic in Blacksmithing, General Discussion
A good idea would be to check etsy.com for simmilar items and do a price comparrison. -
Looks like a sawmaker`s pattern anvil - mousehole works in sheffiield had a pattern exactly like that - and vaughns still make them.
-
Pearl Jam Documentary Blacksmith Shop
Kendall P replied to Prokopto's topic in Blacksmithing, General Discussion
I also watched this - and am a huge pj fan - i too geeked out when the blacksmith shop came up as the bands first practice place. -
Hello and welcome to i-forge iron As a fellow bodger i too have done my best at trying many different "on the cheap" methods of creating and containing a forge fire -Hopefully youll find this as usefull as i have. My fire tray was made out of thin mild steel sheeting - it wasnt expected to withstand much heat, and didnt have to - all it does it provide some large surface area with a big enough lip all the way around it to store my fuel around the fire-pot - also allowing the fuel nearest the firepot to get warming up ready to be burned. The fire pot was cut out of an old oxygen tank i purchased from my lovely local scrap dealer - this steel is made to withstand one hell of allot of punishment as industry standard due to the nature of its content. its also naturally curved - after cutting a section from the tank - i preceeded to weld two slightly thicker lengths of mild steel on the side`s of this make shift pot with and additional 90 degree bent length welded to both the straight peice's lips allowing the mild steel tray to have a square section cut to the size of the complete "pot" and the "pot" to rest nicely on these 90 degree bent lips. As for the air hole - i drilled 3 holes through the now base of my curved fire pot and then took a thick peice of 6mill steel plate and drilled many holes in this - this was cut to rest in the crux of the curve of the fire pot slightly elevated off the bottom. on the base i took some mild steel tubing - and mig welded it to cover the 3 holes i drilled in the pot - i constructed a dump valve for ash and another welded pipe at right angles to connect to my air source - i used a sliding gate valve for my air flow. This set up lasted me a few years - and was put through some punishment. the grand total cost me $50 Things i learned after this build where: 1) Dont make your pot as deep as this - the core of the fire sat too low to work lenghty peices. 2) You don't neet some super fancy "uber blower" to fan a fire - a squirrlcage from an old car will do just fine. - less is more. 3) You dont "need" a clinker breaker built in - its called a poker and fire spade. 4) As a rule really - less is more when constructing these things - if your haveing to over-stretch to bodge something ropey that doesnt work - you probably havent read enough about what it is you want to acheive. Forge fires are simple in concept but you've still got to understand that concept. 5) Mig welders are awsome - after borrowing my brother in law's for this - i now love welding - and more importantly i love migs. 6) Be safe - you can never be too safe. 7) Im not great at spelling or grammer.
-
Well im casting some little mini sculptures and alot of casters rate it for its detailed surface finish over green sand. - Im just going by what ive read up - If i can get some bentonite clay cheap i can try both and see which mixture works best! The drill bit mixer - i completely had not thought about - (total brain fart)