

DanBrassaw
-
Posts
137 -
Joined
-
Last visited
Content Type
Profiles
Forums
Articles
Gallery
Downloads
Events
Everything posted by DanBrassaw
-
Worst condensation in the shop I've seen
DanBrassaw replied to Grundsau's topic in Shop Tips n' Tricks
Same problems here. I was worried about my neglected lathe (it needs a bit of work before its useful yet), but the coat of oil on it seems to have prevented much rust. My anvils and hammers on the other hand, are absolutely saturated, and since I didn't have time to wipe them down before work this morning, I'm expecting that to turn into a layer of ice by the time I get home. That I'm less worried about though, ill just work it off :). Temps are dropping fast here! -
Beekeeping and Smithing: Crafts that go hand in hand!
DanBrassaw replied to Albert A Rasch's topic in Everything Else
This is great! Thanks for the links. The thread title caught my eye, since I've been thinking about raising bees for about as long as I've been smithing (two years). Why, you may ask? Because despite having hives removed from my walls twice, there are still bees in the walls of my shop. Having terrorized them so, I give them a great deal of credit for their tenacity, and would like to make peace with them. On the plus side, meeting a fellow who lives not a mile away and keeps bees has provided me with a great source of wax, as he does nothing with it, and considers it a nuisance. Go figure! -
hypothetical RR track question
DanBrassaw replied to Dogbyte's topic in Anvils, Swage Blocks, and Mandrels
I'm no expert, but my advice would be to skip any welding. Use it mounted on end. You could radius the web to use as a fuller for drawing out stock, and the flat section will work fine for banging on until you find something larger. A horn can be handy, but you can make do with pipes or tapered scrap (cheap spud wrenches) held in a vise if you need something to bend around. I think the most important thing is having the mass directly under the hammer. Welding something to the top of a vertical rail is likely to decrease the efficiency of the unit. -
I can't speak for everyone's setup, obviously, but my hood is just 12 inch single walled pipe, on top of a 2' tall square sheet metal side draft hood on my table. 3' up (1 foot up the pipe), I can rest my hand comfortable when I have a ripping coal fire going. Granted, the ambient temperature in my shop doesn't get above 50 in the winter, so the air getting sucked in is going to cool things down. I built six inches of clearance into my roof when I ran this pipe, figuring it would allow me the space to sleeve the pipe at the through-point if I got worried about the single wall. Now I realize I wasted my time cutting that much clearance out! All that being said, the most important thing is to meet your insurance company's requirements. Often they can be a little stricter than code for certain things.
-
Aesthetically Ugly, Functionally Beautiful Tongs.
DanBrassaw replied to Ridgewayforge's topic in Tongs
IThis is the method I used for my first few set of flat jaw tongs, and it works quite well: http://books.google.com/books?id=zg4LAAAAIAAJ&printsec=frontcover&source=gbs_ge_summary_r&cad=0#v=onepage&q&f=false Go to page 120. I used 9/16 round stock for my first few (I think I've made four, but only two of them are really useable). 1/2" square should make decent tongs to hold 1/4 to 1/2 inch stock, but you'll definitely want bulkier tongs for hardy tooling or other large stock. Apropos, I got my first nice burn a couple days ago when a red hot bottom swage fell out of my too-dinky tongs and landed on my hand. OUCH! Better tongs have been on my mind since... -
Borntoolate makes a good point, and something I wouldn't think to mention normally. That shiny paper really won't burn for anything. I only use actual newspaper, and leave all the ad inserts for recycling.
-
Electric guitar string don't have a bronze coating. With or without, they could make a nice wrapping for really small bundled legs (for a bowl or small vessel, say).
-
I light my coke from the previous fire with a method I read here. I can't remember who posted it, or I'd credit them. I take three sheets of newspaper, wad one tightly into a ball, wrap the next tightly around that, and wrap the third tightly around the whole shebang. I light it, place it right on top of my air inlet, and SLOWLY add air, while holding it down (and together), with my rake. As the paper gets roaring, I scrape in all my surrounding coke, give it a few more seconds of air to make sure I haven't smothered it yet, then pile more on top. Then the rake holding down the ball can be removed. As the paper continues to burn, I press it and the coke down every twenty seconds or so, keeping things compact while it lights. It took me a few fires to get this method down, but it's really fast, I don't have to mess around with kindling, and it works well. Just my .02.
-
I can't think of a reason other than time and effort to not do that, but time and effort are pretty good reasons! If you're forging them by hand, especially without a striker, I think that would add an unnecessary amount of work, since round reined tongs work well enough.
-
The only picture I have of my bellows (and it's too cold to walk outside for a better shot!) This was when I first started setting up my shop a couple years ago, and they're still working, though I've had to scab on some repairs, and patch the tubes in a few places. They took a few hours to build, and cost next to nothing. I got the tubes and metal strapping for free, and scrap plywood practically grows out my ears since I'm a carpenter. They certainly aren't the best, or the most ergonomic, but I'll probably keep using them for a while since the free time to build a proper set is escaping me. They must have a thousand hours on them at this point, which is amazing, considering how little care I took in making them. The PDF detailing their construction is here: http://www.cd3wd.com/cd3wd_40/JF/JF_OTHER/SMALL/04-084_blacksmiths_bellows.pdf . The only major changes I would make are 1: mounting the valves on a removable board so that the inside of the bellows can be accessed for adjustment and repair, and 2: increasing the nozzle size. The plans called for 1 inch, and I didn't know any better. I have it into a 2 inch pipe, so I'm not blasting fuel out of my forge or anything, but I'm sure it adds an unnecessary amount of resistance. P.S. Yeah, I have a chimney now. And yes, that is the most ineffective mapp gas forge ever on the right.
-
Forging a handled hot-cut
DanBrassaw replied to Ridgewayforge's topic in Hot Cuts, Anvil devils, metal cutting on the anvil.
Here's Plain and Ornamental Forging, a great book IMO. http://books.google.com/books?id=PjpVAAAAMAAJ&printsec=frontcover&dq=ornamental+forging&hl=en&sa=X&ei=UU3UUI7-G6-F0QGQl4GoBA&ved=0CDwQ6AEwAA#v=onepage&q&f=false Look for page 165 (two thirds down the scroll bar), the author shows a good diagram of the steps, as well as nice simple instructions. He starts with 1.5" square bar, but theres no reason you can't make a smaller, lighter duty hot cut, though 5/8 may be pushing it. Try it and see! -
I used the top of a stump for quite a few spoons before I got my swage block. Oddly, I haven't made any spoons since then. :P But wood works fine, just make sure the smoke has a place to go!
-
If you really wanted that top portion filled, you could weld round tubing into the square to accommodate the bolts, and go with your drill, fill, and patch route.
-
Ive upset a few (7 if my memory is serving) tools on my anvils, a few on my 150# trenton, and the rest on my newer (to me) 150# fisher. I wasn't worried at all about breaking the heel of my anvil until I read a post similar to this one and now this. Now I'm paranoid... thanks a lot. :P
-
I had terrible luck with magnets staying put on the heel of my anvil. They were constantly sliding down until they were sitting on the waist, being of no use. I tried a rag clamped to the heel, and that worked pretty well, except for the occasional smoky excitement. Like Phil, I found that just securing the anvil down tightly made a huge difference. I put a thick bed of silicone between my stump and the floor, the stump and the anvil (I left all of the surfaces dirty and dusty, and the silicone peeled of nicely when I got my new anvil), and chained the anvil right down to the floor at three points around the stump. Tightened up the chains until the anchor eyes started deforming, and not only was my Trenton reasonably quiet, but also rock solid. Now I've got a Fisher, so it's all pretty moot (mute?). :P
-
I've been using my hand crank ginder holding tools one handed for quick touchups - cold chisels and center punches pretty much. It works pretty well, but mine is situated such that I can rest my arm on the workbench and experience reasonable control. I certainly wouldn't do any super accurate work with it.
-
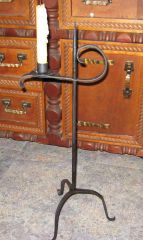 That's beautiful! Is the candle holder just held on with friction so it's removable? I made a stock stand for holding long pieces of metal that works with the same principle.
 -
PSST... No one tell Daniel, but this New Yorker is borrowing his idea as well!
-
I had bad luck with borax when I first started, but having zero clue what I was doing (I have about one clue now!), I'm sure the flux wasn't to blame. My friend brought over some flux he got that was borax mixed with iron filings, and we had a lot of success with that. Since then I've mostly used straight borax, and my success rate with simple welds (mostly faggot welds) has been pretty decent. I'll probably just keep using borax since it's readily available and doesn't require any mixing or proportions or preparation, unless for some reason I find that that's the only thing holding me back in successful welding. Right now I'm positive there are several other factors making my welds suck :P.
-
My ceiling is 7.5' above the anvil. Not only does it feel crowded, but the light bulb right above makes strikers a bit nervous ;).
-
I made the bellows from that second link. They've been working OK for about a year, but they are definitely not great. However, they only took me a few hours to make and all the materials were free, so no real complaints if you're looking for something cheap and easy to start out with. I got the tubes from a local garage, old metal strapping from the lumberyard, and the scrap wood I already had on hand.
-
Wasn't going to post until I had pictures, but I saw this thread and I have poor impulse control. I started a set of tongs in your style tonight. I don't have a power hammer, so I adjusted the tooling somewhat. Went with 3/8x3/4 stock, and used a butcher to start the drawing out, leaving 1 inch for both the jaw and hinge. I've never used a butcher before, and since I don't always have a second hand around to swing a hammer or hold a tool, I made one for my hardy, which I'm inclined to say works pretty well. My first learning experience was cutting in too far with the butcher, which left a cold shut when I finished the bow section to size. That tong half also has a pretty funny looking jaw, since my hot-cutting alignment was not up to par ;) . The second half came out much better, and I'll probably keep the first one for that pair despite its "challenges", since drawing them by hand is time consuming and I don't want waste it. I'll just use it for smaller stock, in case it's weakened. I keep trying different methods of making tongs, but I think until I get drop-tong welding down, drawing down the reins is going to make any method time consuming. Anways, thanks for the tutorial, I really enjoyed making these!
-
Great start! It's hard to tell if that's pressure treated wood in the picture, but if it is, be careful with your hot iron around it, that stuff is nasty when burned. If it's not, or even if it is, you could attach a piece of regular spruce or whatever (I've heard hardwood works better) to the top and keep a wooden mallet right there for straightening out your twists as you work. The wood flaring up as you straighten them adds a little "pizzaz" to your work :P, and it keeps hammer marks off the corners. Have fun!
-
I have enough trouble tying the rocks on to the sticks. When I get that mastered, I'll start naming them.
-
A lot nicer than my first vice that I paid $70 for. Stuck in a tree you say? I better go take another walk through my woods...