November 24, 20187 yr First thing first. I am not a bladesmith. I've made knives before for whatever utilitarian need, and for the odd coworker. But never anything serious. So critique & advice is appreciated. This project got its birth the other day by watching a documentary about the White Death. The Finnish sniper Simo Hayha. Saw some puukko's in the video, and got the itch to make one. This started life as a coil spring. Not sure of the material. But it does harden. More so with a water quench than oil. I wanted an over all length of 200mm. 100mm for the handle & 100mm for the blade. Got close. I'm at about 215mm at the moment. I like heavier & thicker blades. So I am aiming for 7mm thick at the spine. I hammered my material to roughly 10-11mm in thickness. Wanted some slop for filing/grinding. I formed up the tang at the shoulder. I got a bit happy with a hot set trying to isolate the material. Pretty sure I've got a crack there I'll need to deal with. But I've still got plenty to do on the tang . Finally for the day, I filed one side flat. Had some scale on the anvil which I hammered in like a moron. Took some judicious filing to get through it. Sorry to be long winded. Just a personal habit to be thorough. Пока
November 24, 20187 yr Looks good so far. Looking forward to seeing your progress. 11 minutes ago, fleur de lis said: for the odd coworker Hmm...I have some very odd coworkers, but none has yet asked me for a knife. 12 minutes ago, fleur de lis said: Пока So, "Poka's puukko"?
November 24, 20187 yr Author 3 hours ago, JHCC said: I work with a bunch of hillbillies. They are a very knife happy group of guys. Пока. = See ya. Been slowly learning Russian. I am at the point where I've started injecting the random word without thinking about it.
November 24, 20187 yr Ya ain't begun to see hillbillies till ya come here to NW Arkansas. There are places here that even I won't leave the blacktop. They carry knives & guns.
November 25, 20187 yr Author SW Missouri ain't no different than NW Arkansas. Practically neighbors. Heck. I got married down in your neck of the woods.
November 25, 20187 yr Looks like you are on the road. I really like the blade profile and you show great persistence with the draw filing. That will serve you well with all your smithing. Constructive criticism: Yes you definitely seem to have a problem at the tang junction with a crack. That is a serious problem that needs to be addressed sooner rather than after you have spent countless hours filing and finishing. Hard to tell if you have enough material there to save it. If you don't I'm afraid I have no good advise on repair, I'd start thinking of cutting it down thinner and seeing how small a stick tang you can get away with. 11 mm thick is really thick for a short blade like this one. There may be Puukko this thick, but I've never seen one. Not that there isn't a place for very thick blades, just not sure they should be called Puuko. With a very thin stick tang this blade is going to be very forward heavy, you might want to consider beveling down the spine as well and leaving a bit of a ridge in the center. Hard to describe in text, kind of like some of the Japanese tanto blade crossections. With the thing stick tang you shouldn't baton or pry with it in any case. You might consider saving yourself some filing and forging in some of the bevel the next time. It is fun and a bit more of a challenge than just stock removal on a forged profile. You can even forge in distal taper... To save your files, which will get ruined filing on scale, consider soaking the billet overnight in white vinegar to break down the scale. If you are in a rush and don't have a belt grinder, you can get rid of scale pretty easily with a 4.5" angle grinder and a 40 grit flap wheel.
November 25, 20187 yr Author @Latticino I agree with you about the tang. I hope I can save it, but if not I'll figure something out. Its a learnable moment either way. Since I've done so little with forging knives. I genuinely struggle with forging in bevels & keeping things straight. Unless its a froe, herb chopper, or other similarly curved type blade. I realize this is a over sight on my part. I've just not had enough interest in bladesmithing to bother myself to learn to do it right. But I've really enjoyed doing this one enough that I may need to fix that attitude in myself soon. As for filing. I've got plenty o tools to not need to use files. Several of the 4.5" grinders you mentioned. With many assorted body buffer pads. And I honestly didn't even think to use the thing. I feel stupid now. Also got a 2"x72" sorta knife grinder (it's a grizzly). But I've got a hate / hate relationship with it. I kinda sorta took off the ends of 3 fingers with it a week ago & haven't gotten pass wanting to take a 10lb sledge to it yet. I completely blame the machine entirely. It is rhe one who set the rest to far from the platen & its the one who was grinding material thin enough to get sucked through the gap taking my poor to get a with it. I am completely blameless in this particular endeavor. I am better with a file than a grinder anyways. A skill I've spent more time developing. But as always. One should expand their skill sets. I truly appreciate the vinager tip. I had never heard of that before. Very very handy that is. Thank you. Thank you for taking the time to point things out.
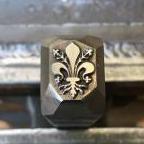
November 25, 20187 yr Author And today's progress report. Addressed the tang as well as I could figure out. Filed out my crack on the one side & the gouge on the other side. Then hit it with the welder in each corner. I didn't care to do this as welds are a pain to file through and blend for me. In retrospect, I believe the the better option would have been to not have dorked it up to begin with. Live & learn I reckon. Due to Latticino's kind mentioning of an angle grinder. I made much faster work of the other side of the blade. Used a 120 grit pad to take most of the scale most of the way off. Then went the rest of the way with files. I broke down & called a truce with the devil grinder. Did a peace dance & sacrificed three chickens so that it wouldn't ask for anymore fingers. I really need to invest in some better belts if I continue doing knives after this. The cheapo belts wear out FAST! Ran a 60 grit belt over it to blend out the file marks & to profile the tang more to my satisfaction. Finished up today with cutting scales from a piece of Russian Padauk I had left over from something. The I cut a chunk of brass & squared it up. Not sure if the brass will be a bolster or a pommel type thing yet. I simply like brass & wanted to incorporate it somewhere. Пока.
November 25, 20187 yr What about heat treatment? If done before the mig weld will certainly screw it up. If still to be done you may want to read up on normalizing cycles. Brass and Padouk are a nice combo, but your grain direction on the wood is a little questionable.
November 25, 20187 yr Author I haven't heat treated it as of yet. I normilized twice afteret forging. Once in ashes, & once in vermiculite (no idea if I spelled that right). I worry about cracks with this being mystery metal. I am using this as a learning experience for a lot of this. Reading the utterly massive amount if info here will only take me so far. Knowing the theory behind a process is good. It helps with understanding. But putting that theory into practice. That takes time and screwing stuff up to improve. My little projects before have been helpful in this endeavor. This project is really combining my experience from those projects. Good eye on the direction of the grain. I wasn't paying attention when I cut it. The temp here took a 20° dump in an hour & I wanted to get inside. That's what happens with inattention. May try to use it anyways. But, I've got more if it doesn't workout at least.
November 25, 20187 yr Sounds like you most likely annealed the steel twice. I recommend you normalize before hardening and tempering as well, particularly after the welding.
November 26, 20187 yr Author So.... Not to sure how well this will work out despite my myriad of mistakes. This was a mystery metal coil spring. I assumed it was most likely 5160. I got a buddy with one of the fancy laser guns to get positive material identification. Cant remember the name. Xlr or something like that. Took three samples of my coil spring to him today to test for me. Comes back as A485-1 grade 1. Hadn't heard of that one. High carbon chromium alloy used for anti friction bearings. Element Weight % Fe 94.9999 — 96.7999 Mn 0.95 — 1.25 Cr 0.9 — 1.2 C 0.9 — 1.05 Si 0.45 — 0.75 Cu 0.0 — 0.35 Ni 0.0 — 0.25 Mo 0.0 — 0.1 S 0.0 — 0.025 P 0.0 — 0.025 Could be good. Could be bad. I does not know. May just be a wall hanger in the end. Been a bunch of fun so far.
November 26, 20187 yr That grain direction would be fine if you had a through tang and a butt plate to reinforce it, but as it stands, it would probably break off short in the unsupported end. Love padouk; used a lot of it back when I was a custom furnituremaker. Carves beautifully and has terrific color, even after the red darkens to chocolate brown (unless you put a UV inhibiting finish on it, of course). One detail, though: padouk is an African wood, not Russian. Regarding belts, I will pass along some advice that ThomasPowers gave me that had been given to him by the master swordsmith under whom he'd apprenticed: "Grind like the belts are free."
November 26, 20187 yr Author I honestly didn't know its an African wood. Lying wood salesman & sticker guy. That would explain why I couldn't find more. I'm also fond of purple heart, zebra wood, & African black wood. I used to make custom pistol grips. Been sitting on a big chunk of birds eye maple burl for years. Was thinking about doing some kind of caps today. I've got probably about 50 pounds of random sized blocks of bronze sitting around. That is very sage advice about the belts. I'm getting pricing from some of the vendors we use at work. I really like the 3m cubitron belts we use. Hopefully I can pick some up.
December 1, 20187 yr Author Well, i managed to heat treat the thing. I read Latticino's write up in another thread on normalizing, and followed that. So hopefully my little blade doesn't fall apart now. Can't touch it with the best file I own. Got it in the toaster oven now to temper. 425-450ish for a couple of hour cycles. Assuming the thing is half way consistent. We shall see. Started another one as well. A bit bigger than this one. Not particularly happy with the shape of the blade, but I seem to have made peace with my grinder for now. So it should be fixable. Attempted to hammer in the levels on this one as suggested. Which is a pain in the butt for me at this point. Needs more practice. But I'm having fun learning from my mistakes, & working at this has become somewhat therapeutic.
December 1, 20187 yr 1 hour ago, fleur de lis said: Latticino's write up in another thread on normalizin That writeup was targeted at a specific problem (extremely large irregular grain). For typical normalizing you don't have to do the first quench (though it shouldn't hurt), just bring it up to full austenitizing and let air cool. The you can proceed with the series of gradually reducing passes (just above magnetic and subcritical anneal <barely red>). One weird thing that I have heard of, but not witnessed, is that apparently there is a lower limit for grain size reduction after which your blade won't harden as well. Guess there have to be some discernible grain boundaries to trap carbides and stress the matrix or something.
December 1, 20187 yr Author Did something wrong along the way & got cracks. Good number of them too. Annealing vs normilized maybe. Thank you Latticino for correcting me on the nomenclature on that. Probably should have not used water to quench. Course, judging by the rust. That wouldn't have mattered. Don't know if I hammered it hot enough. Kept it a bright red heat. But, maybe. The grain doesn't look to bad to my untrained eye. But feel free to correct me. Fairly happy with the shape of my bevel though. Must try to do that again. Basically, I accidentally dropped the thing & noticed the crack in the spine. Knew it was DOA & wanted to see the grain. A vise and rubber mallet did the breaking. I am will keep at it though. Had a lot of fun with this failure. Hammering a blade out is so much more enjoyable to me than straight up stock removal. I'll likely put this one on the was as a "don't do this again" notice.
December 1, 20187 yr Good Mornin' Fleur Start with a lesser carbon material, it is less expensive and more forgiving. The learning curve is not straight. Neil
December 2, 20187 yr Here is a knife i had with a crack a while back that I broke is a few places just to check it out. Steel is 52100. This picture shows 2 grain sizes. The top, blade section near the tip is pretty good, smaller texture. The bottom is from near the end of the tang. Everytime I heated it for normalizing, and for the quench, I heated up the tang first. The idea being to let heat travel to blade so I didnt overheat the blade. It ended up getting the tang way too hot, and the grain totally shows it. Looks like compressed gravel.
Join the conversation
You can post now and register later. If you have an account, sign in now to post with your account.