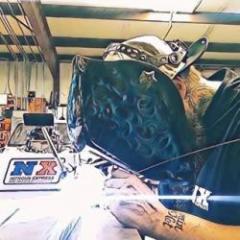
Kyle Cox Posted November 17, 2015 Share Posted November 17, 2015 Hey fellas tuning my 1" reduce to 3/4" with a plate choke.. I got the choke to only be able to open this far before it gets to much air and puts it out... Is this a good flame!? I'm unsure of the pressure output as the gauge is not reading correctly but I do have it regulated! Quote Link to comment Share on other sites More sharing options...
Frozenforge Posted November 17, 2015 Share Posted November 17, 2015 Flame looks too rich (too much fuel) it also looks like your propane pressure is pretty low so it may not be inducing enough air. When you say it goes out when you open the choke does the flame actually blow out off the end of the nozzle or does it go back up the pipe then go out? Quote Link to comment Share on other sites More sharing options...
Charlotte Posted November 17, 2015 Share Posted November 17, 2015 Frosty has covered tuning forge burners any number of times. First off put burner in the forge it is going to run in. Then lets talk about tuning. Quote Link to comment Share on other sites More sharing options...
Kyle Cox Posted November 17, 2015 Author Share Posted November 17, 2015 Sometimes it will make a flutter noise and stay that way or it will go completely out! I'm using an older acetylene regulator to regulate it! If I slowly open the choke the short blue flame at the tip gets smaller and less defined then goes out Quote Link to comment Share on other sites More sharing options...
swedefiddle Posted November 17, 2015 Share Posted November 17, 2015 Good Morning Kyle, Is that Galvanized Fittings??????? It'll kill you. What is the Propane pressure? Looks like you are out of Propane. Run the burner in a fire-box, they react way better. Dangling in the air, tells nothing. Neil Quote Link to comment Share on other sites More sharing options...
Kyle Cox Posted November 17, 2015 Author Share Posted November 17, 2015 I'm running about 9psi on output! I have tried screwing the regulator in all the way and trying it and it seems like I can barely open the choke and it blows its self out Quote Link to comment Share on other sites More sharing options...
rjs Posted November 17, 2015 Share Posted November 17, 2015 jet size? Quote Link to comment Share on other sites More sharing options...
Kyle Cox Posted November 17, 2015 Author Share Posted November 17, 2015 .030 Quote Link to comment Share on other sites More sharing options...
rjs Posted November 17, 2015 Share Posted November 17, 2015 15 minutes ago, Kyle Cox said: .030 have you tried one size larger? ( .035 if you are using mig tips) Quote Link to comment Share on other sites More sharing options...
Kyle Cox Posted November 17, 2015 Author Share Posted November 17, 2015 I will give it a try thanks!! I may have a bad regulator I hook my weed burner up and it works awesome ... Large roar and intense flame Quote Link to comment Share on other sites More sharing options...
Kyle Cox Posted November 17, 2015 Author Share Posted November 17, 2015 Threw a .035 in just a sec ago... Still went out I took swede fiddle advise and threw it in my coffeecan and I could open the choke all the way!! I couldn't do long as my cement has yet to come in but it seems to be running much better in box Quote Link to comment Share on other sites More sharing options...
rjs Posted November 17, 2015 Share Posted November 17, 2015 how long is the 3/4 inch pipe? It looks a bit on the short side in your photos. Flame retention in the open air is a problem that goes away when the burner is in a hot forge. Quote Link to comment Share on other sites More sharing options...
Kyle Cox Posted November 17, 2015 Author Share Posted November 17, 2015 6" without the collar extension Quote Link to comment Share on other sites More sharing options...
rjs Posted November 17, 2015 Share Posted November 17, 2015 1 hour ago, Kyle Cox said: 6" without the collar extension I am thinking that is a bit short for good mixing. How about some other opinions here? Quote Link to comment Share on other sites More sharing options...
Kyle Cox Posted November 17, 2015 Author Share Posted November 17, 2015 I'll grab a 10" here at work and try thank you rjs Quote Link to comment Share on other sites More sharing options...
Frosty Posted November 17, 2015 Share Posted November 17, 2015 Did you follow any of the proven construction and tuning directions before posting your question here? As shown it's burning rich but you're trying to turn a "forge" burner in open air. That's like trying to tune your pickup truck engine on an engine stand rather than in the pickup, a pretty poor method. First "Frosty" tip. Follow proven directions, NOT the HUGE mish-mash of new guy guesses you're going to get from asking the forum in general. By new guy guesses I mean discoveries folk make like ones you'd post as helpful discoveries you're going to make as you figure out how to get your burner to perform. I'm not saying that as a put down, folk want to be helpful and that's a good thing but it sure gets in the way of getting good help from proven sources. Try not to post every discovery you make if you decide to figure this out yourself. A number of guys have these things well and truly figured out not just me, I'm just one guy of many who winkled the things out years ago. For example, I've been posting the basic ratios for naturally aspirated burners since the internet went public and I can't count how many times here. The rule of thumb ratio for tube length to diameter is 8:1. In simple English the tube should be 8 times as long as it is in diameter. .75x8= 6" This isn't a hard number but it's what the commercial burners stick darned close to. Stick it in the forge. Lose the choke and forget F-O-R-G-E-T what psi other guys burners run well on. There are too many variables to try to contend with that effects proper psi so forget the other guy's psi. Frosty The Lucky. Quote Link to comment Share on other sites More sharing options...
Kyle Cox Posted November 18, 2015 Author Share Posted November 18, 2015 Thank you frosty!! I stuck it into a hard makeshift brick forge here are some pics! I adjusted as you stated in a thread I read! Orange flames around 16" outside of mouth to a nice 6" or so dragon breathe ... I think a lot of the orange may be from the dirty fire brick! This is just a temp holster for the burner test! no choke and was a nice roar Quote Link to comment Share on other sites More sharing options...
Frosty Posted November 18, 2015 Share Posted November 18, 2015 Looking good, flame has a nice symmetrical shape. You can probably lean it up a LITTLE more, just not so much it starts making scale in the forge. If you put a sill in the opening it'll help contain the heat in the forge better and help keep the work off the floor so the fire can circulate around it. I often lay a couple pieces of broken brick in the forge to keep the work off the floor and when possible close the bottom of the door so the flame can't just scoot out. I'll bet it was whispering when you took the first pics. These things are unpleasantly loud roaring beasties when tuned. Frosty The Lucky. Quote Link to comment Share on other sites More sharing options...
Kyle Cox Posted November 18, 2015 Author Share Posted November 18, 2015 Awesome thank you frosty!!! Your the man! i am starting to turn a 20lb propane tank that was old into a forge .. I would like opinions on kaowool and a refractory!? Quote Link to comment Share on other sites More sharing options...
Mikey98118 Posted December 5, 2015 Share Posted December 5, 2015 Kyle, The first problem with your burner is that you used a standard "T" pipe fitting instead of a Ward brand reducing "T"; you can order them from Larry Zoeller forge. The second problem is that you screwed a pipe fitting onto the burner, instead of building or buying a flared stainless steel flame nozzle; also available from Larry Zoeller Forge. Larry pioneered the popular modified side-arm burner. Make these simple changes and your burner should work fine. Kyle, Forge building questions are being debated elsewhere in these forums. If you don't want to read Gas Burners for Forges, Furnaces, & Kilns, then look under gas burners on youtube. In that section a guy shows a very creditable video on how to build a furnace from an old propane tank; his methods are a liittle different from mine, but I like them well enough. Quote Link to comment Share on other sites More sharing options...
Mikey98118 Posted December 15, 2015 Share Posted December 15, 2015 Burners can be run without flame nozzles (AKA flares) inside a forge; possibly because of back pressure; I don't pretend to have thought much about this phenomenon. This doesn't mean you are getting a stabil flame; just that your flame is being helped not to blow out by the forge. One of your photos shows the flame trying to do just that. The increase in internal diameter of your screw on "flare" simply isn't sufficient. A tapered flare uses pipe (stainless steel for better wear characteristics), the next size up from a burner's mixing tube, which is an internal diameter about 1/8" larger than the tube it mounts on; to this is added another 1/8" of increased diameter by hot tapering. My nozzle design uses a spacer ring between the mixing tube and an outer tube; together they constitute a flame nozzle with a different shape, but the same approximate 1/4" increase in internal diameter between mixing tube and nozzle interiors. The point of these "flairs" is to provide a drop in air/fuel mixture pressure just behind the flame, which allows the pressure of ambient air to push against the expanding flame, helping it to stay "glued" to the burner, instead of blowing off its end. This allows a burner to be turned up much higher than it can be otherwise. All you have to do in order to test this point is to saw off that coupling even with the end of the mixing tube, and slide another pipe over it so that it overhangs the end of the cut down coupling by about 1-1/4" light up the burner and slide the pipe back and forth on the coupling to vary the amount of overhang, and watch to see how it effects the flame. When you're satisfied with the results, measure the overhang, and that length to the width of the cut down coupling, and cut the outer pipe to that length. Mount your new flare with a single screw, because mild steel won't last long; but it will get you by until you can purchase that size tube or pipe in stainless steel. Quote Link to comment Share on other sites More sharing options...
Recommended Posts
Join the conversation
You can post now and register later. If you have an account, sign in now to post with your account.