DSW Posted December 8, 2013 Share Posted December 8, 2013 Did this last year and posted it up else where, but thought I'd add it here for reference in case it might help anyone who was looking to build their own. I took a basic blacksmithing class so I needed a forge, so I figured I'd use some scrap I had stashed to build one. The fire pot is about the only think I've had to buy material for so far. 5' of 1/2 x 6 flat bar. I've still got almost a foot left. Took a bit of playing around with some 1/2" plywood to work out the angles and rough sizes to match the commercial coal forge from my class. Top opening is roughly 12" x 10" and 4" deep. Quote Link to comment Share on other sites More sharing options...
DSW Posted December 8, 2013 Author Share Posted December 8, 2013 Next I needed a tuyere and clinker breaker. Tuyere is 4" pipe I got from a friend last year for some reason. Clinker breaker is built up from 2" angle and a chunk of 1/2 rebar. Not completely happy with the results of the clinker breaker. I made another one later to replace the original. Ash dump might need an additional counter weight added. We'll see after I try it out and see if the 5/8" x 1 -1/4" bar is heavy enough on it's own. So far it's working out Ok. Quote Link to comment Share on other sites More sharing options...
DSW Posted December 8, 2013 Author Share Posted December 8, 2013 Table... I had a decent sized piece of 14 ga, but it was the wrong size. So I cut it in half so I could get 23 1/2x 34" table out of the 2 pieces when I welded them back together. The sides are some 1/8" x 3 flat. All of this has been laying around in the old shop for quite a few years so it was all heavily rusted. Thought I'd try the electrolysis method to see how well it worked before I go at my post vise. A few before shorts. And the after shots waiting for assembly. Didn't do quite as well as I thought it would even after soaking over 24 hrs. Not sure why. Tried wire brushing off the junk when it was wet and got fair results. Tried on the next batch to let the stuff dry and then wire brush the crud off. Not as good a result. I'll try the pressure washer next time. Seems like the residue should come off easier. The arm on the ash dump came out better for some reason, not sure why and it was as bad or worse that the other steel. Less surface area in that batch maybe... Quote Link to comment Share on other sites More sharing options...
DSW Posted December 8, 2013 Author Share Posted December 8, 2013 And the table assembly... I had a small bit of oil canning in the two plates. Trying to weld 14 ga with .035 wire wasn't my 1st choice. ( ran out of .030 wire and had no tips with me for the .023 I had. Then like a dummy I welded the air transition on top of the table and added some more oil canning. Detail picts makes it look rustier than it actually was. Surface looked rust free prior to welding. Outside corner joint. Inside corner of the 14 ga and 1/8" just touching. Ended up running tap 2 on my MM185 and .7 on the wire eventually. Couldn't get decent results if I dropped the voltage any more. Inside showing penetration. the wide weld in the vertical was because the end of the one piece wasn't quite square and I had a large gap to fill. Quote Link to comment Share on other sites More sharing options...
DSW Posted December 8, 2013 Author Share Posted December 8, 2013 For a blower I have an old fire place air circulator I salvaged years ago for building a forge at some point. Pulled off the original adapter and made up one to fit the goofy angle of the fan outlet. I had quite a big set of holes in the corners to bridge. The galvy 3x2x2 reducing T didn't help even with the gavly ground off. Thought I had more picts of this, but it was getting late and I wanted to get all of this torn back down and a coat of high temp paint on. I still need to work out the legs. This needs to be "portable" so I can move it out of the shop to use it. The old gas grill stand I was thinking about using temporarily is too flimsy for this. I've got some nice folding legs, but the pot and blower means it won't fold and that seems a waste. Eventually I'd like to do a nice set of wrought iron legs, but that will take some planning. Right now I'm just using saw horses, but I'm debating about "wasting" some nice clean 1 1/2" square tube I've got, some really rusty 2" OD tube, or breaking down and buying 10' of 1" pipe... Still need to choose. I've got a nice set of oversized wheels I hope to use when I finally figure out how I want this done. Quote Link to comment Share on other sites More sharing options...
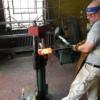
DSW Posted December 8, 2013 Author Share Posted December 8, 2013 Last batch of picts for now. A few of the forge as completed so far. I've got a better anvil stand now for my little 50 lb Fisher than what's shown in the one pict. Though the big 1 1/2" table does well if I need anything heavier. Also not shown is any of my leg vises, just the monster Parker on the big table. Quote Link to comment Share on other sites More sharing options...
Dave51B Posted December 8, 2013 Share Posted December 8, 2013 DSW... next time ,try adding some more sacrificial electrode to your E-tank. Think, up to, or more, equal surface area(pretty much line of sight). Yes, pressure washing right out of the tank seems to work best, when fresh out of the tank, but a solvent sprayer with water on the end of your air hose will work in a pinch. Wire wheel works well too. And, that clean piece will re-rust immediately , I normally spritz it with phosphoric acid to protect it. Dave Quote Link to comment Share on other sites More sharing options...
VaughnT Posted December 8, 2013 Share Posted December 8, 2013 Beautiful work DSW! I can't imagine trying to weld 14ga sheet, but I might try to copy your design for the pot. I just happen to have some half-inch plate laying around.... Quote Link to comment Share on other sites More sharing options...
DSW Posted December 8, 2013 Author Share Posted December 8, 2013 14 ga is cake with a mig. I don't really start to get "challenged" until it's thinner than 18 ga. Only thing I'd do different possibly would be to make the firepot square vs rectangular if I had to do it again. Trying to get the angles right to transition from rectangular to square at the bottom, AND keep the sides the same, took a number of tries using plywood and tape to proto type it all out. I finally got it to work going to rectangular at the bottom, but it wasn't as easy as it looked at the beginning. I did this pict for someone else who was asking about building a pot similar to mine. Quote Link to comment Share on other sites More sharing options...
arkie Posted December 8, 2013 Share Posted December 8, 2013 Nice forge, DSW. You'll like the high sideboards...keeps the coal in better! Mine were only 1 1/2" originally and I fabbed some 3" with tabs to slide onto them. Now, I'm not scattering coal on the ground. I gotta make an ash dump like yours. Now, I just unscrew the pipe cap on my 2" black iron...getting to be not fun with my stiff old back. Quote Link to comment Share on other sites More sharing options...
Rashelle Posted December 21, 2013 Share Posted December 21, 2013 For legs you might try welding on female pipe fittings onto the bottom at the appropriate size to your pipe. Then you can just screw on or off the legs as you decide to move it. Reduce weight and add to portability. Quote Link to comment Share on other sites More sharing options...
Recommended Posts
Join the conversation
You can post now and register later. If you have an account, sign in now to post with your account.