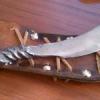
April 12, 201214 yr I am making a version or Prince Naulas Magic Spear this week. Yes, THAT Prince Naula. From Hellboy 2: The Golden Army.I was given a lawnmower blade so & cut, sanded, sanded more, and came up with what you see in the picture. The 16.9 oz water bottle was added for scale. The entire blade measures 13 inches long. Of that, 4 inches will be embedded into the wood. The wood will be carved to approximately 22 inches long x 3.25 inches wide x .75 inches thick. I am using wood that I think is too long because i am going to be able to keep trimming it back until the balance feels right.The original http://www.nitrocomi...es/39104023.jpgMy version:The handle I am carving by hand to look something like this, but with burned in filigree http://www.handaxepr...aded/FS1201.jpgInserting the blade into the wood using this method http://www4.gvsu.edu...nifemaking1.htmHowever I will be using two, 2 inch Chicago Screws like these to secure it instead of a but cap.http://ak.buy.com/PI...0/218913383.jpgThen making something out of leather decorative to cover the part where the wood meets metal, thishttp://i964.photobuc...er/75221e7a.jpghttp://i964.photobuc...er/ca0ad10f.jpgI am going to Temper and Anneal next. My plan is to temper it in the forge as evenly as I can until its “straw yellow” then quench in motor oil, three times. Then bake it in the oven at 400 degrees and let it cool overnight, three times. Why three times? I am shamelessly going to copy Stormcrows technique and see how it comes out. Questions for you all:1) I am “guesstimating” that the 4 inches and two, 2 inch Chicago Screws will be deep enough to support the weight of the blade. 2) Should I add epoxy when i insert it or is that overkill? Suggested brands?3) I can already tell that sharpening this is not going to be easy or fun. I’d like to sharpen it before i mount it. Any advice on how to get a good sharpening with just my hand tools and a few table clamps? I want to get it as even as I can over the entirety of all four edges. Thank you for any input!
April 12, 201214 yr I liked that spear and its companion cleaver sword, except for the blasted gut hook. :( A.) Always test junkyard steel before investing a lot of time working on it. Heat a thin section above non-magnetic, quench in oil, then see if a file bites in or skates off. If it bites in, you know it didn't harden adequately. Repeat the process again with water. If it still doesn't harden, I'd say move on to another piece of steel. B.) Understand your heat treatment process as thoroughly as possible. Blademaking is a total package; if all else is done well, but the heat treatment is off, you don't have a good blade. First you harden and then you temper to take some of the brittleness out that you instilled with the hardening phase. So, in this case heat the blade much hotter than tempering colors (straw is around 400 degrees and you want to harden it at above 1340 degrees), above the point it no longer attracts a magnet, then quench in oil that is pre-warmed to around 130 degrees. I like canola oil as its rate of cooling is good and it has nothing toxic to deal with like you would see with motor oil. It's up to you whether you quench it once or three times. If you go for three, heat it back up to above non-magnetic each time before your next quench. After your final quench, temper it in your oven for an hour at 400 degrees, pull it out and let it air cool (takes five minutes or less), then put it back in for another hour, let it air cool, and temper a final time. So about three and a half hours of your time total, and for three hours you can work on other stuff. :) C.) Epoxy is good. The slower the set time, the stronger the bond. Avoid the 5 minute or 1 minute stuff and use 30 minute. You may need to order it. I like Devcon and have had no trouble with it, other folks like other brands. J. B. Weld works great too, but is thicker. D.) It's hard to tell from the pics, but I'm wondering if your bevels are too short, making a bevel that is too thick to cut well. The closer your bevel starts to the edge, the thicker it is and the harder it will be to cut through material. Take a knife that cuts well and feel the thickness of the bevel, then compare yours and see if you have it or if you need to work some more. E.) Sharpen last, always. Otherwise you're just asking to get cut. :( I heat treat with the blade in its final form except for the secondary bevel, the part that does the actual cutting. After doing the handle and making the sheath if need be, then I put on the final edge. Most knifemakers don't take it as far before heat treatment, expecting to do grinding afterwards to make their blades smooth and leaving enough extra thickness to do so.
April 12, 201214 yr If you are at all interested in the mythology behind the spear and the one who used it do some research on Nuada Silverhand. You intend to put a lot of work into this piece so why not spend some time looking into the real mythology and magick rather than the Hollywood version of things. That being said, I`d go with epoxy as well as the mechanical fastenings. Thousands of knife makers, yacht builders and gunsmiths worldwide seem to think it`s worthwhile to do it that way.
April 12, 201214 yr Since that blade is totally a-historical I don't see it tying into the Irish mythology at all and would just go with the pop-culture version. As previous mentioned you have the heat treat completely wrong! Hardening temps are *glowing* temps, well over 1000 degF. Tempering temps are usually between 375 and 600 degF depending on alloy. Annealing is making the metal as soft as you can get it. So your "I am going to Temper and Anneal next" post reads "I am going to make it softer and then make it as soft as I can get it" and after tempering it doesn't matter what you quench it in to cool it---now for Hardening it does! Really suggest you read through something like "The Complete Bladesmith" as a starter.
April 12, 201214 yr Read the heat treat stickies. Google your material specifications...easier said than done as lawn mower blade is highly variable and can have some pretty exotic stuff in it, or it can be 1050ish... Annealing is for prior to cold bulk finishing, prior to hardening then you harden then you temper last you do cold finishing, and install furniture. I don't see where you are going design wise, because I am confused by all the links, and there is no pen/pencil/crayon drawing of YOUR idea. Phil
Join the conversation
You can post now and register later. If you have an account, sign in now to post with your account.