March 27, 201214 yr I am about to start construction on the last piece of equipment for my shop, the forge and need some input. I want to build a side blast water cooled forge. Most all of the side blasts that I have scene, never actually used one, have a hood to evacuate the smoke. However most every one here recommends a side draft hood. Has anyone here built one with a side draft hood, if so can you post some pictures? I can see how a side draft hood would work with the blast blowing up from the bottom and then is sucked sidewise into the hood. I question if it would be effective having the blast blowing sideways in the opposite direction from the suction of the hood.
March 27, 201214 yr here is the link to the one i built it works really well, and i am extremely happy with it.. Link removed at request of owner
March 27, 201214 yr Author Sorry for the double post. I had the title wrong on the last one and thought everyone would think it was just another post for side draft hood, since that is what the title says. It is for a side draft hood but on a side blast forge which I have not scene before. I could not find a way to edit the title after it is posted. I am about to start construction on the last piece of equipment for my shop, the forge and need some input. I want to build a side blast water cooled forge. Most all of the side blasts that I have scene, never actually used one, have a hood to evacuate the smoke. However most every one here recommends a side draft hood. Has anyone here built one with a side draft hood, if so can you post some pictures? I can see how a side draft hood would work with the blast blowing up from the bottom and then is sucked sidewise into the hood. I question if it would be effective having the blast blowing sideways in the opposite direction from the suction of the hood.
March 28, 201214 yr Before you set things in concrete (pun intended) you may want to try a mud fire pot and a 3/4 inch dia piece of pipe for the side blast forge. This will allow you to make changes before the final build. Look at Hofi's side draft chimney in the 1000 series blueprints. IForgeIron > forum > pages > Hofi Series.
March 28, 201214 yr Here is the side draft I just finished building today. http://www.flickr.com/photos/kyblacksmith/7022497573/in/photostream I built it with a door that slides up, so that I can adjust the amount of draft. Hope this helps, Good luck Trip
March 28, 201214 yr Mark Aspery posted a pdf file with the one he uses on his sideblast here: Post #4 I think, Hope it helps... Rubén
March 28, 201214 yr Here's one of the two side blast, side draft forges that date back into the 1800's that I used while teaching in Newfoundland last year.
March 29, 201214 yr Author Thank you to everyone who replied. Ruben that PDF was exactly the information that I was looking for. Randy your picture was also quite helpful; since you used this forge can you give your impressions of how well you thought the combo worked.
March 29, 201214 yr As far as the blast to draft there was no problem. Only problem we had was that we couldn't get a very big fire. I believe this was due to tearing down the chimney and putting it back up and not doing drawings or taking photos of what had been there. Once we added more bricks to the back of the tuyere we got a bigger fire. We still want to see a neighboring shop, that wasn't rebuilt to see the logistics of that forge. Here's the shop: https://www.facebook.com/pages/Green-Family-Forge/332813906740743?sk=photos#!/pages/Green-Family-Forge/332813906740743 And some photos of the forge in operation:
April 9, 201214 yr Author Randy, thank you for the pictures and info you provided. I have finished all of my current projects and am ready to start constructions of the forge. I just need to finalize my design and gather the materials. I am going to follow Mark Aspery’s design for the boss and water cooled tuyure and also use his side draft flu that Ruben linked to above. Mark’s PDF states the forge pan should be 9.5” to 10” deep but there is no mention of the other dimensions. I have scene everything from 18” x 20” to 4’ x 6’ mentioned in various sources. What size should the pan be? I plan on using it for home décor items like panels, gates, railings, and hardware.
April 10, 201214 yr Author I had a conversation with Mark Aspery about his forge and thought I would include what I learned here. His fire pan is 2’ by 2’ which is big enough for the fire. One a little larger like 3’ by 4’ is nice because it gives you more room when cleaning out the fire and you also have a place at the front where you can lay your tools and such. His pan is 10” deep with the center of the blast pipe 4” from the bottom. The pan is filled with 6” of dirt. A hole is dug out around the tuyure and shaped as needed for the fire. Above the dirt is fuel waiting to be fed into the fire. With this arrangement he has to slightly angle the piece to be heated to get it into the heart of the fire. For heating long bars the sides of the forge pan need small removable doors. Which when removed allow the bar to sit lower in the pan and in the heart of the fire. He likes to have the water jacket tapered for two reasons. The first is that it prevents steam pockets from building up at the front of the pipe which could cause a burn through. The second is it keeps the area in contact with the fire small. If it is too large it can actually cool the fire. His flu is not attached to the forge but sits in the pan supported by the tuyure.
April 10, 201214 yr Thank you for sharing that information. I've never seen a side blast in real life so this was something I wanted to know because I'm tweaking my 55 side blast and this helps me diminish the trial and error process I've been using :) Thank you again Rubén
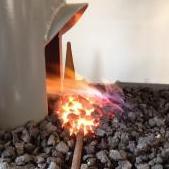
December 17, 201213 yr Author After several long delays my forge is finally finished. I fired it up for the first time this weekend and am very pleased with the way it turned out. The forge gets nice and hot and the chimney draws very well. I am using an electric fan and a sliding air gate. Any doubts I had about using a side draft hood with a side blast forge are gone, the combo seems to work very well.
December 17, 201213 yr nice tight design looks great I have one also they work great, very nice for forge welding
December 19, 201213 yr Kubiak is that entire box filled with coal? If not what'd you fill it with and how far up did you go?
December 20, 201213 yr Kubiak is that entire box filled with coal? If not what'd you fill it with and how far up did you go? I was wondering that too. A very nice looking forge too.
December 20, 201213 yr Author The pan is mostly filled with dirt. The dirt comes within an inch or two of the top and the fuel is sitting on top of that waiting to be fed into the fire. There is a hole dug out around the air nozzle which is filled with fuel. See http://www.iforgeiron.com/topic/29191-side-blast-forge/?hl=%2Bside+%2Bblast+%2Bforge post 18 by DanP for a pic. The hole can be shaped to suite the work being done. A small one like Dan shows can be used for an isolated heat or something much larger can be made. This is the basic setup, shown is an image taken from Mark Asprey's Side Blast Forge PDF:
January 3, 201313 yr Here is our forge with a side draft hood, we got the idea from a web site name beautiful iron. The thing works really well.
January 3, 201313 yr I'm trying to wrap my head around the idea of the deep pan, then filling it up with dirt. I'm guessing the dirt acts to protect the bottom and to build a bit of a clinker pit/ ducks nest kind of thing. Can someone explain the reasoning for this? Steve
March 23, 201412 yr I am in the planning stages of building my first solid fuel forge and I am really liking what I see here. Nice job Kubiak!! However, I have what might be a dumb question, but nevertheless, here goes: How do you keep the dirt in the bottom of the pan and pit from mixing and becoming a mess. Is this a concern at all? Thanks
March 24, 201412 yr RE: my "dumb" question, what I meant was, how do you keep the dirt and coal or coke from mixing and becoming a mess. Thanks
March 24, 201412 yr Some people that have a trough forge table use sand or ash and it is wetted and shaped like clay. After and firing of the forge the water drys and the sand or ash will harden in place some. Certainly not like cement but still pretty hard. The shape made will last a while and can easily be broken up with a hammer, wetted and re shaped as desired
March 24, 201412 yr Some people that have a trough forge table use sand or ash and it is wetted and shaped like clay. After and firing of the forge the water drys and the sand or ash will harden in place some. Certainly not like cement but still pretty hard. The shape made will last a while and can easily be broken up with a hammer, wetted and re shaped as desired Thank you, MLMartin.
March 30, 201412 yr If you're using dirt, it isn't a problem. After you've fill the forge with dirt, you just scope out the area in front of the tuyere and pack the sides down with your hand. I've never had any problem with "Mixing" nor with the hole keeping it's shape and size. Thanks Gerald,
November 23, 201510 yr Author I have been asked by a few people for pictures and as the ones above no longer seem to work I am posting some of them again. I am also including Mark Aspry's PDF for the bosh and flue. Blackmiths Flue Article.pdf Side Blast Forge Original.pdf
Join the conversation
You can post now and register later. If you have an account, sign in now to post with your account.