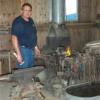
March 20, 201016 yr I always admire clean, well organized shops and I usually hate to show anything in mine because everything is covered in dirt and grease - but here is a decent pic showing a bunch of scale piled into the tray holding my anvil. It a sure sign that something has been happening when the scale pile builds up and the anvil face is shiny. The tray is 2-1/4" deep and brim full so it's about time to get the shop vac and see if any tools are buried in the debris. It also never ceases to amaze me how much forge scale pops off during normal work and a big shop must make mountains when doing really large work under power hammers or presses. FWIW, this was the first anvil I bought nearly 30 years ago. It is a 238 lb Peter Wright that had a horribly dished and broken face so I replated the top with a piece of spring steel off a track loader; it now weighs 252 lbs. The plate was set 3/8" off the existing face so I could weld from the inside out and get a homogenous weld, which is why most people notice that the face is so high above the horn. This is the first one I ever rehardened; I got lucky that it turned out so well and it's been my main "battle anvil" since I began this journey with a hammer in my hand. I plan to keep it under I meander off into the sunset and hope someone will come by to ring it once or twice when I'm eventually not around to do it myself. I am also one of those odd smiths who works with the horn on my strong side so I would normally be facing the camera and behind it in this picture. This preference has nothing to do with the horn; I do this because I prefer my hardy tools to the left of my normal hammer impacts, a stance I would call "open faced". A double horned anvil is OK, too - so long as the hardy in on the left. You might also notice the ruler I carved into the leading edge near the hardy and below the face. It's a permanent scale in 1/2" increments so I can make quick measurements while working. The "T" shaped pieces in the tray are vise spacers and the other items are conventional anvil tools.
March 20, 201016 yr welding from the inside out would be pretty tricky to say the least did you stick a something like a 1 x 3/8 flat bar in the middle and work your way out cleaning the slag would have been a nightmare it would be pretty hard to clean 5 inch's in or at least really slow I bought a new anvil it needs some work it was used in a blacksmithing school in england the right side of the horn and the face are worn near the front its not too bad but it ould be nice to have a real flat face on it
March 20, 201016 yr Author welding from the inside out would be pretty tricky to say the least did you stick a something like a 1 x 3/8 flat bar in the middle and work your way out cleaning the slag would have been a nightmare it would be pretty hard to clean 5 inch's in or at least really slow I bought a new anvil it needs some work it was used in a blacksmithing school in england the right side of the horn and the face are worn near the front its not too bad but it ould be nice to have a real flat face on it Bryce, I ran a long piece of 3/8 round down the face to the hardy hole and tacked that to the anvil. I laid pieces of 3/8 along each edge of the hardy and circled the pritchel, tacked them, then added another piece leading from hardy to tail. The pattern on the face was sort of like this: __________________ "-----------------[]---o----" __________________ I placed the plate on top and tacked it front and back. I used 1/8" E6011 rod to reach down into the gap and did a weaving pass to cover from one side to the other. I chose 6011 because you can weld over the top of it without chipping it all away and it is not subject to bad slag inclusions. I had to move from side to side because the plate had a tendency to draw down on the side getting the welding and in fact, it was not perfectly square when I was finished so I had to grind the top with a slight bevel to get the face square across the body. I kept welding until the bead was standing proud on all sides then ground it away (although you can still see a the bead on the side facing the horn). I've replated a few anvils this way and it has always worked. Let me know if you have any other questions.
March 20, 201016 yr I like the scale measurements on the side. For the top repair, have you ever used 7018? The reason I ask is that my 7018 welds almost deslag themselves. Usually just have to drag the slag hammer across them to finish removing what is left.
March 20, 201016 yr Author I have never used 7018 but no reason it will not work. If you spot the stand-offs as I've described, you are only reaching in about a maximum of 2-1/2" on an anvil with a 5" wide face (since it is bisected). I had an idea once to adapt a needle descaler to reach down into the pocket but 6011 always worked. I also never repaired enough anvils to worry about it very much so I didn't pursue it. I also neglected to mention that a person is better off filling any holes in the face before adding a new plate. I repaired one Trenton that had part of the faceplate broken away completely so I filled the depression with the MIG before replating - just easier to get at before it's covered.
March 22, 201016 yr I have never used 7018 but no reason it will not work. If you spot the stand-offs as I've described, you are only reaching in about a maximum of 2-1/2" on an anvil with a 5" wide face (since it is bisected). I had an idea once to adapt a needle descaler to reach down into the pocket but 6011 always worked. I also never repaired enough anvils to worry about it very much so I didn't pursue it. I also neglected to mention that a person is better off filling any holes in the face before adding a new plate. I repaired one Trenton that had part of the faceplate broken away completely so I filled the depression with the MIG before replating - just easier to get at before it's covered. Did you pre-heat? Also, how did you cut your hardy hole into the plate you welded on? I'm getting ready to repair a small one (pics in this thread) but haven't decided on how just yet.
March 22, 201016 yr Bryce, I ran a long piece of 3/8 round down the face to the hardy hole and tacked that to the anvil. I laid pieces of 3/8 along each edge of the hardy and circled the pritchel, tacked them, then added another piece leading from hardy to tail. The pattern on the face was sort of like this: __________________ "-----------------[]---o----" __________________ I placed the plate on top and tacked it front and back. I used 1/8" E6011 rod to reach down into the gap and did a weaving pass to cover from one side to the other. I chose 6011 because you can weld over the top of it without chipping it all away and it is not subject to bad slag inclusions. I had to move from side to side because the plate had a tendency to draw down on the side getting the welding and in fact, it was not perfectly square when I was finished so I had to grind the top with a slight bevel to get the face square across the body. I kept welding until the bead was standing proud on all sides then ground it away (although you can still see a the bead on the side facing the horn). I've replated a few anvils this way and it has always worked. Let me know if you have any other questions. seems like a pretty cool method of doing it should be less grinding than just building up right on the face unless it warps too badly on you you can save anvils that are really far gone as well wrking 4 living you should preheat any anvil before welding on it
March 22, 201016 yr Author Did you pre-heat? Also, how did you cut your hardy hole into the plate you welded on? I'm getting ready to repair a small one (pics in this thread) but haven't decided on how just yet. I did not preheat because if you work without stopping, the anvil will get too hot to touch so the only chilled welds are the first ones - plus I was planning to re-heat treat anyway. For the hardy, I drilled a series of holes that were close together to get the center plug out then filed the protrusions until the hole was square.
March 22, 201016 yr I'm saving my scale for re-smelting back into iron---yeah I'm too lazy to go drag a magnet along the arroyo to get iron ore...
October 6, 201312 yr Well Hollis, I am going to give it a shot. I have a Mousehole that has been very abused. Jerry A. has repaired a few this way and it has worked very well for him. He has a piece of leaf spring that we will use. Hopefully, it will go as well as those in the past. Thanks for sharing.
October 6, 201312 yr My Mousehole's face has a significant chunk gone from it's hardy/pritchel area, not too many flat parts on it and the edges are bad, so I have debated refacing it some way. I have a pair of forklift tines that are the same width as my anvil's face (4") so I just might have to try this method using a piece off one of them.
October 6, 201312 yr The plan is to document the process with pictures and videos. I will be sure to let you know how it goes.
October 7, 201312 yr Author The plan is to document the process with pictures and videos. I will be sure to let you know how it goes. Jerry, JA is pretty good at it so I expect you'll be successful. Let us know how it goes and if I can help y'all...HW
October 7, 201312 yr HW I am so sorry for how you treated this anvil....However since I am a proactive anvil sympathizer...I will give it a good home for its eternity. And I will waive my usual monthly fee. It will be kept oiled and clean and daily I will speak kindly to it. No newbie will be allowed to hammer dents into its face or horn. It will never see the cutting tip of an O/A torch. Pm me for my shipping address. I will prepare a new mesquite stump for its arrival. You may request current pics most of the time and I will send right away. Of course I expect you to pay all shipping costs, and since I am so old and weak I will have to hire a couple of young lads to take it out back and place it quite carefully and respectfully onto the afore mentioned stump. I will submit a bill for that expense. :)
October 7, 201312 yr Author HW I am so sorry for how you treated this anvil....However since I am a proactive anvil sympathizer...I will give it a good home for its eternity. And I will waive my usual monthly fee. It will be kept oiled and clean and daily I will speak kindly to it. No newbie will be allowed to hammer dents into its face or horn. It will never see the cutting tip of an O/A torch. Pm me for my shipping address. I will prepare a new mesquite stump for its arrival. You may request current pics most of the time and I will send right away. Of course I expect you to pay all shipping costs, and since I am so old and weak I will have to hire a couple of young lads to take it out back and place it quite carefully and respectfully onto the afore mentioned stump. I will submit a bill for that expense. :) Thank you kindly, Rich and I will certainly give your generous offer my utmost consideration. My only condition would be that no live mesquite trees are harmed in the process...;-)
October 7, 201312 yr This mesquite tree will not be slain for the stump,,,I killed it long ago for something else...
October 7, 201312 yr Rich, Hollis is not too terribly far from me. To save the shipping, I would be happy to deliver it to you. I will pick it up at no charge and store it here until I get a chance to make the delivery. If there is anything else that I can do to be of assistance, please feel free to ask.
October 7, 201312 yr Rich, if you're seeing bullets in a battle of wits you're winning. Thats a beautiful anvil HW.
October 7, 201312 yr as surley will be mentioned at the graveside service---"He was winning and then he caught a colt"
January 7, 201412 yr I got started on my Mousehole Anvil repair. I rebuilt the step today. I have a piece of 3/4 inch leaf spring for the top. I had the hardy cut with a waterjet and have it framed with 3/8 inch square. I will drill the pritchel tomorrow and frame it with a piece of 3/8 inch plate. I have 3/8 inch round down the center and will add a little more to keep the top from pulling as it is welded on. It is a lot of work but, I am sure looking forward to the finished product. Thanks for the help.
Join the conversation
You can post now and register later. If you have an account, sign in now to post with your account.