OddDuck
Members
-
Joined
-
Last visited
Everything posted by OddDuck
-
This is probably the only hobby where it is perfectly acceptable to beat on an antique with a large hammer... My anvil is probably an early 1800's-ish one, and looks every year of it.
-
Wow. Shows how much attention I pay to the news. His house is about 4 miles from mine. I used to drive by it all the time. I hadn't even heard about this until I read this post.
-
In a Speedy-melt furnace? Stick with aluminum and bronze alloys, maybe the rare iron melt. They are not designed to melt and cast exotic alloys but for small production runs of basic alloys. For the things you are talking about you would have to have atmosphere and temperature controlled furnaces and very exacting chemistry in each melt. Probably an induction setup of some type or other and failures will be very expensive. You probably won't be using greensand, either. I won't mess with magnesium, and at melting temps titanium burns rather readily as well. If you have a crucible full of Mg catch fire in the school furnace you will probably be buying them a new furnace. And no, you can't just buy a bar of a particular alloy and expect it to be exactly the same after you melt and pour it. I hate to throw cold water on your enthusiasm, but this is very similar to the new smith saying "Can I make a katana out of bedsprings and sheet metal? I have a ball peen hammer and a piece of rail for an anvil..." or " How can I cast an anvil with thermite?". Learn the process and the terminology, learn about gating and risering, learn more about metallurgy and controlling the chemistry at pour temps. Casting exotic alloys is worth learning about, do your research and gain some more practical experience first.
-
Whitlox, it may be sooner rather than later, necessity being a mother, I am going to bull through on the gear project because I now have several pressing applications for gearing and they are just too xxxx expensive to buy. I may have results in as little as a month or so, stay tuned...
-
Thanks, Farm Hand, I appreciate the compliment. The project has been stalled, I have a bunch of things going on at the moment and just don't have the time (or dough...) to finish up the set of tooling ( dividing head, repairs and tooling to lathe and mill) to make the gears. I will finish the project. Eventually.... Stay tuned, might surprise you all by spring. You never know. Every time I go out in the shop I look at all the bits and it has been bugging me that I haven't made much progress on it. Thank you all for your patience, you will be rewarded for it.
-
I also have required of my daughter (16, talented, and beautiful, sometimes genetics are a mystery...) to inform her beaus that not only can my daddy make the murder weapon, use it in a painful and very final way, he can also easily destroy the evidence and likes to dig holes. You do the math. Good luck, you have years of wonder and joy ahead.
-
Nah, the guy hiting the anvil just found out that was how Chuck Norris makes tinfoil out of billet...
-
Disposeable aluminum turkey or lasagna pans and a propane barbecue, dries it out in no time and you don't have to worry about kitty presents. Do it a batch at a time as you need it or do the whole works at once.
-
Simple answer is that I just don't have the cash. I did research commercial gears, and a single set would have set me back almost $100. If I bought a bunch, yeah, the price per gear would come down, but it was still expensive. Besides, I'm stubborn enough that by jimminy, I'm gonna make the whole durn thing. (Stubborn or stupid, you be the judge... :rolleyes: it's a very fine line.)
-
Don't get hung up on what the book says it "has" to be. Copper would work fine at the firepot (if a bit pricy) and plastic would work fine to deliver the air supply to the tee that leads up to the firepot, you may have to rig a heat shield for it where it goes under the firepot. Look around, ideally you are looking for black iron pipe, even the smaller sizes will work. Check in your area for a dedicated plumbing supply store, and get ready for sticker shock.
-
I'd say go for it, 3/16 is a pretty thick piece of aluminum, is it diamond plate or something similar? That top has enough thermal mass that unless you put a really big chunk of red hot iron or a concentrated pile of live coals on top of it you won't have a problem. The heat is concentrated in the firepot itself, and the junction between the top and the pot isn't going to be thermally conductive enough to cause any damage. If you have the table, I'd say cut the hole in it and go for it. Probably the worst that will happen is that it'll warp, and at least aluminum doesn't get rusty. If you are worried about direct contact, line it with a layer of clay and sand, just like a rivet forge.
-
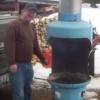
Here's a pic of the first blower kit, I'll be adding parts in the near future. I am planning on having the belt drive add-on kit by the end of this week. I'll post some pics of it then.
-
Probably not very large, maybe a B4 or 6 at most, and you are going to have some difficulty getting the larger one up to temp if it's full. You want a couple inches of fuel surrounding the crucible at all times. If you've been doing your research, make yourself a small popcorn-tin furnace to do your melts, it will just be that much more efficient, both time and fuel wise. Where you want to use solid fuel, the refractory liner isn't as important, so you can get away with cheaper materials. If you are a good scrounger, you should be able to set one up for near nothing. If you are intent on using your forge, you can have nearly the same effect by building up the height of the fire by making a chimney arrangement with firebricks, this will give near-furnace performance while allowing you to easily return it to a forge.
-
No pics yet. The gear drive blower is still in the works, I have a bit of a learning curve and equipment construction with my mill, I should have the gear drive version ready to go by summer. I sincerely appreciate everyone's patience, and I'm looking forward to seeing some in action soon. Mod note: advertizing removed.
-
Painfully slow and with little/no progress to show so far. Had a lot of non-critical or life threatening family stuff to deal with over the last few months so very little shop time. There will be something soon, things are starting to clear up time-wise so I'll be able to devote some shop time to them.
-
Up around here the problem is moose. I've seen the results of a few head-ons, one was a full sized Chevy pickup that hit one head on at about 70, it took off everything right up to the firewall, including most of the extraneous appendages around the engine like wires, pipes, etc. All that was left was the block and frame. Of course, there was ex-moose spattered everywhere on it. Like Ferrous said, "cow on stilts", and I think that moose are on the whole larger than elk, although the end result would probably be the same. Usually whoever hits one, they take out the legs and it lands on the roof of the car, very much bad. And, to top it off, the durn things are nearly invisible until you are right up on 'em. I've never hit one, but I've had a few rectum-clenching near misses. Thank God you are okay, and buy another of those brush guards. Seems like a cheap price for a little added armor.
-
FWIW, something as small as a key you may have a lot of loss due to dross, oxidation, etc. You also have to factor in the extra metal for the sprue and gating. I'm going to kind of go with Frosty, you are going to need some extra, find a couple of old keys that you aren't using anymore, or buy a couple of extra blanks at the hardware store for some extra. Your original key will still be in the mix so it can still be said that you made it from "that" key. Go to www.alloyavenue.com and search "Steam Casting". It's a pretty simple technique and for small pieces like that it's pretty easy to do. Also a nice thing about that technique is that you need a minimum of equipment.
-
The simplest and most versatile (and dirt cheapest) no-weld crucible mold is just a half-flask filled with greensand and ingot sized depressions pressed or carved in. Infinitely re-useable, you can make as many as you have sand for, and if you are careful when you remove your ingots, reuseable without having to redo it.
-
I'll second Matt, don't do it. Like I told ya in our PM's about this, find yourself a cast iron saucepan, or a chunk of iron pipe with a cap or welded bottom (find a buddy who is a good welder, it should be able to hold water without leaking). I'll un-recommend stainless kitchen anything, I've tried them and they aren't worth even the couple of bux they'll cost you. They last one or two melts at the most and then spring a leak. Stainless does nothing for you at those temps. I know you really really want to try this out, but shortcuts will discourage you due to imminent failure. I've tried a lot of the options that you have put forth, they have been abandoned for good reasons. Like Matt said, check out Ledgend Mine, you can get an economy fireclay crucible for under $20 (before shipping...) and their budget clay-graphite #8 crucibles go for a whopping $28 or so. It'll probably cost that much in welding rod by the time you get a good one made out of pipe. I kid you not, this will save you a bunch of time and heartache, and allow you to learn the actual craft of foundrywork instead of just getting the thing to work.
-
Yup, for those interested, it's www.oddduckfoundry.com . Original, eh? Not a heck of a lot on it yet but it's a start.
-
Thanks, John, and I sincerely appreciate everyone's patience with me. I pick up the mill tomorrow, and this project is up there high on the priority list. I will post my website as soon as I have something to sell. I will have an operating model of each before I post it. Who knows, maybe even my first Youtube video...
-
Oh, I plan to offer several different kit levels, I think I showed the belt drive bracket in an earlier part of this post. I have a different shell for that one, the more typical snail-shell looking one. I figured that I would offer all the different options at the same time, that way the customer would have the greatest range of options available. Ramsies, if you really really wanted one, I could quote you a blower cast in brass, I'd get the metal locally to save shipping costs. Seriously, if you are worried about melting your blower, you shouldn't, unless you are doing something horribly wrong. Even if you reversed it and it was sucking the fire and coals into the blower instead of blowing air out, the airflow would probably be sufficient to prevent an immediate meltdown, and I'd think you would notice. Don't be too quick to discount a belt system, as long as the pulleys were the right size you would get just as good a drive ratio with that. Might look a bit strange, but would still work like a champ. Kind of a potatos-potatas argument, really.
-
Ramsies11, I'm closer than I ever have been, I finally managed to pay for my mill, and it will be in my shop by Friday evening (coordinating three different schedules for delivery, don't ask). Progress will be rapid. This has been an excercise in both humility and frustration. For those who think I've given up, I haven't. I've been sidetracked on other projects that allowed me to get my new/old mill. As far as the blower being made from aluminum and melting, as long as there is air flowing through it (and even if there isn't) it won't melt. If your blower is getting hot enough to melt aluminum you are either cranking way too fast or you've set it IN the fire. Brass would look nice, but good gawd the cost! I'd have to charge WAAY too much for a blower made entirely from brass. You've given me a great idea for a display model, though. I will have them working soon, and ready for prime time.
-
Welcome, and nice post! Thought that looked like Colin's setup, I use something very similar. They'd love to hear from you over at Alloy Ave., they are always looking for info on investment casting. And just think, a couple thousand more acorns, and twenty or thirty thousand more leaves, and you'll have a life-sized oak tree. ;)
-
How fine the sand is depends on the particular metal you are pouring. For cast iron, you want a coarser mesh sand, say in the 60 mesh range or so. For aluminum, a 50/50 mix of 90 and 120 mesh sand is said to give the best balance in surface finish and porosity. For brass/bronze, this is where you need the finer mesh sand, 120 mesh and up. The finer the mesh, the more critical your venting is, The magic of greensand is that it is porous enough to allow the gasses created by the heat of the pour to vent out between the sand grains to some extent, and as the mesh increases the porosity decreases. An excellent read on this is the Navy Foundry manual. The nice thing about petrobond is that the venting problem is lessened considerably, so a finer mesh can be used with improved surface quality. The problem with petrobond and its variants is that you must use very specific ingreedients for it to come out right, and making your own can be a crapshoot. You also really need a muller to use it effectively, unless you want to throw away the burnt bits every time you use it. Oh, did I mention fairly expensive? Greensand, on the other hand, is duh-simple and dirt cheap to use. No special equipment needed either, and reconstituting it means just adding a sprinkle of water and mabey a dusting of fresh bentonite. It's what I use, I wish my sand was a bit finer, I got it from a guy who did iron and steel, but it works okay with aluminum and bronze as well. As long as you are using the right range of mesh for the metal you are using, the finish should be comparable between the two. Pour temp is very critical to surface quality as well. If you are still interested in oil-bonded sand, you may want to look up K-bond, recipies can be found on the web.