OddDuck
Members
-
Joined
-
Last visited
Everything posted by OddDuck
-
Adam2519, I am not going to sell completed units, this is going to be strictly a casting kit thing, I don't have the facilities or equipment to build them consistently or cost effectively. As far as pricing goes, I am thinking $175US + shipping for the full kit, with lesser part-count kits cheaper. I may add mounts or hose adapters eventually, if these go well. I've thought about doing a rivet forge kind of thing, I actually have access to one I could basically copy piece for piece, but the pan itself is a pretty big casting for a small setup like mine. I've been trying to think of workarounds, and I may have one, but I am going to finish this up first.
-
Here's a pic of the compound gear and the crank handle, I haven't had a chance to work on the gear yet but I cleaned up the handle a bit. I used a steel core to make the d-hole in the square end of the handle but I think I am going to switch to using a sand core to save time. I've got to modify the original handle a bit to make the coreprint but that's going to be pretty simple. I should get the gear done in the next few days, almost ready to take orders!
-
I've given that a thought, Bentiron, but I'm not set up for/ have any experience with lost wax or investment. They turned out a little oversized as-cast, so there will be lots of meat for fine tuning by the builder/s. I got a good cast of the compound gear this weekend, no pics yet. I also cast the handle, first casting always comes out a bit rough until I figure the gating out. It's a direct copy off of an antique handle off of an apple grinder or something. I bought the handle at a yard sale a few years ago because I liked the shape of it. I'll post some more pics when I get the compound gear cleaned up. The toughest part of this whole project is going to be writing the instructions.
-
Thanks, JNewman, I have seen the skeleton patterns like you spoke of in some of the older pattern books. This one was small and simple enough that a simple strickle worked, I used that casting to make the master pattern. I have more time than I do equipment, so some of the old school methods apply to my needs.
-
Thomas, the gearbox and gears were laid out with the same rule, so shrinkage shouldn't be an issue. I did put a riser on top of the larger gear to help control in-mold shrinkage. Serendipidously, the gear patterns were a bit oversized, but that will allow some meat for whoever builds one to clean'em up. I took a file and some sandpaper to the ones that came out and here's a pic I think they are still a bit rough, but for hand power they should be fine.
-
Getting closer! I cast a set of gears the other day, I tried for a full set but settled for a partial The compound gear for the center gear in the train didn't come out, I was experimenting with some local sand and it had way too much clay in it so it held too much moisture and ruined the cast. I also cast an impeller and that came out very nicely. I'm quite happy with that one. here's the ones that came out, Photobucket was giving me fits so I only have a few pics. And here's the one that didn't come out; I started to clean up the good gears today, and they are going to work pretty well, I think. I will be re-casting the compound gear in the next day or so and I will post some more pics.
-
Proper furnace atmosphere will help as well, run on the rich side to ensure a low oxygen environment. If you are looking for a cover, charcoal does work well, and will last a suprizingly long time in a rich furnace. Bottle glass and some borax work for a cover flux as well. To de-oxidize, stir like they said, or if the piece doesn't have to be perfectly pure copper, drop a zinc penny or two into the melt, the zinc will de-oxidize the copper as well. It casts okay, perhaps not quite as well as bronze or brass.
-
Just an update, I have been working on it on and off for the past week and here's the results so far: I've got it ground out to the shape I more or less thought it should be, and found some material for the handle and guard. I was originally going to use deer antler, but my only set has dissapeared into the depths of my shop somewhere... I have some black walnut slabs that someone gave me at some point so I thought that would look nice. I even got the grain to come out at a nice angle, I can't wait to see it finally shaped and finished. I've definately got some work to do on my fit and finish skills, I didn't get the guard and blade matched up as perfectly as I wanted, may have to try again. I have yet to heat treat the blade, but so far so good. Whaddya think guys?
-
Too late, Old N Rusty, my only saving grace is that I have too many other projects with higher priorities to go totally nuts. Pike3e, I'm pretty close, I'm in Orrington. Thanks for the compliments, guys!
-
Thanks, Mark. My friend makes knives through stock removal and was fairly impressed with how well it came out too. I left a lot of meat on it so I could tweak the shape a bit while grinding, the tang is a little over 1/4" at the base of the tang, and not quite 1/2" through. I think I may just grind down from the spine a bit to compensate for my error. My son has already claimed this first one, I got into blacksmithing to try and interest him in something other than TV, perhaps this will encourage him to come out and beat on some metal with me. He's not too interested in the foundry end of things.
-
Lost foam, actually, and I bored it out using the Gingery lathe that I am (painfully slowly) building,. Lost foam is nice for one-offs and quick projects, I usually don't like the surface quality but then again I don't coat my foam with anything, I usually use it for structural stuff where looks aren't important. I didn't get any pics of that, I start something and about halfway through I think "Geeze, I shoulda been taking pics!" The camera is usually dead anyways when I do remember.
-
Yahoo! I can finally post in the knife section. I actually heated steel and pounded it into submission. I helped a friend build a forge, and this was the first thing made with it. Two firsts, I guess. I used an old tire iron, and Brian Brazeal's technique to do it, and guess what, Brian's way works pretty slick. If this is my first result, it's either a really good way to do it or I'm just naturally talented. I think the former is probably the true part. Here it is in all its glory: For some reason they came out a bit blurry, my poor old camera ain't what it used to be. It's about 6" total length, I figured that I really didn't need a sword, so a reasonable sized knife would be better. I did make one mistake in hindsight, I should have set the tang down a bit from the spine of the blade, the handle is going to look high when I get it together. Now all I have to do is grind it out, and heat treat it, and give it a hilt. Easy peasy (yeah, right...)
-
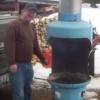
Here's a neat forge a friend of mine built for himself, he had the firepot already, and found himself a nice little champion blower, but lacked a base. So he took a well control tank and started cutting, and this was the result: The firepot stood off the bottom of the tank, so I gave him some clay and he built up around the firepot with a clay/sand mix until it was level with the top. He also was missing a coupler to go between the 3" inlet of the firepot and the 2" hose coming off his blower, so I got creative and cast him an adapter, came out pretty nice, and fit near perfect. The whole rig works like a champ, we fired it up yesterday and heated up the first steel on it, that little blower puts out a lot of air. Larry thinks his stack could be a bit taller for better draft, but after it heated up it drew a bit better. It's a piece of 12" stainless conduit he had. That's my handsome mug in the second pic, I managed to make a pretty good knife blank using the forge (my first ever, I'll post about that in the knife forum) using Brian Brazeal's technique. We had a fun afternoon, and Larry has a nice new forge.
-
if you really have the bug to start, use clay instead of iron, the no-dry school clay you get at Michaels or other craft stores. Get a large anvil shaped chunk of wood, and a ball peen hammer. Start banging out your basic forms in clay and develop your hammer technique and basic skills that way. If anyone complains, tell 'em you're learning how to play drums. You should be able to set yourself up to do this for under ten bucks, and you don't have to ask anyones permission. If it appeals to you, seek out a smith on the island somewhere (there's gotta be at least one) and ask for lessons or use of space. Nice thing about clay, if you mess up, just roll it back into a bar and away you go again.
-
If you have the fireclay, use it. Works fine, mix it 2 or 3 to 1 sand/clay. Moisten with only enough water to make it like crumbly cookie dough, put it in a plastic garbage bag for a day or two to even out the water content. layer it in to your firepot, and ram it down with a short section of 2x4 to make sure there are no voids. Either let it dry on its own for a week or so, or just build a fire in it to dry it quick. Nice thing about the clay liner, all you have to do to repair it is moisten it and spackle the cracks closed. Easy peasy.
-
When all else fails, read the instructions. It's not paranoia if they really are out to get you.... :blink:
-
Just out of curiosity, would cast buttons or rowels be okay, or do they have to be completely by hammer, chisel, and tong?
-
I cast the gearbox this weekend, and I am fairly happy with the results. I had one small section that didn't fill, but I think I have a solution. Here's the casting with the gating still attached: You can see the spot that didn't quite fill, but where this one will be for my use a little JBweld will fix 'er right up. Here's the back of the castings: I think if I add a connecting gate between the two on the end that didn't fill it will fix that problem. The cover side filled first, so it should help feed that end of the casting. Here's a closeup of the serial number, I decided to number them so when they are being sold 100 years from now they can tell when it was made... One can only hope. This one is # ODF03110001, the first four numbers are the month and year.
-
I realise this dates me horribly, but I remember seeing that first video on tv, the show was (I think) "Real People" or "That's Incredible" and my whole family would sit and watch it. This was back in the days of three major networks for you younger folks, when we didn't have 500 channels and nothing on. I was amazed then with his skill and watching this again I am still amazed.
-
I missed this post, I guess. Looks great Luke! How's it turn and how's the air supply?
-
Progress report, I am finished with the gearbox matchplate, and I am nearly done with the impeller matchplate. A little sanding and some fillets at the base of the vanes and it's off to the paint shop. Sorry for the pic quality, I had to revert to my old camera because my daughter absconded with the newer one and the USB cord for it. I hope to have a full set cast this weekend, and I'll get pics of the outcome, good or bad.
-
Yahoo! I can finally add an "it followed me home" post! Karma pays off, I got up early and drove my wife down to her grandmother's for a visit, she had spun out the week before trying to make the same trip herself and had to be pulled out of the snowbank so she was a bit nervous about making the trip that day. Well, I dropped her off and was released to go check out an antique place that I had been wanting to stop at for a while. I started looking around, and there it was, standing by the back door, a nice 4" post vice. It didn't have a price tag on it, but I figured what the heck, ask about it anyways. Turns out that the tag had just fallen off, and it was only listed at $80! And, to make it even better, the mall was having a 20% off winter sale, so it wound up costing me appx. $70. All the parts are there, the screw is in excellent shape, and the jaws aren't all beat to heck, nice and straight and they meet square. Pretty good deal, I thought!
-
As far as I'm concerned, the mere fact that you asked yourself the question and fretted about the answer is evidence enough that you take your ethics and honesty seriously. Many, both nowadays and in the past as well, wouldn't have thought twice about it. Like the others have already said, your time is valuable too, and your judgement as well. It didn't look right, and you solved the problem instead of giving your customer something you weren't perfectly happy with. You take pride in your workmanship, and that is a good thing.
-
Tlrief, that will probably be the next pattern, the impeller should be near 9" in diameter, give or take. The kit will consist of raw castings, so you may be doing some machining anyways. I'm going to try to keep it to a minimum. Hand tool finish, if necessary. Luke that was my trusty bandsaw, with the questionably sharp blade. It's just a small benchtop unit, but works great for small patternmaking. The large gear is a 48 tooth, and the small gear is a 12 tooth so if my math is right it should be 16 to 1 all told. If it isn't enough I'll just have to add another stage. A little more compact than trying it with belts.
-
Next steps, I got the gearbox side cut out, and the two gear blanks. I didn't spend too much time in the shop today, it was pretty cold in there and my pathetic excuse for a heater wasn't making a dent. The gearbox side is pine (or something, just an old board I had kicking around) and the gears are oak. There are only going to be these two sizes of gears for simplicities sake, final gear ratio should be 16 to 1, two stages of 4/1 increase. More progress to come. Oh, this is the site I used to get the gear templates: http://woodgears.ca/gear_cutting/template.html