
ILikeShinySteel
Members
-
Joined
-
Last visited
-
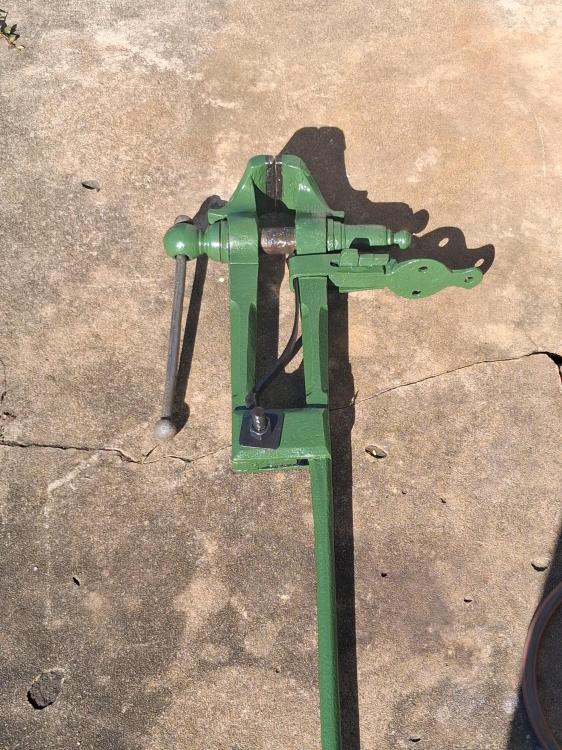
Been really busy for last few months but finally found the time to finish the vice and assemble it. Went with 3in1 light oil for the screw and used some grease for the pivotots working a treat and the jaws line up almost perfectly, quite happy considering the age and that its dont have the original bolt. Overall im very happy with it, I just need to make a sturdy stand for it; the plate is at least 4 inches taller than my existing workbench, which isn't all that sturdy as is.

-
Also just today I was thinking about how to turn acme threads and I asked my co-worker and he said without manually doing it, you'd need an adjustable gearbox for the spindle and feed screw. However, i came up with a solution. The main screw of the lathe would be acme, so you can use that as a reference. First you would wrap a square wire around the threads of the maimscrew-like how old screwboxes were made. You wouldn't need too much, probably an inch to 2 Then you'd have the steel you plan on using for the screw and turn the whole thing down to size, then turn down the end of it even further so that the wire you have wrapped can fit on snug, then braze, solder or weld it on. This would essentially thread the end of the bar. Repeating the wrapping you could use that as a "screwbox" and attach it to the back of the tool post, this means when the bar spins, it also moves the tool post and carriage forward. From there its just inserting a cutting piece ground to size, hss steel might be better than a carbide-gives sharp 90° corners rather than with a radius. You would want the spindle speed extremely low, and depending on yhe carriage resistance you might have to apply slight pressure but the wound up wire would guide the cutting piece to duplicate the threads. If the second piece of wound wire doesn't work as a "screwbox" just a flat insert between the makeshift threads should also work. I'd try it myself only th shop isnt open tmr, and I'm only working there for the holidays, so thats about it for me. The main issue I can think of is to remove the wire wrapping you would need the end of the lead screw exposed, or other acme threads to copy, like off another vise
-
You could go with 3in1 light oil, irs about $3 at bunnings, thats what i use. At the same i dont think it makes much of a difference, ive been working in a machining workshop the last two weeks and the main screws on their lathes are to so greasy and covered in swarf and filings, it has had no ill effect. I think it is a possibility, but in reality I don't think its that important. Your threads are pretty thin though and it doesn't hurt to get light oil, but I wouldn't worry too much
-
Looks bloody amazing, beautiful fit/lining up of the jaws. Really.like the meatball on the handle, much better than modern cylinder ends. Do you plan on giving the jaws teeth with file?
-
Looks incredible jono, like a proper vise. Also nice and shiny When you say swage pipe over the threads, do you mean hammer heated pipe over the threads to try and imprint the threads on the inside of the pipe? I don't think thats really possible because it would shrink once it cools anyway. The only way I could see getting the threads on the inside of a pipe is through tapping, and taps are mighty expensive. I would suggest making your own tap from the bolt by grinding away three grooves on the end and hardening it through a quench, effectivly creating cutting teeth like a standard tap, but i think the steel in bolts is just too soft unfortunately. Ive thought about doing that many times but never tried it. When you say the screwbox is keyed, do you mean has a lug or indents that corresponds to the immobile leg to prevent the screbox turning? If so you could always weld on two lugs onto the vise, touching the flat sides of your threenuts, this would stop them spinning. My vise isnt actually keyed, its stopped from spinning by friction and tension, its a tight fit on the sides so the screwbox can pivot vertically, but doesn't want to turn. Also I've noticed the hole in your leg is only wide enough for the bolt, usually the screwbox extends into this hole. Shouldn't make much of a difference though.
-
Also I've an idea for a spring that will fit in your vise even without the usual clamp. Ive put in a photo of the end of my spring, its got a T end with the arms bent so they wrap around the leg, the other end is held by the clamp. In your case, you could make a spring just like this, only at the other end it bends back in a V shape to hold onto the other side, like in the drawing. The pointy end of the v could sit in the enclosed box area at the hinge with both ends of the v having flaps that wra around each leg. Where you have the hole for the screw, the jaws get wider and this would stop the spring from sliding upwards.


-
Looks amazing, impressively fast work. Idea i had for the screw assembly, if you wanted more work(love of the game) you could use a really big screw designed to go into wood, this would mean the threads would have a larger gap between them, would be larger so should be stro nger, but most importantly the pitch is way bigger, more similiar to real post vise threads, so you dont have the turn the handle so much. For the acrebox you'd probably have to do it old fashioned and wind some thing round or square rod (same thickness as the pitch) around the threads, and then braze/weld them into a housing for the screw box. Thats how it was done on my post vise so should work I think the screws are called lag bolts or lag screws. I don't think ti would be too hard to get a hold of one cheaply
-
An angle grinder with a sanding disc or flap disc works really well for shovel handles, rounds it up really quick and you finish it smooth with a sander easy enough
-
They look really nice. Did you colour them through tempering?
-
With so many legs how do you fit your legs under the table, or just your feet
-
Are they white or black mulberries? I don't think that white mulberries really produce a crop but black ones pump out loads of berries, and wher either am none of them have seeds since no one has a male mulberry tree in this country. Ive made wine from my own mulberries as a gift for my dad and it was quite good. Only thing is you need to freeze the fruit over the harvest to because they'll go off if in only couple days Mulberry wood is also decent for smoking meat too
-
It does look like it has less grain and finer one, so the etching would be finer as well. Heavy etching would likely be bad anyway as it could make it quite uncomfortable to wear as it's given sharp edges and sanding the inside smooth could make it loose. Something to consider. You could always try a very quick dip in ferric chloride. But ultimately if the grains very fine, the finish will be too, cant change that.
-
I could be wrong but I always thought that to cold weld like that the surfaces had to be perfectly clean, which is why it happens is space. But if they're coated with any kind of lubricant or rust preventative like oil they wouldn't be able to weld due to a layer of oil/"contaminant" between the metal surfaces
-
I know its somewhat old but to add to this, contrary to what most have said, machining is far superior in practicality's sake. You can make things you would never make with hammer and tongs. For example, a blacksmith might use a swage block which was machined to have perfectly round indents (i know they can be forged but it isnt nearly as precise). Perfectly flat and round surfaces can also be machined/ turned whereas they would never be hammered that way. Personally I would be over the moon if I had my own lathe and milling machine, and intend on making one someday. But thats because I love making things and some things can only be made by machining. Obv blacksmithing takes the cake in terms of aesthetics and beauty but to me personally aesthetics are often second to practicality. Theres also no reason they have to be mutually exclusive, a Smith could forge a nice pleasant piece that needs specific tolerances to fit a certain application and those areas can be machined, leaving the rest of the piece nice to the eye.
-
Is that the stuff which is magnetic iron powder? Would it have the strength to form a mould or would the surface finish end up really rough with crumbly edges?


