

Alan Evans
-
Posts
1,990 -
Joined
-
Last visited
Content Type
Profiles
Forums
Articles
Gallery
Downloads
Events
Posts posted by Alan Evans
-
-
I would explore cleaving out the handles following the grain rather than rip sawing them out. The greener the wood the easier but even with seasoned and planked timber you can rip saw oversize following the grain and then split off the excess with a drawknife or froe or similar, the handles will be much stronger.
Alan
-
To clean out the female threads in the box I bend the tip of a bit of 10mm (3/8") bar at right angles and grind the bit to a chisel/scraper to fit the thread groove then rotate it in and out as a thread follower. I bend the other end in the opposite direction to form a handle and an indicator of the the direction of cutter tool.
I use graphite grease, I have too many bits of kit to maintain a regular oil maintenance schedule, so they are checked before and during use on an ad hoc basis.
-
In case the pm does not get to you...20mm worked fine, can you see the images I tried to post?
I can only suggest that you do not make a crank handle but follow my windlass and tube system. Trying to turn and hold an eccentric load for 4 or 5 hours would not be much fun. Much better to give it a quarter turn, lock off, leave for ten minutes and turn again... -
Why are you using cast iron for your mould? The basic process/principle of casting is that you pour molten metal into a sacrificial mould from sand or clay which can then be broken off easily.
What you are doing is a form of brazing where brass is melted onto the work pieces to effect a joint. The whole point of which is that it should stick... the problem arises if it does not.
Your original post asked for advice about the temperature it could be worked at. On a forging forum context "working" implied forging. Were you actually wanting information about casting?
Alan
-
Dick Quinnell used it quite a lot. He referred to it as "water twist".
He made it using a gas torch to isolate the heat as well.
As far as I remember he just held one end of the bar in the vice and with a twisting bar or wrench on the other end just heated and twisted one way and then heated again and twisted the other way rather than gripping in the middle and trying to do two together.
I think that avoided getting any bruises from the wrench.
Alan -
If you experiment with it so that you can find the upper limit you can then work safely below that. I find it works just like butter compared to steel's cheese and stainless' Parmesan! You can move it very radically in one heat so you do not need to push the heat limit. In my forge I can see that it is red before it gets too hot, but as Fe Wood says the ambient light levels of your workplace are specific even at different times of day.
-
@ Olly,
You are of course very welcome to borrow those bits for your event if you can make use of them -
@ Timothy Miller
I have just dug this out from the pile of "to be tidied up one day" in the old forge. It has a much longer leg than yours, or any of my others come to that. But the actual body of it is an inch or so shorter than yours. I picked up probably over twenty years ago and it still has a 15 pounds price label on it!
I only noticed the mounting plate and spring were attached to the wrong side when
I took the photo! -
@ Timothy Miller
I have just dug this out from the pile of "to be tidied up one day" in the old forge. It has a much longer leg than yours, or any of my others come to that. But the actual body of it is about the same as yours. I picked it up probably over twenty years ago and it still has a 15 pounds price label on it!
I only noticed the mounting plate and spring were attached to the wrong side when
I took the photo! -
On stones of course! Though maybe rating it in half-pints would be more commensurate with its stature!
Yes the frame is cast and the thread and lever are steel. The corrosion pits are because it was dumped in a quarry after my Grandmother died and I dug it up ten years later after a chance remark by my father when he saw my first fly press. "I chucked a little one of those away when I was clearing out her house"
It is spring lifted and the spring is either bronze or gunmetal, perfect condition when I got it apart.
Alan
In this area of the Cotswolds they call the wall crest stones "cocks and hens". Just thought you might like to know that! -
@ mainly Jeremiah
Well I have to admit that I went onto the bottom blast in part because the 5 gallon oil drum I was using rotted away and in part because I acquired a power hammer and wanted longer length heats. If you're starting out and going to be mainly using hand hammer then a back or side blast with a "swan's nest" fire is probably the most advantageous, have a look for the thread earlier where John B and I shared ideas with OllyO, I posted a sketch of the hearth layout.
http://www.iforgeiron.com/topic/28704-alcosa-forge-dimensions/page-3
@ Jeremiah and lupiphile
The bottom blast I made is not like any other I have seen. It consists of a sheet metal rectangular funnel underneath the hearth which the air blast fed into, there was a counter weighted drop out at the bottom for the ash. Mk I was a piece of flat 12mm (1/2") plate sat on top of the funnel and had a double row of OA torch cut holes running along like a domestic gas oven burner. I plunge cut these with the torch and discovered they were tapering holes larger on the side I cut them from, so I flipped the plate to put the small size on top so if any crud got into the hole it would fall right through. Mark II I fabricated from some 60x30mm (2 1/2"x1 1/4")bar set on edge with a 3 or 4mm slot between. I will measure it when I am at the forge next if you're interested. It was from rubbish lozenge shaped bar so I again used the angle to form a tapered slot for the crud to fall through. I manage to get a 500/600mm (20/24") heat with it and if I want a short heat I just drop a couple of bits of plate over the air blast slots. I also made a couple of banana shaped chumps which enabled me to contain the fire if I needed to reduce the spread and increase the depth of the fire (back to the swan's nest) for fire-welding or punching.
The fire is kept not very high generally, nothing like the Lillico fire pot, the bananas are only from 50mm (2") square I think.
I seem to remember that the Lillico pot was a heat source and that the workpieces were set on the ledge around the fire rather than in the fire itself, I have a couple of amazing Italian films of shovel and bucket forging with a water wheel powered hammer which uses a similar ledge type enclosed fire/furnace.
So as far as the stuff getting stuck on the joint surface it sounds from your description like there is not enough breeze/ fire-heart between the air blast and the workpieces, but with a 9'depth there should be plenty. Are the workpieces being heated in the flame above the fire or in the fire itself? You are not just burning a small fire in the bottom of the box are you? The coke is not spitting is it? If it is try and bank it up around the fire so it will dry out before use.
Try making up a fire plate and dropping it on top of your box and see how you get on. Use the box like my funnel. I found using the blanking plates and bananas useful to contain the fire for lighting and then when it was under way make the fire shape I needed by adjusting the loose bits.
My final confession is that I have not lit the coke fire for 7 or 8 years, I have made a number of gas furnaces and they are all I use now. The last time I lit it was to show a student how to fireweld!
-
@ Timothy Miller
I have just dug this out from the pile of "to be tidied up one day" in the old forge. It has a much longer leg than yours, or any of my others come to that. But the actual body of it is an inch or so shorter than yours. I picked up probably over twenty years ago and it still has a 15 pounds price label on it!
I only noticed the mounting plate and spring were attached to the wrong side when
I took the photo! -
@ Timothy Miller
I have just dug this out from the pile of "to be tidied up one day" in the old forge. It has a much longer leg than yours, or any of my others come to that. But the actual body of it is an inch or so shorter than yours. I picked up probably over twenty years ago and it still has a 15 pounds price label on it!
I only noticed the mounting plate and spring were attached to the wrong side when
I took the photo! -
I found that style of hammer the best for drawing out and spreading before I acquired a power hammer.
The one I used for hot forging I bought at a used tool place. I was told it was a saw setters hammer. Used for truing up the saw blade on a big band mill. It weighs 1800gm (4lbs).
I discovered the advantage of the twisted cross pein when I was using my teachers home made raising hammer when silversmithing. I noticed the hammer was much nicer to use on one of its faces and realised it was because of the twist. I then made all of my cross pein silversmithing hammers with a twist deliberately. And it also made me aware of the potential when I spotted the saw setting hammer in the junk shop.
One good thing that has happened thanks to your thread, I have given my hammers a wire brush and wax in order to take the photo. They have been in the drawer unused and going rusty since I stopped the silver work in the late Seventies! So on behalf of my hammers, thank you!
Alan


-
Following on from the littlest leg vice thread, here is my contender for the smallest fly press!
It was used by my grandmother for riveting the poppers onto her leatherwork. The spike on the front was used to assemble the components and push the leather onto them. A double ended bottom block was used for the different sides, male or female.
I have been using it as nut cracker.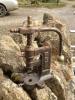
-
I remembered I had another little hinged vice in the shed at home. This one is complete and fully working.

-
I thought I was going to win until I saw twodogzz post!
The little pin vice was my Grandmother's and it came with a small fly press of which I will post a photograph some time..
Pair of 5 inch leg vices

Another pair of 5 inch leg vices

-
The Baffle after speaking to a couple of people it was mentioned that a baffle ( or some flat welded sideways onto the air pipe would help the water convect ....An inlet and outlet to an old header tank is a great idea save a lot of work
Thanks for replying
Jez
More of a cooling fin than a baffle then?
The heat source is up against the end of the tue rather than the air pipe so possibly concentric rings welded onto the back/inside surface of the end plate would be more effective for heat exchanging. The only part of my home made tue that burnt away was the end of the air pipe which I had stupidly projected out of the end plate and put a fillet weld around, of course that became the hottest part and was eroded. Your drawing shows it flush so should avoid that problem.
However I would still go for a dry bottom blast set up!
-
I also thought bead blast at first but if you zoom in you can see some longitudinal marks on the back plate, running in the same direction as the wood grain.
So I would think probably just fine wet and dry or similar (crocus paper, rouge paper), wrapped around a stick or block. May even have been Water of Ayre stone. Then either oiled or waxed.
Does the book give any clues as to what it is made from?
Of course it might have been made out of brass and been chemically patinated....it looks very similar to a silvered clock face, treated with silver nitrate.
-
@ Dale M sorry my smiley did not make it to the post:)
@ JJ if you have not committed yourself yet I would be inclined to cut out the wet tue experience altogether and go for a bottom blast fire.
The only advantage I found lacking was the simplicity of a tight fire for punching or welding, for everything else, especially when you get a power hammer and want to do longer lengths the bottom blast is far more versatile and maintenance free in my experience.
Alan -
The gripping force of a vice is proportional to the applied torque and the tpi of the thread. Same as with any lead screw. To compare any given two vices, look at the ratio of tpi and the ratio of handle length.
+1
You can increase torque easiest with a longer lever.
The longer lever is more radical but for an everyday improvement you can put a ball race in place of the washer on the thread spindle. Standard ball races will cope with a few tonnes of end thrust, angular contact or spheroidal roller bearings will obviously do more. -
rember you will lose 3 to 4 " @ each end when rolling will have to be cut of after rolled
I am intrigued, why would you lose metal at each end? -
@ Jeremiah Johnson
The straight tube tue works fine, I would tilt it the other way so that the tip which is the hottest part is lowest point, so that the thermo siphon will take the water away.
The one I used initially (for five or six years) had an end plate both ends and I had a couple of car heater hose (1/2") rubber pipes feeding in to an old oil drum as a remote bosh which saved making a bosh and trying to get a water seal around both air pipe and water jacket.
I do not quite understand your drawing. You show the thickness of the metal of the end plate but not the tube wall or the baffle.
I am baffled by the baffle! Just one tube inside another should be adequate.


swage block
in Blacksmithing, General Discussion
Posted
After twenty years as a professional smith I bought my first swage block because somebody turned up with it in the back of their car. I thought as a blacksmith I really ought to have one. That was twenty years ago and it has sat by the door where I offloaded it ever since...apart from using its bulk to set up a series of supporting pillars for assembling one job.
I know some people find swage blocks very useful, but if you are starting out and budgets are limited, I would use your money to buy tools for the project in hand and wait for opportunities to buy speculative equipment when it turns up cheap.
I might even sell you mine when you actually need one!
Alan