
JamesBBrauer
Members
-
Joined
-
Last visited
Everything posted by JamesBBrauer
-
The colors look awesome, if not .. well kinda pretty. (A photographer fella at work loaned me his color calibrator for computers monitors so I get really true colors.) Being really new to all this, and looking at these pictures, I think I am still tempering a bit hot. My bands of the same color are less than an inch wide on much thinner stock than this. note to self: be patient.
-
Good article in Wired Mag about Craigslist: Why Craigslist Is Such a Mess Gets into the philosophy of the founder quite a bit. He is an interesting character. I flagged that post.
-
I got a really good deal on the cylinder so I'm sorta locked into using it. But I'll be sure to leave room in the design to replace it with something smaller. I'm hoping that by using electronic controls I can dial in the stroke length and frequency into something reasonable.
-
Hope you didn't re-seat the bead with explosive vapors. I've heard tales of this, but never seen it up close. Supposedly it works.
-
Thanks for all the expert advice. I'm getting that a cement filled tube would be the equivalent a hard faced deadblow mallet. Or that there would be a second order effect of the compressed/breaking/shaking cement in the relationship between the two masses and the modulus of elacticity that would wreck the energy transfer. There is a long piece of 3 or 4" round (old carpet picker for a forklift) at one of the local scrap places that I might be able to get for a good price. Hopefully it is still up there and I they will let me cut it down to 3" lengths on-site. And John, I do get proud of things I build myself. I get complements on a tandem axle trailer I made, and like saying I built it myself. Plus, thinking about how to make things is a productive way to occupy my thoughts. Instead of thinking about the last person that ticked me off, I am assembling things in my head. I read your site, and you make some awesome machines. - James B
-
I would question the shape and symmetry of the handle. It looks like a modern hammer handle. Not that somebody couldn't have carved one that perfect with a drawknife, but I have my doubts. There may have been railroads in that area at that time. Here is a link with a timeline: http://en.wikipedia.org/wiki/Oldest_railroads_in_North_America
-
As the title suggest, can I fill some rectangular tubing with wet concrete, and weld a block of tool steel on top for an anvil on a pneumatic hammer I'm working on? From what I've read a 1:10 hammer to anvil weight ratio is a good rough guide. But I don't exactly get why this is the case. Is there some sort of shock pulse that rebounds the hammer, and cement would dampen it? Or is the idea just for the work piece to absorb all the energy from the impact? Or something else? thanks
-
I really got into blacksmithing to make tools, and managed to knock out a couple that got the job done. The big tires spoon started life as part of a jeep suspension, and the smaller one came out of my high carbon bucket but I'm not sure from what - maybe an axle from a motorized kid toy. The ends were pressed flat in my 12-ton shop press that I adapted for the task, then more final shaping and smoothing with the hammer and belt sander. They are far from perfect, particularly in regards to being symmetric. They were slowly tempered to blue on the ends. My forge can be opened on both ends, so I heated both ends at once - sliding the spoon back and forth to gradually heat them up. These really worked well. I bashed a hole in my 33" jeep tire driving up a canyon at Moab, and then drove the other jeep over the hook on a cement rake and left a nice hole in the tread. These spoons worked well for getting both tires on and off the rim for patching.
-
I saw Kinyon mentioned when I was looking for pictures, but searching on that specific term pulls up lots more examples than I had seen previously. Thanks for the tip.
-
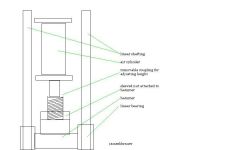 Sketch of air hammer mechanics.
 -
parts so far Scored a 5" cylinder with a a 6" stroke and 1" shaft on ebay for $10 (usd), plus shipping. It has two 1/2" ports. Mac 4-way valve with 24v solenoid. Has cyl A and B outputs, input, and exhaust. All 1/2" ports. Ordered some surplus 1" linear bearings to run on some 1" shafting I already have. Got a bunch of 1/2" fittings in copper and brass (biggest expense so far). the plan Plumb 1/2" copper straight off the tank of my 2-stage 80 gal air compressor. It makes about 160 psi. I know black pipe would be better, but I'm trying to keep the cost down. Keep the air friction for the 20' run between the supply and valve to a minimum with wide bends. Shock mount the valve to the cylinder with rubber or maybe springs. Put a 'T' with a screw cap between the valve and cylinder for squirting in oil. Mount the cylinder and shafts together so the output of the cylinder is driving a hammer that rides on the linear rails. Weld a 2" nut inside a sleeve on top of the hammer. Attach a mating threaded rod (I already have) to the shaft of the cylinder so I can raise and lower the hammer by six or so inches. what I haven't figured out yet How much weight will my cylinder move with my air supply? The plan is to fixture this temporarily to the bench and experiment. Will this be a single shot or can I get some hammering action? I'll start with a manual switch on the solenoid for single shots. If I can flick the switch back and forth and get some sustained hammer action, I'll build a little timer circuit that can control the stroke height and duration. What will the hammer and anvil be made from? I can get some 4" round stock locally. Depending on how much weight this can push around I would like a 10" length for a hammer and about 36" for the anvil. I'll dovetail both to take small dies.
-
progress report I lined the forge with a mix of kaolin, pyrax, and polyester fiber. The reasoning was the kaolin shrinks, the pyrax expands, and the polyester holds it together while it dries then burns out. I put a greased piece of 6" duct inside the ceramic wool insulation, and poured the mix in. This didn't work worth a crap. With the forge on end, the wool compressed more at the bottom from the pressure head of the thin mix. The greased duct didn't let any air get to clay, so when I pulled it out there were chunks of wet clay attached. I smoothed it out by hand and dried it over about a week with light bulbs and a household space heater. It still cracked all over the place. After ten plus hours of use, it isn't a total catastrophe. The insulation is stabilized. The lining is fairly durable. It is so thick that it holds heat really well for normalizing, but not so thick it takes too long to heat up. Next time I'll leave out the polyester fiber - it really smells. I should have mixed the slip thicker and pressed it in by hand and smoothed it with a tool.
-
I only used polyurethane glue once or twice because of the mess. After a big glue-up of a plywood carcass, my hands were stained and where it dried on my shirt it cracked and left a hole. I'm partial to PVA (yellow) glue for most woodworking, and sometimes epoxy. At least the epoxy can wipe off skin with acetone, though that is nasty stuff.
-
I thumbed through a couple of google books, and this one looks like it might have some specific info: Machine design: hoists, derricks, cranes - Google Book Search And I always thought a snatch block had independent side pieces along the pulley so it could be placed along the line, without having to feed the end through the pulley. But I guess there are different terms for things in different places. I set up some rigging last week with a couple of these to get some logs off the mountain and into the trailer to take to the sawmill.
-
Nice work. It sort reminds me of a doctors knife. Excellent attention to detail.
-
I'm partial to soapstone, sharpies,and my carbide tipped scribe. For the fat cuts the soapstone is fine, but for laying out drill holes, etc, I'll lay down some sharpie ink then scribe over it. The blue machinist ink doesn't work so hot over mill scale, seems better on aluminum. sharpie def: permanent felt tip marker
-
I refurbed a blower, but sold it to get cash for kaowool and plumbing parts for a gas forge. My coal forge has an electric blower. But anyway, if you get this blowing and aren't happy with the axial runout you might try a drill bit shaft collar to lock the position. I've used those on a couple of my contraptions, and they work nicely.
-
Thanks, those pix are awesome. I completely get it now. Next time I do scroll work, I'll fab up a jig like that.
-
I see a little steampunk in there, besides the sinew Geiger thing. But unlike most steampunk, it isn't made from plumbing parts and found objects. Quite the real deal.
-
I recently put a Norton 3x Zirconia Alumina (sounds like refractory additives) on my 4x36" belt sander and was surprised that it actually lasted longer than the previous belts I have tried. It looks like it is worn down, but it still does a good job sharpening the mower blade, and did well on a bunch of de-burring and weld prep for the two gas forges I am working on. It did snag on a burr and get ripped down to a smaller width, but this happens to about every belt I put on there. I would recommend this product. I've also used 3M and Norton wet-dry to run from 150 grit, on up to the 3000 grit range to sharpen chisels and plane baldes. The wet-dry seems to last pretty good relative to the 150 grit paper targeted to sanding wood. Speaking of grit, I think I read in Fine Woodworking that the grit is based abrasive falling through a screen with that many holes per square inch. If the grit ends in a 'p' it might be metric mesh or a vendor specific designation. And I guess most of you already knew that sander belts have a direction, based on how they scarf the two ends together. Took me about 10 years to figure that one out, but after running through a bunch of low end belts where the mounting direction actually mattered, I started to look on the back side.
-
So is the jig tapered to be taller on the section that has the tightest curve (the start of the jig)?
-
Here is one of my secret references: McMaster-Carr If someday this link goes dead, this is under the raw materials -> metals -> steel section of the McMaster-Carr website. - James B
-
How do you get the metal into those scrolling jigs? Start on the inside and spiral it down, maybe? I've got a scrolling jig for a metal bender, but I like the idea of these for the ability to reproduce the exact same curves. I played hell trying to get my scrolls symmetric on a headboard I made several years ago.
-
I was on that group, but haven't seen any activity for at least a year. I pulled the motor and steel off my bandsaw and chucked it in the trash when the blade came off in the middle of yet another crooked cut. Hope yours works better.
-
You might be able to cut it into roughly 1/8" strips, plane them to a consistent thickness, and make a lamination that would be durable. You could even stain/dye some of the middle laminations to give a little contrast, if you like that look. If you do go with a pine species, try to get wood from the near center of the log. Trees grow on the outside, so the interior cells will have harder (relative to pine) cell walls.