Pat Masterson
-
Posts
244 -
Joined
-
Last visited
Content Type
Profiles
Forums
Articles
Gallery
Downloads
Events
Everything posted by Pat Masterson
-
What did you do in the shop today?
Pat Masterson replied to Mark Ling's topic in Blacksmithing, General Discussion
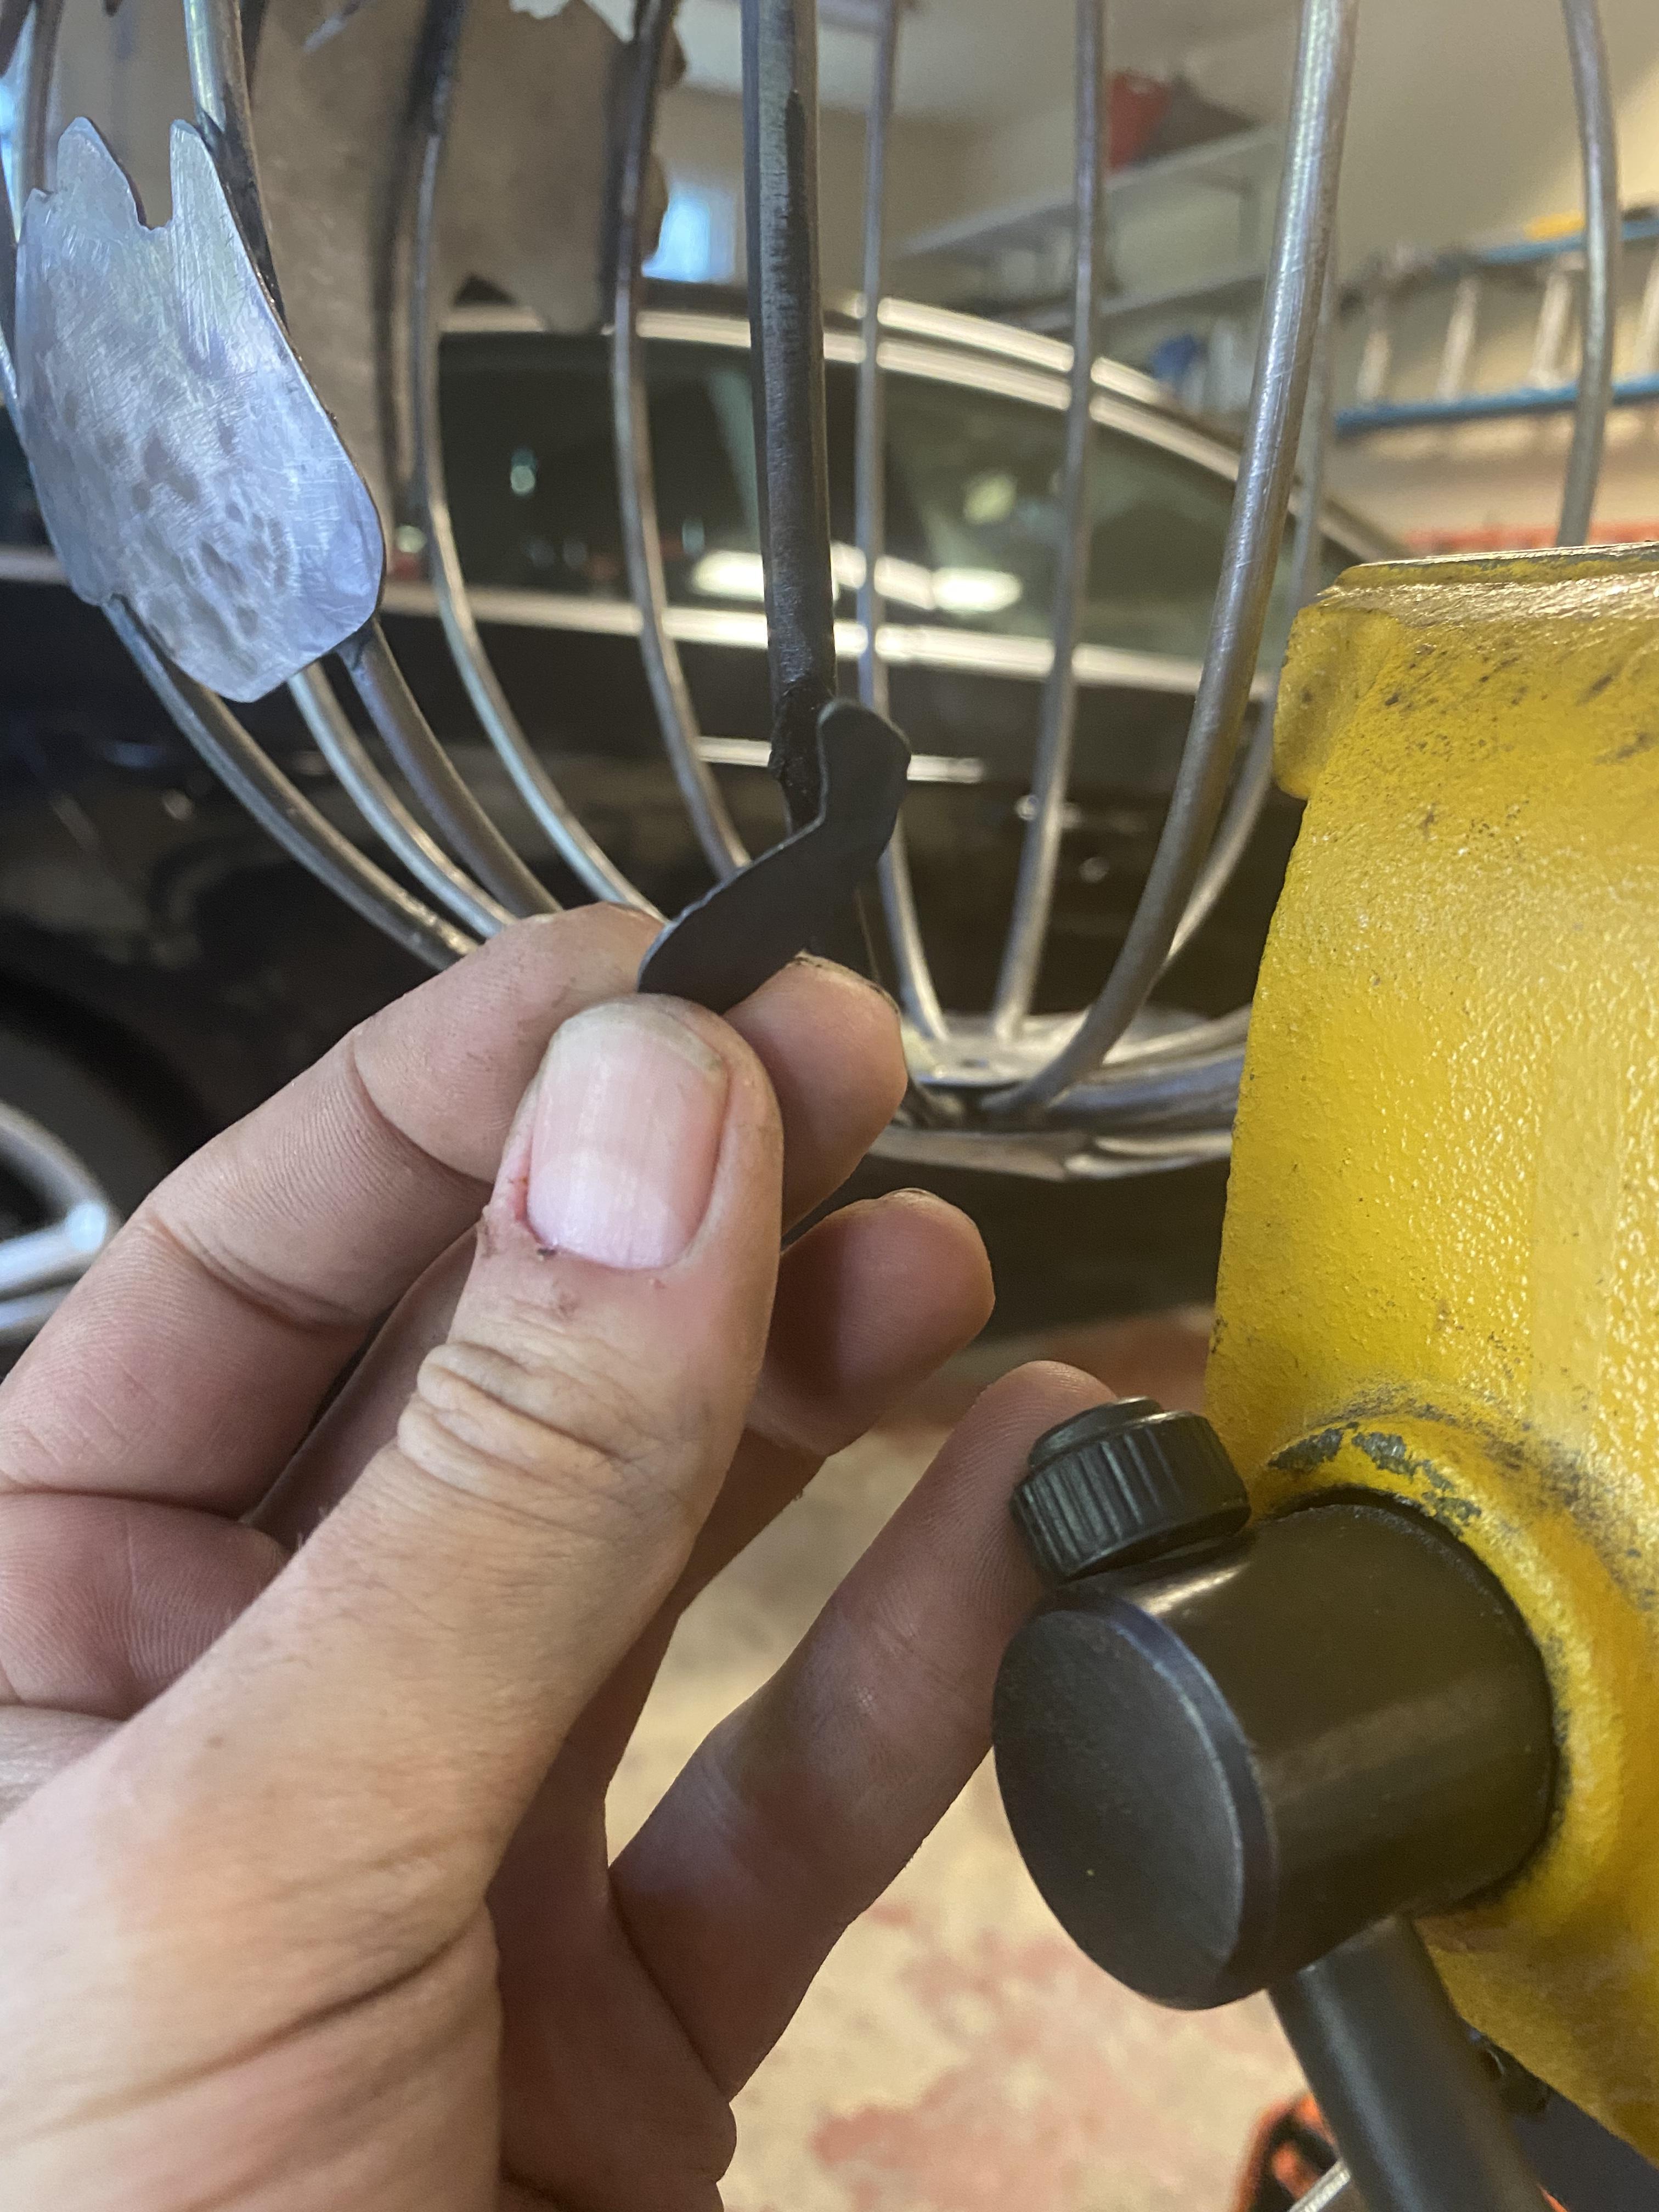
Thanks Frosty. What about the silver stuff that comeS with a little bernomatic? Do you think that would hold it or would they also fall off when blackening? I’ve never used it for anything. Chances are I’ll have to do what you guys suggested but since they’re already attached I figured I’d ask. Thanks. -
What did you do in the shop today?
Pat Masterson replied to Mark Ling's topic in Blacksmithing, General Discussion
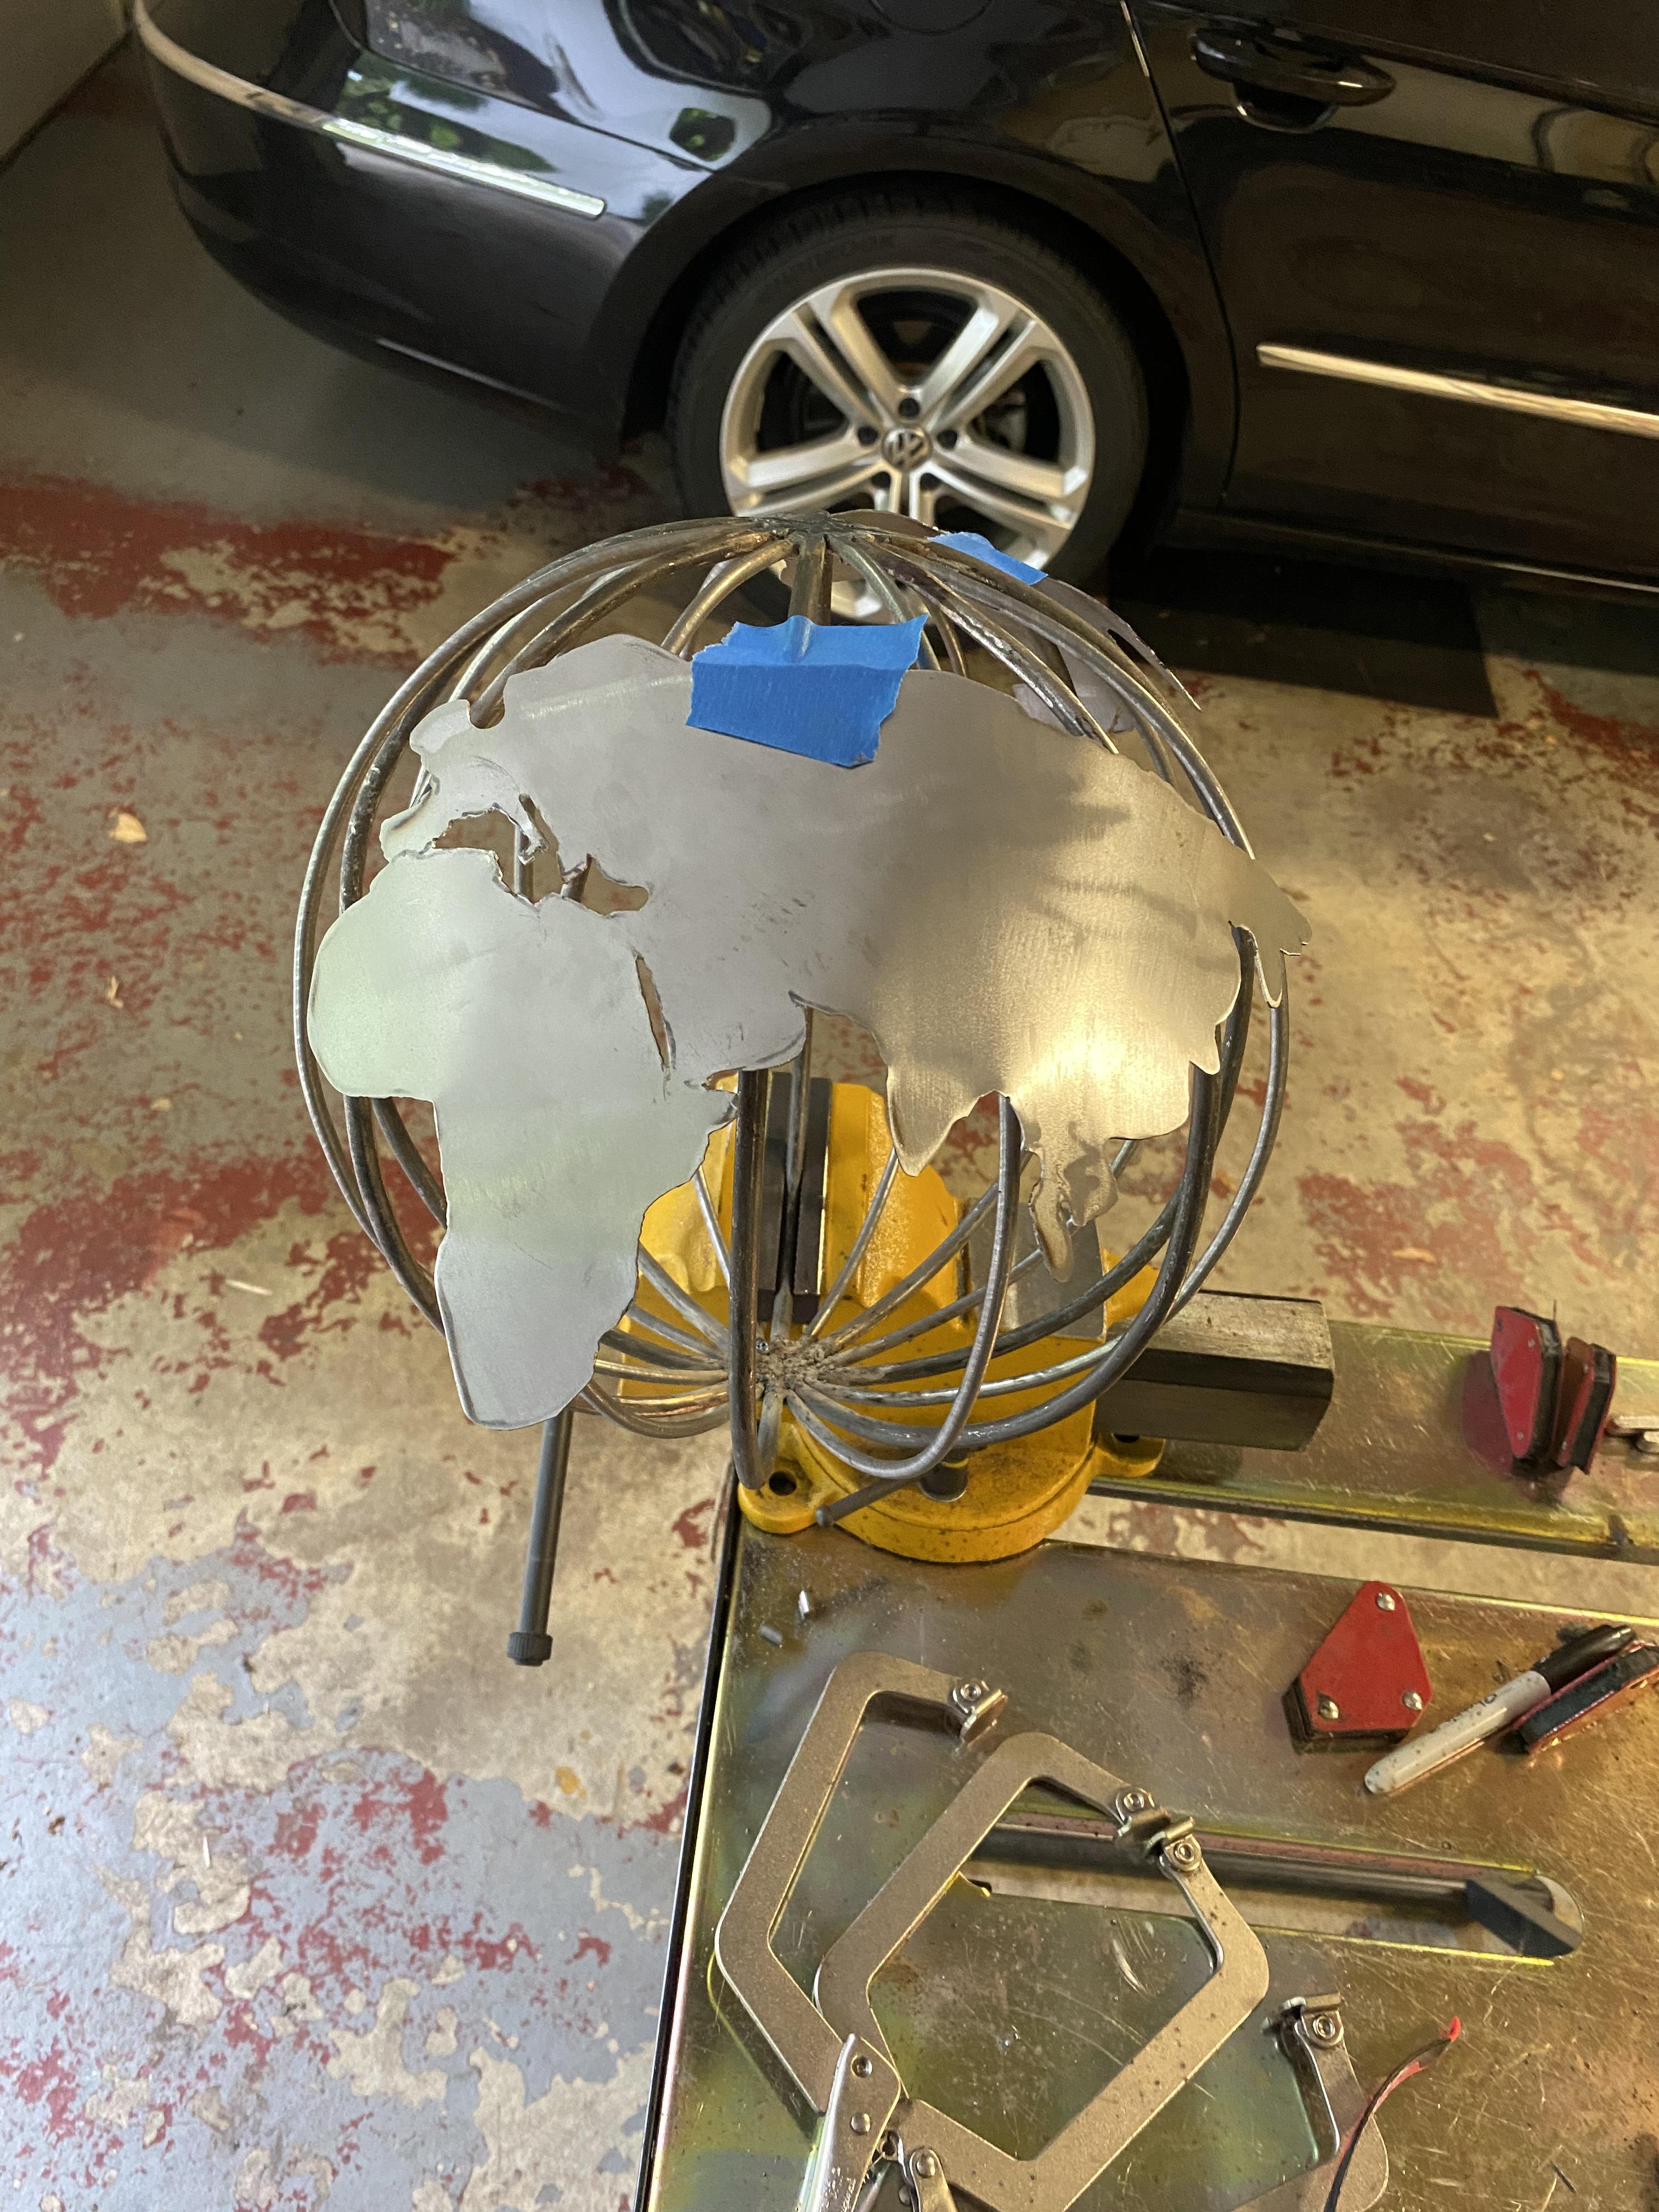
Ok I don’t know why I thought JB Weld would hold up to heat but it doesn’t. Starting heating to black with a torch so put a paste wax finish on and New Zealand or whatever this was supposed to be fell off. I almost went back and started tack welding but I know I’ll blow through somewhere and I’m too far to ruin this now. Considering painting it black and then clear coat or just a clear satin exactly how it is….any ideas/suggestions? Real shame because after getting one spoke blackened with the paste wax I can see how good it would have looked if I could do the whole thing like that. Forgot to put mock up of final assembly. IMG_1088.MOV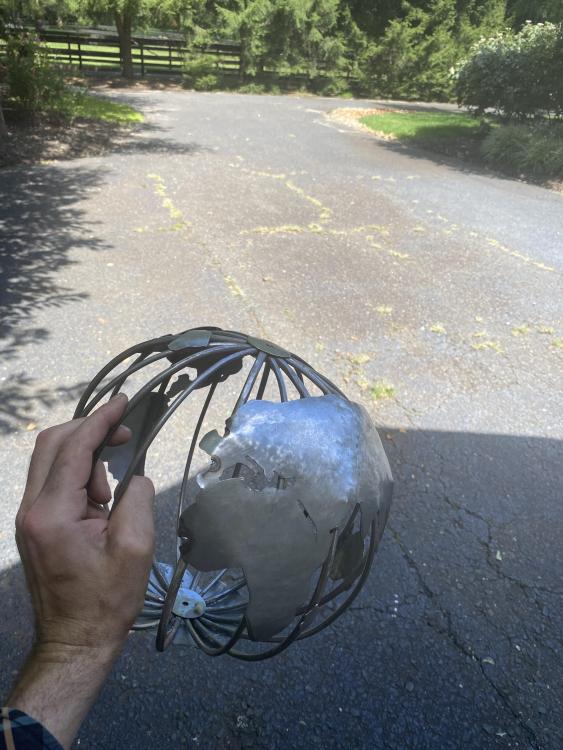

-
What did you do in the shop today?
Pat Masterson replied to Mark Ling's topic in Blacksmithing, General Discussion
Thanks for pm Les. -
What did you do in the shop today?
Pat Masterson replied to Mark Ling's topic in Blacksmithing, General Discussion
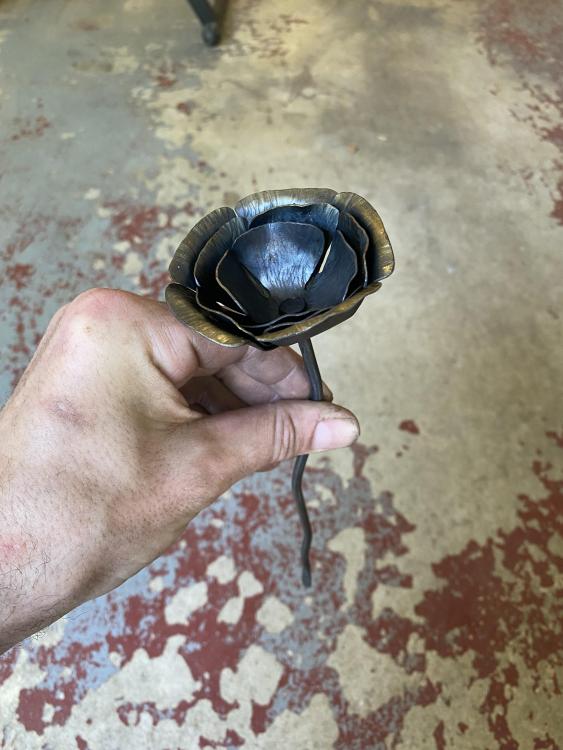
Thanks for the detail Ted. I do hit almost all of my stuff with a wire wheel before applying finish but a flapper wheel and a good cleaning I have not tried. This is really awesome. Do you cut the shapes for the roses out yourself or use precut blanks? My first attempt at a rose doing the former didn’t go so well - looks more like a poppy flower (thank you Thomas Powers for that- at least I have a type to call it instead of just a “flower” now). If you cut your own what gauge material are you starting with? My mind is going a little crazy trying to figure out how you did that bird - amazing. More pics if it’s not a pain please! -
What did you do in the shop today?
Pat Masterson replied to Mark Ling's topic in Blacksmithing, General Discussion
Ted - these are amazing. I’m always jealous of the finish for the pictures you post - it’s one of my biggest problems with my own work. I already asked what you use once before and you said you apply a satin clear coat. I got a rustoleum satin clear coat but it seemed to literally peel off once it was dried and looked terrible. I’m guessing I maybe didn’t clean the surface well enough before applying. Do you have a specific brand you use/# of coats/process? The finish on this compared to the door knocker is quite different unless it’s just the lighting but both are finishes I’d really like to be able to replicate. Appreciate any tips you can give. Everyone here makes great stuff but yours and Alexandr’s work are always the ones that seem to strike a chord with me the most. -
What did you do in the shop today?
Pat Masterson replied to Mark Ling's topic in Blacksmithing, General Discussion
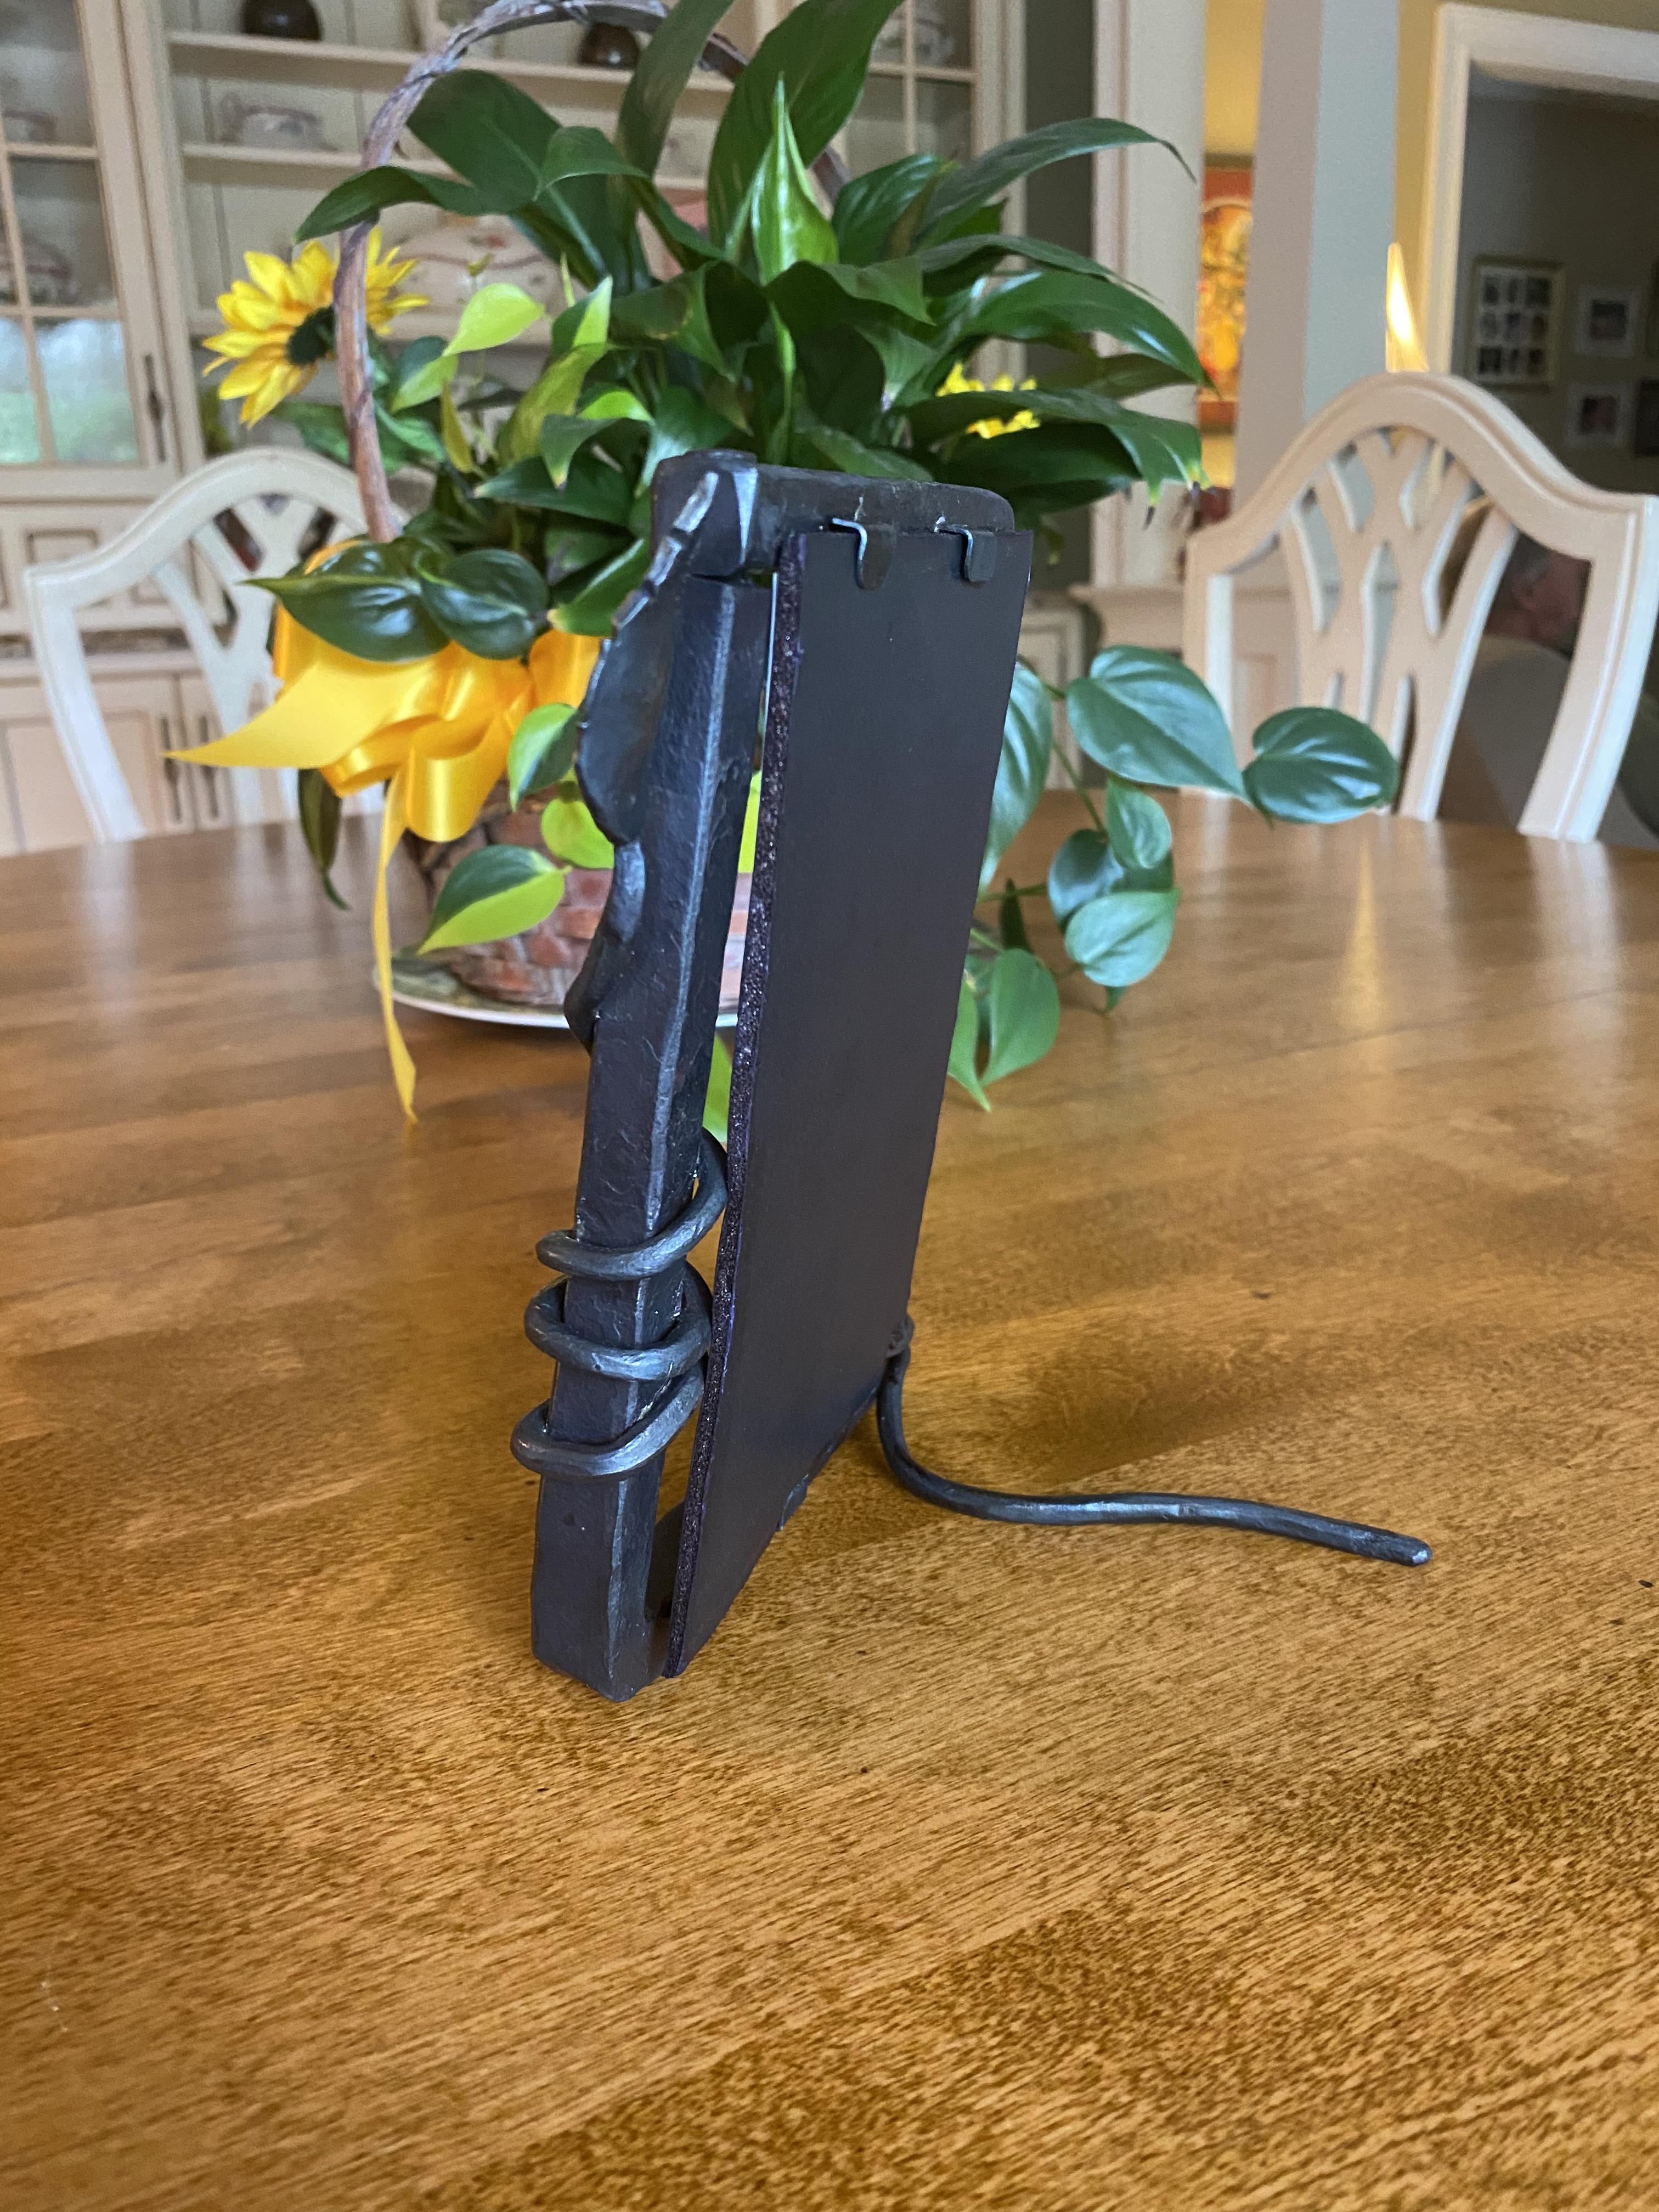
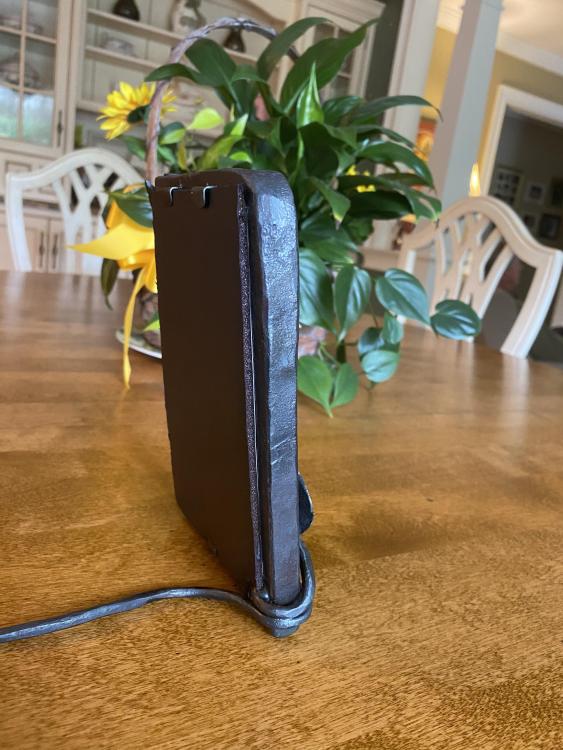
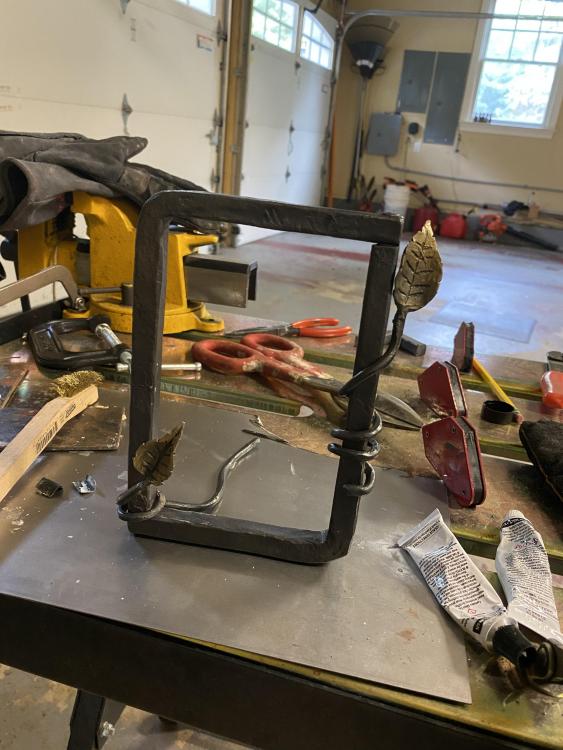
Very often I wish it hadn’t taken me till I was 31 to find this craft I enjoy so much. We got hit with a storm this weekend so I didn’t get any actual forge time in. I’m really enjoying welding though so I made this removable swivel shelf for tool holding at the anvil which I’m convinced you can just never have enough of. I got the idea from Black Bear Forge on YouTube - John’s is much better though. Video is only 12 seconds but it doesn’t seem to want to load. And I got the picture put in this frame so it’s finally finished. Not happy with the fit and finish of the picture but it will have to do. There’s a huge gap on the one side because of the vine but I knew if I started cutting I’d just made it look more sloppy. Looks ok from straight on. Blurred faces since I didn’t ask permission to post their picture lol. IMG_0928.MOV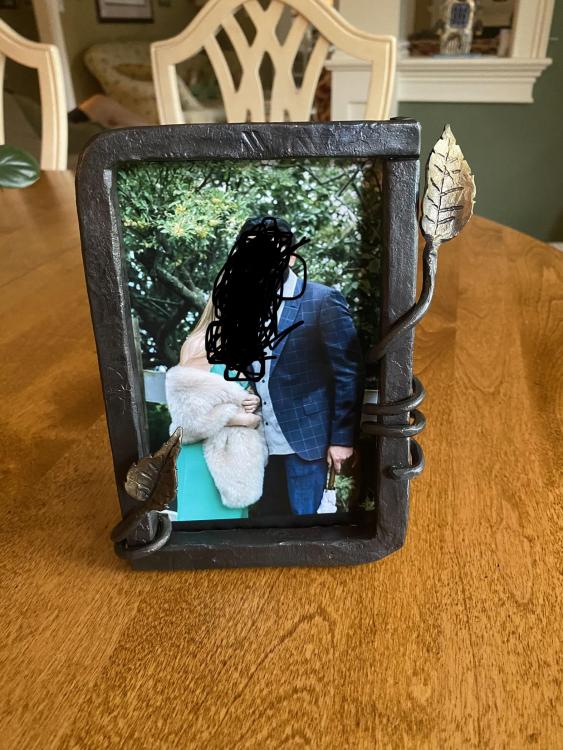

-
What did you do in the shop today?
Pat Masterson replied to Mark Ling's topic in Blacksmithing, General Discussion
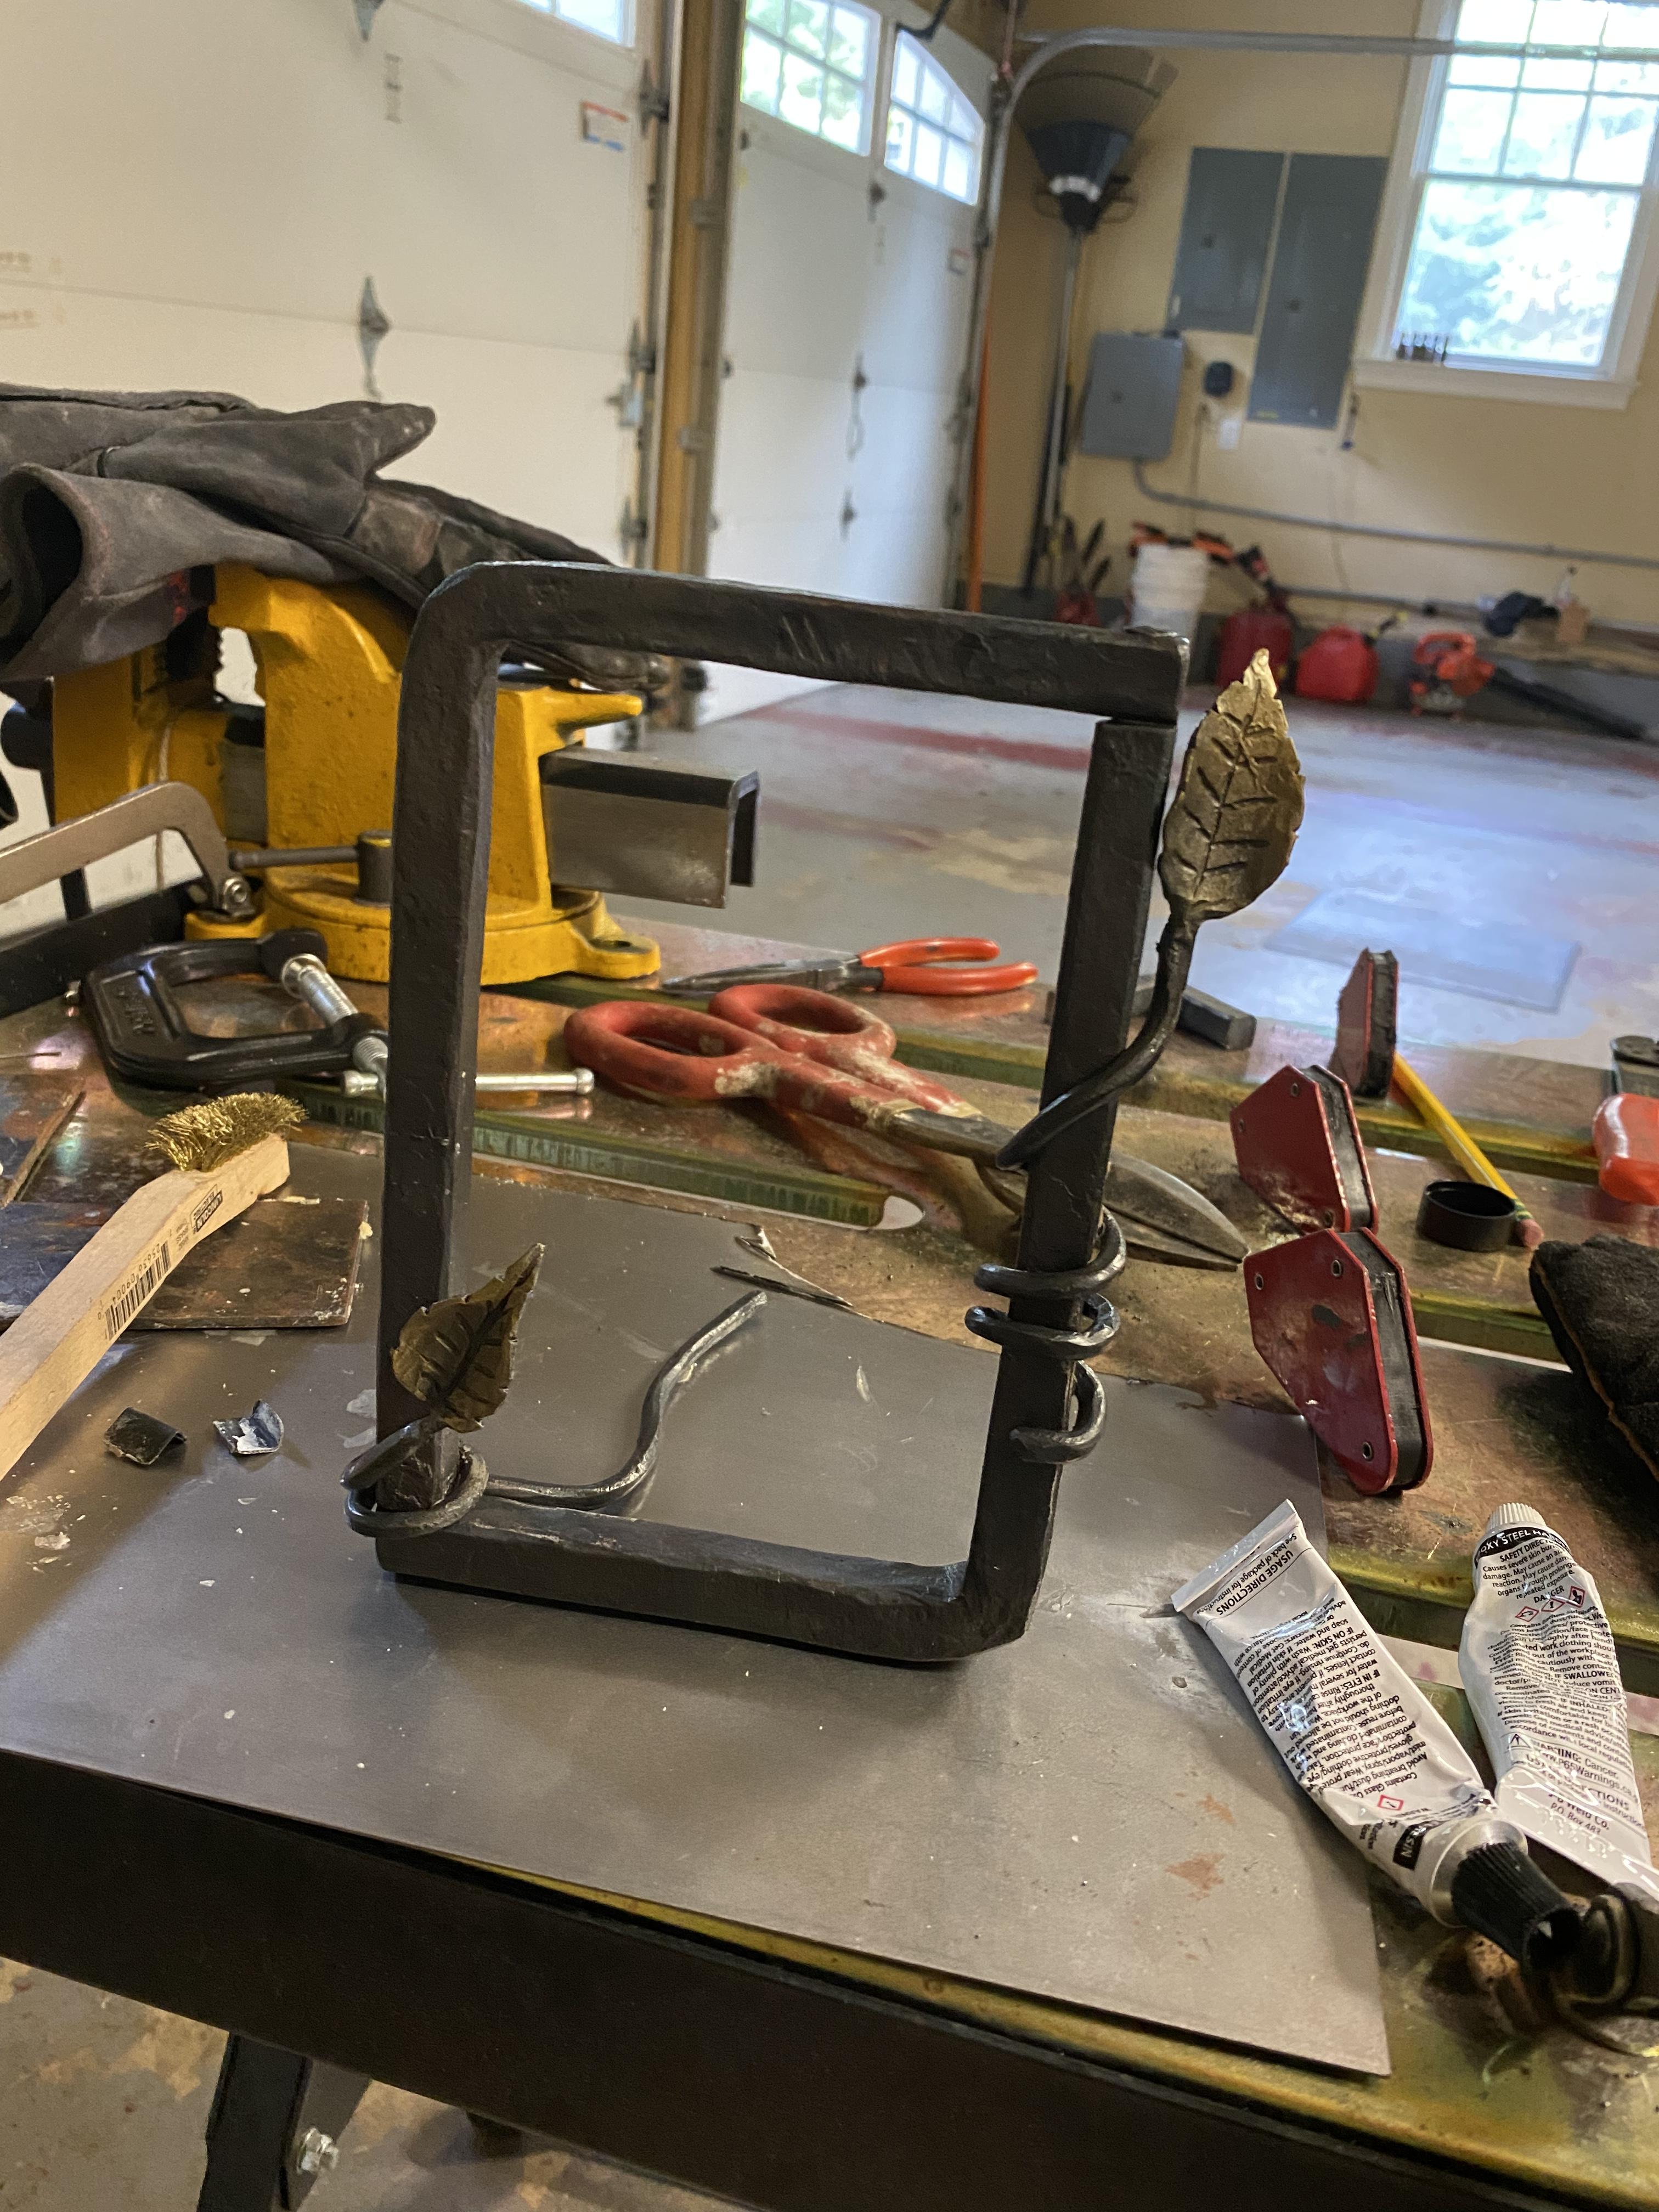
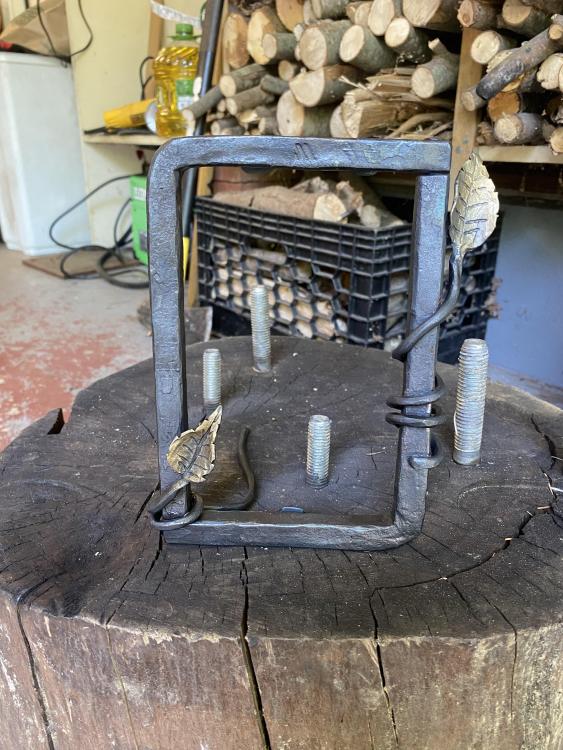
Rojo Pedro that is really cool looking. Nice job. I finished this picture frame this weekend - I had trouble getting the clips in the back to stay on so I ended up drilling small holes and grinding a “post” into one side of each tab that fit in the hole with some jb weld. Not great but it should hold for something that’s just going to sit on a shelf. Tried to make a rose as well. I think it’s pretty good considering I kind of just cut the shapes out on a whim and the whole thing only took 45 min or so. Doesn’t really look like a rose though - some other strange flower.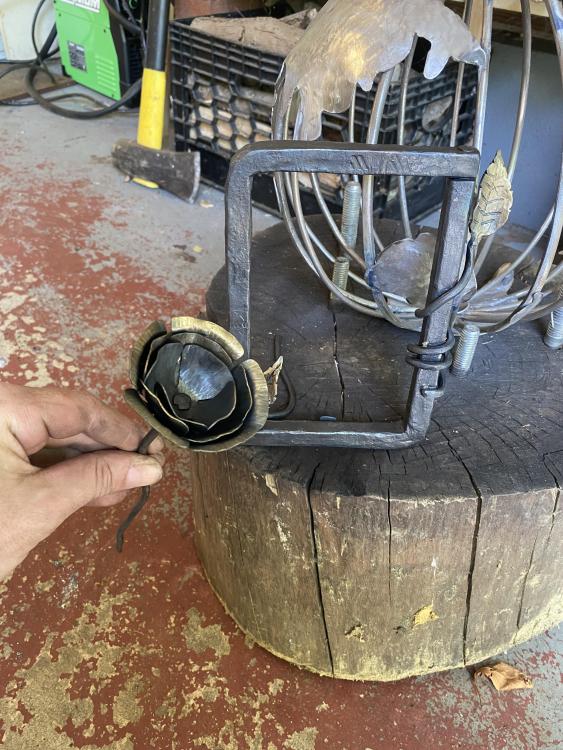
-
What did you do in the shop today?
Pat Masterson replied to Mark Ling's topic in Blacksmithing, General Discussion
Got a good laugh from this JHCC. I second that “welcome” though Are John - I’m still pretty much brand new to smithing as well and IFI has been an amazing resource for me. -
What did you do in the shop today?
Pat Masterson replied to Mark Ling's topic in Blacksmithing, General Discussion
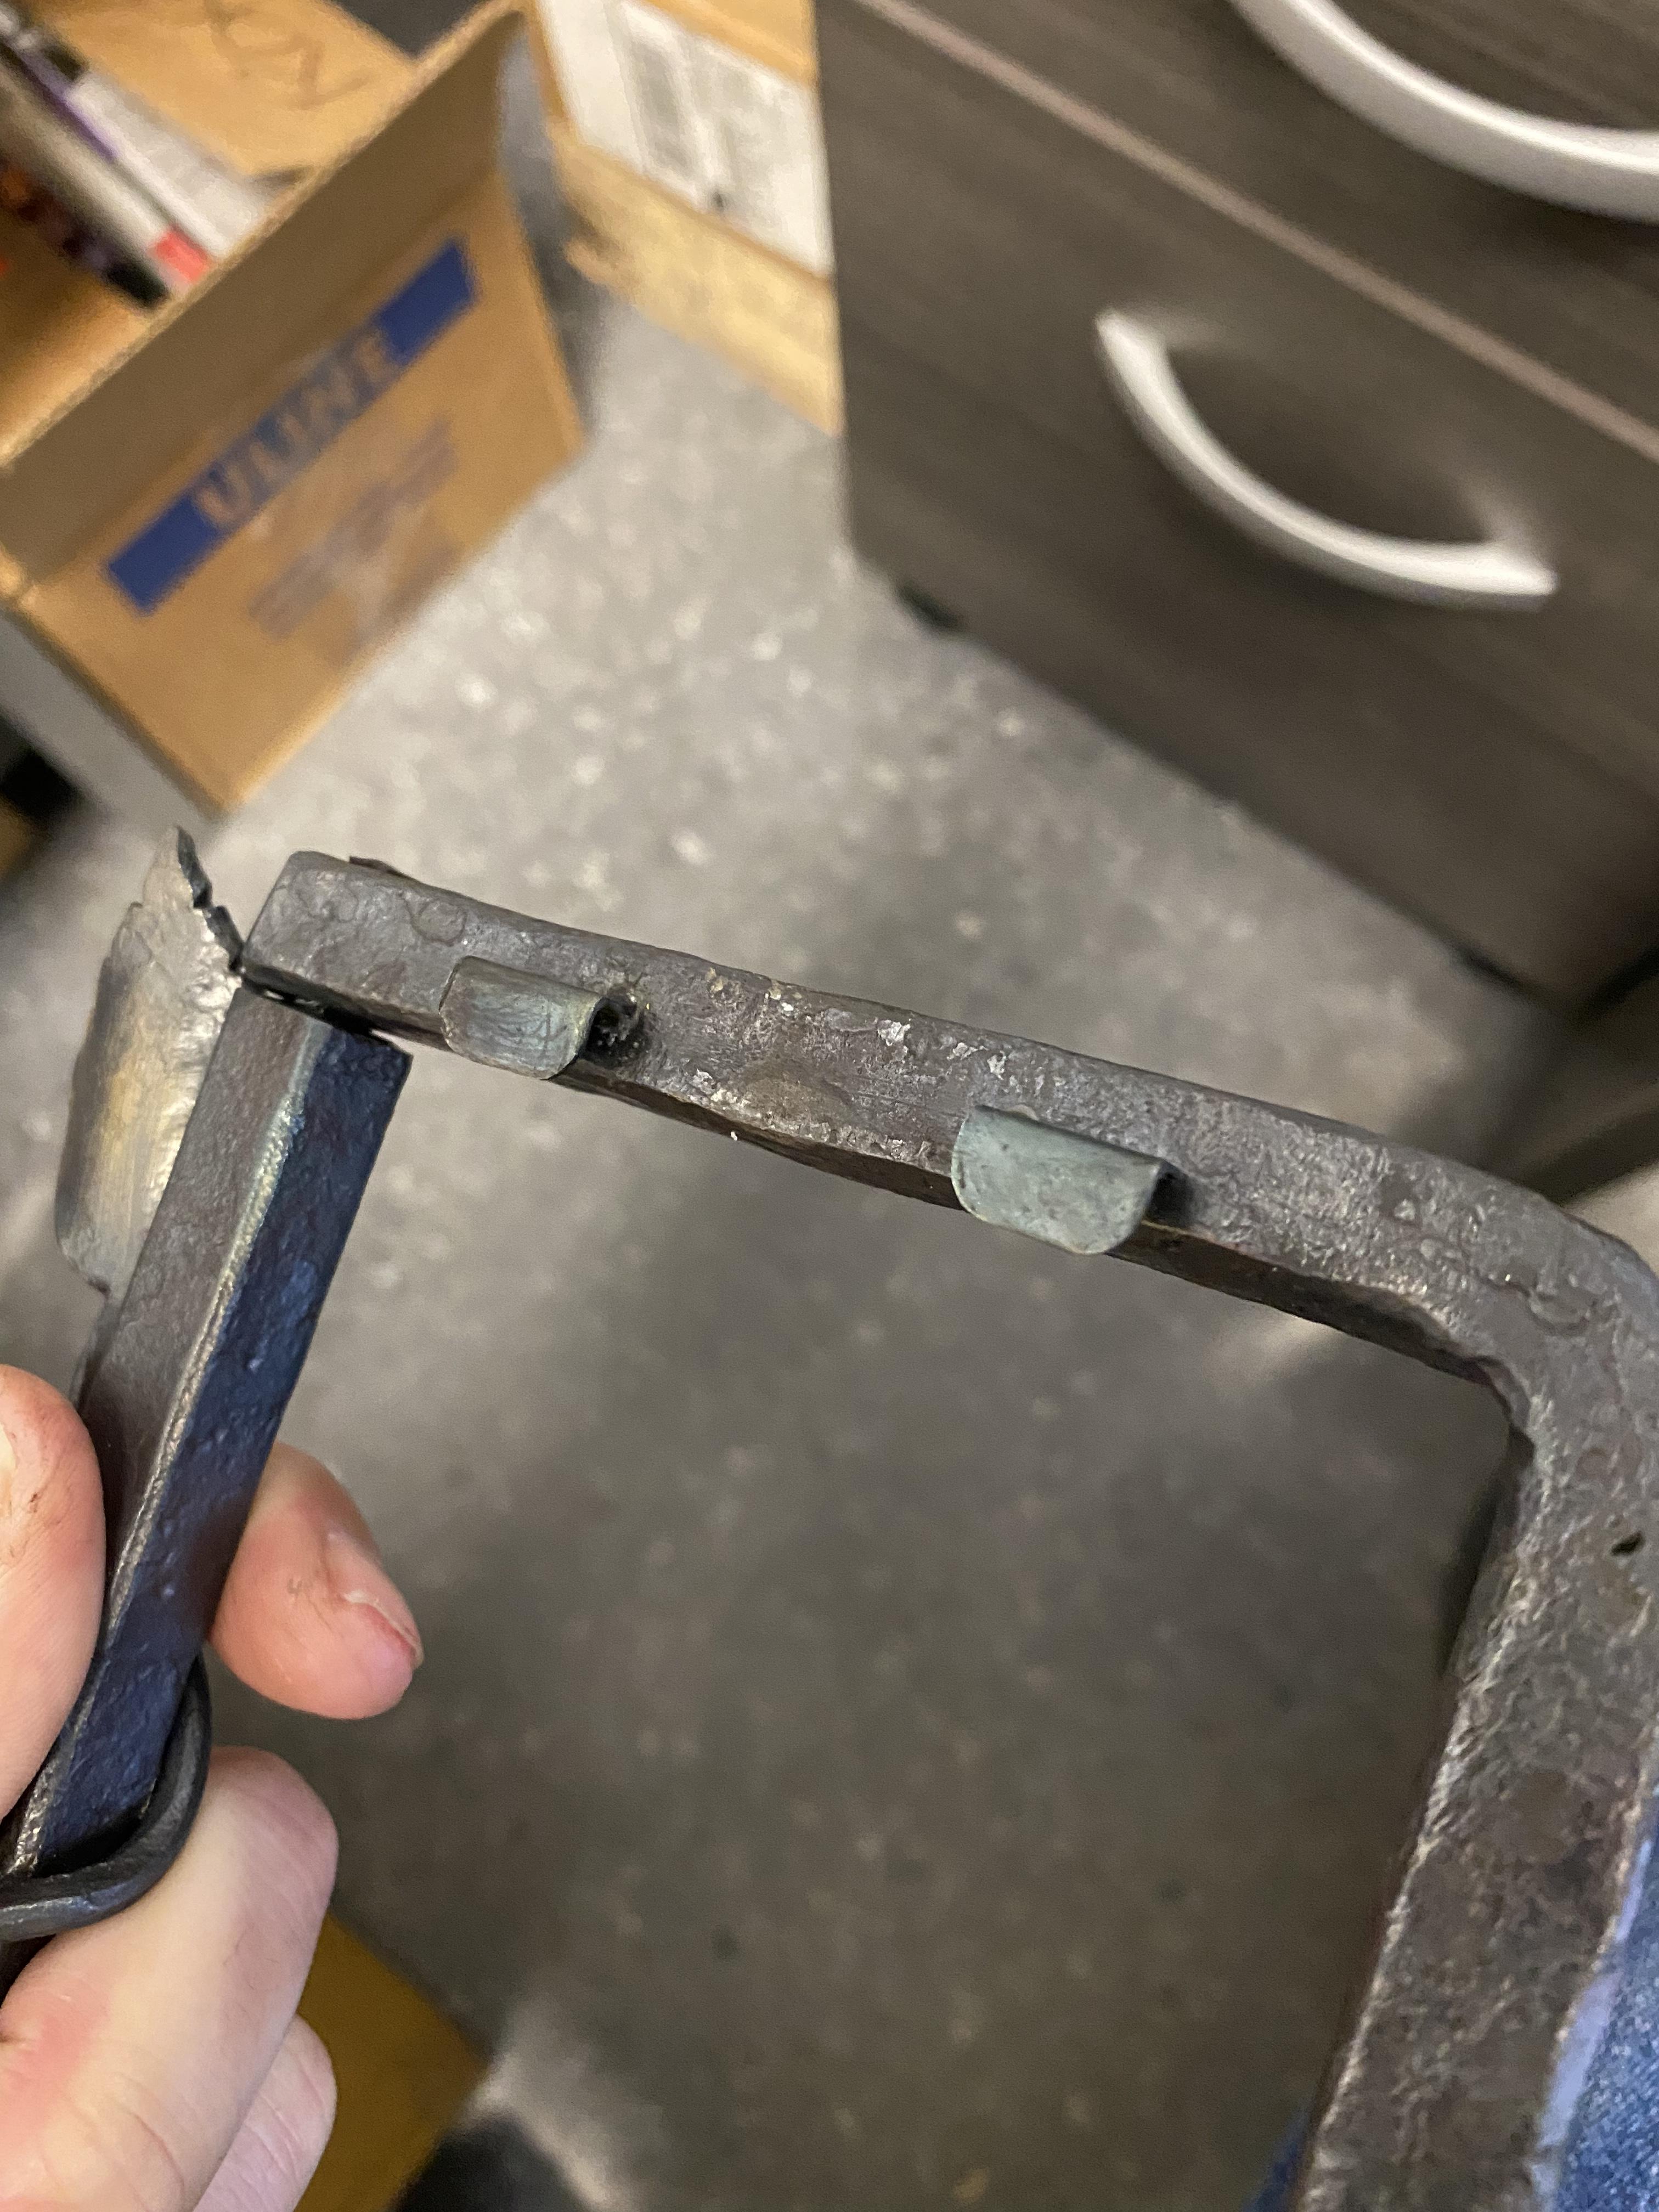
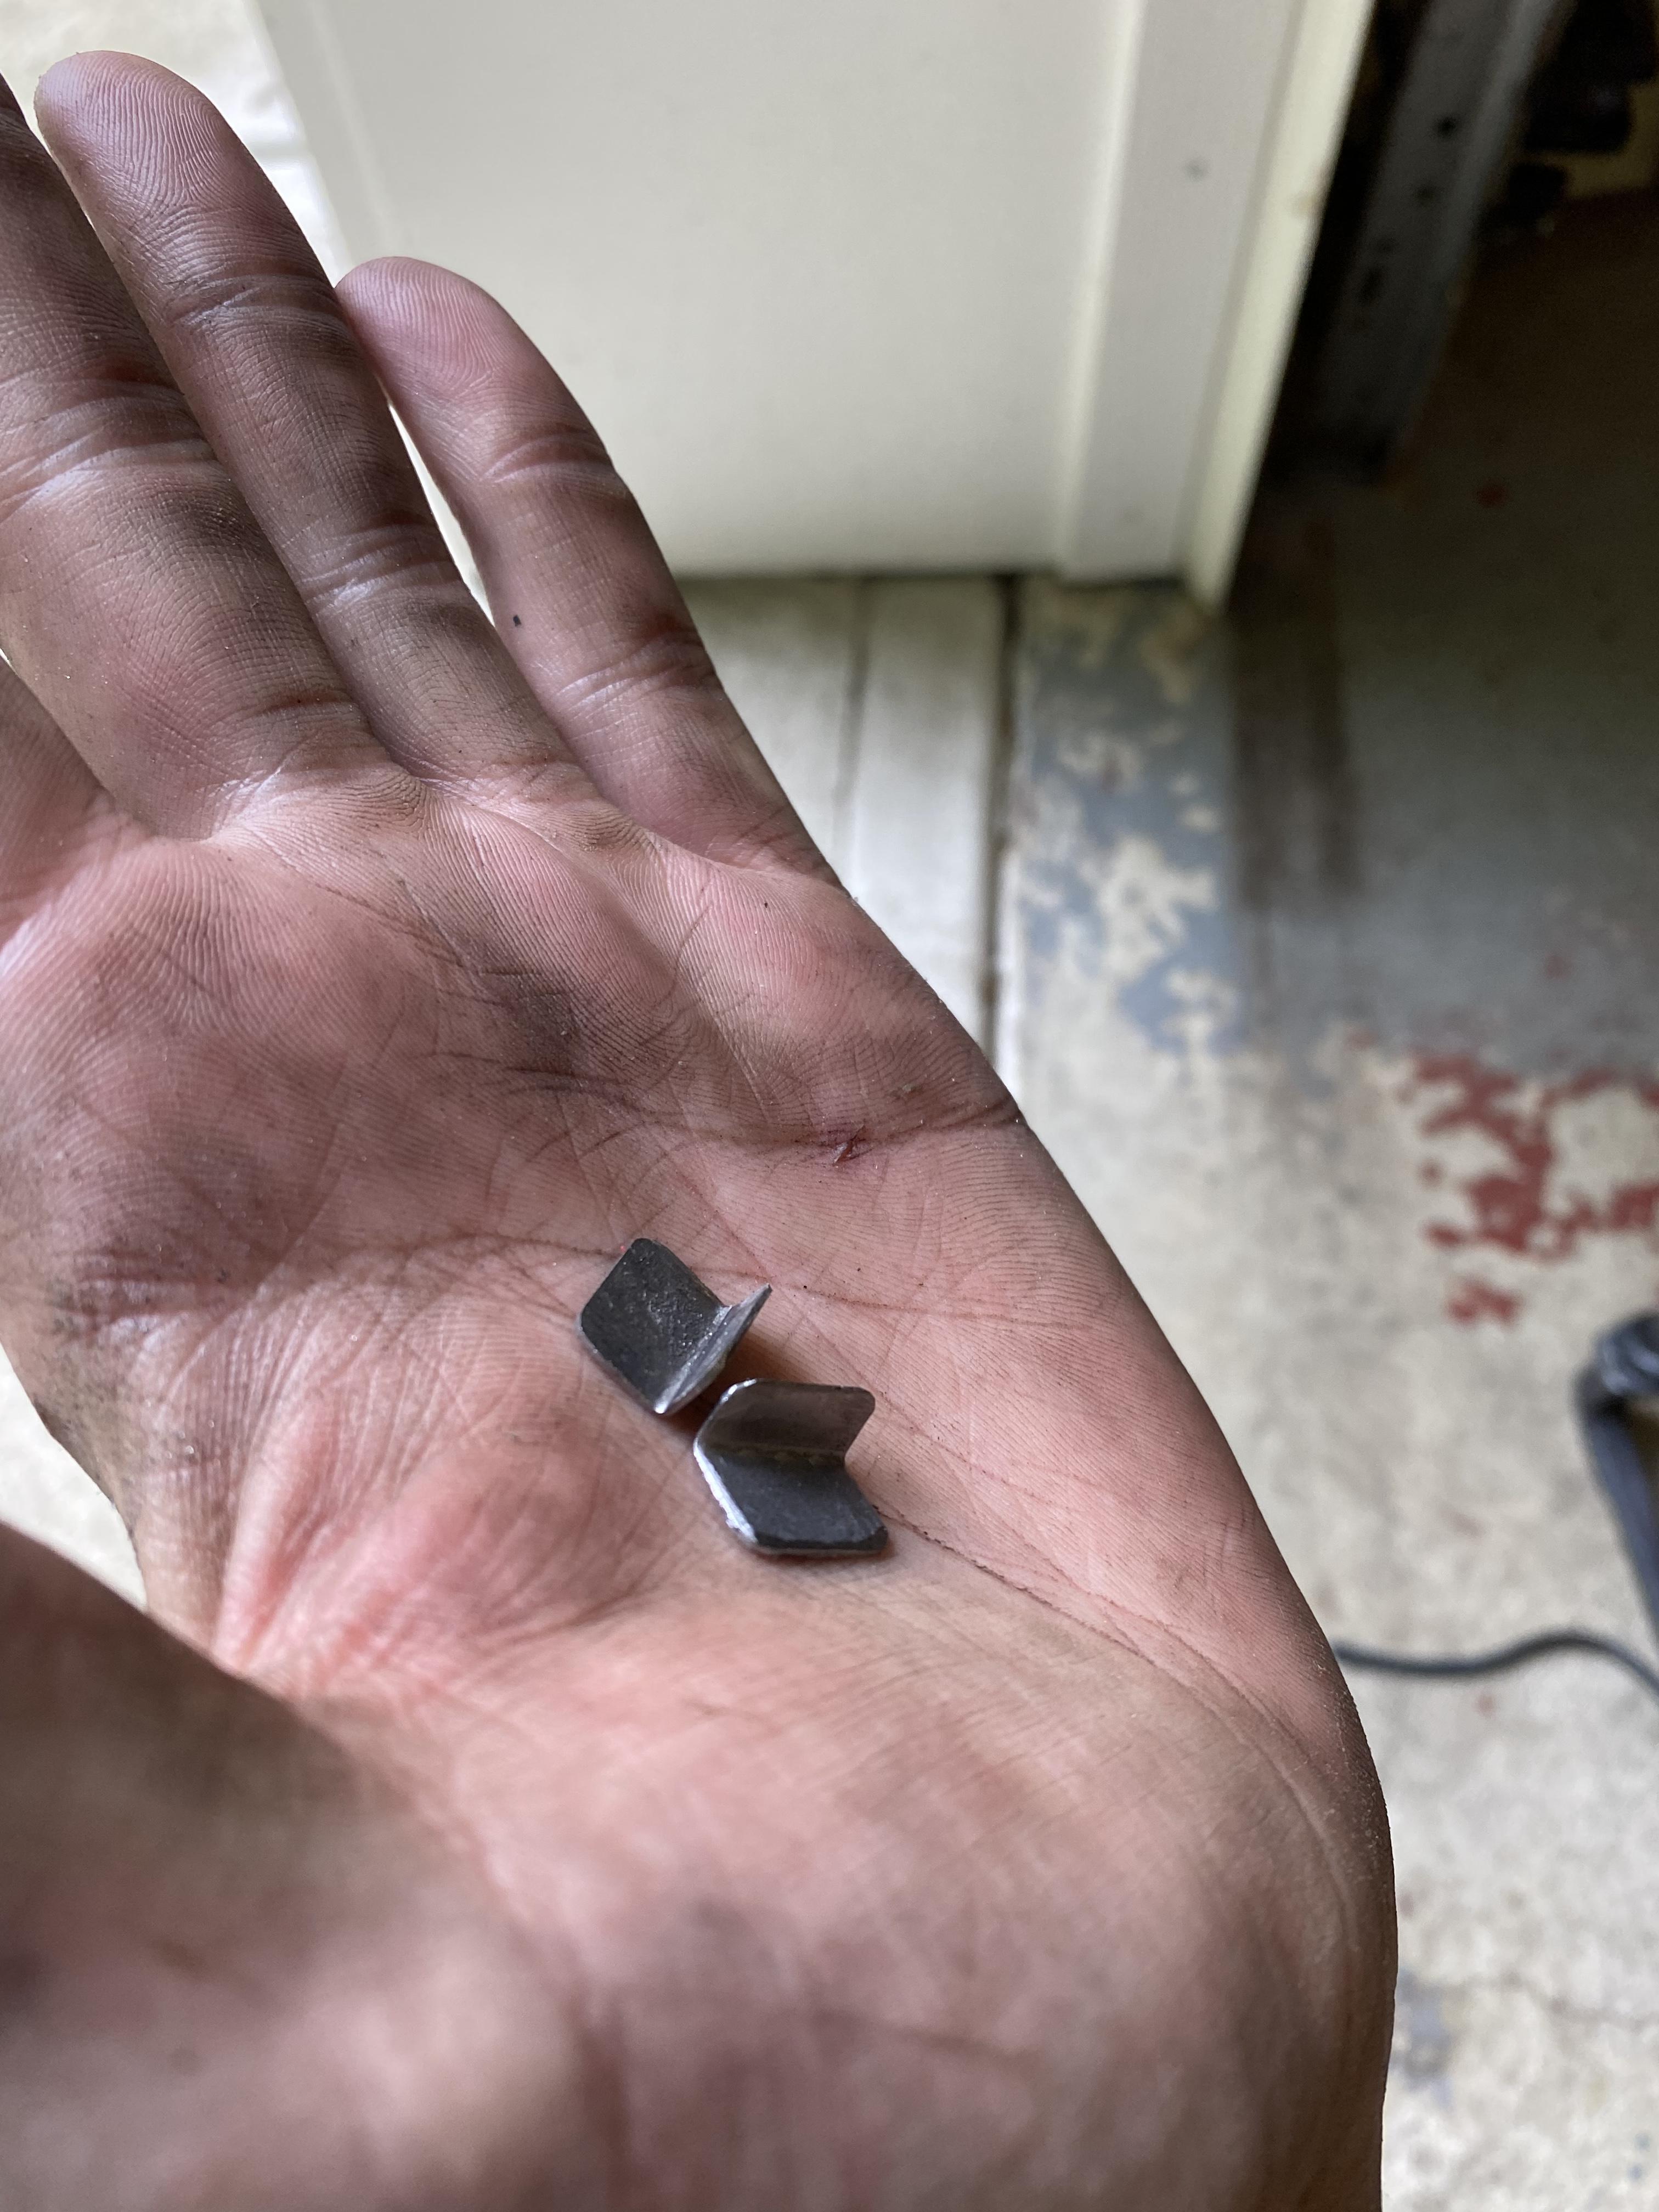
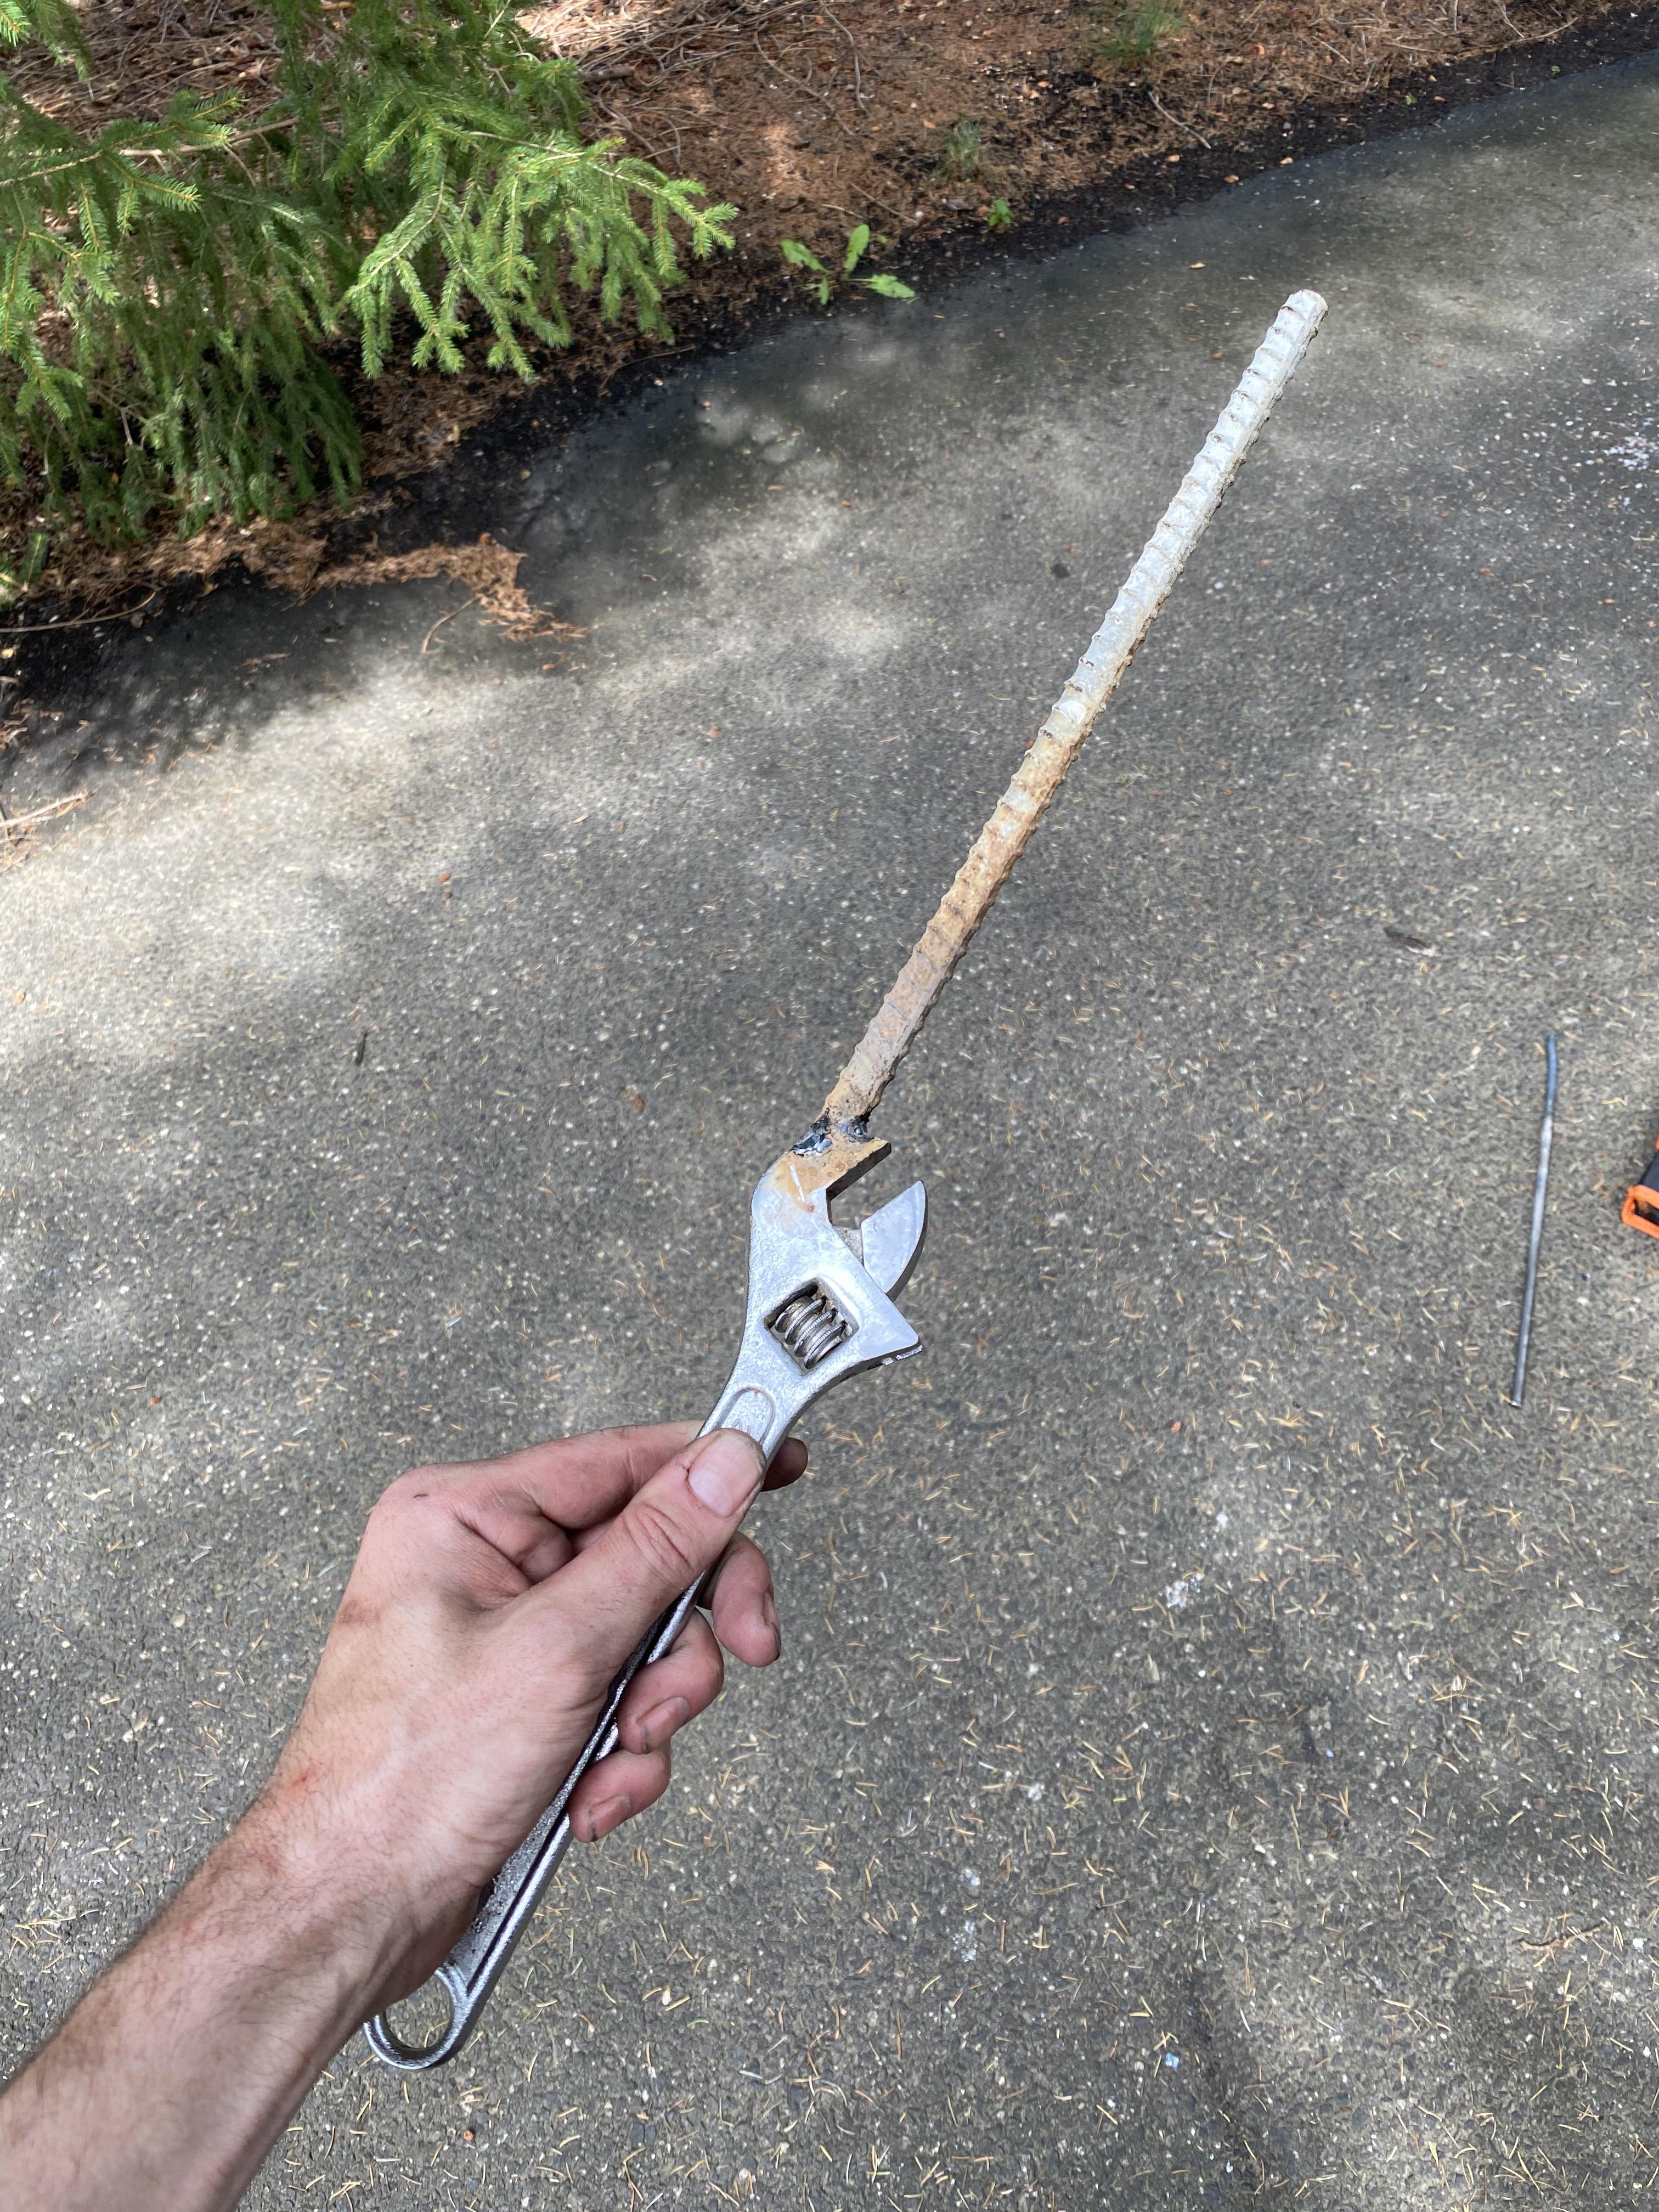
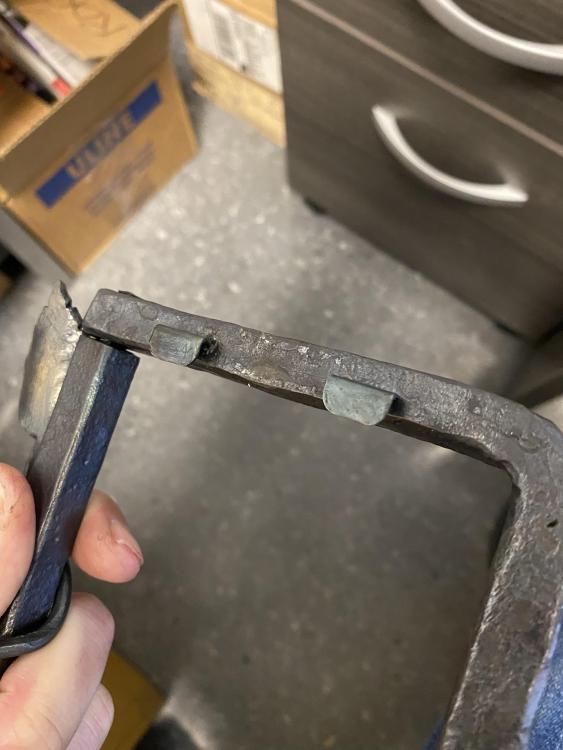
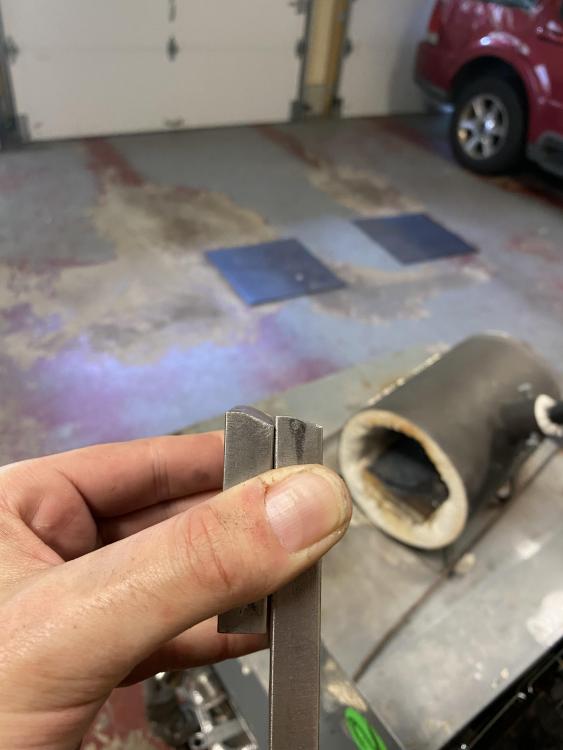
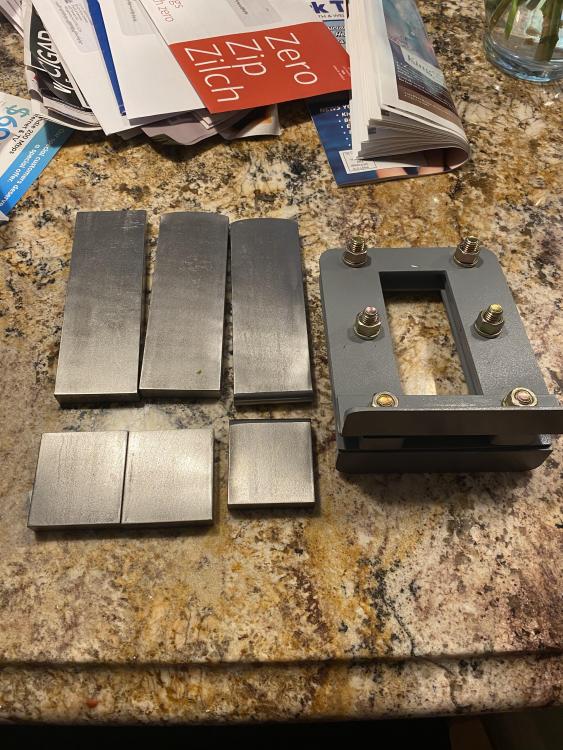
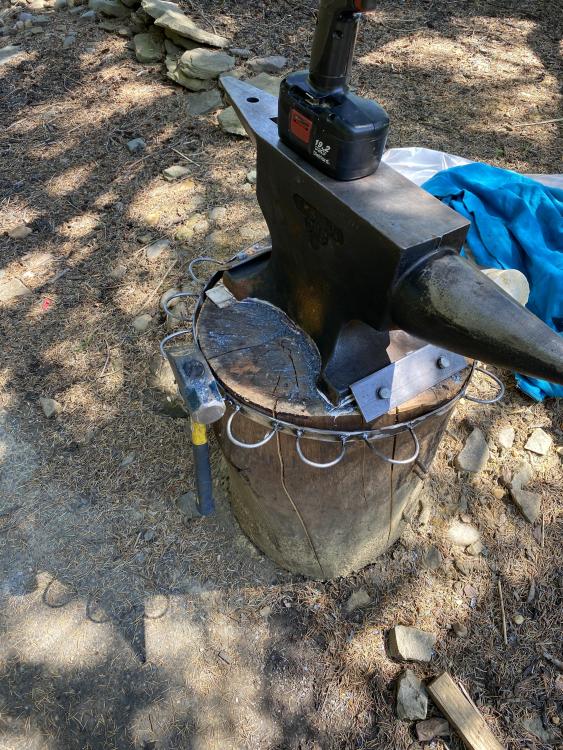
Nice deck pieces Billy. I finally got an auto darkening helmet. Made my welds ten times better. I was able to make one of the tools I’ve wanted most for a while now - twisting wrench. Also used the new guillotine tools to make tenons for this picture frame. Was not as easy as I hoped. I’m sure that’s mostly because I need practice but do you guys think having the grinds all the way to the edge of these dies would help? I guess now that I think about it I’ve only seen butcher dies in YouTube videos and never up close so maybe they all look like this… Anyway, and Most importantly- I’m in need of some help! - I made this picture frame over the weekend for a wedding gift. I’m really happy with the way it came out but I realized once it was done that there’s nothing to actually hold a picture in place lol. Big problem. I made these little tabs to try to attach to the back on the top and bottom cross pieces but both jb weld and gorilla glue didn’t hold them…maybe bc of the paste wax finish? I guess I could just double sided tape a picture in but I’d like them to be able to easily change the picture if they want to. Any ideas??? Thanks.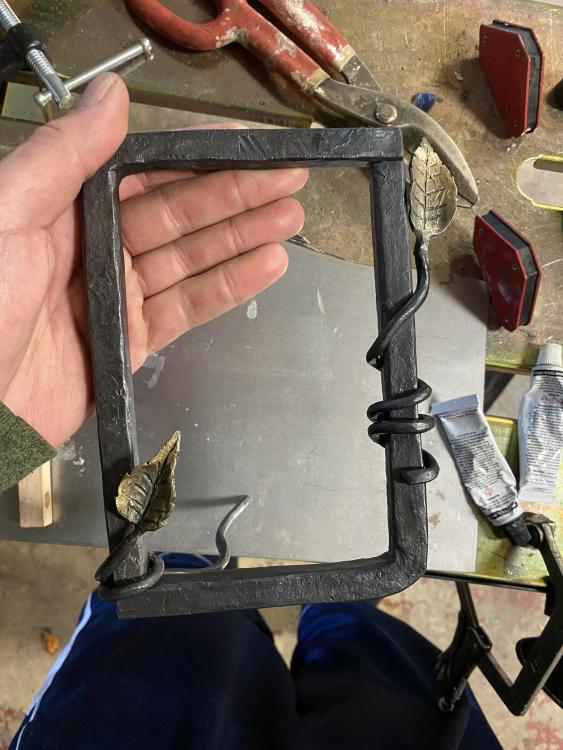


-
What did you do in the shop today?
Pat Masterson replied to Mark Ling's topic in Blacksmithing, General Discussion
Thanks Ted. No monkey tool. I used my bolster plate on the last one I did but these will be my first “proper” tenons with a guillotine tool. The last one I did free hand at the anvil and it was awful. -
What did you do in the shop today?
Pat Masterson replied to Mark Ling's topic in Blacksmithing, General Discussion
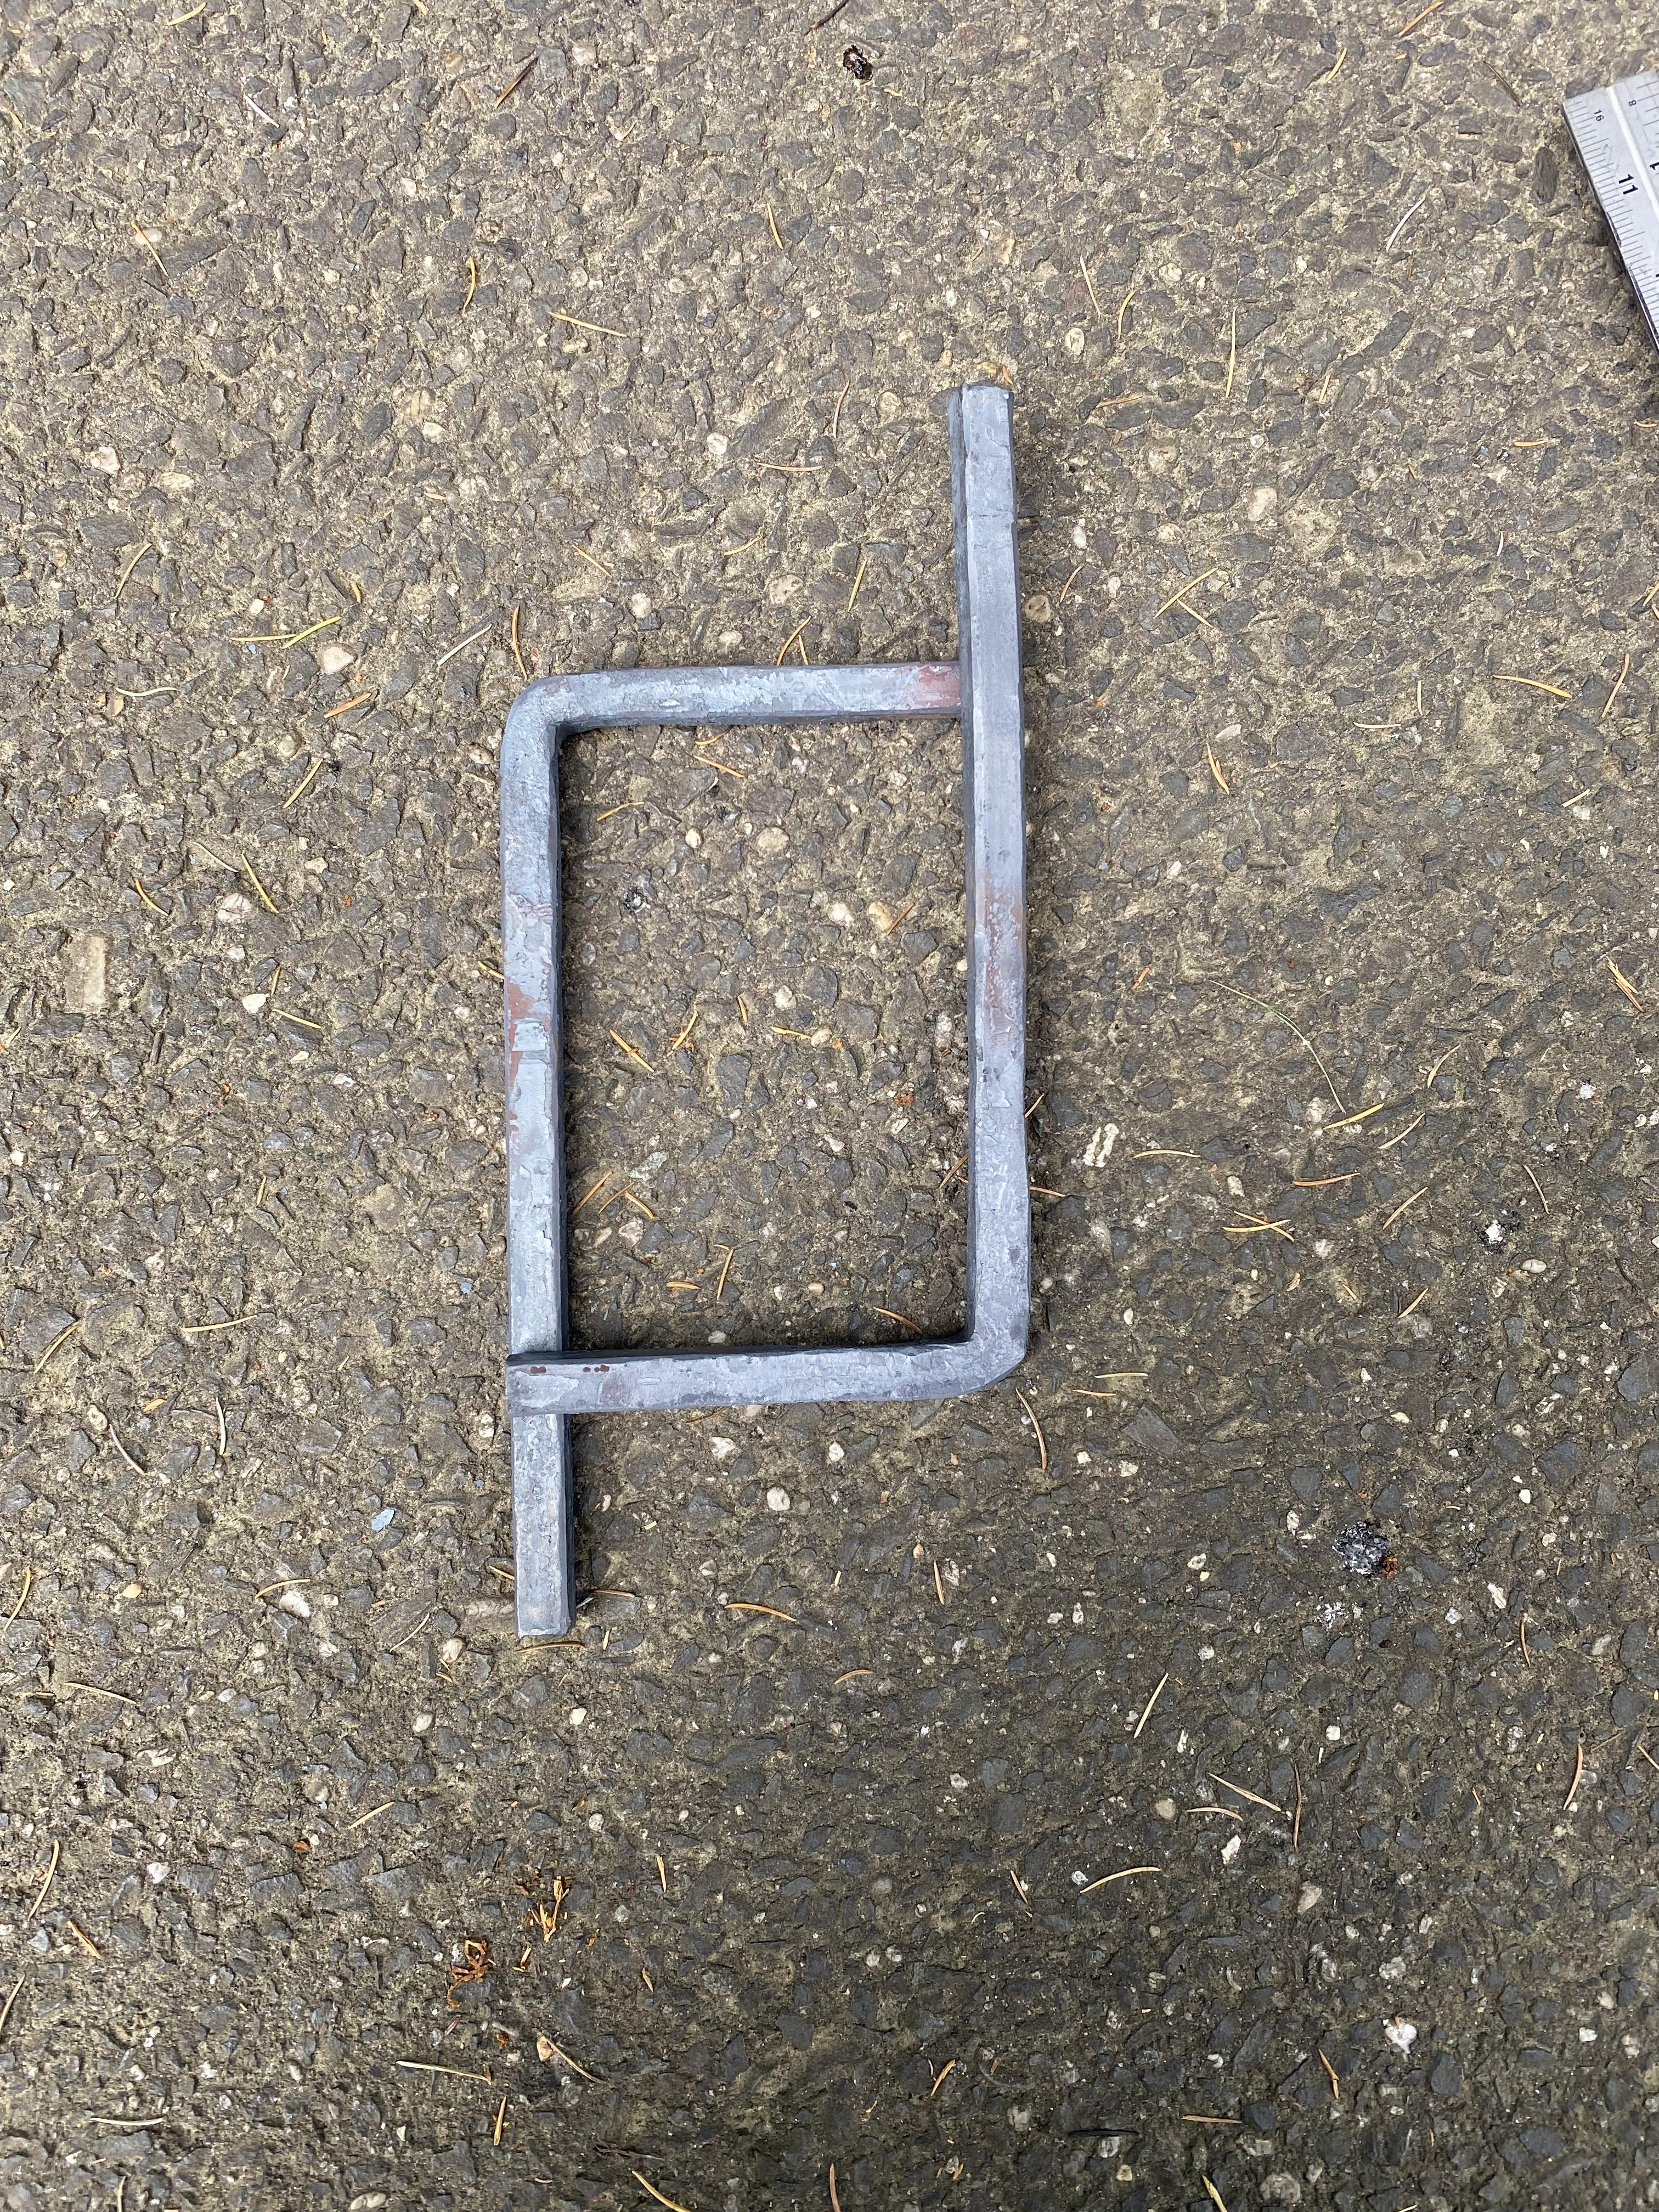
What’s up guys. Hope everyone’s enjoying the weekend so far. I have a question about tenons for what I’m working on right now. Going to be a picture frame. It was supposed to be upset square corners - the type the has the nice sharp outside edge with the smooth radiused inside. I basically ended up with the opposite lol. I didn’t have the right stock to try to technique that Peter Ross does - taking a thicker piece of stock and drawing down towards each end starting from where you want the corner to be. I thought I could upset the bar where I want the corner and try to work the upset towards the side where the outside corner would be and then bend - maybe a better smith than me could pull that off. But it’s ok they still look better than if I had just bent some square bar (I think) at least that’s what I’m telling myself after almost two hours of work. Anyway back to the tenons - how much of a bite do I need to take to to have enough to join them at the corners? This already ended up being smaller than planned so I don’t want to take any more that I absolutely have to. It’s 1/2” square bar. Thanks!
-
What did you do in the shop today?
Pat Masterson replied to Mark Ling's topic in Blacksmithing, General Discussion
Good to know JHCC - I’m going for a semi-meridian then. Thanks. -
What did you do in the shop today?
Pat Masterson replied to Mark Ling's topic in Blacksmithing, General Discussion
Thanks Nodebt. I was already planning to make a base and then have that half circle arm piece that connects at each pole like most globes have. I’ve got a few ideas along the lines of what you suggested. Thanks Frosty. -
Wow that’s not far at all from me thanks Frazer!
-
My thought with the power hammer was to be able to forge it into more workable shapes after cutting like maybe for some drifts, punches, hardy tools etc. but yes I need someone with the ability to cut it as well. Not many many blacksmith shops around here. The only two I found online I emailed and didn’t receive a response. I am talking to this guy on Etsy with the shop name wyoblacksmith tools about possibly sending him a chunk in return for some tools. I just got his guillotine tool. Jerry is the owner and is a really great guy. He let me pay in installments and pick what and when the installments would be. He also shipped it before I had finished paying. There was a slight hiccup in that he sent me the wrong die sets the first time but he was very quick to correct the problem, overnighted me the one I was missing and let me keep the incorrect one which means I ended up with 4 sets instead of 3 - an extra blank to do whatever I want with. The dies are 4140. I haven’t used it yet but will this weekend. It looks like a really well made tool though and he makes a bunch of other stuff so check him out. I also got a bolster plate from him a few months back. The guillotine also has a hardy shank that bolts up to it.
-
Anyone on here in the central NJ area and have a power hammer? I scored a fork lift tine and can get my hands on another. I’d like to get it broken down into workable pieces - hammer blanks, guillotine dies etc etc but I don’t think I’ll be able to do it with a 4inch angle grinder and my hand hammering. I mean I guess I technically could but I’d really love to get inside a real shop. I’d be willing to trade a large amount of the good steel for the time spent helping.
-
What did you do in the shop today?
Pat Masterson replied to Mark Ling's topic in Blacksmithing, General Discussion
xxxx it lol -
What did you do in the shop today?
Pat Masterson replied to Mark Ling's topic in Blacksmithing, General Discussion
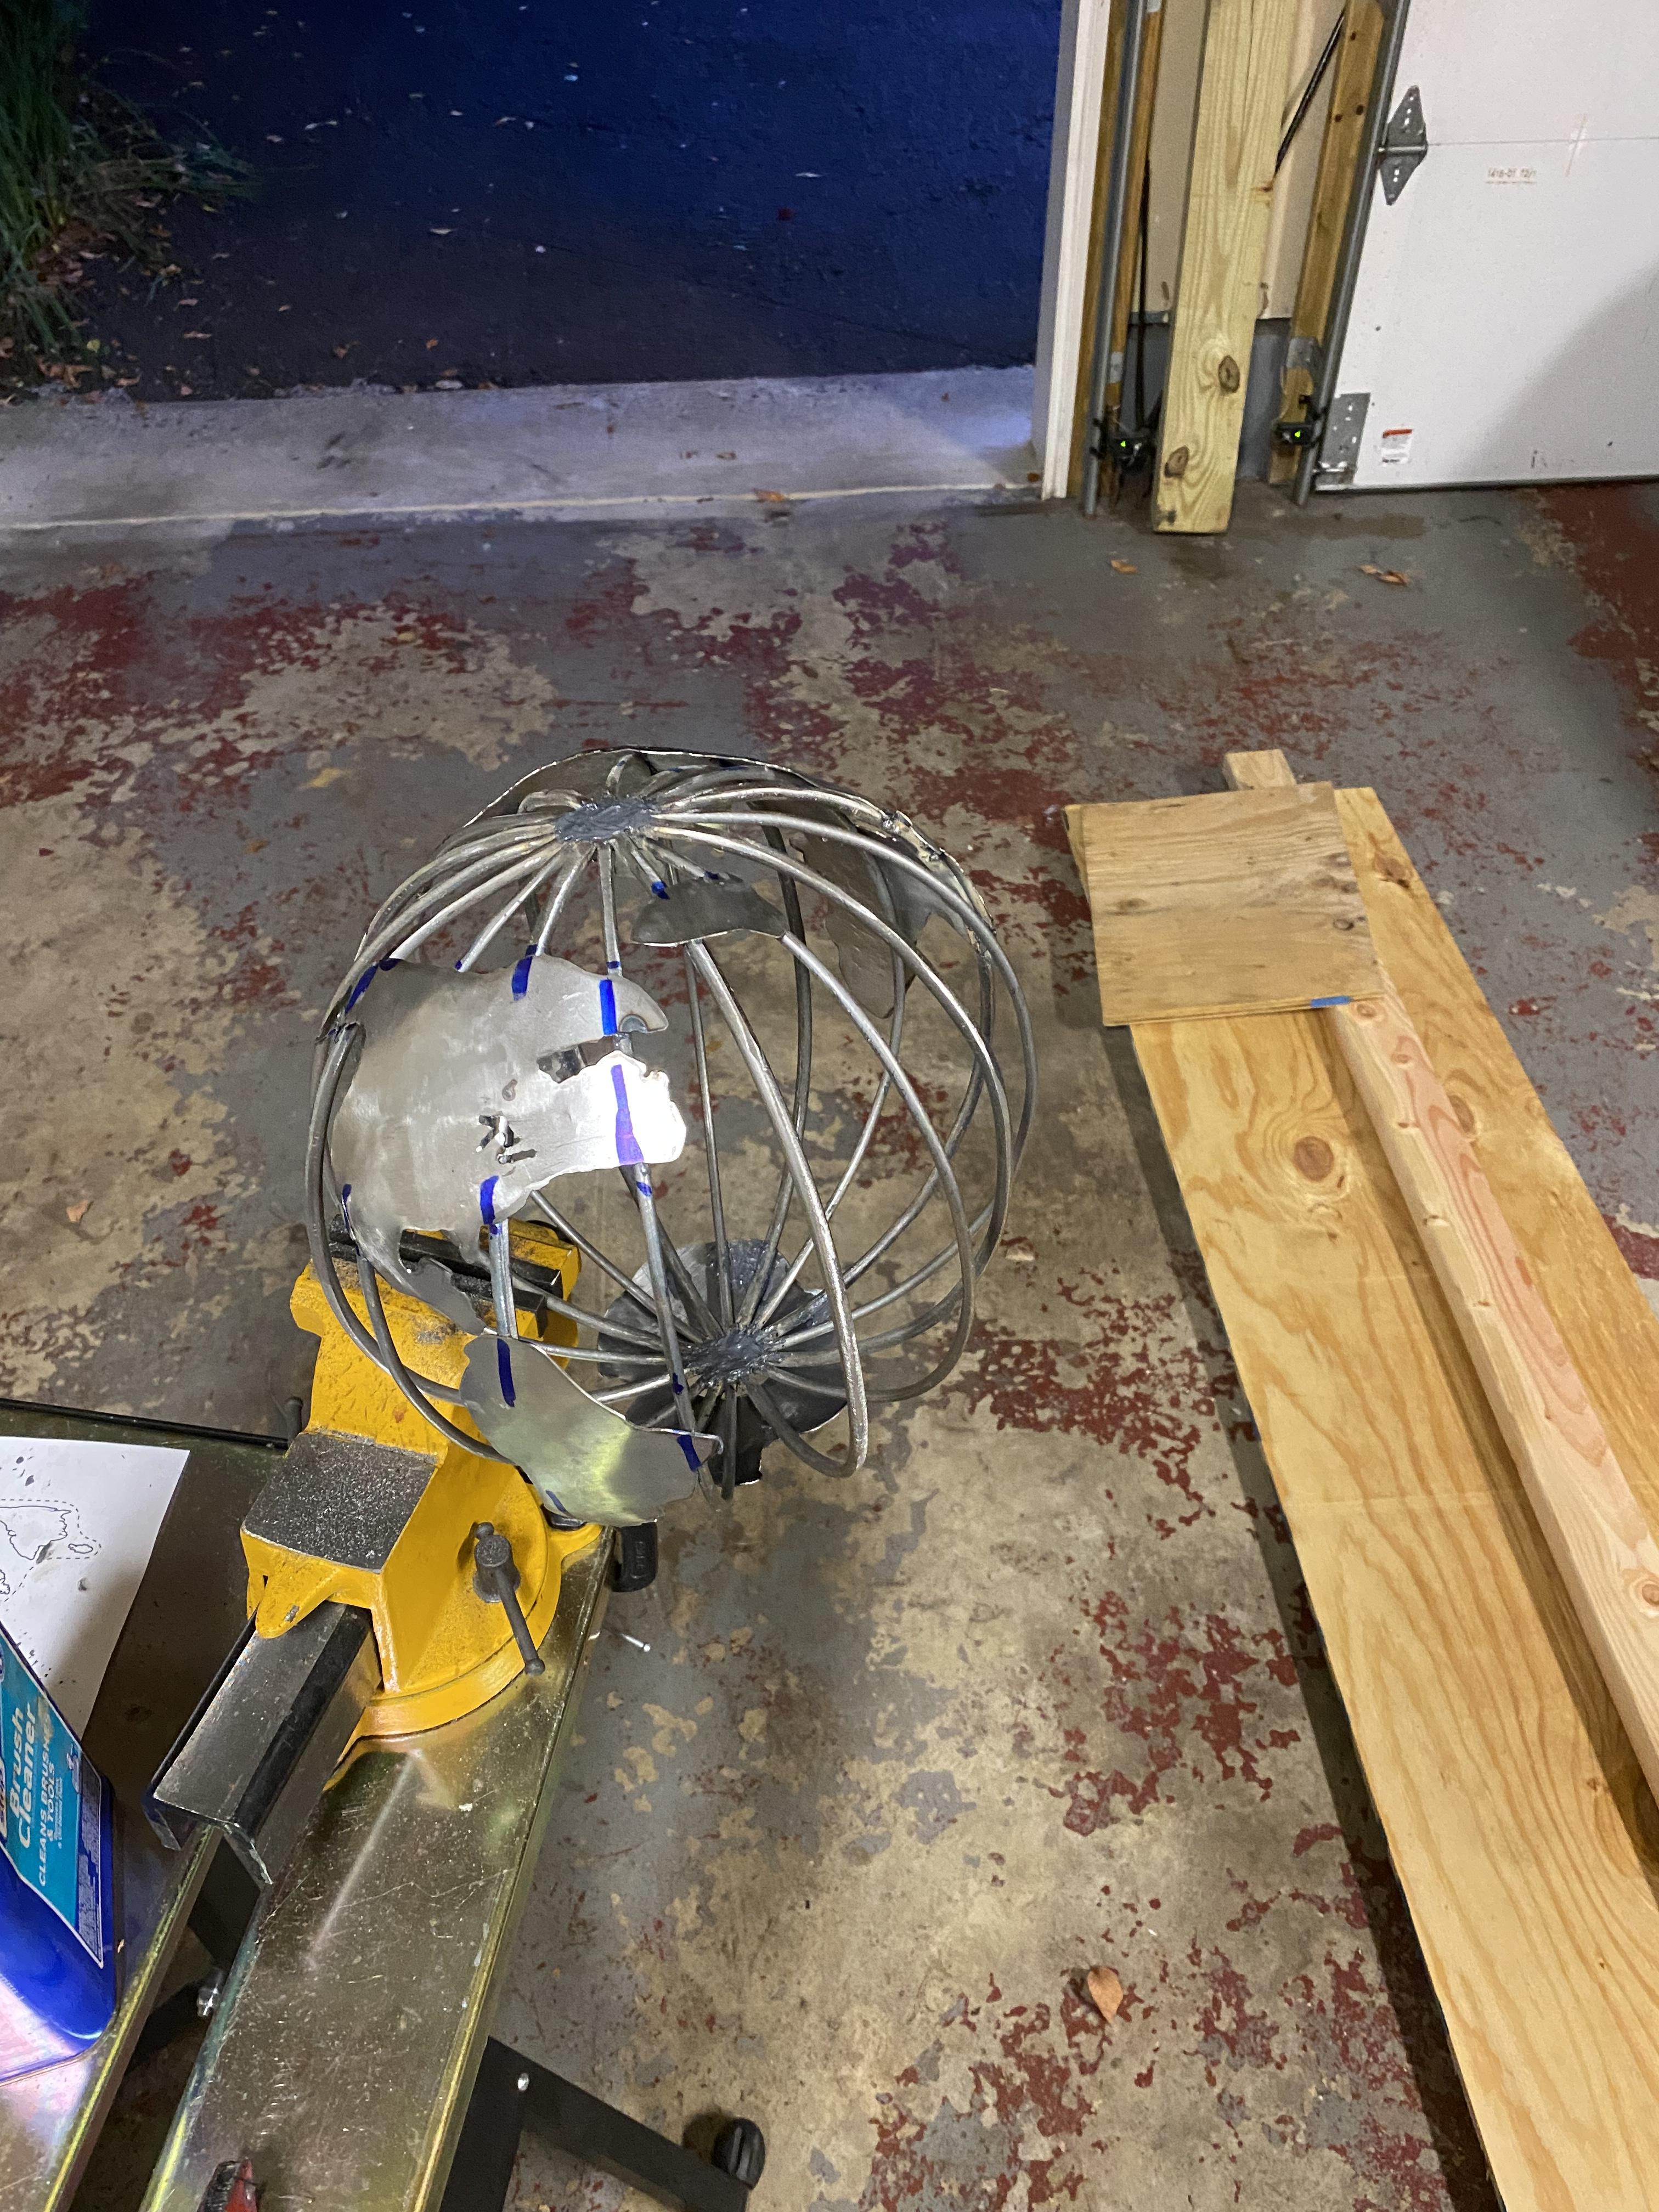
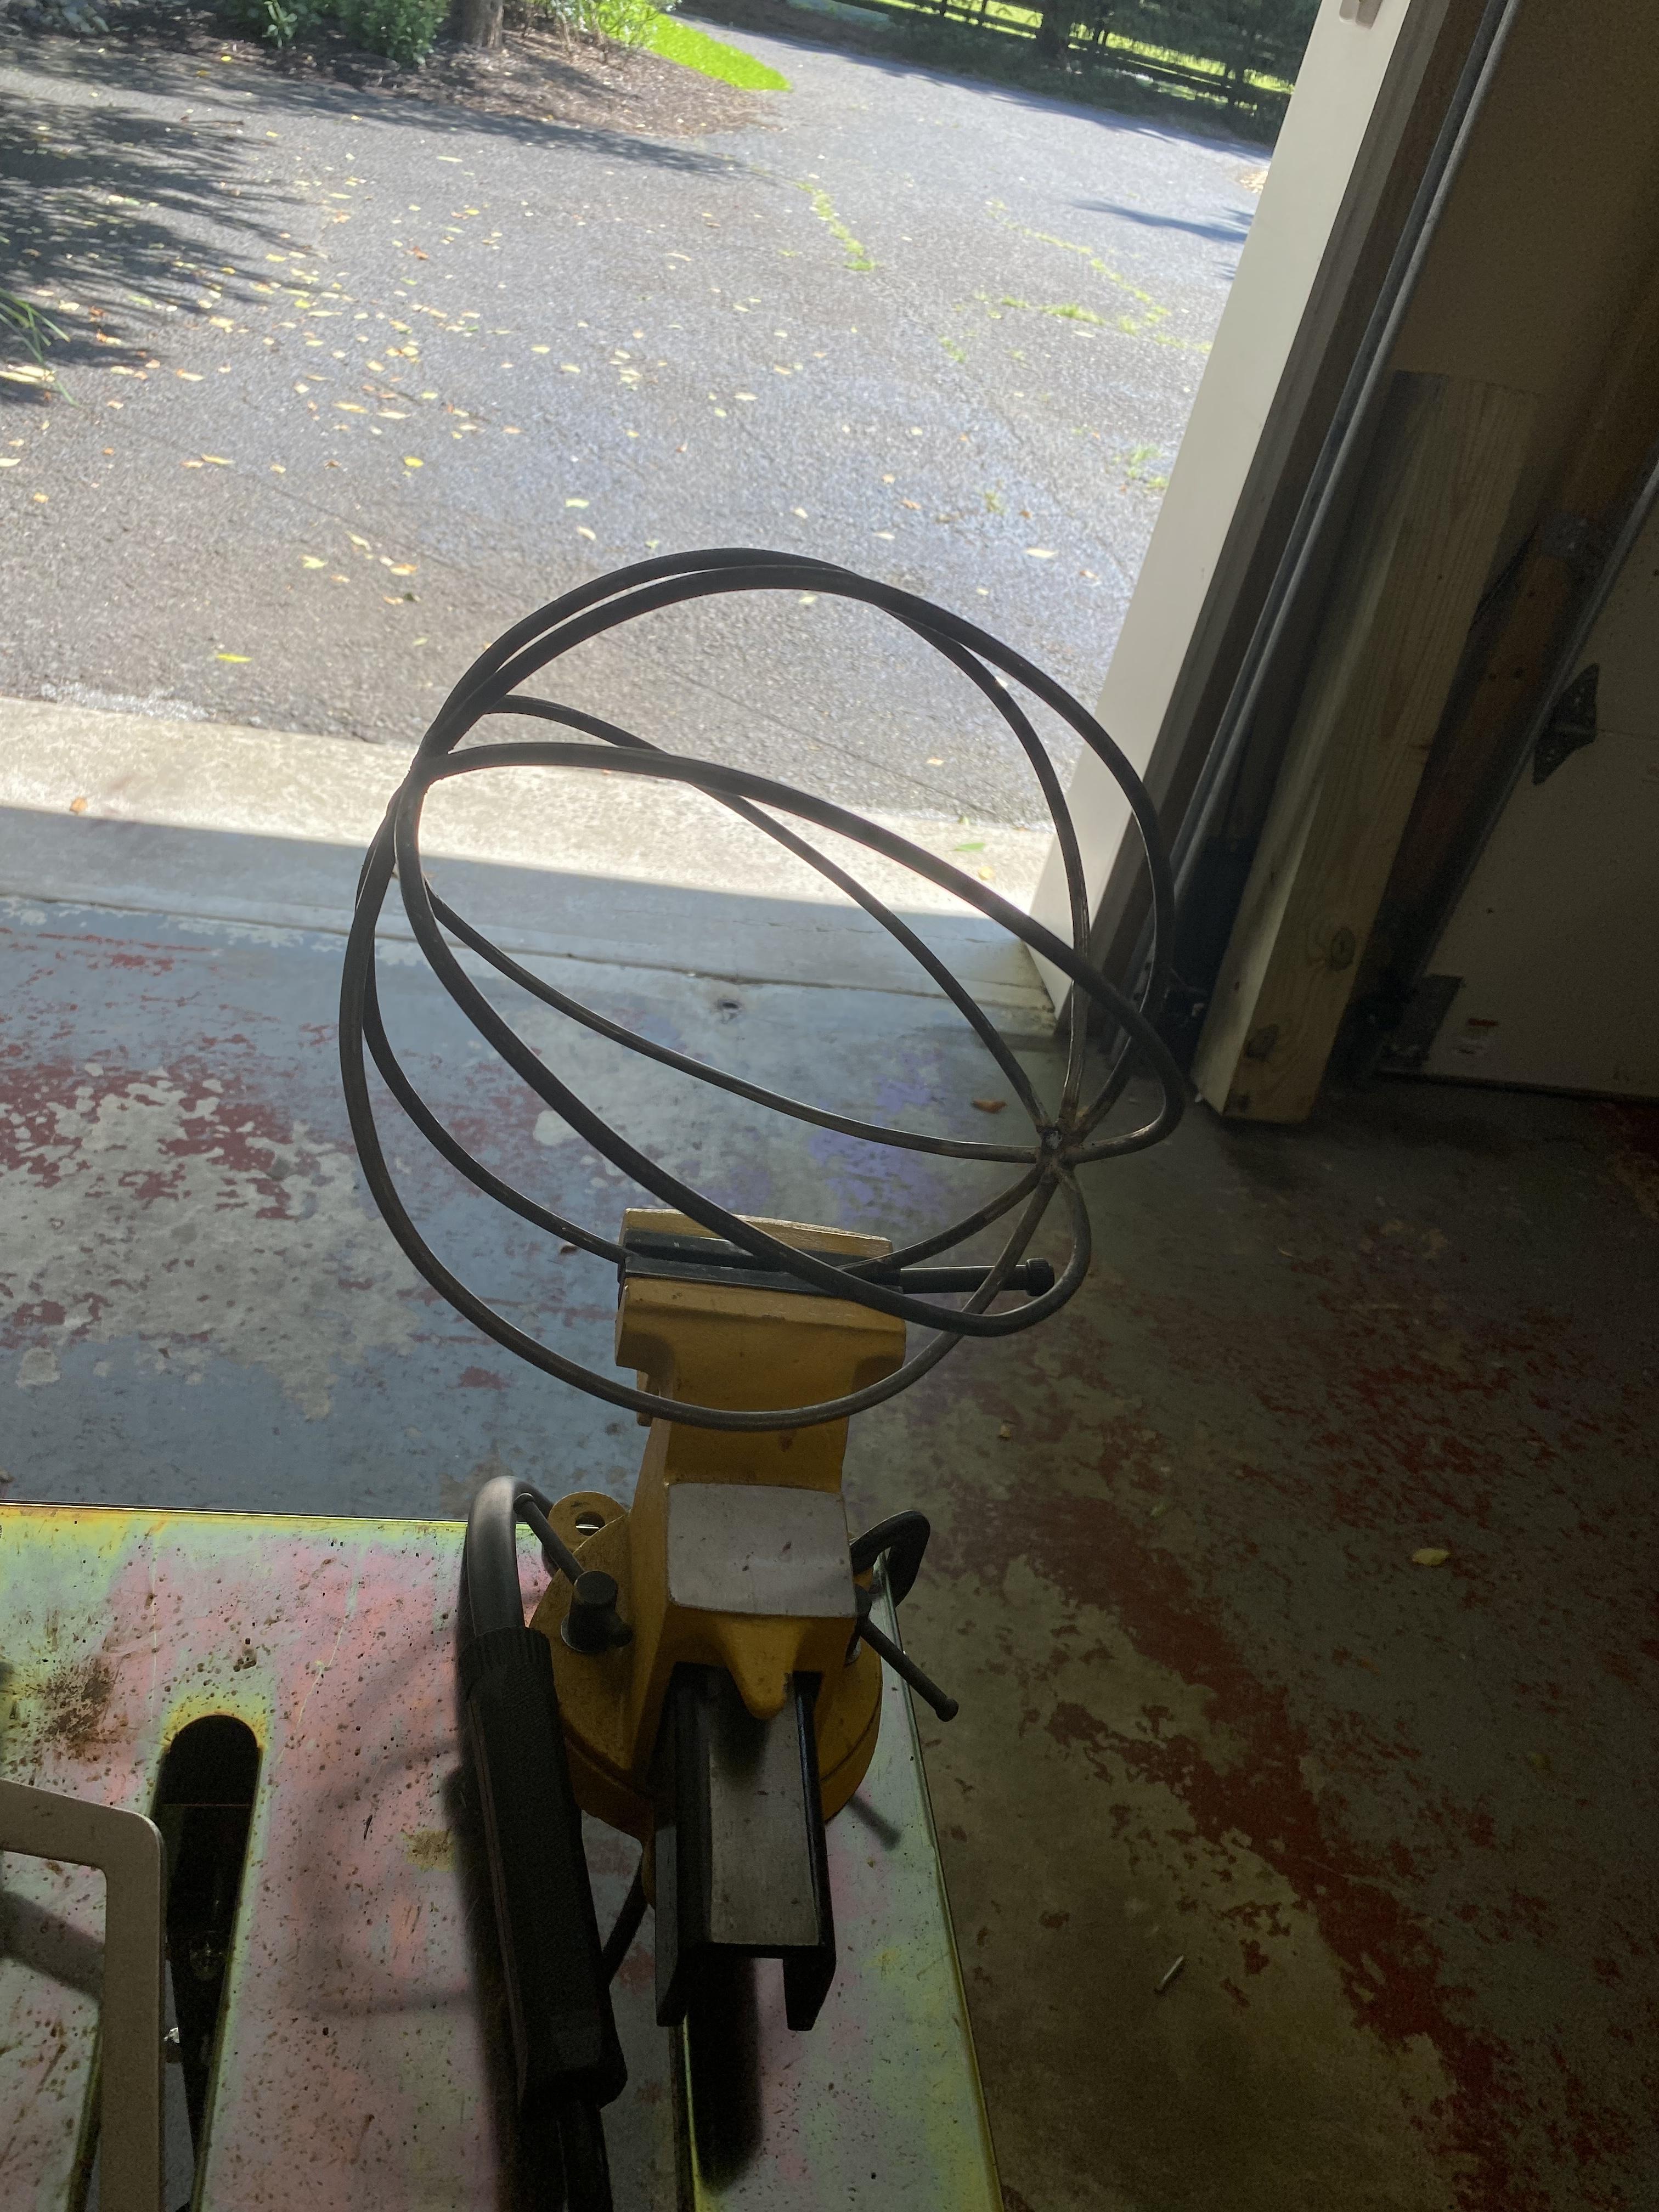
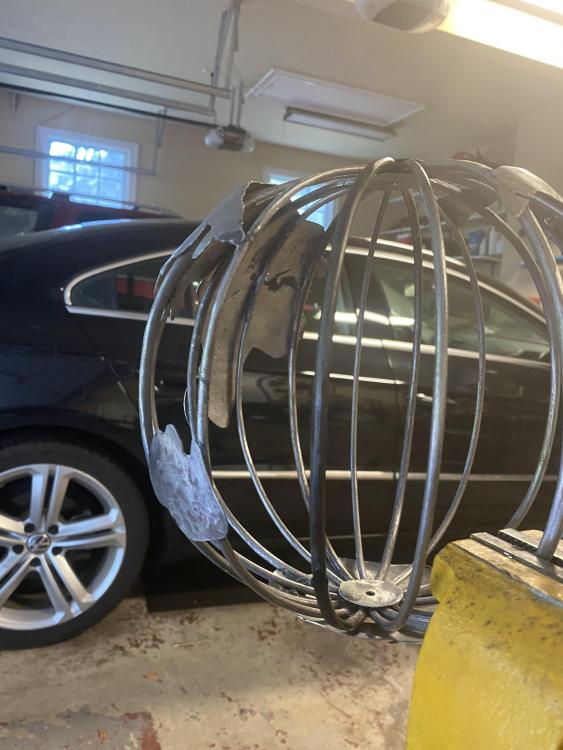
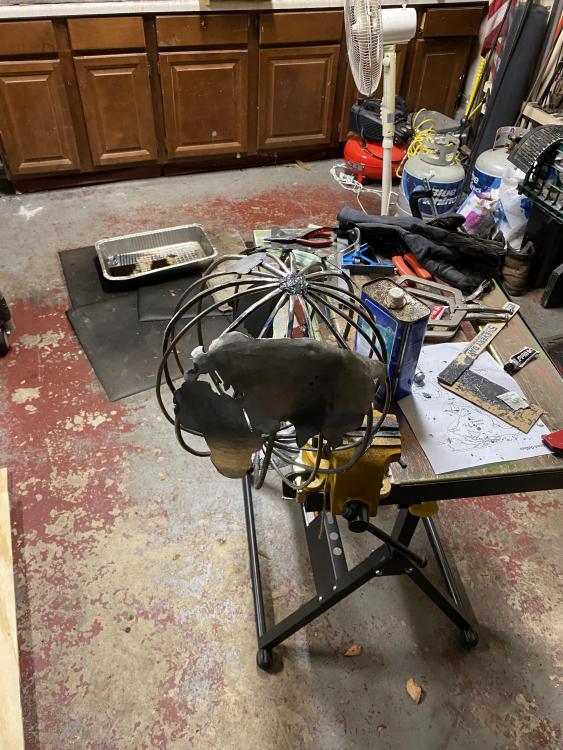
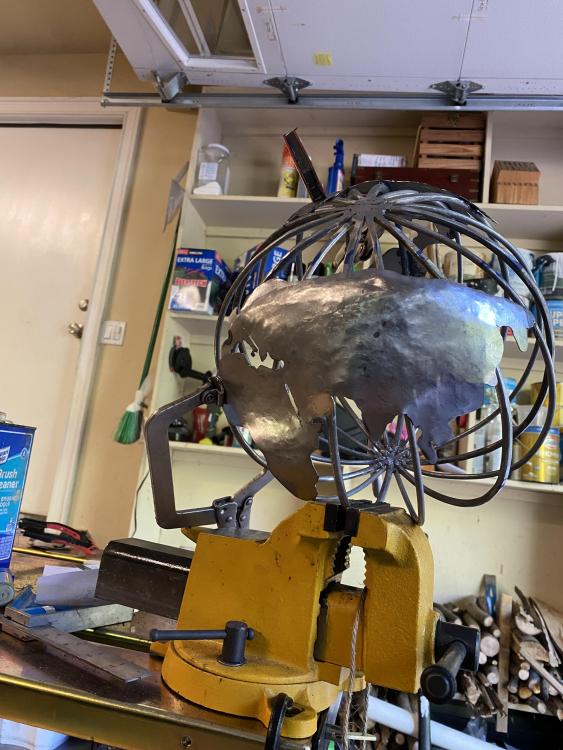
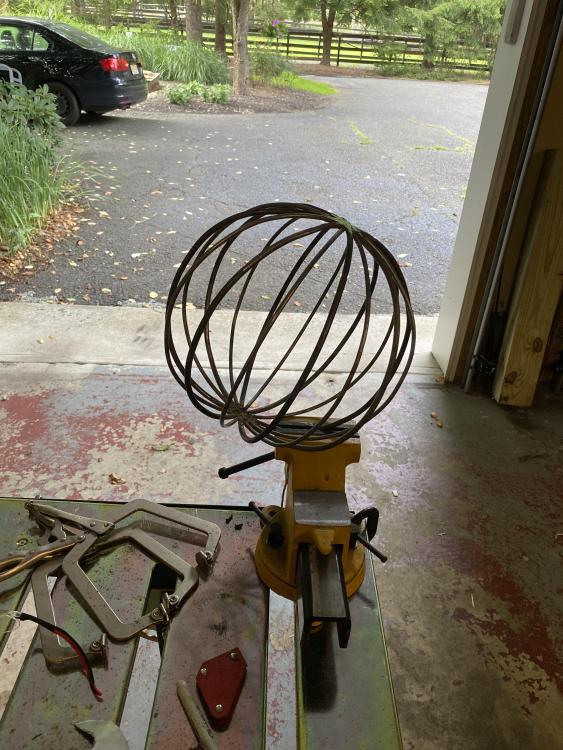
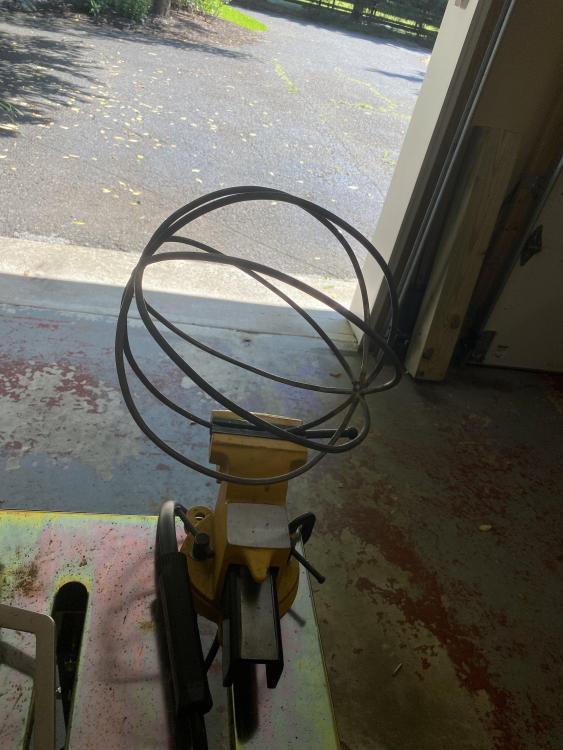
Really cool idea Ted. I made some progress on this globe this weekend. All of the continents are mounted. Used JB weld for that and to fill in my terrible welds at the north and south poles. Have to do a bunch of filing and sanding and then figure out a way to make it spin but I just might pull this one off lol. Continents are a bit on the small side - had to redo Antarctica and Australia but I think the rest will be good enough for this first try. Also made a tool rack for work at the anvil which I was badly in need of. It’s ugly but it’s functional.
-
I know this post is super old but since I’m relatively new here I like going back and reading as much as I can - but that’s the coolest thing I’ve ever hear and I want one!
-
What did you do in the shop today?
Pat Masterson replied to Mark Ling's topic in Blacksmithing, General Discussion
Usually only get to forge on the weekends but I really had the itch yesterday for some reason. I’ve been dying to make something out of these springs I got from work so I made two scribes - one for me and one for a buddy at work. The only other time I had hardened and tempered something was my touch mark which was made from rebar and it only kind of hardened. It was crazy to feel the difference of a real hardenable steel after quenching for the first time. There’s really no mistaking which part was hardened. Had a little trouble tempering though - I guess I wasn’t leaving enough heat in the middle for it draw all the way to the tip. The colors kept stopping about 1/2 inch from the tip so they might be a little harder than they should be.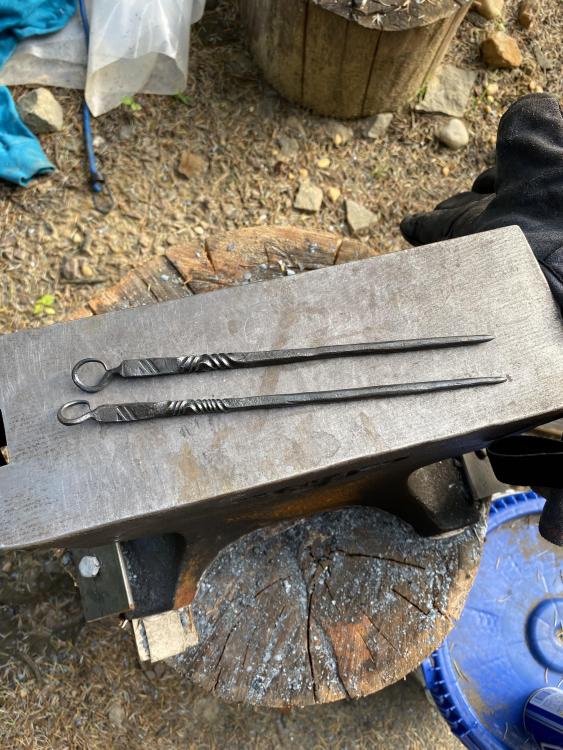
-
What did you do in the shop today?
Pat Masterson replied to Mark Ling's topic in Blacksmithing, General Discussion
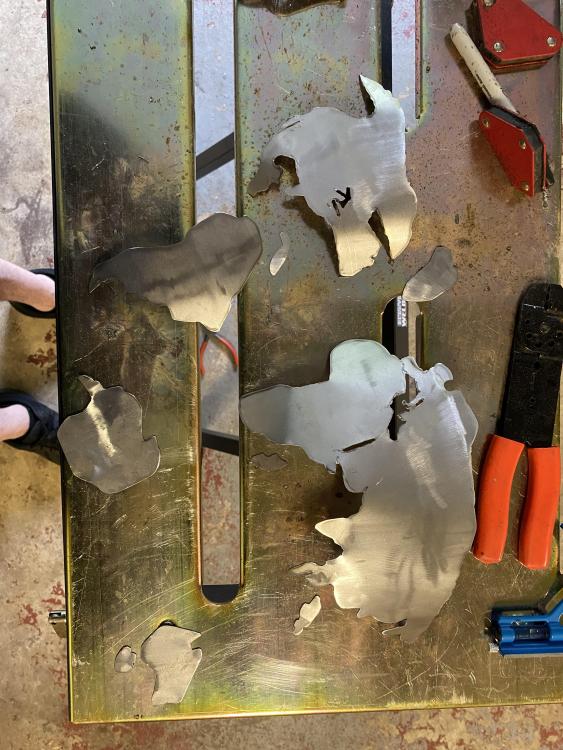
Billybones and lary - I’m big on black bear forge also. He’s definitely the channel most responsible for me actually starting to smith. Good stuff. I put 8 more pieces into the frame of the sphere for the globe this weekend and got the continents finished up as far as cutting out and grinding. I think I’ll have to sand them to have a decent finish and I think they’re going to end up being a little small but that’s ok - I definitely plan to make another one. The new pieces are 3/16” where the old ones are 1/4”. They’re out of whack enough that the different size isn’t really isn’t affecting much. It’s only a good sphere until you get up close lol. I notice that the Great Lakes look I carved out the letters TV also - really don’t like that lol.
-
What did you do in the shop today?
Pat Masterson replied to Mark Ling's topic in Blacksmithing, General Discussion
This is really cool. The ultimate holdfast. -
What did you do in the shop today?
Pat Masterson replied to Mark Ling's topic in Blacksmithing, General Discussion
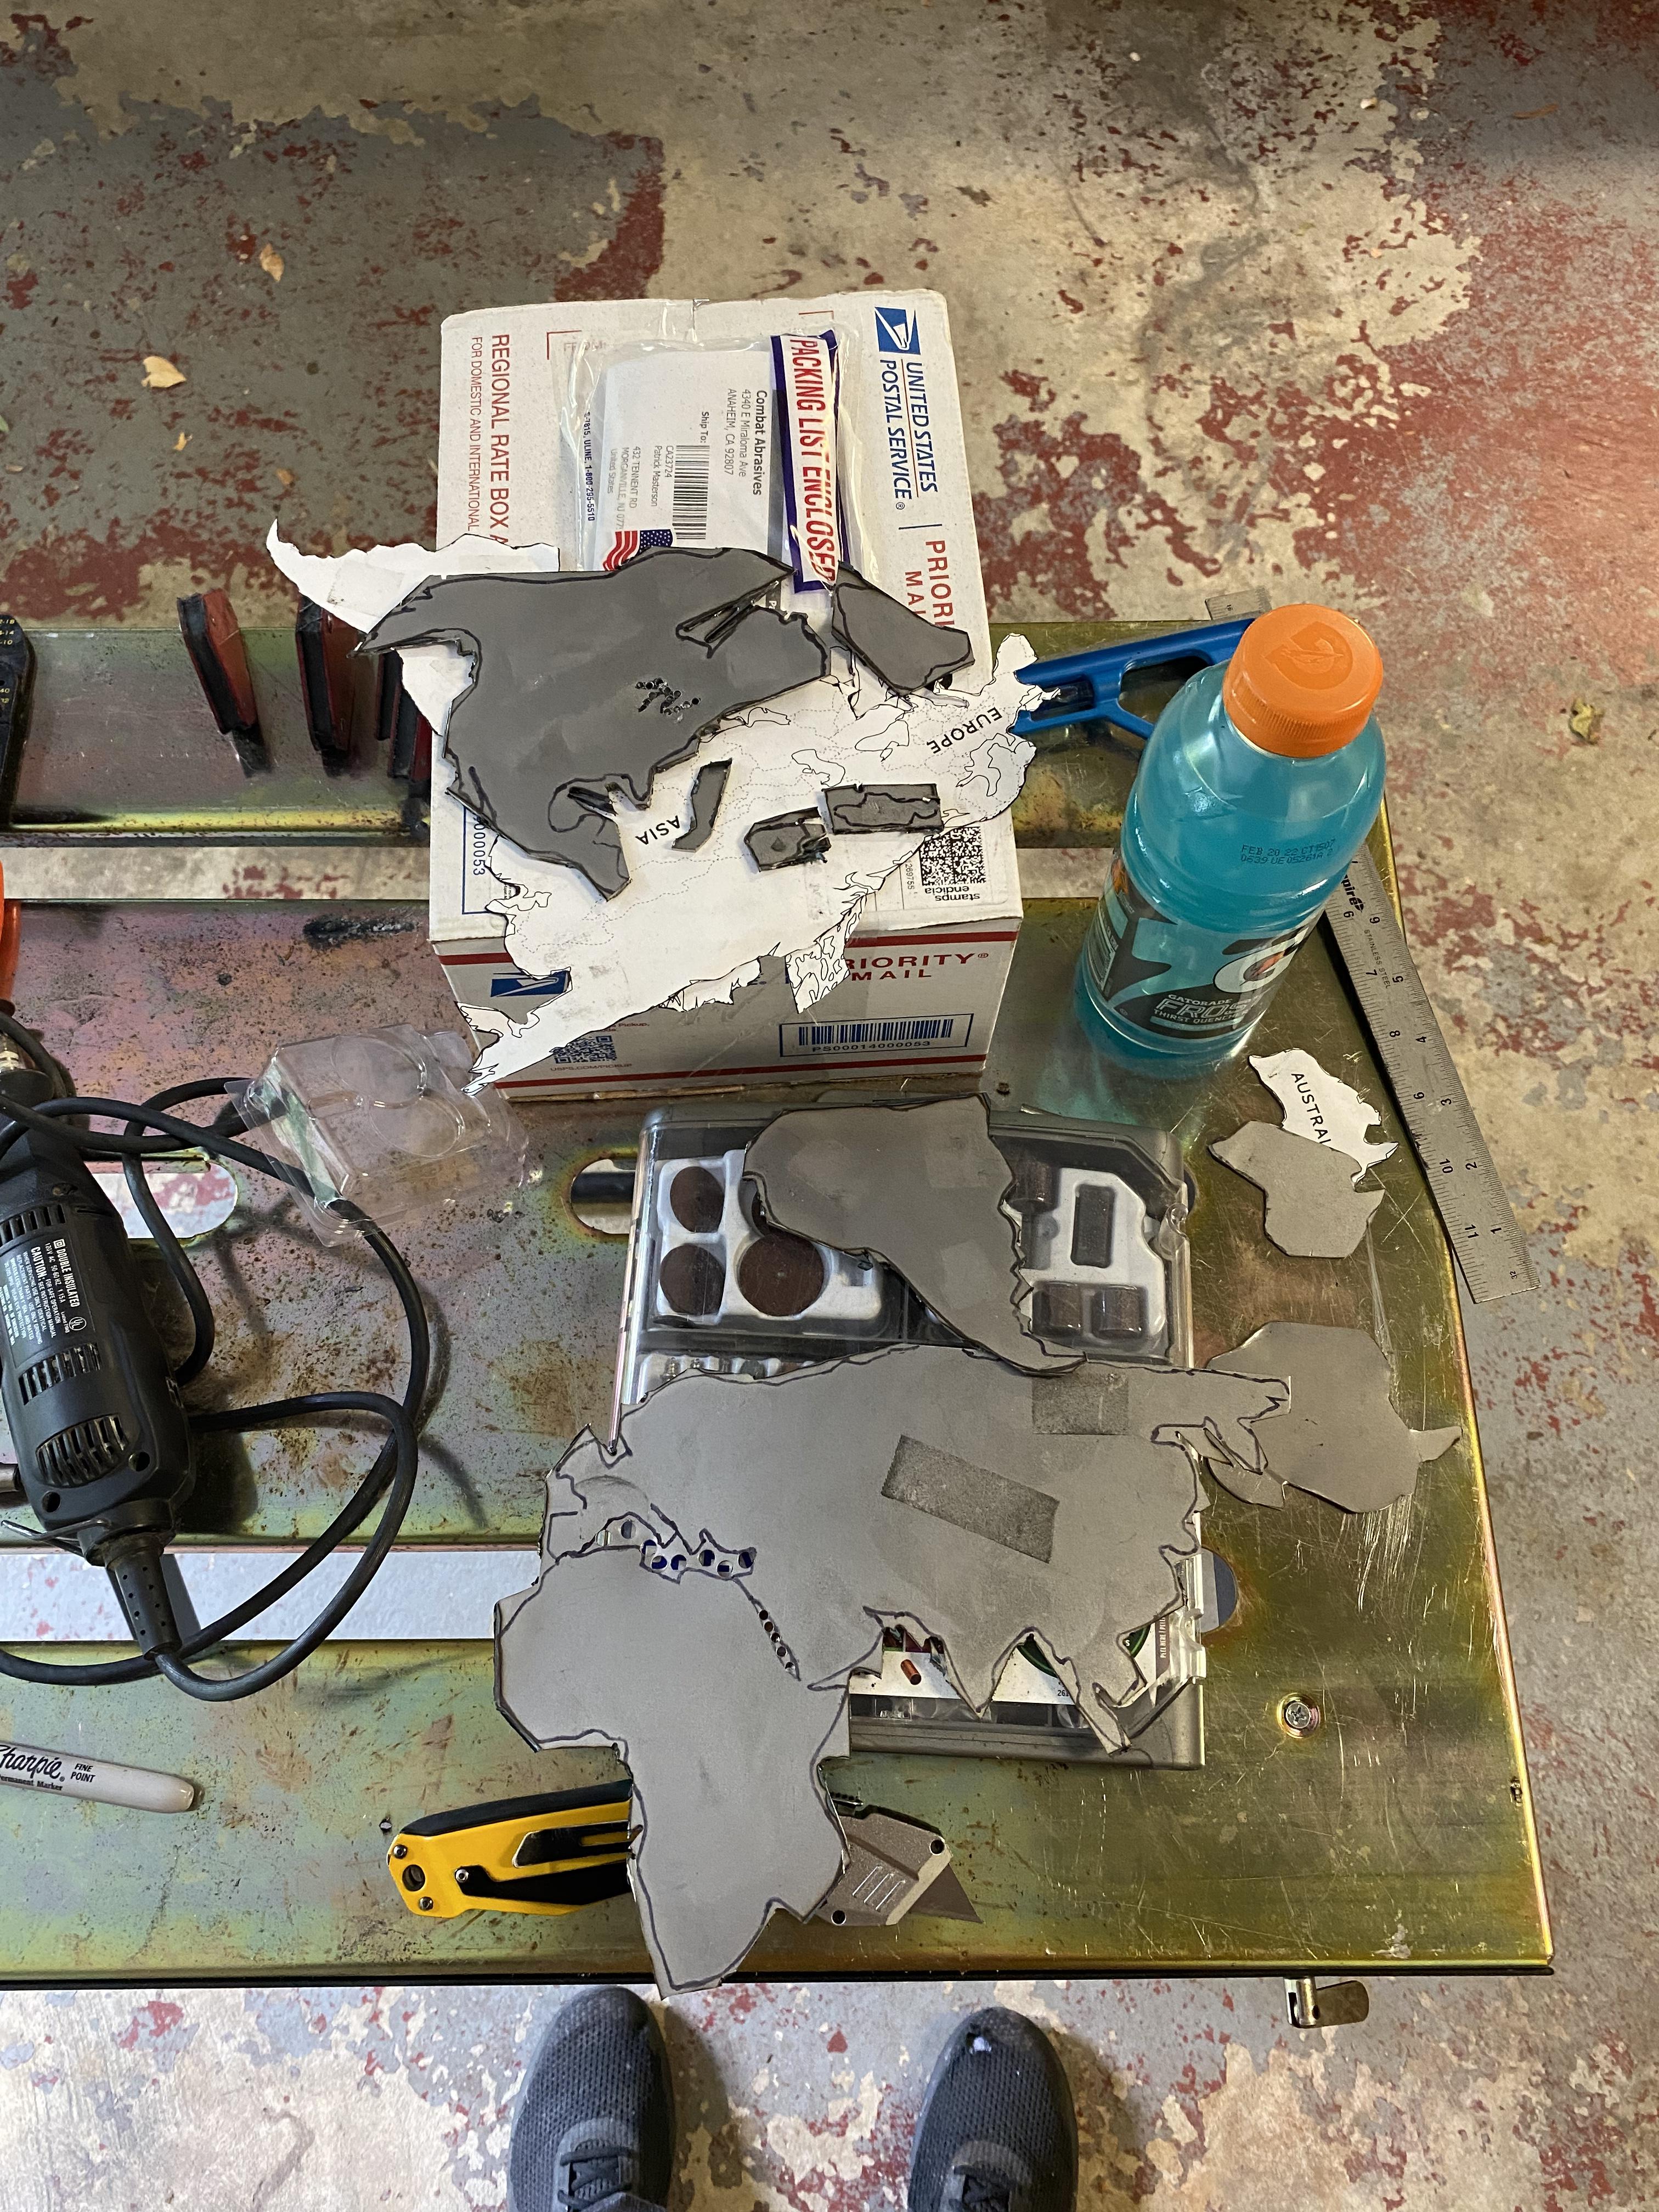
Started cutting out the continents for this globe I’m working on. Still have a lot of filing/grinding to do. I think they’re going to end up being a little too small but it’s ok for this first one. I also think I’ll need to add more sphere rings - maybe 1/8” between the existing 1/4” ones just to have more places to attach the continents too, I think it might just look cool too though. It was tough deciding how much detail to go into…like does Cuba get the boot or not lol. And the 22 gauge stuff I got was a little too much to cut by hand and more than I needed. With a thinner gauge I’ll be able to do more details on the next one.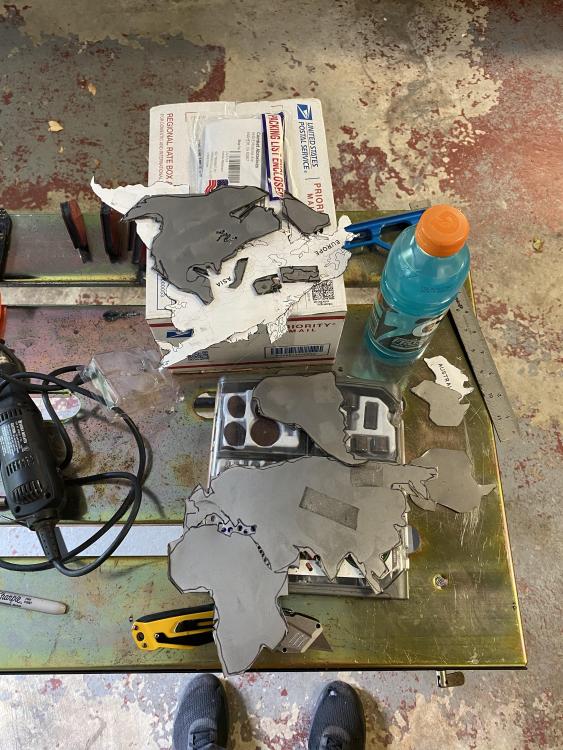
-
That’s what I was afraid of. I’ve seen little torch kits that are made to fit up to a regular 20lb propane tank. I always have a few tanks around so it wouldn’t be an issue to leave it hooked up to one and they’re cheap enough I wouldn’t be angry if it turned out to be terrible. With the material I use being as small as they are maybe just the propane would be enough. Thanks guys.
-
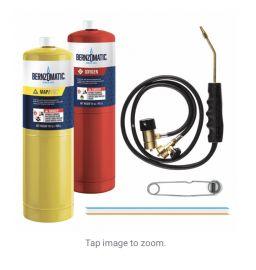
Sorry if I’m putting this in the wrong thread guys but I thought this made the most sense. I was curious if anyone has ever used one of these small kits? And obviously what you thought of it. Of course to you guys with giant oxy acetylene set ups this is a joke haha but for someone like me working with 1/2” and smaller 99% of the time, I thought this might be pretty useful for localized heating - rivets, tight bends, upsetting etc etc. I simply don’t have the funds, or the space even if I did have the funds, to go with a real deal oxy set up. Thoughts?