Panik
Members
-
Joined
-
Last visited
Everything posted by Panik
-
Welshj, I am sorry for not responding sooner. I didn’t see the notification until yesterday when I posted up a different topic. That is some amazing detail work! Thank you for sharing it’s an inspiration! I had no idea you could use Super Blue with vinyl stencils. It came out great and at some point I’m, when my skills progress, I’m going to have to give it a try as it really adds depth of character to your work. Any thoughts on durability? I’ve 50-60 year old guns whose bluing is perfect, but they are safe queens and we’re commercially done... I’d be curious to see how light wear (sheath as ex..) would impact the finish.
-
I've posted here before, primarily in the gas forge section, but mainly stick to reading through the wealth of information shared on this forum. I have what I would consider a fundamentals question for which I would very much appreciate the input of those more experienced than I. I'm very much still in the infancy of playing around with knife making. Made several knives using a Gough jig and in the process gave myself decent case of trigger thumb. (Probably shouldn't be typing right now without a brace in fact) I very quickly realized that while hand filing a knife can produce some amazing results, at least for me, it comes at a cost of time I don't really have, as well as wear and tear on my body. As a result, and because I am still trying to figure out how far I want to take this hobby, I invested in a cheap 1x30 and several of the easy upgrades so that it can be an approximation of serviceable for making a couple knives. (I am very much aware of the limitations of that piece of equipment and if I pursue this further will likely be upgrading to something more appropriate if funds are available. With respect I also am not sure that the short comings of 1x30's are germane to my question) In any case, I've also spent a fair amount of time in bed with a beverage in hand watching people shape knives on a wide variety of belt grinding machines. I have watched 1x30's being used such that they are orientated so that they are laying on their back. I have seen folks use much higher quality grinders placed in a way such that the belt runs horizontal to the ground. I've also watched all manner of tool, wheel and platen swaps so that equipment can be used to its fullest abilities. The one thing that I do not believe I have ever watched is an operator address a belt grinder such that the individual is orientated in plane with the width of the belt and length of the tool rest. I have taken the concept of using a belt grinder face-on as a matter of course, and until yesterday evening in the shop had never given it any thought. I am a very visual learner and while I can rely on tactile feeding back, I generally do better when I can have a full picture of what is transpiring. As a result, one of the issues I have had in switching from files to a power grinder is developing a sense of what is transpiring at the point in space where the knife meets the running belt. This is because I can't really see what's going on until after I have made a pass. On a whim last night, I turned my 1x30 90 degrees and used it such that I was looking down the width of the belt and drawing the knife towards me, across the belt. In doing so I could see much better how the knife was moving in relationship to where it was contacting the belt. It was very much an "Ah Hah!" moment and the consistency of my grinds immediately improved because I had the visual feedback I needed to make corrections on the fly. Like I said, I'm new at all this, and while this appears to be a big step forward for me, I am not trying to Imply that I have made some amazing discovery. Rather, I do know that there are years of experience on this forum from an incredibly diverse array of personal and professional backgrounds. I'd be grateful is someone would be willing to share their thoughts as to why belt grinders seem to be designed to be used face on... Or alternately if what I am perceiving in terms of use is observer bias. Is there some fundamental aspect I might be missing for changing the orientation of how I use a grinder?
-
^ It’s amazes me just how much just a tiny bit of ambient air movement can impact naturally aspirated burners. From 30’ away I can have my fan running on high at the back of the shop and if it’s even slightly off angle from my forge I have no issues. However, if I happen have a slight breeze come through the rear window in a straight line to the forge I get sputtering until the forge reaches temperature.
-
Will do! And thank you for pointing me in a direction
-
Gorgeous work! Was that done in what appears to be the paint can forge on the right in your last picture?
-
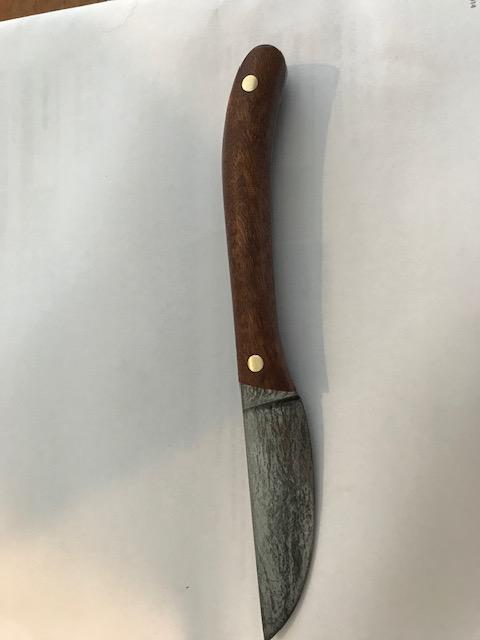
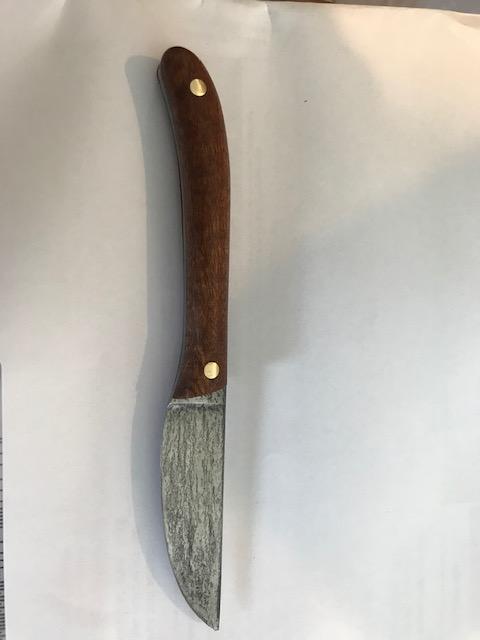
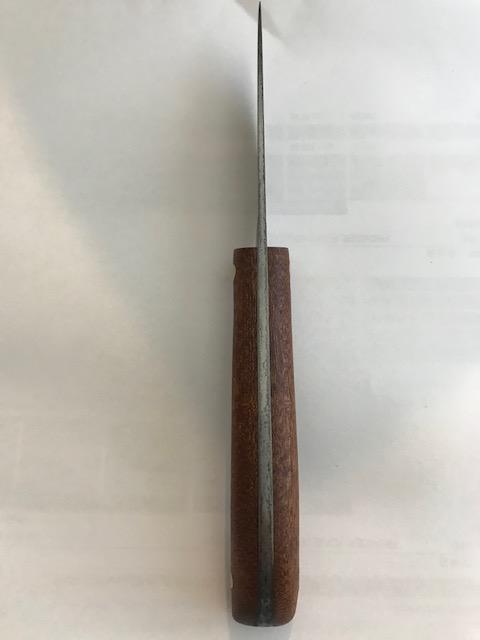
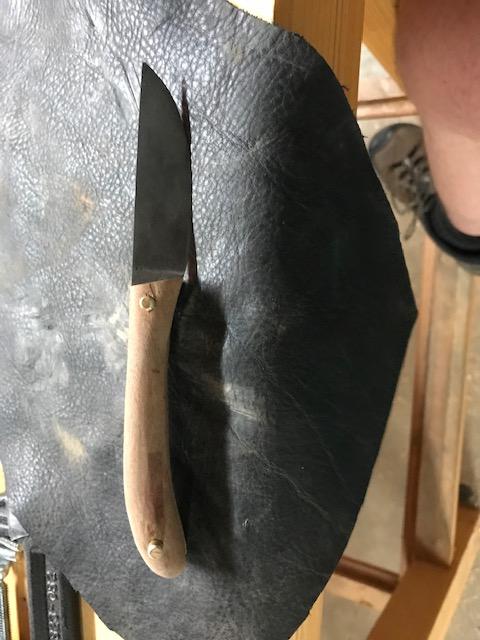
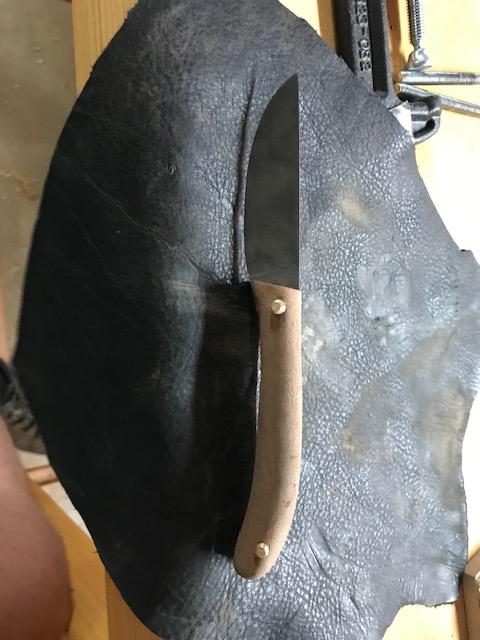
To be clear this is not my first attempt at a knife.... just the first one that has made it to completion There have been three preceding attempts - one in pieces on the shop floor (file knives are a horrible idea for beginners), one in the scrap bin, and one that has been put aside until I have the patience and skills needed to fix my mistakes. The knife is a stock removal job made with Aldo's 1084 steel and sapele scales with a coat of Odies Oil as a finish (several more needed). It is destined for a friend who expressed encouragement and interest in it beyond it just being a first-ish attempt on my part. One of the comments my friend made in seeing the unfinished blank was that he sometimes enjoyed the dull look created by forge scale. I didn't feel comfortable leaving it with scale from the heat treat and endeavored to come up with a slightly more refined, but matte finish. To that end I did a bit of research and came across what appeared to be a relatively simple way to do a for of rust bluing on Youtube (yes.. I know..). In any case the process detailed involved repeatedly etching the blade in vinegard, painting it with a H202/salt solution to encourage rust and then using filtered boiling water to supposedly convert the rust to magnetite. Obviously that didn't happen here, or at least did not completely occur in this case. I was wondering if anyone might be able to provide their insight as to what type of changes actually occurred. The only things of note I can think of is that I deviated in using tap water instead of filtered, and that it is my understanding that there is some vanadium in Aldo's 1084. (To be clear, I do enjoy the results but also take it as a good lesson in both using test coupons and ensuring I understand the process occurring)
-
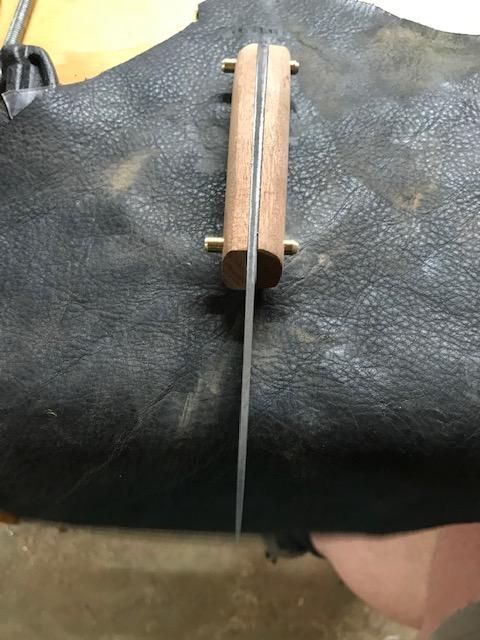
Templehound, thank you very much for the kinds words and advice!! I very much appreciate your encouragement and I apologize for not responding sooner. I also want to apologize as my writing style can be difficult at times. Thank you for reading through it. You are exactly right in what you stated. I am using the file jig to get comfortable with the geometry involved and am greatly enjoying contemplating the ideas that come from that. When I am able, I best learn by physically doing, and it is a lot easier to correct mistakes when I make them slowly. I do hope to eventually progress beyond using a jig. Whether that involves filing freehand or using a belt grinder I do not yet know. I do know is that there is some amount of peacefulness to be had in shaping metal regardless of how it is done. This was my first attempt at cutting a ricasso and it was done without scribing a line on both sides of the knife. I have since bought a carbide cutter for layout lines and I will use for future efforts. I have also been making an effort to regularly look at each side of the knife blank while filing. More generally, a little bit of progress with things. I am taking it slowly both because I don’t have a great deal of free time and because I enjoy attempting to think through the process prior to doing it. My originally intent was to polish up the blade prior to putting a handle on it. However a friend expressed interest in how it looks after seeing it on my desk at work. (It has been tempered, and de-scaled in vinegar) Attached is a picture of how thing stand currently. I have a running debate in my head about rust bluing the knife prior to permanently affixing the handles. I have been playing with shaping the wood scales and this is my second attempt. I like the direction it is headed but need to reduce the total thickness and will also start with scales that are not as thick next time. The wood is un-stabilized sapele. It was chosen because I had a block that was already squared up and because I think that when it is finished it will have some nice, muted play in the figure. Once everything it ready, the plan is to finish the handles with Odie’s oil. I have a friend who makes ukuleles that swears by it. That finish has an amazing citrus smell.
-
A suggestion for a fix..... If you look in the plumbing section of your local big box hardware store they sell brass termination flanges. I used one as the port/holder for the burner going into my forge. It's a little pricey at about $20.00, but it makes for easy installation. You just have to drill and tap holes for the bolts that use to hold the burner in alignment. .... And don't be embarrassed. I bought all of the nuts and bolts to hold my forge together before I realized that zinc plating is somewhere the opposite of a good idea.
-
My man! You are missing out as a wood worker! It can be absolutely beautifully figured, easy working wood.... AND working it smells AMAZING! I used to help a couple of folks who did custom milling of urban lumber and was lucky to snag a piece. The only reason I'm not taking the suggestion of using a chunk for rust protection in a cabinet is that the only camphor I have left is part of a project I put on hold. (That being said, if you are creating a ton of dust... dust collection and a respirator would probably be a good idea while working camphor) You know... that's kinda where I am at the moment, simply because while I have the alcohol I haven't yet had a chance to pick up a couple of air tight containers. I agree with everyone that it makes the files clog up faster, but on the other my files also seem easier to clean as when they have been treated with the WD-40 for rust prevention.....On the whole though I think I would rather use something else for short term rust prevention in between weekly uses.
-
Thank you all for the quick suggestions! While I have a slab of camphor it is already dedicated towards a partially completed art project. I never knew camphor in an enclosed space was a rust inhibitor, I just really enjoyed the smell of working with that particular species of wood. While I very much like the idea of VCI bags, the immediacy of the issue and the ease of getting denatured alcohol means I'm going the old skool barber route with a couple of tuperware or glass canisters with reasonably tight lids. Though I am probably going to be getting rust inhibitor bags down the road for a number of tools. Again, I really do appreciate the diversity of viable ideas and information!
-
I wish I had the skills to be able to get some benefit from using technical pens in any manner..... but my skills don't lay in that direction. I'm pretty sure my friend Mark also mentioned Prisma pens, but I am so brain fried from listening to lectures this weekend that I can't recall the specifics. In any case, I hope the suggestion bears fruit for you. If nothing else, my understanding of the Sakura's is that they are relatively affordable.
-
I was just listening to a friend's lecture yesterday on scientific illustration and he mentioned the exact same benefits and issues with radiograph pens for the professional illustration work he does. While he's mostly switched over to digital illustration (Photoshop, etc), he does still occasionally use scans of work that he inks as a base layer in the final digital version. He recommended using Sakura Pigma Micron pens as an alternative to radiograph pens, and is apparently well please with them as an alternative.
-
Hopefully I put this in the correct sub-forum. I live in NW GA and while we are blessed with 4 actual season, spring and summer can be pretty intense in terms of humidity. My shop is enclosed, but it is not and nor will ever be at the point where I can have climate control. I am somewhat new to treating files as anything more than an occasional use tool and am still learning. (The horror…. I know) I understand about most basic care at this point (carding, chalking, acid bath sharpening) and in particular not storing them stacked or on a wood surface in a humid shop. However, there is one area I am unclear about: From my broader reading, I have gotten conflicting information about rust prevention and was hoping for some clarity. On iforgeiron, I have seen multiple brief mentions about lightly oiling files to prevent rusting. On the other hand, I have also seen elsewhere people mention that oiling can lead to files more rapidly clogging while in use. My simple question is whether I should be oiling files after use, and if so what would be a decent product to utilize?
-
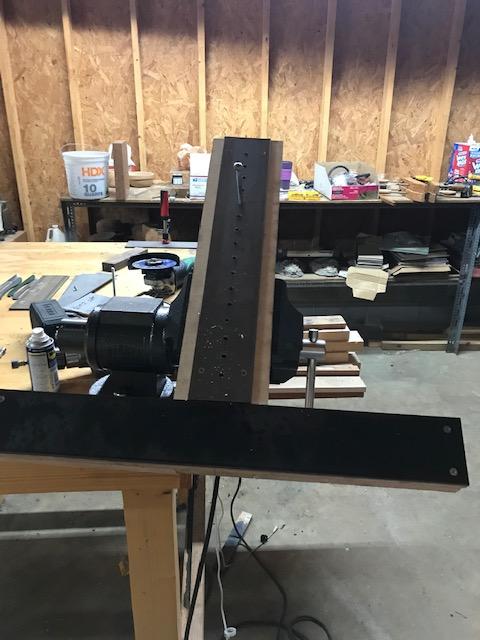
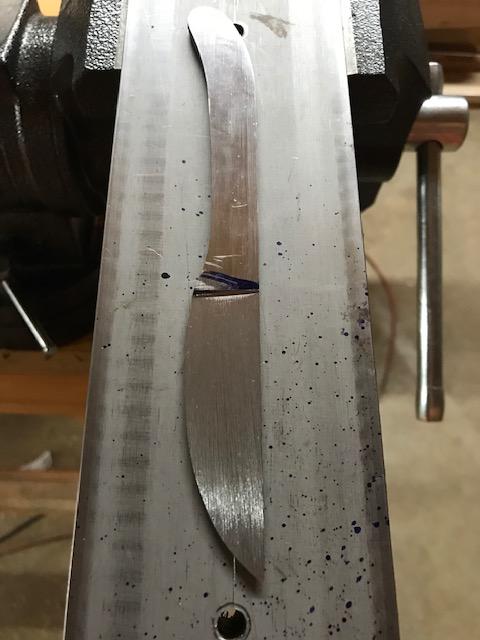
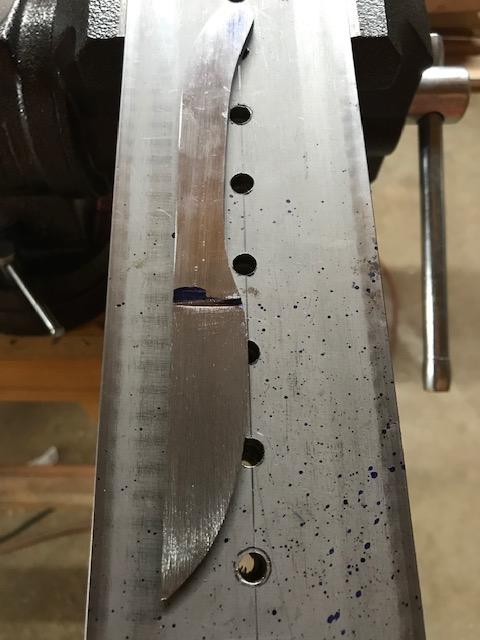
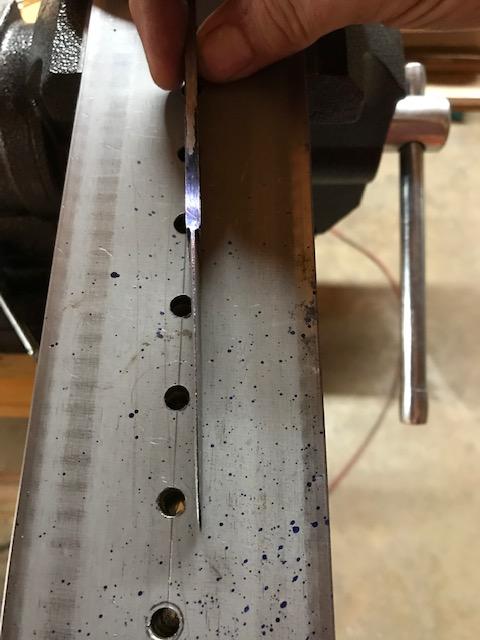
Sometime during quarantine, I got the bright idea to learn how to make knives and thanks for some wonderful advice on this forum I got a very small but functional forge up and running. I also learned from several horrific experiments that I am not yet interested in using a belt grinder to attempt to make stock removal knives. The obvious and well stated reasons apply regarding wood belt sanders. The other reason is that, honestly I would rather learn knife geometry using a tool that is more forgiving, in that I cannot remove too much material in one go. As a result, I did some searching and came across multiple examples of Erin Gough’s jig. The attached pictures are my second attempt at making a serviceable filing jig. I think that it is a wonderful tool to learn some of the fundamentals of shaping knives. I, unfortunately, cannot free hand drill three holes in line with each other, and as a result was unhappy with my first attempts. A steel work surfaced jig with full length backer plates suits my abilities much more readily. I had read about the idea of welding together such a jig, but have yet to actually see pictures of such. Lacking welding equipment and skills, an oak backed, mild steel surface is the closest I can come to approximating the concept. In truth, I’ve been enjoying it enough, and its functionality works well enough that I have been making a conscious effort to use it after work. I enjoy it because it is very easy, for me, to ensure that a knife blank is in proper alignment, regardless of which side is facing upward. That is not in any way, shape or form a criticism of Aaron's original design. Rather, it is a concession towards both my abilities and my preferred way of thinking. Also, shown are my first attempts at hand filing a knife… such as they are. Please don’t be too brutal and keep in mind this knife blank is a refuge of my abortive attempts to cut bevels with a belt grinder. Prior to filing on the Gough jig this blank had multiple, crazy bevels and the thickness at the working edge was all over the place. I figured that considering that it was messed up to begin with, that it might as well serve to practice file stroke form and practice efforts to bring things into consistent bevel and thickness. As a result, pulling the bevel and plunge line all the way to the spine was a conscious decision on my part, even though it is not aesthetically appropriate. All in all, I certainly do need to practice setting my plunge lines. As well, I am aware that there are multiple issues with the blank as it stands: - Plunge line evenness, and continuation to the spine - Weird bevels on the plunge line wall - Thinness of blade edge prior to heat treat - File scratches near the plunge ling. This blank continues to provide opportunities to learn, and I am pretty happy with the direction my experience is headed. In all likelihood, I will probably play with correcting the plunge lines, heat treat and polish to some level of finish so that I have an understanding and can do better, and more quickly on the next go 'round. I mean why waste more material? Things I have learned that might benefit other new folks: - Some Nicholson mill files have one edge that is not serrated and a side each that is single and double cut. Life is easier if you buy two and set them up on separate guide rods so that you have a separate left-hand dull edge and right-hand dull edge file for working near the plunge line. (You can of course grind the edge having serrations smooth, but for 11-ish dollars it’s nice to have two files whose edges that you know have consistent and factory geometry) - Draw filing actually goes surprisingly quick and makes interesting corkscrew shavings, as opposed to perpendicular filing. - It’s worth spending some time practicing cutting bevels with a single cut file… While it is slower, you are less apt to leave deep scratches, and it is good to have an understanding of what it feel like to have a file quickly load up with metal shavings. - While most videos I have seen show people filing perpendicular to the knife spine, it can be beneficial and a time saver to file at a moving angle across the face of the blade….to help prevent filing divots. - Draw filing near the tip of a knife is tricksy and it pays not to use too much pressure. - While it is time consuming, and I’m not sure I want to do it for years, there is a certain amount of Zen involved in hand filing knives. - Weird flex, but I built my jig way way larger than I needed… mainly because I was being lazy and didn’t want to cut metal. This actually worked out to my advantage in that the additional length on the “wings” lets me use them as a steady for my off hand while filing. - It’s worth practicing and getting comfortable filing with both your dominant and non-dominant hand for each “side” of the knife. You don’t have to be perfect, but it does help with both divot and deep scratch cross filing. In any case, any thoughts, advice, or criticism would be appreciated.

-
Not in the slightest... working with college kids has given me a tougher skin that I used to have. They're not near as brutal as grade school kids but still......dang! Yup, time vs money is an ongoing issue, although I have learned to at least try to re-frame things as "I don't want to spend the money right now" or "I don't want to use the time".....It at least gives me the illusion of having a choice in the matter Directly forging related pics will be forthcoming I promise. Unfortunately, I just don't have a lot evidence of using the forge. I'm horrible at remembering to take photos and the best I have at the moment is a pic of the oil burning off of my heat treat pipe. It was neat and a bit spooky the amount of time it took for the film on the pipe to burn out of the inside. It was a very good demonstration of a low oxygen environment. (Probably also a good reminder to de-grease things before I chuck them into the forge as well). I could also post up the file knife I tried to heat treat.... but all that would do is demonstrate my impatience and illustrate what happens when you don't treat steel nicely In very mildly forge related news, I have learned that for the time being, I am uninterested in using powered tools for stock removal knives. Aside from the obvious, and well discussed, issues of re-purposing a bench top sander, I just don't have enough experience to maintain an accurate and repeatable grind yet. I'd like to get a better understanding of how things work before moving on to powered tools. On the plus, a Gough Knife Jig is pretty easy to build with simple tools. I added a mild steel face/work surface to improve durability and reduce flexing. The one thing I dislike about the jig is that it uses a series of stop bolts across the bottom of the jig to hold the knife blank in alignment to the file. From previous experience, I know I'm not going to be able free-hand drill the holes necessary with the accuracy I would like. Instead of using stop bolts, I am going to attempt employ clamped metal strips as a backstop for the knife blank and use a bubble level to make ensure it is level. This should prevent the attitude of the knife from changing in relationship to the file when I go to do the other side. Pics of the doggo cause I'm seriously lacking direct forge related photographic evidence.... Besides he's the best furry friend I could have ever hoped for.... very much a once in a lifetime companion.


-
Hey folks, just wanted to update briefly here, as I don't want to leave the impression that I came, got advice and jumped ship. I am very grateful for the support and guidance I received while building my first forge. I am also very appreciative of Glenn's willingness to assist with supplies and going the extra effort in welcoming me and making me feel comfortable ordering from someone I didn't know, among other things. I am still reading, learning and making attempts. The forge is now complete and the reducer coupling Frosty recommended works very well as a replacement for the end cap that fell apart. Point being, with work getting back into the swing of things I have had very little time for myself. What little time I have been able to grab here and there has been devoted to building my own version of a Gough jig so that I can put my forge to use heat treating. (In fact with a capped pipe it provides pretty even heating for heat treating) I just don't want to give the impression I cut and ran after getting what I needed..... I'm still here reading and thinking so that I can develop questions to ask. Again, thank you for putting me on the path!
-
Thomas, Frosty - I agree with you both you and didn’t intend for anything I wrote this morning as a refutation of your thoughts. I’m reasonably certain I was among the last to be taught how to use a stereoscope and interpret stereoscopic aerial photos at the water management district I worked at before they switched to fully digital databases of aerial mapping. It was a shame because there are skills in interpreting stereoscopic images that can inform analyzing digital images. My post was more about reminding myself, and anyone else willing to come along for the ride, that there is still a lot of cool “chit” happening out there.... even if it is largely absent from big businesses. Back to more topically relevant posting...
-
Not that everything is rosie (no riveter puns intended), but not everything is lost either: - I’m 43 and I remember my dad arguing numbers and design for laminar flow with his partner while building custom composite free style canoes. (Was about the same time as the first Olympic kerfuffle about low drag suits.) These were the folks that produced Canoesport Journal, which eventually became Paddler magazine) - it’s my understanding that smokejumpers still sew and pack their own chutes, as well as fabricate their own gear. Most of the after market equipment supply companies catering to that industry are founded by former wildland fire personnel who want to combine personal experience with materials science to provide more ergonomic end user products. - I watched a high school educated friend not more than two years ago teach himself architectural design principles as well as CNC/CAD so that he could expand his business further into the restoration of historic wooden structures. It’s been a neat melding if technical skills, computer guided production and theory. While a lot has been shifted to menu driven computer algorithms there’s still cool stuff happening in the strange eddies and back currents of tech..... this forum and AFB’s printed mixing tubes and nozzles as example? Heck, while end users may have to wade thru 27 thousand menus to create a torus in a design programs, algorithm design for such programs (especially for open source programming) still requires grass roots understanding and manipulation of concepts) I’m not necessarily disagreeing that much technical expertise have been lost to the average person due computer aided product development...... I‘ve seen and been a part of it generationally..... more its just I’d very much like to believe it’s not fully a black and white thing. Aside from the obvious fire bug on my back, the above is one of the reasons I very much enjoy prescribed fire. There’s two very separate sides of that field that come together in a Venn Diagram. There’s is a side that strives to be driven objectively and by discrete data collection (duff accumulation measurements, material drying rates, flame speed, micro-macro atmospherics, etc ad nauesum). However, much like weather broad scale predictive capabilities are coming along but fine granularity in predictive capability On the other hand that still leaves wide space for, what is to me, the spiritual side.......intuitive understanding based upon both experience and hard science....That sometimes unconscious decision making that says “If I put fire here, it may burn hotter and therefore create room 6 months down the road for species X to better thrive”. At least in the SE US you’ll still regularly hear about the idea of “painting the landscape using fire as your palette” In any case, I have once again been writing prior to finishing my first cup of coffee and somehow managed to muddle empiricism and the idea of spirituality in the strictest sense (i.e profound respect for that which we don’t fully understand). Apparently I’ve been listening to Mike and the Mechanics on Pandora too much. Feel free to call my BS.
-
Aside from drooling over the pretty (rich), vortical forge atmosphere, I was wondering if you were using wool in that forge or is it a solid cast of refractory?
-
LOL, never been a driller, well a well driller anyway.... worked with a bunch as a project scientist for a chemical remediation company straight out of college.... I was a pretty sheltered kid and it was an fun education working with them, especially since I was technically supposed to be in charge. Kinda the rougher version of a staff sargent dealing with a lieutenant straight out of OCS. You're not the first person to accuse me of overthinking.... it's a blessing and curse Not a blacksmith yet... more dilettante at the moment but interestingly enough when I bought a 2nd hand planer it came with a beast of a stand that is perfect for supporting an overhanging top. Things to think about definitely... just would need to not get caught up in watching the flame swirl in the forge without actually doing anything.
-
Thank you for sharing! I'm excerpting your text because there is a lot of absorb and a GREAT DEAL that is going to be spinning in my mind for some to come.. even then I'm not going to say I'll be able to process all of it. Something that did come immediately to mind when you brought up the issue of exhaust path and burn out casting methods were tire treads and tire grooving tools. I certainly don't know the pattern necessary, but would it be possible to use raised ridges to both work as a spacer and to channel the exhaust as it travels through the annulus Or would doing so create the need for a greater induction force than a NARB or blown burner can produce?
-
So I finished a forge that was a bit of a qualified success and have already been thinking putting what I learned to use building something slightly larger and a bit more refined. I have been reading and re-reading through parts of the Forges 101 thread today and I had a question about a forge design I saw. There are a couple instances that someone has built a flat-bottomed, half-round forge where the burner port came up through the bottom of the floor, adjacent to where the arch wall meets the floor, and at the back of the forge. In looking at it the thoughts that pop into my head are: - Within reason, half-round/oval shaped forges tend to maximize floor space while reducing excess "open" volume... at least as compared to rectilinear forge bodies (Thanks Frosty) - The burner location induces the flame to follow a path along the ceiling and create a swirling atmosphere that may increase flame/hot gas hang time. - As a corollary, I want to believe that such an arrangement would lend itself a less turbulent environment and as a result create less back pressure than if the flame were to impinge on a wall in a perpendicular fashion. - Burning propane creates a chemical active environment and locating the burner in such a manner would make it difficult to use any replaceable materials (kiln shelf) to protect the refractory at the point where the flame impacts the wall. - There might be some logistics to navigate in mounting a forge to a stand when the burner is projecting out the bottom. I don't want to bash anyone's efforts, because I think it is a really neat design..... especially because swirling hot flames/gases are cool to watch. (Don't judge, I'm a prescribed fire junkie and any day is a fun day when you can watch fire whirls from a safe distance). I was hoping for a bit better understanding towards any additional pros and cons I might have missed in such a design.
-
A quick comment I should have included earlier. I very much appreciate y’all being willing to share encouragement, knowledge and critics. My thanks!
-
Good catch on the Kaowool! I hadn't noticed it until you mentioned it. I would swear up and down that I buttered and rigidized each layer as I put them in..... Apparently that's not the case, or I didn't use enough. On the plus side with the back off I can wet and then reapply rigidizer and cap the whole thing with Cast-o-Lite. I have seen online many nice examples of hand lay ups and I may again try it sometime, but for now I'm liking the idea of all the figidity stuff being front loaded in making the forms and filling them being limited to making sure the wet stuff gets to where it needs to be with a proper tamping. Lol, yup.... the back wall was actually tamped with a dowel. I still like the idea of mini forges.... but when the inside volume is roughly the diameter of my closed fist and I'm having to work around two pipes being used a forms for ports it got really difficult for me to appropriately tamp the side walls. Working with it is an interesting mix between working with clay and concrete. I kinda shot myself in the foot with limiting the amount of space I had to work with when coating the interior. Ehh, it was a great learning experience for doing better next time and with some tweaks I should still have a reasonably functional first forge.
-
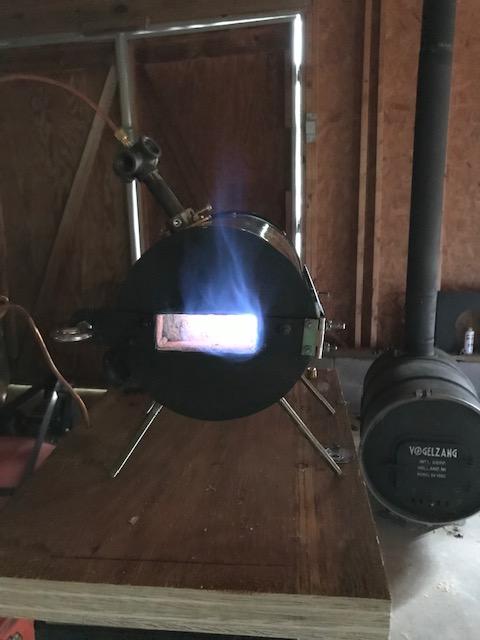
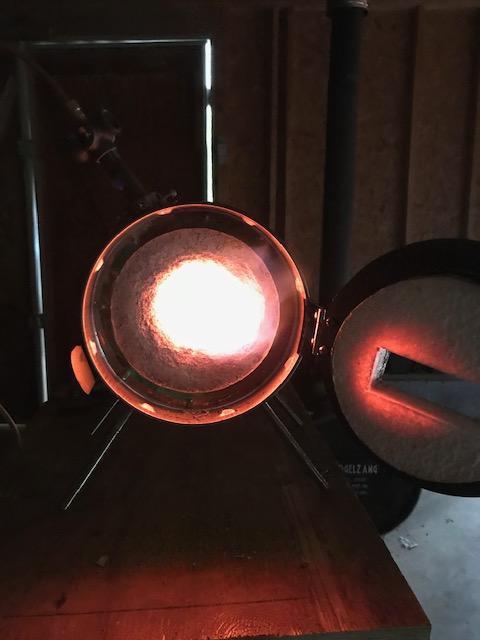
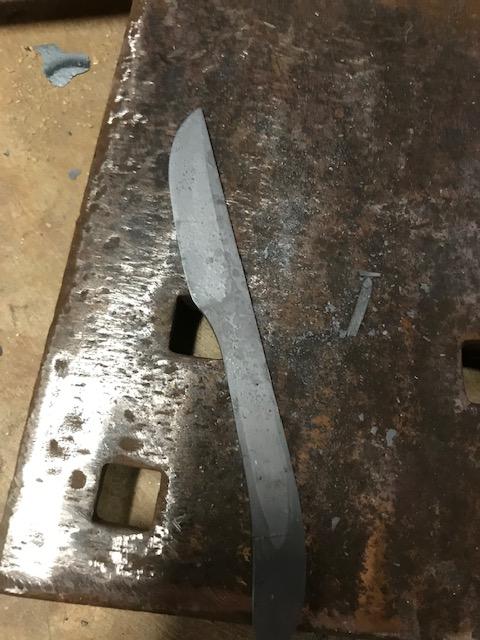
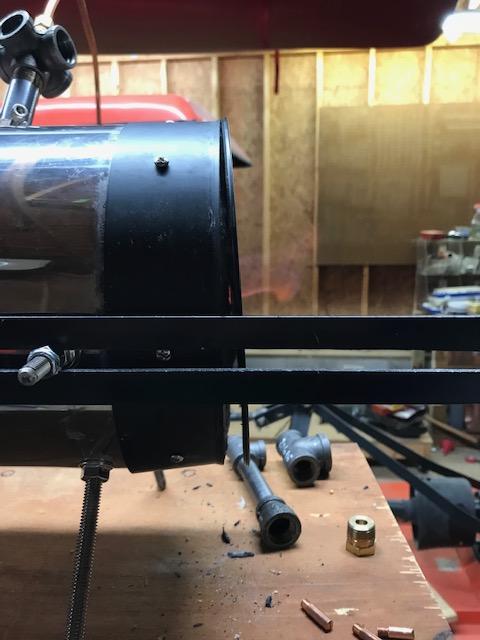
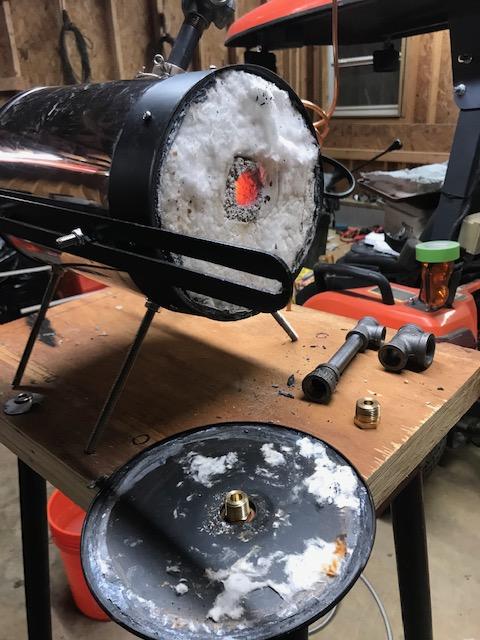
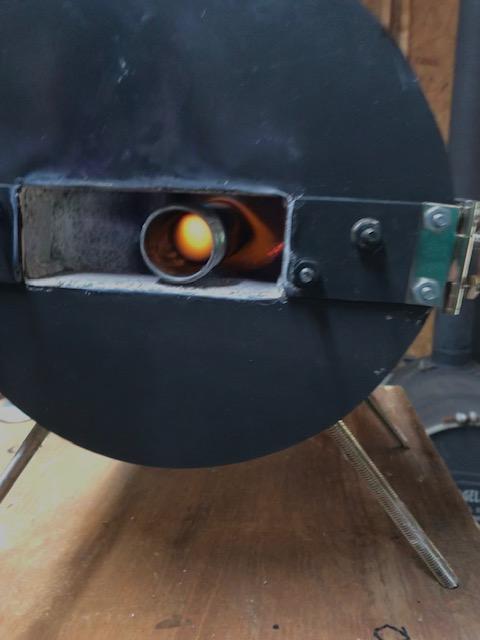
Last night was the first time I’ve been able to run the forge since completing the full curing process and I figured I would take this as an opportunity to document how things turned out. While it is not an unmitigated failure, in retrospect, there are certainly things I would have done different in order to have a better end result. The Positives: 1) Even without washing the interior with Metrikote the forge seems to come up to temp pretty quickly and get pretty hot. 2) With such a small size it appears to be a gas sipper. I was able to maintain it pretty close to its high temp (as estimated by interior color) using 0.5-1.0 PSI. 3) The door configuration actually meshes with the body correctly and prevents the edges of the inner stainless inner lip and the outer edge of the forge shell from burning up. The Negatives: 1) I really disliked trying to get Kast-o-Lite to adhere to Kaowool, especially since there wasn't a lot of working room…. It didn't come out nearly as neat and tidy as I would have liked. (I might have been able to mitigate this with a ever so slightly wetter mix – I adhered pretty closely to the recommended ratio) 2) The roll crimp stove cap I used for the back wall of the forge failed. Due to differentials in expansion the flat portion of the stove cap popped out of the crimp and fell on the ground, leaving rigidized, but uncoated Kaowool exposed to air. (Note – forge exterior, not inside the chamber) 3) I apparently oversized the port for the burner, as I had small flames coming out of the gap between the burner and port walls. 4) The forge is too small for the kiln shelf I purchased to use as a flame face. 5) While I am very pleased the door arrangement actually functions as envisioned, I will also happily concede I should have followed advice from others and integrated some form of adjustable baffle for the work port of the forge. It would have been much simpler and would have allowed me a greater amount of flexibility. (Still remains a fun puzzle to have worked through though) The Pleasant Surprise: I had/have a great deal of difficulty interpreting flame color and it’s implication on whether a burner is running rich/neutral/lean. I get tripped up because what I see in person is significantly different than how my camera phone renders the same colors. It leads me to question my ability to compare what I am seeing in person to exemplary flames found online. I also had a very frustrating time accurately drilling and tapping the requisite holes without a drill press. As a result, I did a fair bit of experimentation with ad hoc drill guides and different fittings in an effort to reduce my chances of error while assembling a functional burner. I have several different burner bodies constructed, including several of Frosty’s T-burner designs. The first burner I tried in the forge was an offshoot experiment that uses a ½” 5-way fitting with the air intakes bored out using an electrician’s step/knockout bit. After a bit of alignment adjusting within the burner channel, I was very pleasantly surprised to hear the classic jet engine noise. Even better, when I put a piece of old Nicholson file in the forge it started forming scale very slowly. For me, it is nice to see what an oxidizing forge environment looks like in person, as everything I have made to date seems to produce a very rich flame when run on a test bench. Hopefully, a little bit of fiddling with an air choke I can get it to produce a slightly neutral flame. Where To Go From Here: 1) Before running the forge again, I am going to remove the remnants of the stove pipe cap back wall. The exposed Kaowool on the exterior of the forge does not appear to be in direct contact with any flame and I did not see any evidence of it pyrolyzing. However, I would feel much more comfortable with all material being sealed away regardless of where it is on the forge. Plus, it will look better without the insulation being visible. The plan is to get a new stove cap to use as a form for the back wall. I want to lay in an inch or so of wet Cast-o-Lite in the bottom of the cap and secure the whole thing by slipping the collar of the cap over the outside of the forge body and then screwing the whole thing together. Hopefully, if the end cap falls off a second time the Cast-o-Lite wall will stay attached to the forge and protect the Kaowool. After the new cap is secured and tested against failure, I will wash the inside of the forge with Metrikote and put it into use again. 2) I need to adjust the current burner closer to neutral, as well play with the other burner attempts to see if any work better/run more efficiently than the one currently in place. 3) I want to see if there is any use in baffling the burner port to reduce the amount of heat moving towards the burner body. 4) I am already thinking about constructing a moderately larger forge. Although I may not yet have the requisite skills, I am sucker for clean lines. I am very intrigued by the idea of using forms to separately ram cast all of the forge components (inner shell, outer shell, front and back wall). If I can work out the fine details, I would like to use a series of negative impressions in the front and back wall as a register to support the edges of both shells and then use thread-all and angle iron to hold the entire arrangement together with gentle pressure. If everything comes together and works as designed I can always go back and use refractory to adhrere the edges of the forge shells to the front and back wall. My one major concern outside of construction details is that a forge built in this way be very fragile. Some Suggestions To A Fellow New Person: 1) If you are without a drill press and do not have the skills to tap fittings freehand, with stubbornness/patience it is entirely possible to creatively cobble together fittings to work as a pretty accurate guides for drilling and tapping both the hole in the back of a T-fitting, as well as the hole receiving the Mig tip. I believe this is mentioned elsewhere but it deserves being brought up. Given my lack of a drill press, I tapped the hole in the T-fitting from the inside of the fitting and used reducer bushings as a guide to insure I was accurately drilling and threading that hole. You do have to be careful not to over tap that hole because only the first couple of threads on the outside face of the T-fitting will be holding the Mig tip holder in alignment. 2) I very much agree with Frosty’s recommendation to drill and tap the requisite holes all in one go. However, I also tripped myself up using this methodology. If you are having alignment difficulties, evaluate the fitment of Mig tip holder and T-fitting as two separate items. When I was concentrating, I found that it is entirely possible to drill and tap one of the required holes correctly and screw up the alignment of the other hole without realizing it. A 3/8”X1/8” plug style reducer bushing is a wonderful tool to evaluate whether the Mig tip is threading straight into the Mig tip holder. You don’t have to look through the openings in a T-fitting to determine alignment and it is much easier to see if things are seated correctly in all planes. Pictures: 1) At start-up (Looks rich to me) 2) At operating temps (Seems to have settled into an oxidizing environment..... maybe there was a bit of curing/water removal to be done?) 3) First heat treat and resulting scale formation 4) First pic of cap failure 5) Cap failure 2 If anyone has read this far please, I would appreciate any criticism, suggestions or other knowledge you might be willing to share.