

Panik
-
Posts
66 -
Joined
-
Last visited
Content Type
Profiles
Forums
Articles
Gallery
Downloads
Events
Everything posted by Panik
-
Thank you for understanding and thank you indulging my theoretical question! I have had a mental image of the burner stuttering until things get up to operating temp for some reason. It's nice to know I might just not be completely off base in my thinking. Your input has also helped me to better be able to formulate my thoughts....... something the about colder denser air inside the annulus creating increased back pressure and impeding a smooth flow of exhaust gases through the entire forge as things come up to temp tickles my mind. Even if does not have actual bearing on the how a forge functions at temperature, for me it is fun to think about. My first attempt at forge is up and running. With some small changes and a bit of tuning I think it will work okay for a small heat treat and experimental forge. However, I'm already thinking of something a little larger and more solidly built. Broad stoke, I've been kicking around the idea of using Cast-o-Lite to cast the inner and outer shell and a front and back wall as separate pieces. Specifically, I would love to make forms so that the front and back wall have negative impressions; serving as a register to support the two shells. It doesn't help that yesterday my coworker threw away a large amount of heavy picture mounting stock that, along with wax paper and framing, would making great backing for building forms. I am still thinking through the burner port and its alignment for casting, but were I to use thread-all and angle iron to hold all four pieces together with gentle pressure, I could then easily disassemble it. The ability to take it apart implies that I could, potentially, have the ability to play with using the clear annulus as a means to increase the distance exhaust has to travel before leaving the forge body, while still leaving open the ability to insulate that space. Do I have any idea of how judge the annulus volume or the port sizing necessary to create an effective recuperative forge? Not in the slightest, and it would be wildly egotistical for me to claim otherwise.... especially since I am still learning how to tune a burner. Heck, if I attempt something like the above I could easily fail wildly in just casting the forge walls. On the other hand and with no experience, I built a very functional, gravity fed 5ga sand filter for work using plexiglass and spare parts a couple weeks ago. In and of itself, stuff like this is captivating for me and a fun puzzle to think about as a distraction from everything else going on in the world these days.
-
Frosty – my apologies and thank you for having patience… sometimes when I get excited about an idea my mind runs faster than the man at the gate in front my mouth can check to make sure what I am saying makes sense. I was diagnosed with written language disorder as a child and while I have worked at compensate it still trips me up occasionally. Not a complaint or an excuse, rather an explanation. Usually, I am able to express myself in writing pretty well, but it also frequently takes me longer the others to figure out how to arrange my thoughts into writing. When I rush because I am excited about a concept and also haven’t had my morning coffee things tend to come out in a jumbled mush. I was thinking about how changes in temperature, as a regenerative forge comes up to operating temp, might impact the flow of gases in the forge and through the annulus. I can’t exactly conceptualize in order explain to fully explain my thought process, but there is part of me that wonders if the flow of gas from the forge interior through the annulus might be more turbulent while the forge is cold or coming up to temperature, as opposed to when it is running at its operating temperature. I was hoping you might be able to help me verify or correct my thinking.
-
Missed the timeframe for editing my last post so please excuse the 2nd consecutive post...... I think my follow up question would be: If you painted the outermost wall of the annulus space with Plistex or similar material, would the double wall + annular induction exhaust arrangement be a potentially efficient enough insulator and re-radiator that, at a hobbyist scale, someone could potentially get away without skinning the whole forge in Kaowool? (I think I am correct in understanding the answer is in part determined by individual goals in terms of refractory wall thickness, operational time and patience in the forge coming up to temperature) * Please feel free to tell me to leave off if appropriate.... as stuff like this can occupy my mind and get it spinning in neat directions - as a diversion from day to day stress.... kinda like doing crossword puzzles)
-
Honest thanks for blowing my mind this morning! The concept of using the low pressure created by the passage of the flame to induce exhaust to flow into the the annulus is a beautifully elegant concept. Given the idea of "path of of shortest or least resistance", its the only way I can imagine inducing a significant amount of exhaust to flow through the annulus without having to almost completely occlude the port for the work piece. I'm not even going to attempt to claim I can fully visualize that. However, I did have a question for my understanding if you don't mind? Assuming an eventual and ideal end state (forging temperature) inside the forge, would I be wrong to think that there might be a period of system wide gas+exhaust chaotic flow to over come while the annulus and forge interior come up to an equilibrium operating temperature?
-
That makes a great deal of sense and answers my question. I was thinking of a baffle in the sense of a permanent obstruction in the path of exhaust rather than a moveable object used for reducing heat loss by re-radiating heat (i.e a temporary wall) Lol, I'm learning slowly... at least I can better recognize my shallow understanding I can see the simple (as in I am missing fine detail) steps necessary to separately ram cast two cylindrical, nesting forms, with the necessary porting for exhaust to flow into a clear annulus. I can also see how someone could use a 3D printer to create the accurately dimensioned shapes necessary to press into the casts of the front and back wall; creating negative impressions that will support each end of both cylinders. (I am unfortunately behind the tech curve in that I don't have a 3D printer... and still cursing the fact that we almost bought one at work before quarantine) Where I get hung up is how to create accurately aligned ports to accommodate the tube required to both hold and isolate the burner from the annulus.
-
I may be taking what you are saying out of context or otherwise misunderstanding the concept, please forgive me if I am. In taking into consideration balancing back pressure with exhaust exit speed, I was wondering if there would ever be any benefit to be gained by hobbyists in using a simple baffle in front of ports in order to slow down exhaust gas and increase its "hang time" in a forge? Put another way, I think I am contemplating whether there would be a situation where a baffled exhaust port would function better than just employing a smaller exhaust vent.
-
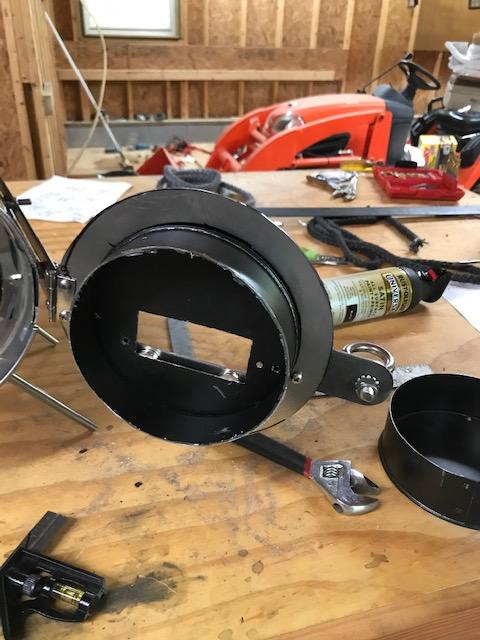
Haven't updated on the forge in a bit because progress got hung up on a couple of issues: - Returning to work semi-sort of full time and trying to spool back up to speed - Almost getting scammed on Amazon. Thankfully Amazon refunded the sale and Glenn was willing to step in with an assist to get Cast-o-Lite headed my direction. - Not being happy with the fitment of the original forge door. Basically, as designed there wasn't enough clearance between the door and the lip just inside the body for me be sure that things wouldn't get hung up once I put any type of insulation on the door. In putting the back of the forge on first I didn't leave myself the ability to accurately measure the gap between the door and lip and I really did not want to rip it back off. I was also concerned about keeping the insulation adhered to the door as there would have only been lateral support. It took a bit to figure out, but the solution was to ditch the original door and come up with a two part solution: an outer door skin and a separate, smaller diameter insulation plug attached to the skin. Once insulated, the plug will just extend past the inner lip, and when closed there is maybe 1/8" clearance all the way around the plug. As is, it's a bit loose for my tastes, but I am also planning on beveling the cast-o-lite up and into the forge from that lip. That way when the door is fully closed the face of the plug will just meet with the walls of the forge. Once the cast-o-lite is in place and cured I will be adding two lengths of stove gasket. The first will be placed all the way around the outer edge of the forge lip. The second will be placed around the base of the plug, where it meets the door skin. I'd like to think that since they won't be directly exposed to flame they will serve as a decent seal and not degrade to quickly, while also providing some cushion if the door gets out of alignment. I ditched the idea of a rear pass-thru port and went with a smaller ventilation hole. I understand what I'm losing out on, but with such a small space to work in it's starting to feel like diminishing returns for the amount of effort to shoe horn stuff. Similarly the port on the door may be too small for it to be anything other than view port. If that is the case I am hopeful that the forge is small enough that any energy lost in opening and closing will quickly be replaced. In any case, the kaowool is in the forge and is drying from being rigidized, there's space for a small burner flare to be shaped into the cast-o-lite, and I have thing set up to insulate the forge door. I also added a simple door catch. Just waiting on that sweet shipment of cast-o-lite, compliments of Glenn. I did have two questions: - I think I have an okay understanding on mixing and buttering cast-o-lite, as well as the curing process. However, I am unsure, when mixed, how much slump it has and how well it stays in place. What I am getting at is whether or not you can cast one part of the forge (wall, ceiling, floor), wait till it starts to set up and then cast the next section and have everything adhere......and whether all that might be a good idea since I am working in such a small space. The interior forge right now is a little larger than my closed fist. - Also, I've read plenty about the benefits of casting a flare shape for burner ports. I am curious if changing the shape of the ventilation port as it passes through the insulation might somehow have any benefit regarding circulation inside the forge.... like casting a gentle inversely orientated flare instead of a cylender? It's kinda theoretical given the amount of space I have to work with.... then again I might also just be overthinking stuff. (Edit- The picture of the door came while I was test fitting everything and before it was secured with bolts. The gap between the door skin and plug frame is from the magnets I was using to hold things together while getting it all aligned.)
-
Thank you! I can easily work with that within the idea that a hole can almost always be plugged... but can be much more difficult to enlarge after construction.
-
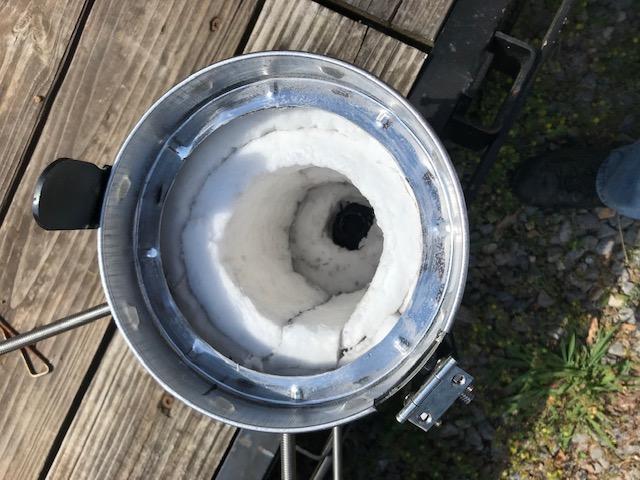
The port on the door is a diamond that is ~2.5" per side. In answer to your question about whether it is a large enough opening; having never done this before I honestly do not know. I guesstimated the size necessary that might be necessary for inserting and removing smaller items from the forge and based the opening on that. If you or anyone would be willing to lend their experienced opinion about whether a secondary exhaust port would be beneficial I would be grateful, if for no other reason than to have a better understanding of forge/burner dynamics. I am planning on firing the forge with a 1/2" T Burner. When I first conceived this forge I had not really anticipated that I would be interested in heating anything larger than what might fit easily in the forge. Figured I would build a larger forge if I got that invested. On the other hand, I really didn't have as good of an understanding that even in a small forge there might be relative and noticeable hot spots and cool spots. If for no other reason than that, I am considering cutting a similar diamond sized and shaped opening at the rear of the forge.
-
On a more related note I did have a question about my forge build. When I was working through construction ideas I had tried, for me anyways, to go with the KISS principle and therefore chose not to create an exhaust port in the rear wall of the forge body. In doing continued reading I have gotten the impression that NA burners are sensitive to back pressure. That got me to thinking about balancing energy retention with burner performance. I guess what I am asking for is folks thoughts on positives and negative impacts of cutting an exhaust port in the rear of my forge before permanently installing the insulation.
-
Mikey - One of the reasons why I've asked a couple questions about the quality of the flame I have managed to produce is because I have a curiosity about the how and why of fluid dynamics (is that the right choice of words here?) and how it impacts the flame a burner produces. To that end, I dug through this forum and located a couple of posts from you discussing the why behind the book you wrote and its intended audience. In stating that, I wanted to say thank you for authoring that book.... both because I am getting ready to ready to read a copy I downloaded and because I remember what it was like to be a curious college student without a great deal of resources. I still am very curious, if imperfect student.....just with a bit more resources Rather than muck up this forum with a bunch of questions that have been asked and answered multiple times I'm going to continue digging through the forum and hopefully ask the occasional, more informed, question However, I would like to further supplement my reading. Does anyone have any additional book Edit-(or other accessible publication) recommendations on the subject that they think would be somewhat accessible to someone who doesn't have a highly technical back ground?
-
By all means run with it...
-
Paul, what about a chunk of single wall stove in a length and diameter that interests you? It can be had for relatively cheap.
-
Can't agree more! While it can be frustrating, trying to accept and understand the different cultural/societal pressures each generation is exposed to makes things so much easier. It also is a great vehicle for middle aged and older "dogs" to learn new skills. At some point here when things get back to more normal, one of my college students is going to be teaching me how to use a 3D printer and the associated software so that we can print parts for our aquarium filtration systems at work. We will literally recoup the cost of the printer the first time we use it as we will be able print wear items that we regularly go through for 15X less retail cost. In other news, forge build is on hold as my supplier for Satanite dorked up my order and had to refund the purchase. At least I can finish installing the Kaowool, butter and rigidize while waiting for new supplies to arrive.
-
Genuinely curious to see how this goes and where you take it, as I’m part way through doing a stainless stove pipe forge myself.
-
Thank you! If I can ask, why did you move away from cylindrical forges? It's funny how our minds work at times. We look for creative solutions in one direction and without realizing we bias ourselves from considering other equally valid or better solutions. When figuring out how to close off the backside of the forge I was fixated on a simple, one-step termination/closure in an effort to keep things simple. (I had already decided that I didn't want to attempt a pass through forge) In the process, I skipped right over the idea that reducer pipe with a cap would have both simplified the process AND allowed easier modification should I later want a pass-thru style mini forge down the road. I'm chuckling at the moment because I have a very clear memory of passing over those fittings to find the one cap that might fit for what, at the time, I thought to be an elegant solution.
-
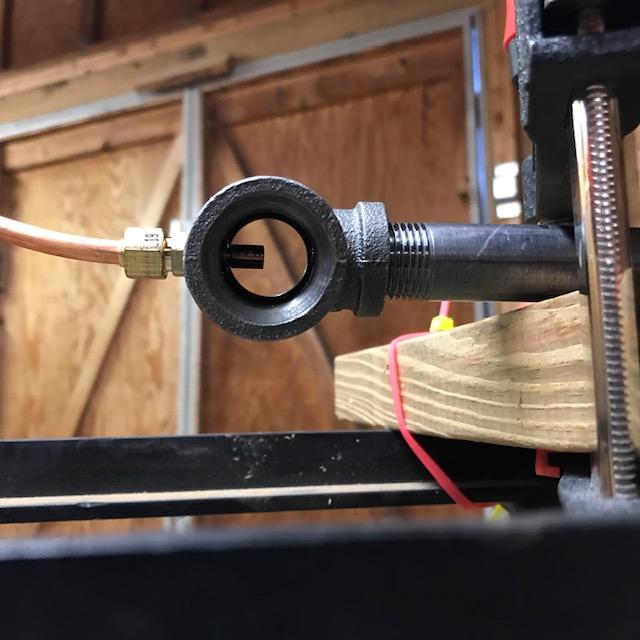
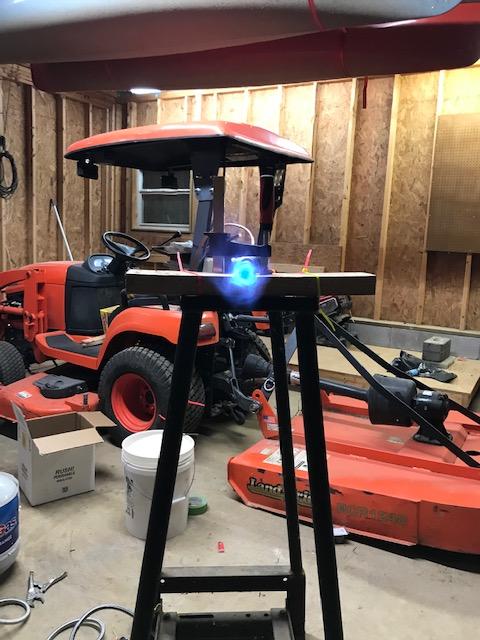
I do, and have made attempts with the drill press and your floor flange suggestion; however, I still need to work on my technique... I can manage straight and in line with one aspect of the burner orientation but have yet to hit dead center. I know this is a family forum so I am resisting very hard at making jokes at my own expense. I did want to ask on a related, but slightly separate burner, experiment if the attached picture was movement in the right direction? By the picture it still looks too rich to me, but in person it appears more blue than portrayed.

-
I suspect what you are referring to may be a generational and/or exposure thing in terms of acquiring skills necessary to use a particular technique. I can use basic tools to better and sometimes worse effect because I had to pick up those skills from the work I have done. While I know what rivets are, I’ve never been presented with a situation necessitating that I leant how to get decent at doing them. (Perhaps I missed a good opportunity here because I didn’t think of it as a choice for fastener) Similarly, I work a great deal with college students involving light construction. The number of those students who have no idea about how to use a drill.... to install a screw in a predrilled hole is impressive. Most of the time it is because they have never been in a situation where they have needed to acquire that simple skill, let alone setting the head of a screw flush. I would hazard that in many cases we have moved a way from a lifestyle that would require many people from needing to learn how to set rivets.
-
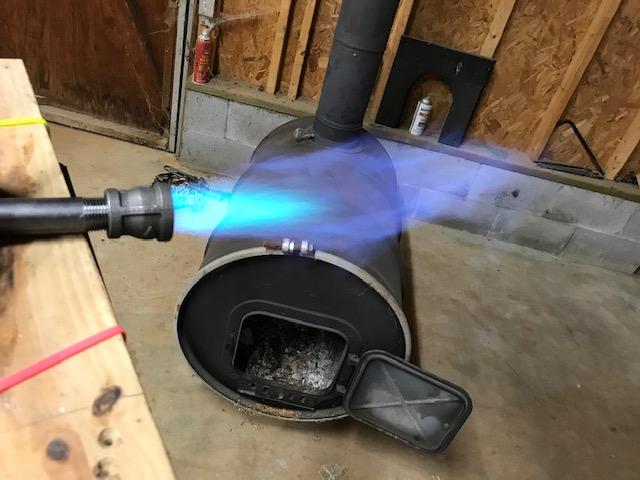
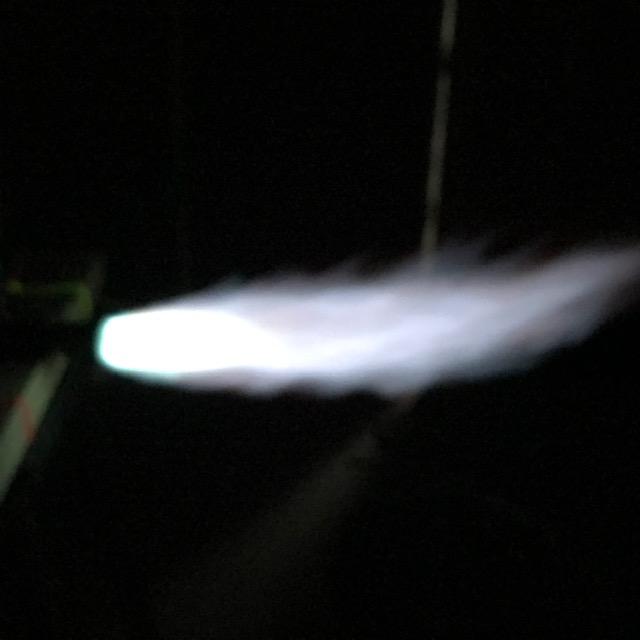
About the mixing tube length. The ratio is, D x 8. 1/2" x 8 isn't 6" is it? - No it is not, and that's on me.....as if the rest of this build. My thanks you for pointing out the error. Keeping the jet mount fitting from moving can be a problem. I had luck with one I couldn't keep from jiggling by peining around the tapped hole with a blunted punch to drive the hole more closed. Made the hole a little smaller without messing up the threads. - Thank you for the tip about peining around the tapped hole. I will try that and may also have another solution if that does not work. The first flame pic shows the jet to be slightly out of alignment, down in orientation with the camera angle. The flame is rich, possibly partly due to the misaligned jet. The too long mixing tube is also a problem. - It is out of alignment and is likely in the main due to being apparently unable to drill a plumb hole and in part due to the fact that I over tapped the jet mount hole. Then again, if I hadn't over tapped the hole I also wouldn't have any ability to adjust alignment whatsoever and would be blowing even more gas out the side of the air intakes. I'm not being flippy here, I am appreciative of your observation and thankful I could at least correct a little bit for the purposes of having an example to ask about. The last pic is crazy too rich, you could cool hot steel with it. - The pic is of the same burn as the previous pics (no adjustments), just with the lights out. In addition to correcting the alignment and tube length issues, would I be correct in understanding that, given it is too rich, I would need to introduce more air into the mixture by either reducing the tip length and/or reducing the diameter of the tip opening?
-
Thank you! It has and continues to be a fun exercise in trying to find items that will fit together without welding and/or significant fabrication.... definitely not the most affordable way of doing it. You are very right about the stainless and I am legitimately curious to see how well everything holds together with heating and expansion and contraction.
-
Perfect and thank you! - seriously. For whatever reason, it has been really hard for me to pick up in differences in flame attributes in pictures (unless grossly different) and even harder to compare those what I am seeing in person. Now that I know what at least what one aspect of what not working looks like in person I have a little better basis to judge what I am doing I'll likely have questions for folks, but i need to better wrap my head around some concepts first. My thanks!
-
I am currently waiting on a shipment of supplies to finish my forge body build. In the meantime, I was hopeful to get some feedback on my attempts to build a burner. If this is not the correct thread, I would be happy to create a separate thread. Because I’m working on building a mini forge, I’ve been attempting to build a 1/2” T burner. (If I can ever be successful at that, a 3/8th’s may be in the offing as well). I have also read so much in that last week that it is all getting jumbled together, so please, please do correct my equipment choices. Current Specifics: - ¾” X ½” X ¾” T - 6” barrel/mixing tube - .25 Mig tip (cut down and de-burred with a mig tip tool) - The below pictures were taken operating at 10 PSI. The flame blows off the end of the burner at about 20 PSI - Not shown is a quarter turn cutoff valve upstream of the burner I’m having some difficulty translating what I see in pictures online to what I am observing in person and I would be happy for some guidance on whether the flame in the pictures is lean/neutral/rich. I am aware that those characteristics will change when I actually run a burner in the forge. I'm mainly just looking for a point of reference, so that I can better classify what I am seeing in person. I am primarily working with hand tools at the moment and the attached pictures represent the best of multiple attempts that I have been able to produce with a ¾ X ½ X ¾ T fitting. I have tried using the neighbor’s drill press; however, those attempts have come out significantly worse (operator error). I have been having difficulty with alignment issues and frankly have been getting frustrated. I can change flame alignment (quality?) by rotating the burner body (approx 25 degrees of rotation) around the mig tip holder and am aware of what that means in terms of my fabrication technique. At the moment I am considering just finding the best alignment and soldering/brazing the tip holder in place if if the attached pictures are decent. I would the use needle nose pliers to to remove and adjust mig tip length for tuning it with the forge. Thanks!
-
With apologies to Gord for thread tangent.... it's incredibly cool to make those contributions that move someone(s) forward in their knowledge and experience, and it is equally neat to recognize it and watch it happen from the sidelines.
-
I suspect you are.... and yes it is very cool!
-
When you get right down to it you are entirely correct. Unfortunately, a lot of people take for granted that such observations are objective when they are actually subjective. Frosty, it is abundantly clear that both you and Mikey possess a wealth of experience and are experts in this area and I hope in writing that I didn't imply anything to the contrary. It was also not my intent to imply the conversation that you and Mikey may have was anything more than discussing small details. My apologies if it came across otherwise. I had to orally learn the jargon of the lab where I was employed. It was conveyed on necropsy room floor in the process of conducting necropsies. In order to learn that language, I had to learn something of the personalities of the people who contributed over time to the development of the lab’s technical language. Right before I moved into another field, we were asked, as group, to start theoretical development of an indexed and term searchable database for the 20 some odd year of reports that had been compiled. Neat concept, but because there had been a slow and fundamental shift in terminology and drift it presented an intrinsically difficult task. At that point machine learning algorithms were just on the cusp of being more widely used. As you stated, language structure and definition are essential for information to be relayed in any field and I have noticed and enjoyed the focus on that while reading through this forum. I also have some understanding of the frustration involved. Language is something that is continually evolving…. Sometimes in large jumps, but more frequently in a slow and constant manner. As a result, many people don’t take notice of that shift/drift. My only point in originally posting was that, as an outsider, I appreciate what may be implied (in a good way) by two very knowledgeable people sitting down to discuss small details.