Ferritic
Members
-
Joined
-
Last visited
Everything posted by Ferritic
-
The equilibrium solubility of iron in gold is very low at room temperature, e.g. less than 1wt%. However, it's solubility is greatly increased at higher temperatures. Going from the phase diagram, I suspect, if you were to quench at a sufficiently great rate, from 900C, you could retain a non-equilibrium alloy of 10% Fe in gold. Not sure what quench rate would be required and, of course, if you were to heat the alloy moderately, it would decompose into a two phase material (alpha Fe and gold).
-
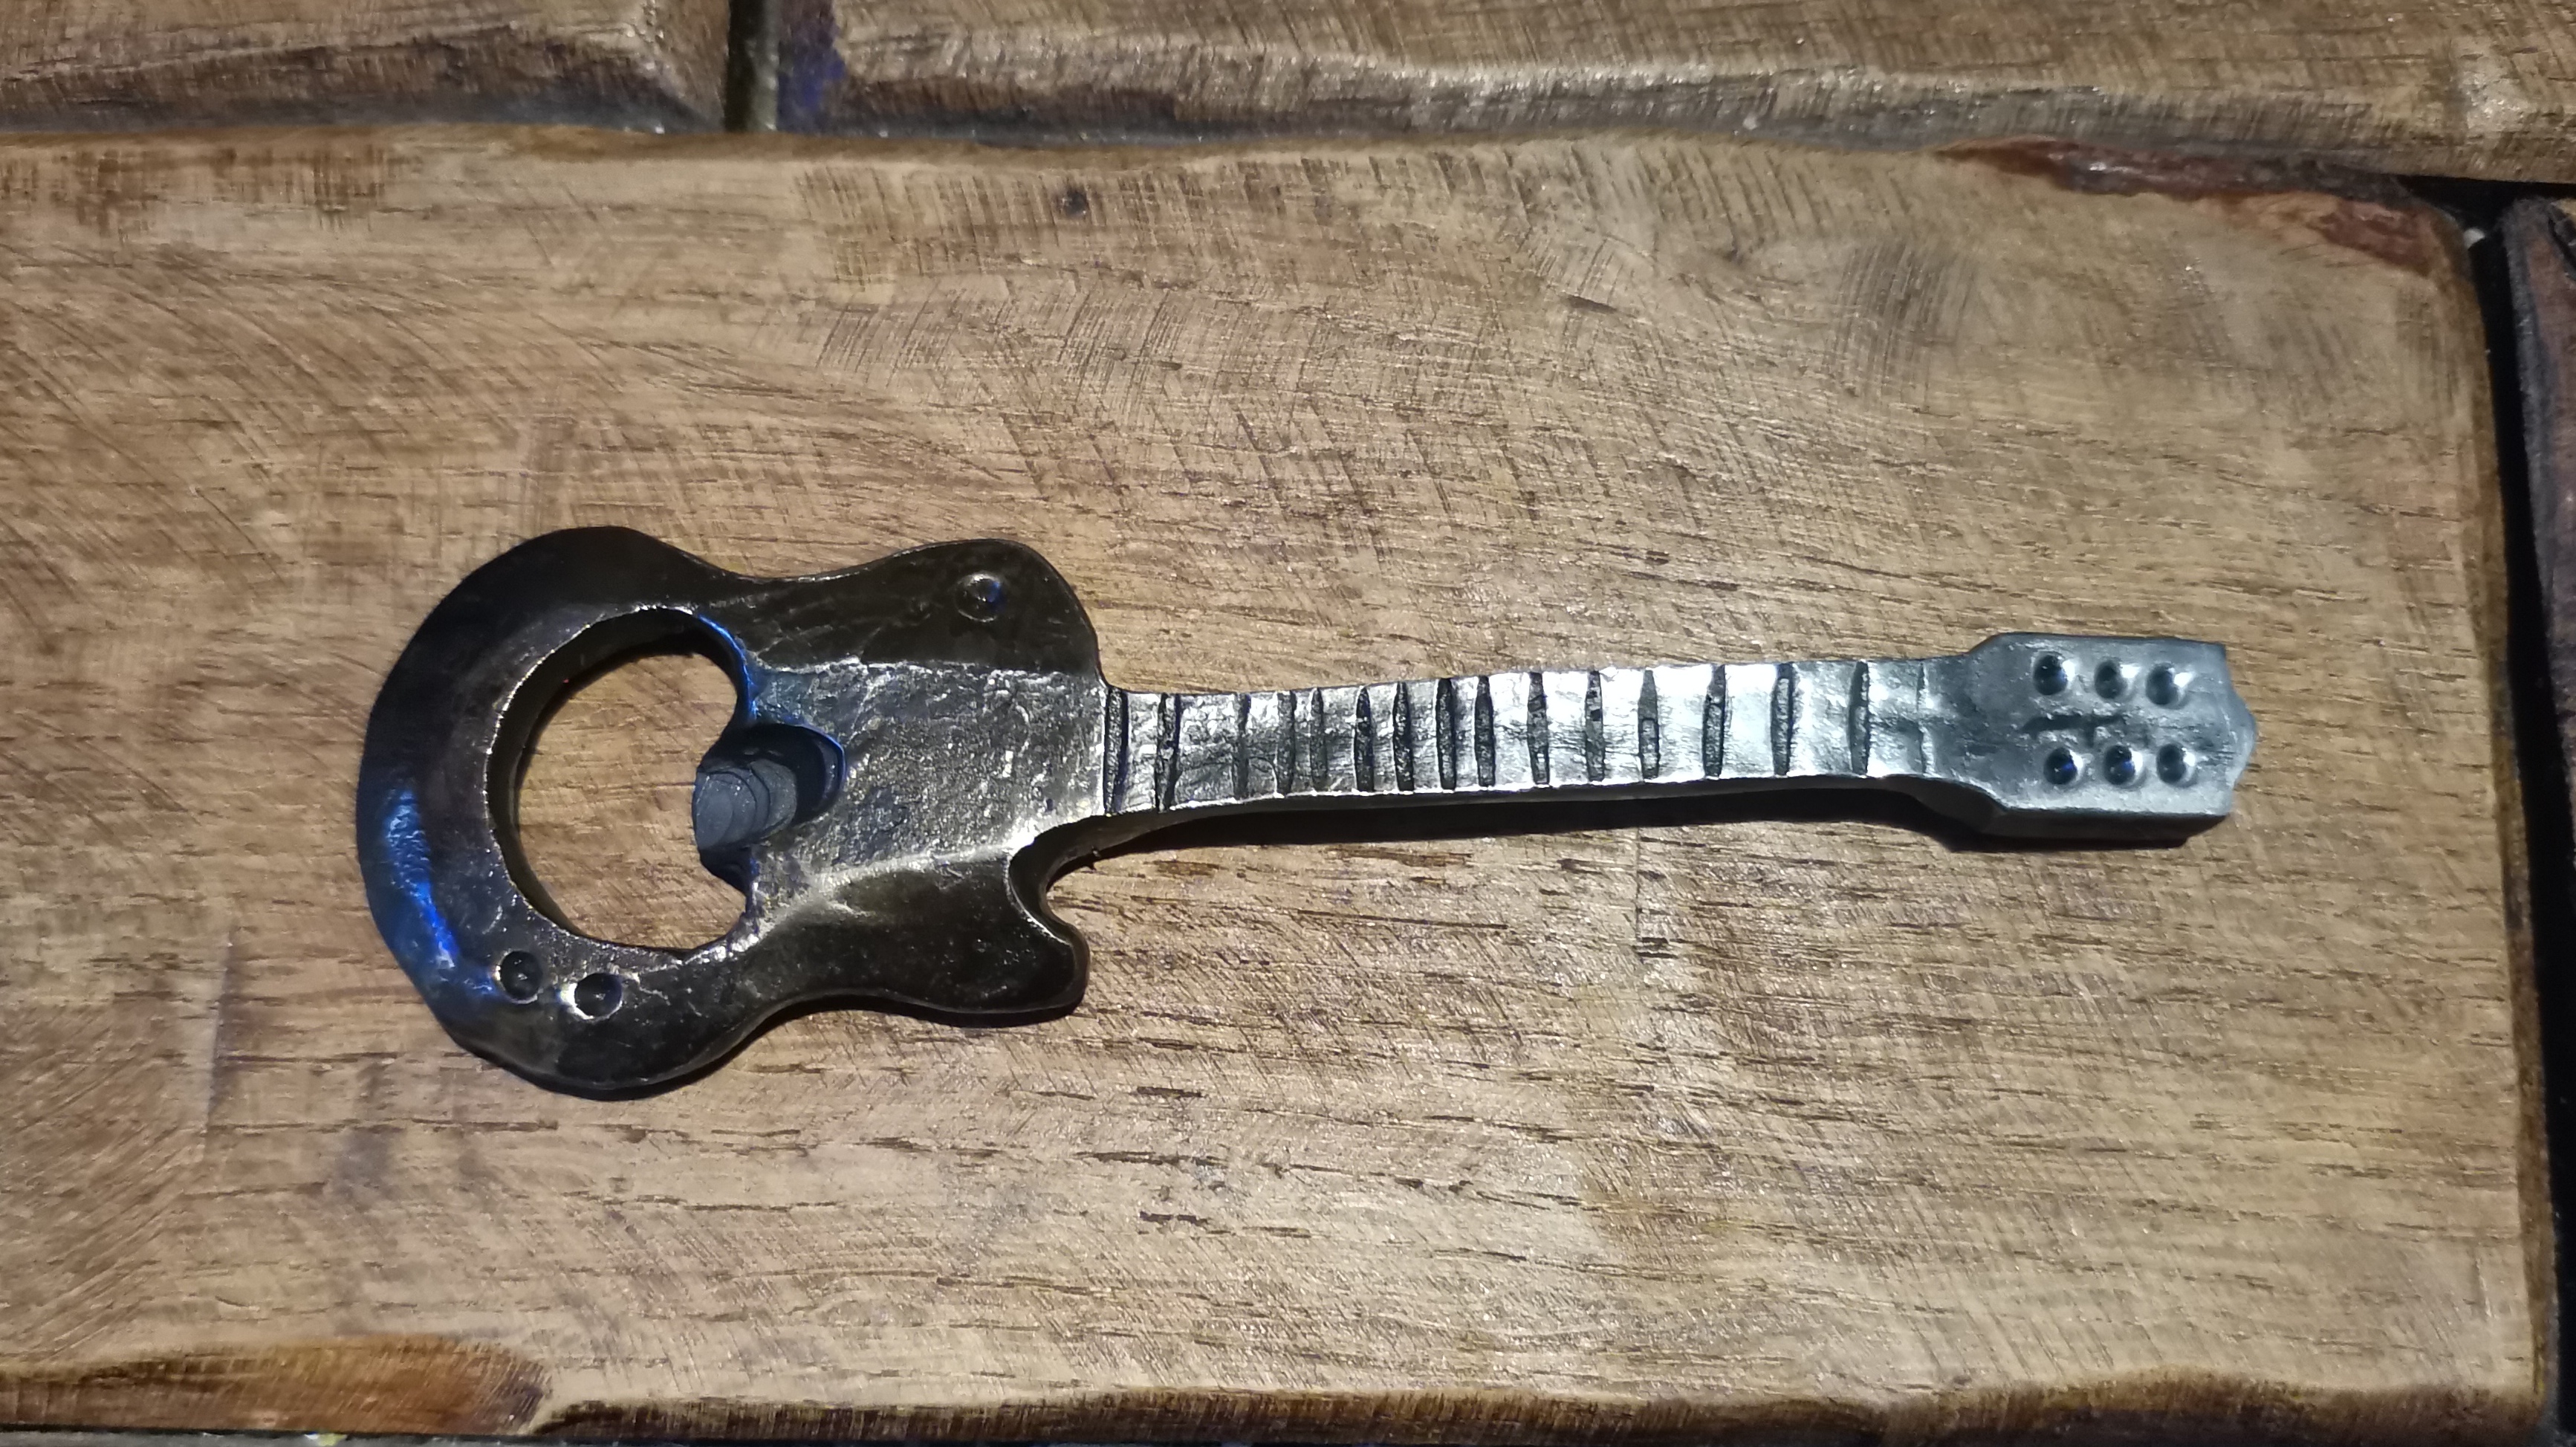
I've seen them called axes before, but not exactly a Viking axe.
-
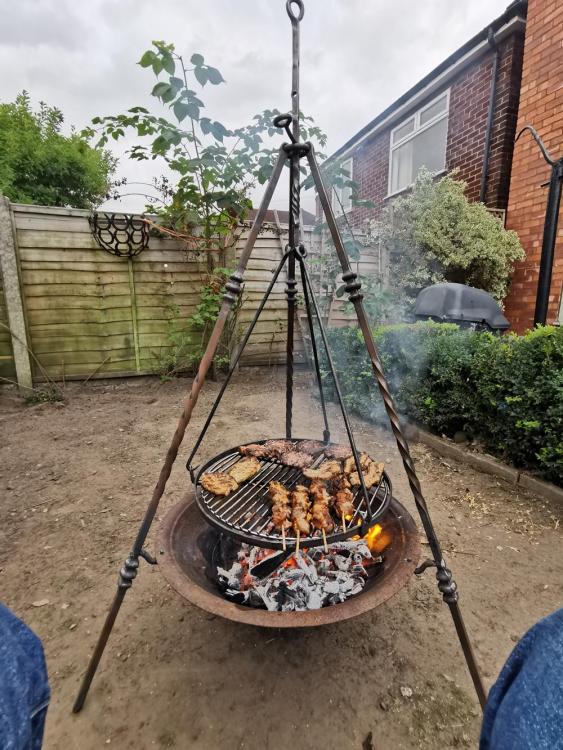
Legs made from 20mm square, punched through at the top and joined on a ring. Height adjustable hanger punched at various positions, with a through-pin. The fire bowl was rescued from a fire-pit, however, I'd like to forge a bowl, to complete the job. The bowl sits on three hooks riveted through the legs. Shop bought grill, made from 6mm diameter stainless steel. Any advice, or ideas for forging a 600mm diameter bowl?
-
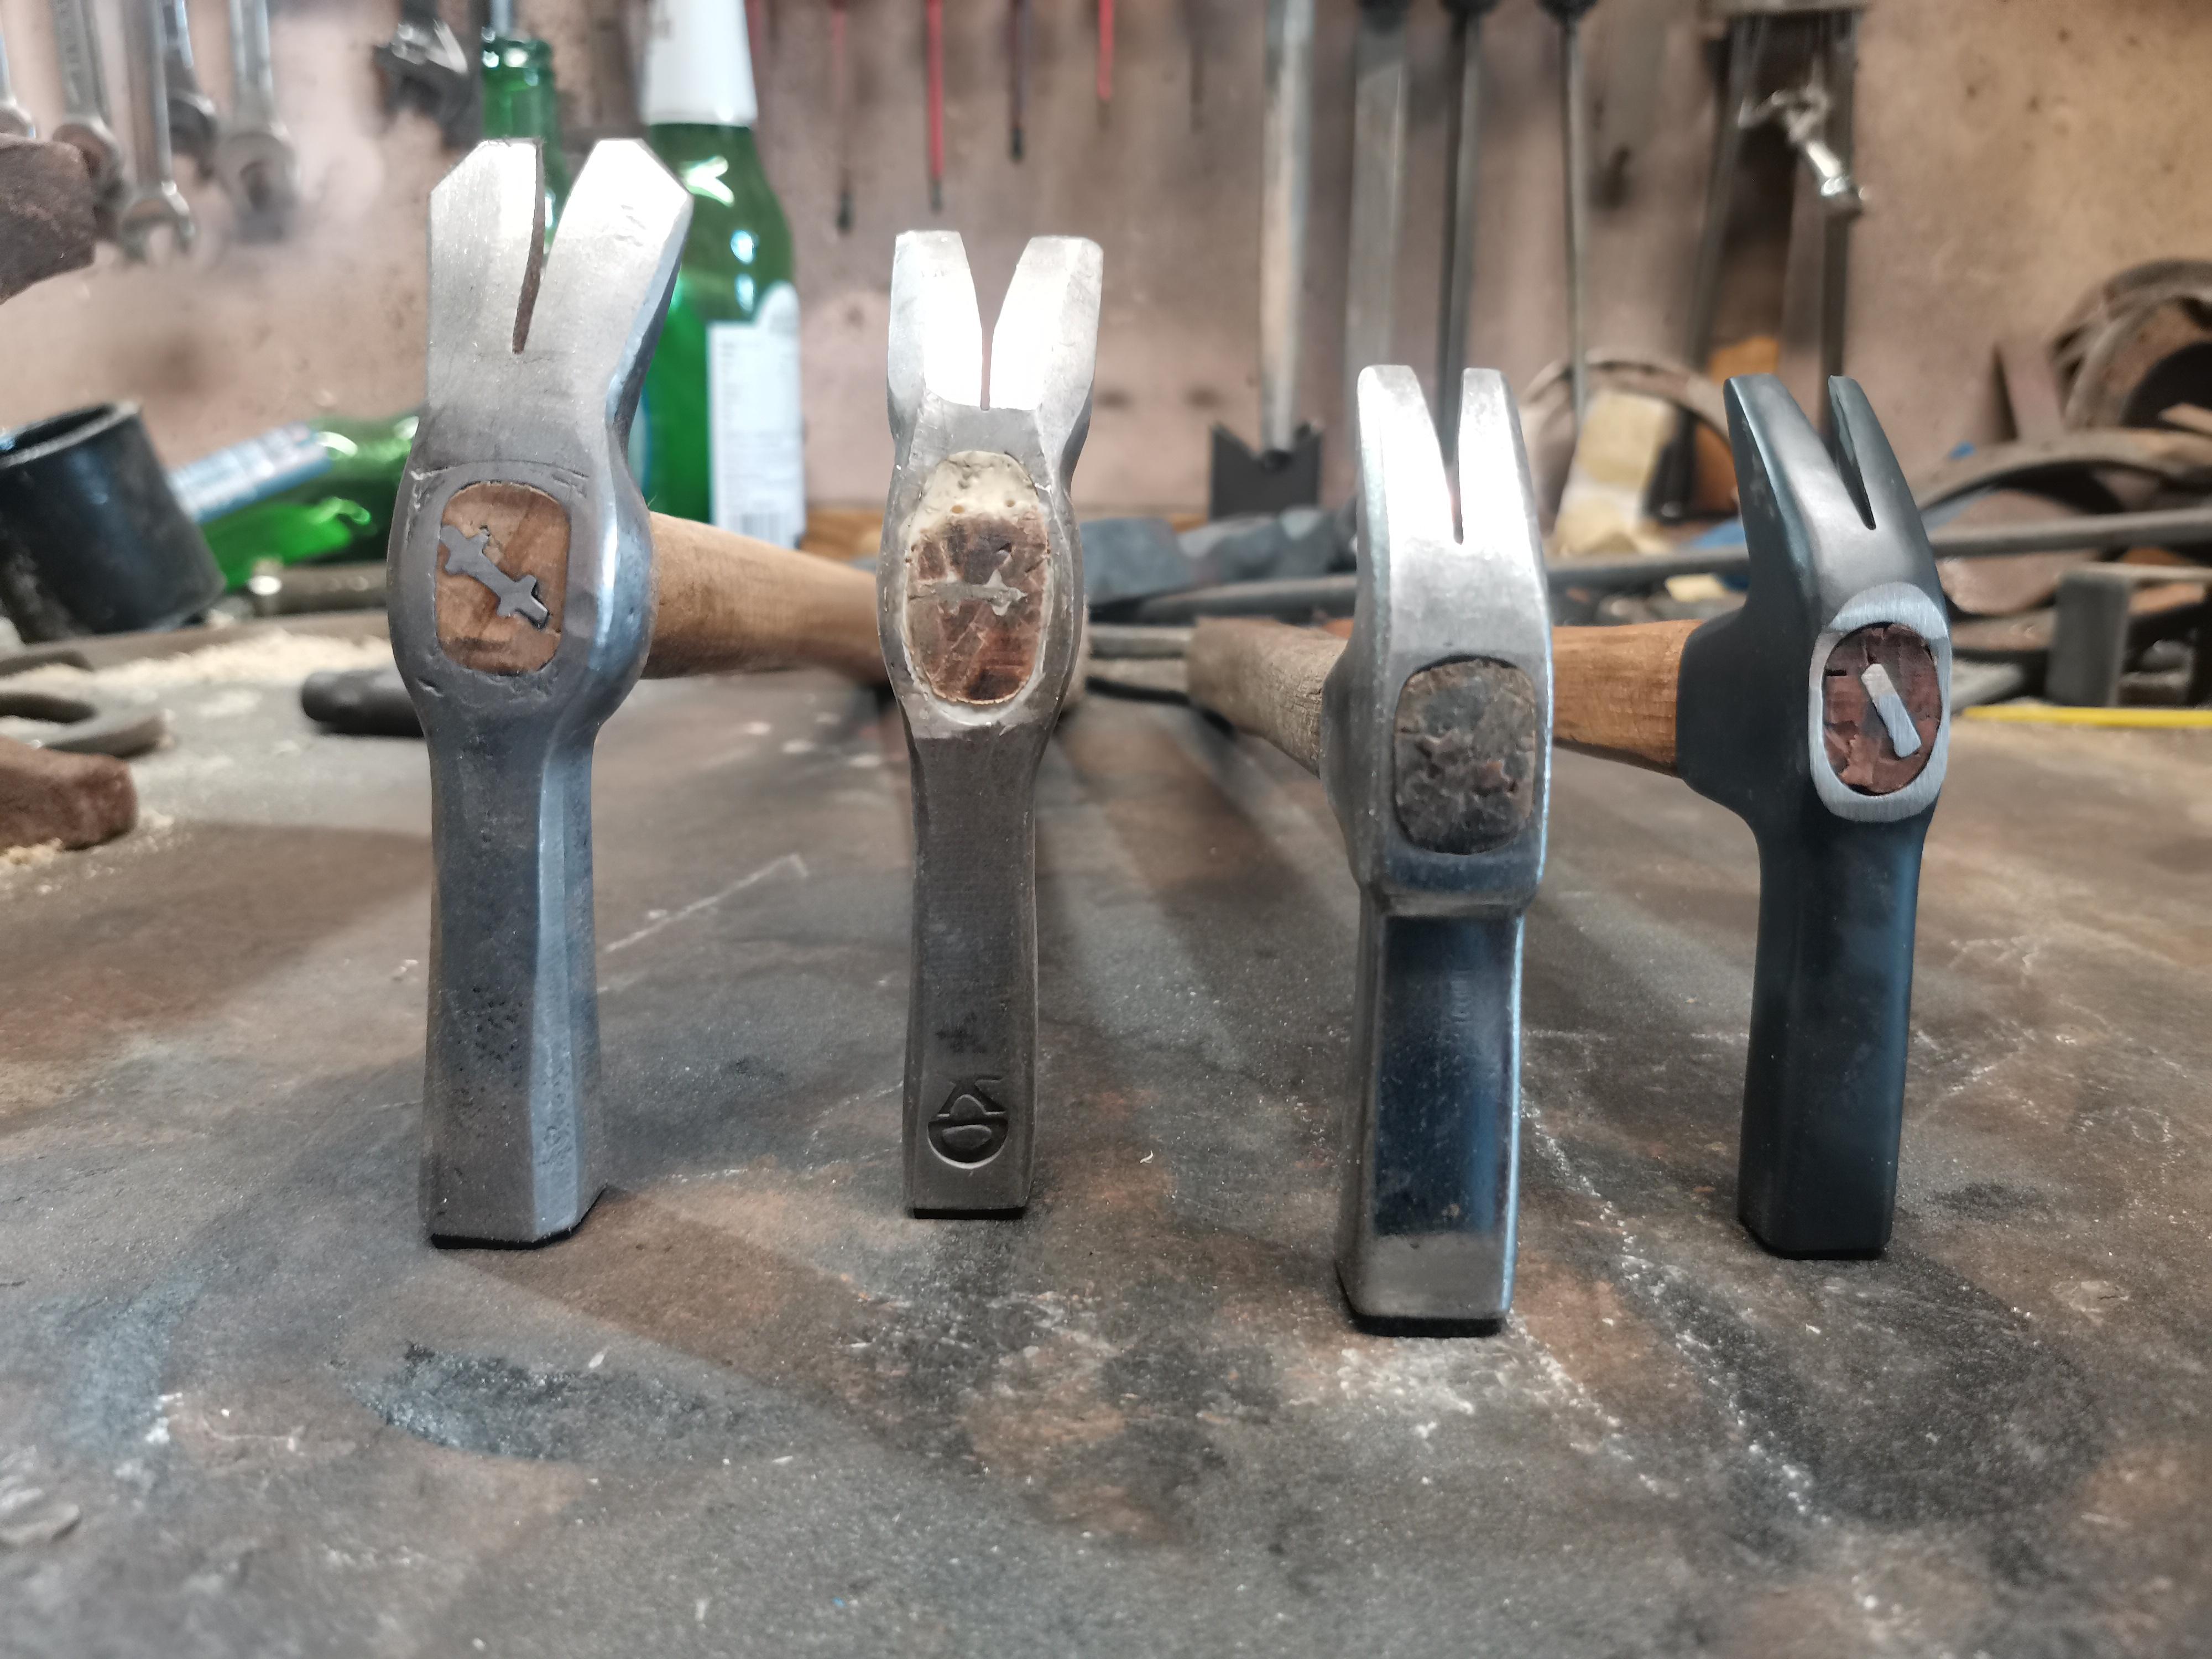
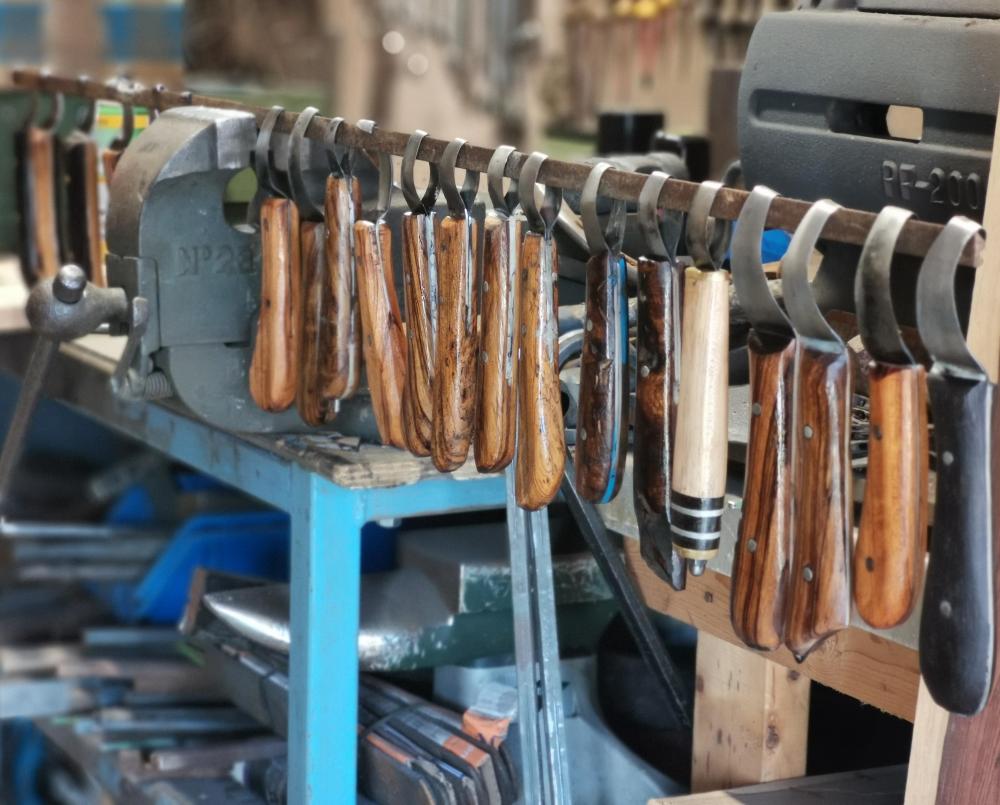
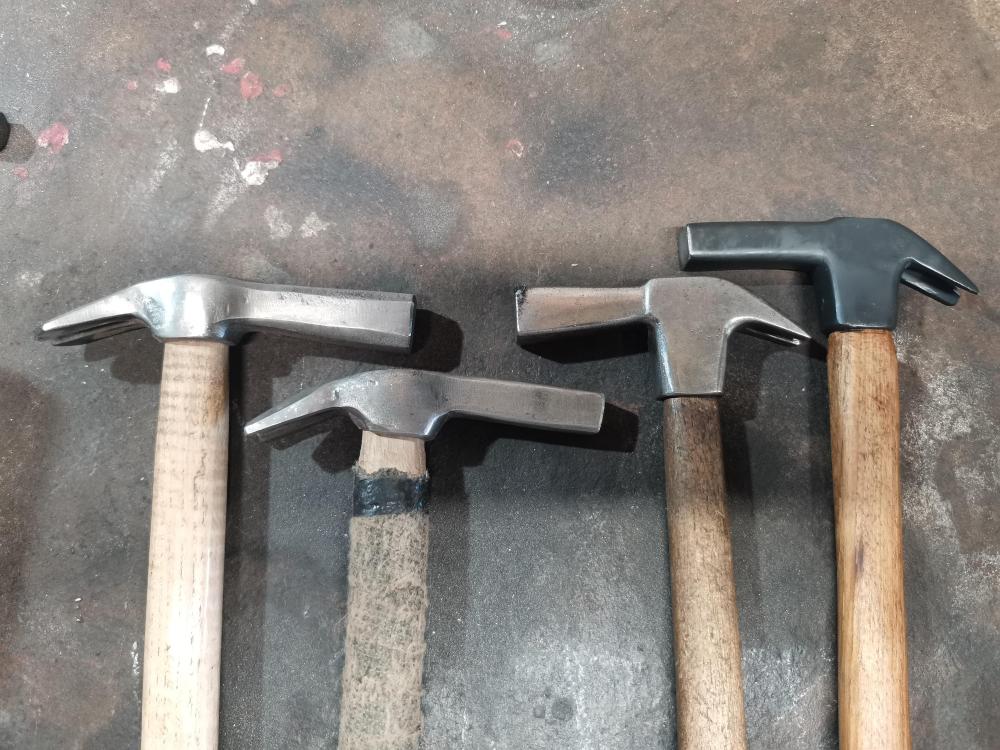
JMShrader, the driving hammers range from 9 to 12 Oz, so somewhat heavier than you like. My everyday hammer (2ndfrom right) comes in at 12 Oz. I drive everything from E2 to E12 nails with the same hammer and honestly don’t find it too heavy, even for the little ones, I guess it’s what you get used to. I use GE clenching tongs, Mustad shoe pullers and recently opted for MFC nippers. For many years I used GE nippers but having been influenced by recent poor reviews of GE, I decided to try MFC; there is a really nice Youtube video which shows their manufacturing process. I like the MFC, they are well made and last but I think my next pair will be GE. I’ve a pair of diamond nail pullers too. How does the mod work out? The best knives I used were Joe Peterca loops. I loved the folklore stories that came along with them and don’t care to know if they were true, or not. Unfortunately no longer available, so I make my own.
-
I've used a few different driving hammers over the years, including the Tom Hall and Horsehead hammers you show above. I think the Horsehead was possibly the best commercially produced hammer I have used, or at least best suited to me but nowadays I prefer my own handmade hammers. The two on the left are forged from 4340 alloy and the two on the right were ground and shaped from blocks of D2 steel.

-
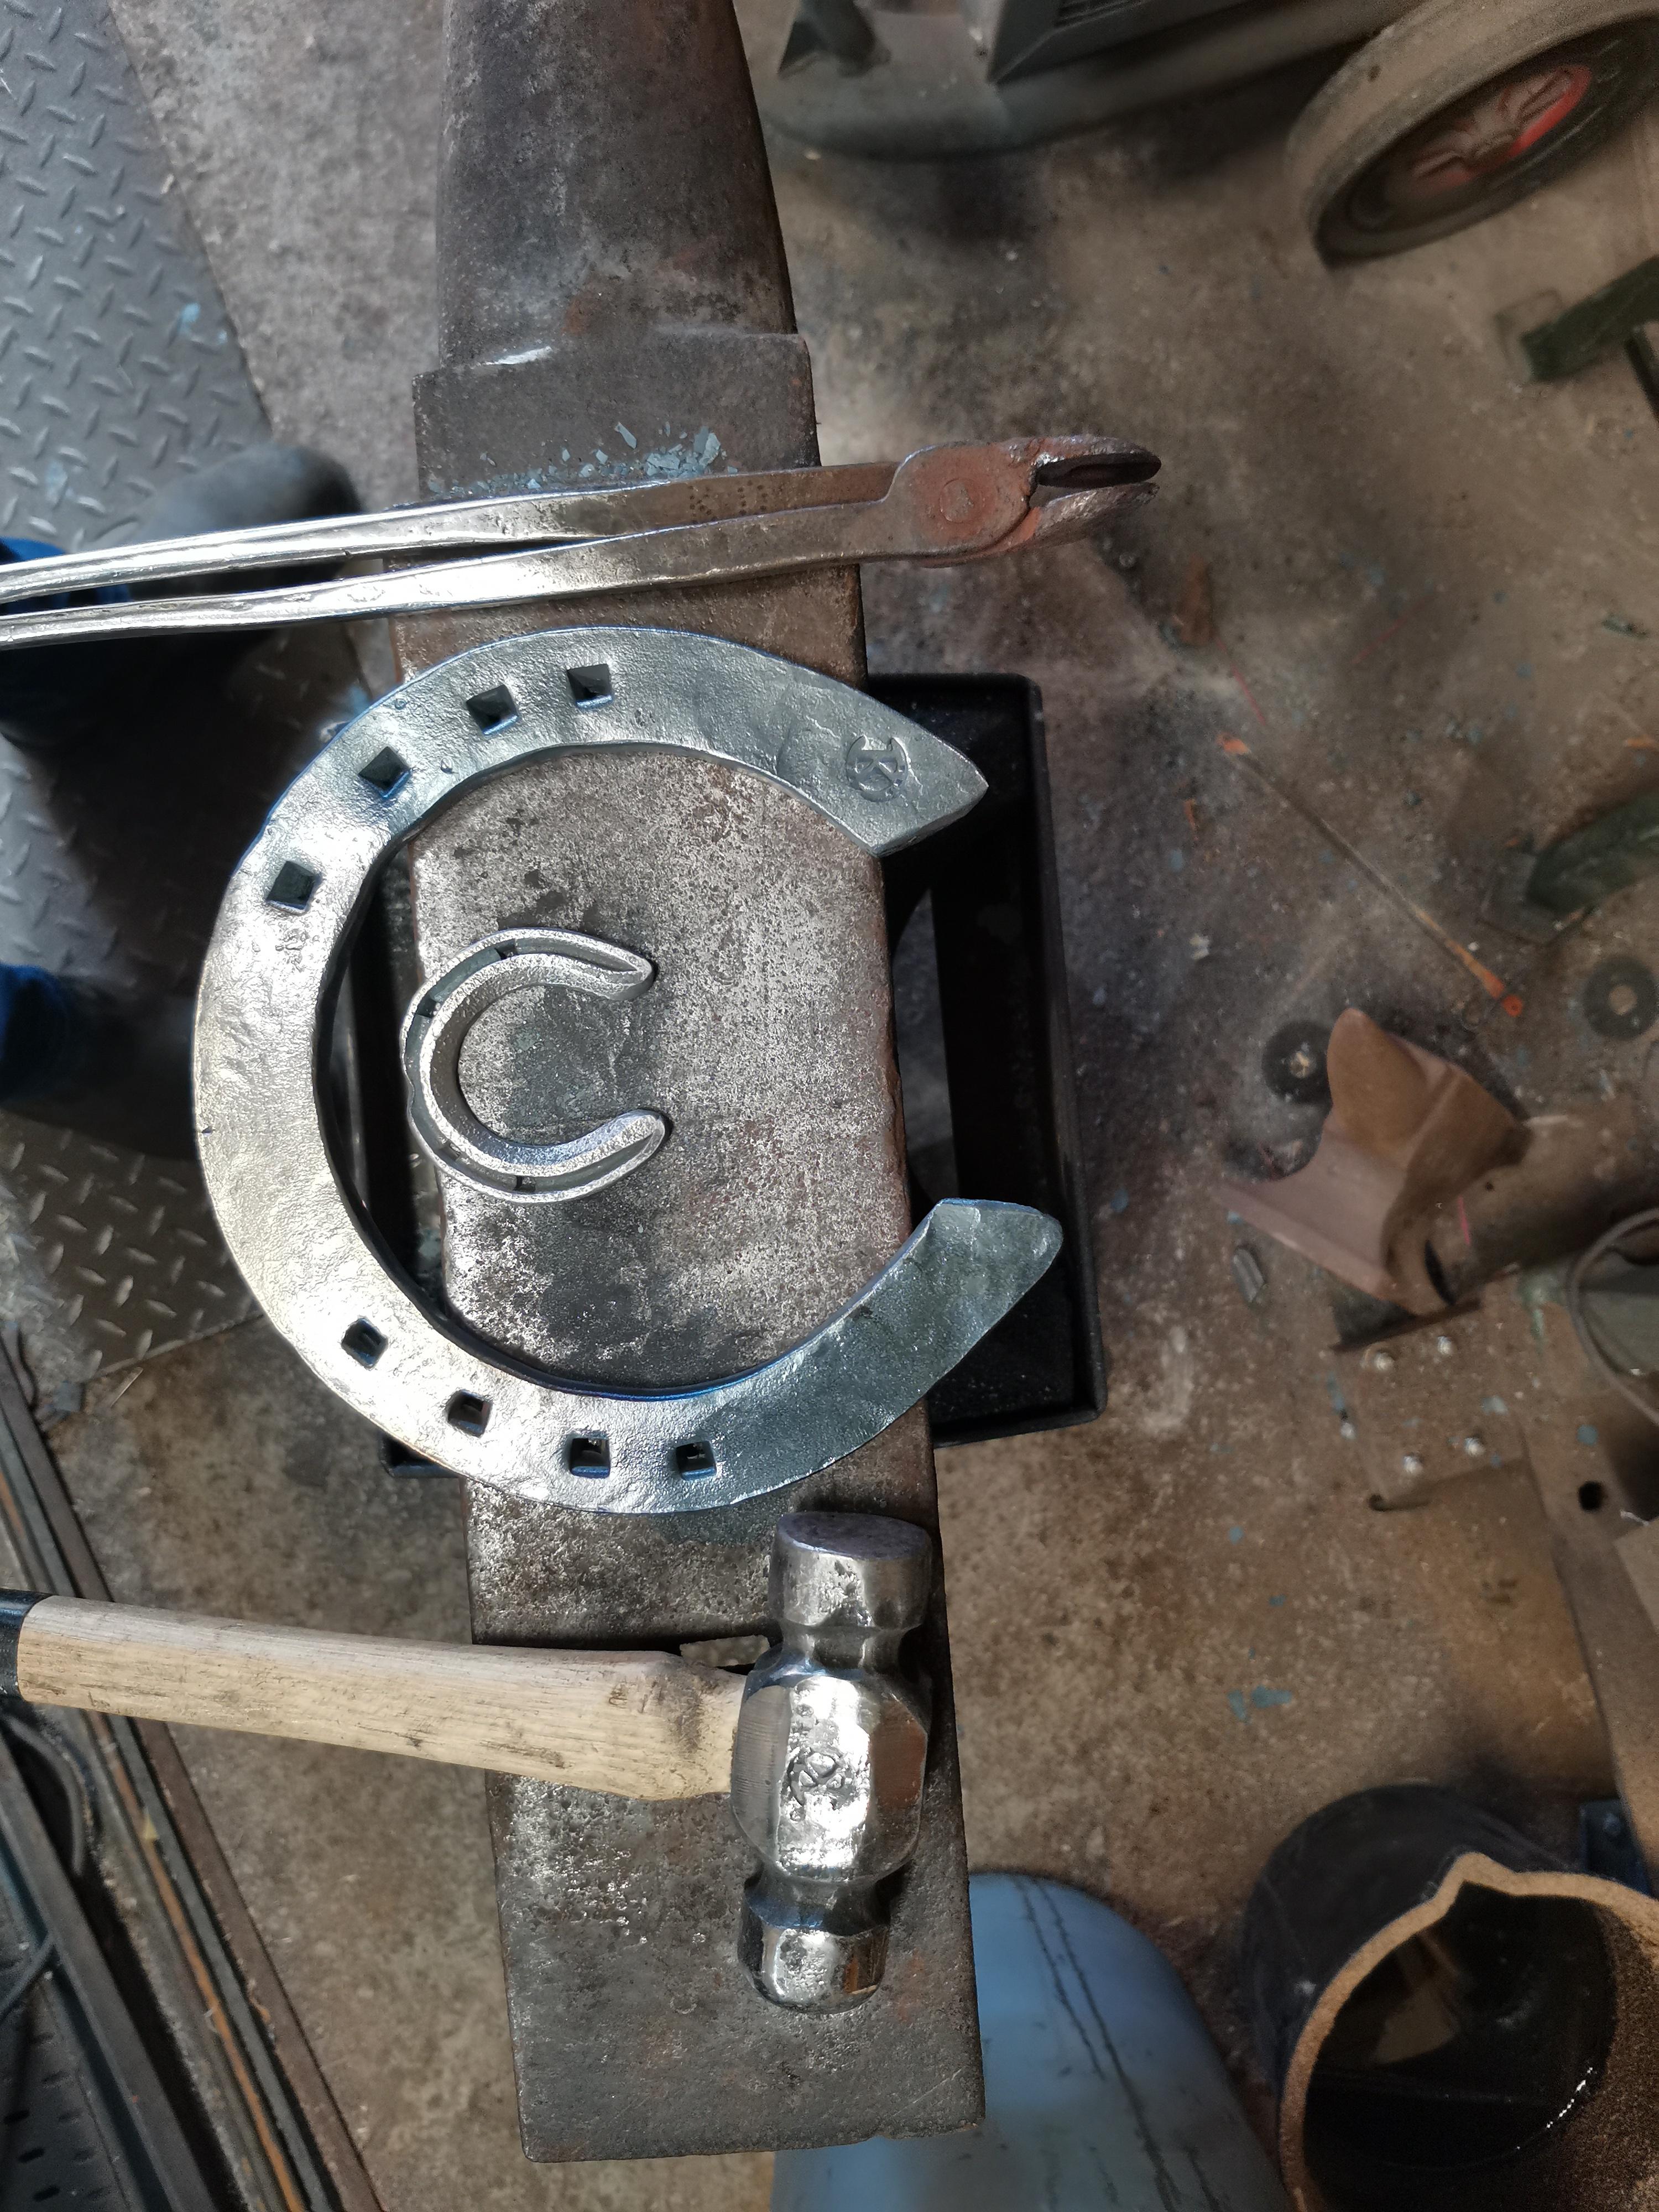
The cross section, size and weight of steel you require will be dictated by the type of horseshoe you wish to make. You can make belt buckle size shoes from 5/8" x 1/4" and draft horse shoes from 1 1/2 x 1/2". The shoes in the image are made from 6" and 20" of steel, the smallest and largest shoes that I fit.

-
Microtomes are unbelievable pieces of kit, I’ve very little experience with them myself but I know they have been used to slice through steel powders, very hard steel powder at that too. I remember Jan Hoffman preparing TEM (transmission electron microscope) samples, <100nm in thickness, from mechanically alloyed oxide dispersion strengthened steel powder; some greater than 1000HV hardness. As for the effect of carbon in non-hardened steel, if it sits on the lattice, or forms Cottrell atmospheres around dislocations, it can pin and inhibit dislocation movement, hence the steel has a greater resistance to deformation. But, as Thomas points out, the effects are insignificant when compared to the martensitic structure; they also diminish quickly if operating at temperature.
-
Here's a better image that goes some way to indicating where the hard region is. As I said, my colleagues anvil has an apparent 'difference in properties' in the same locality.The difference being that his anvil has a 'soft line' just behind the hardie hole and hard either side of that, whereas my anvil has this hard 'patch'.
-
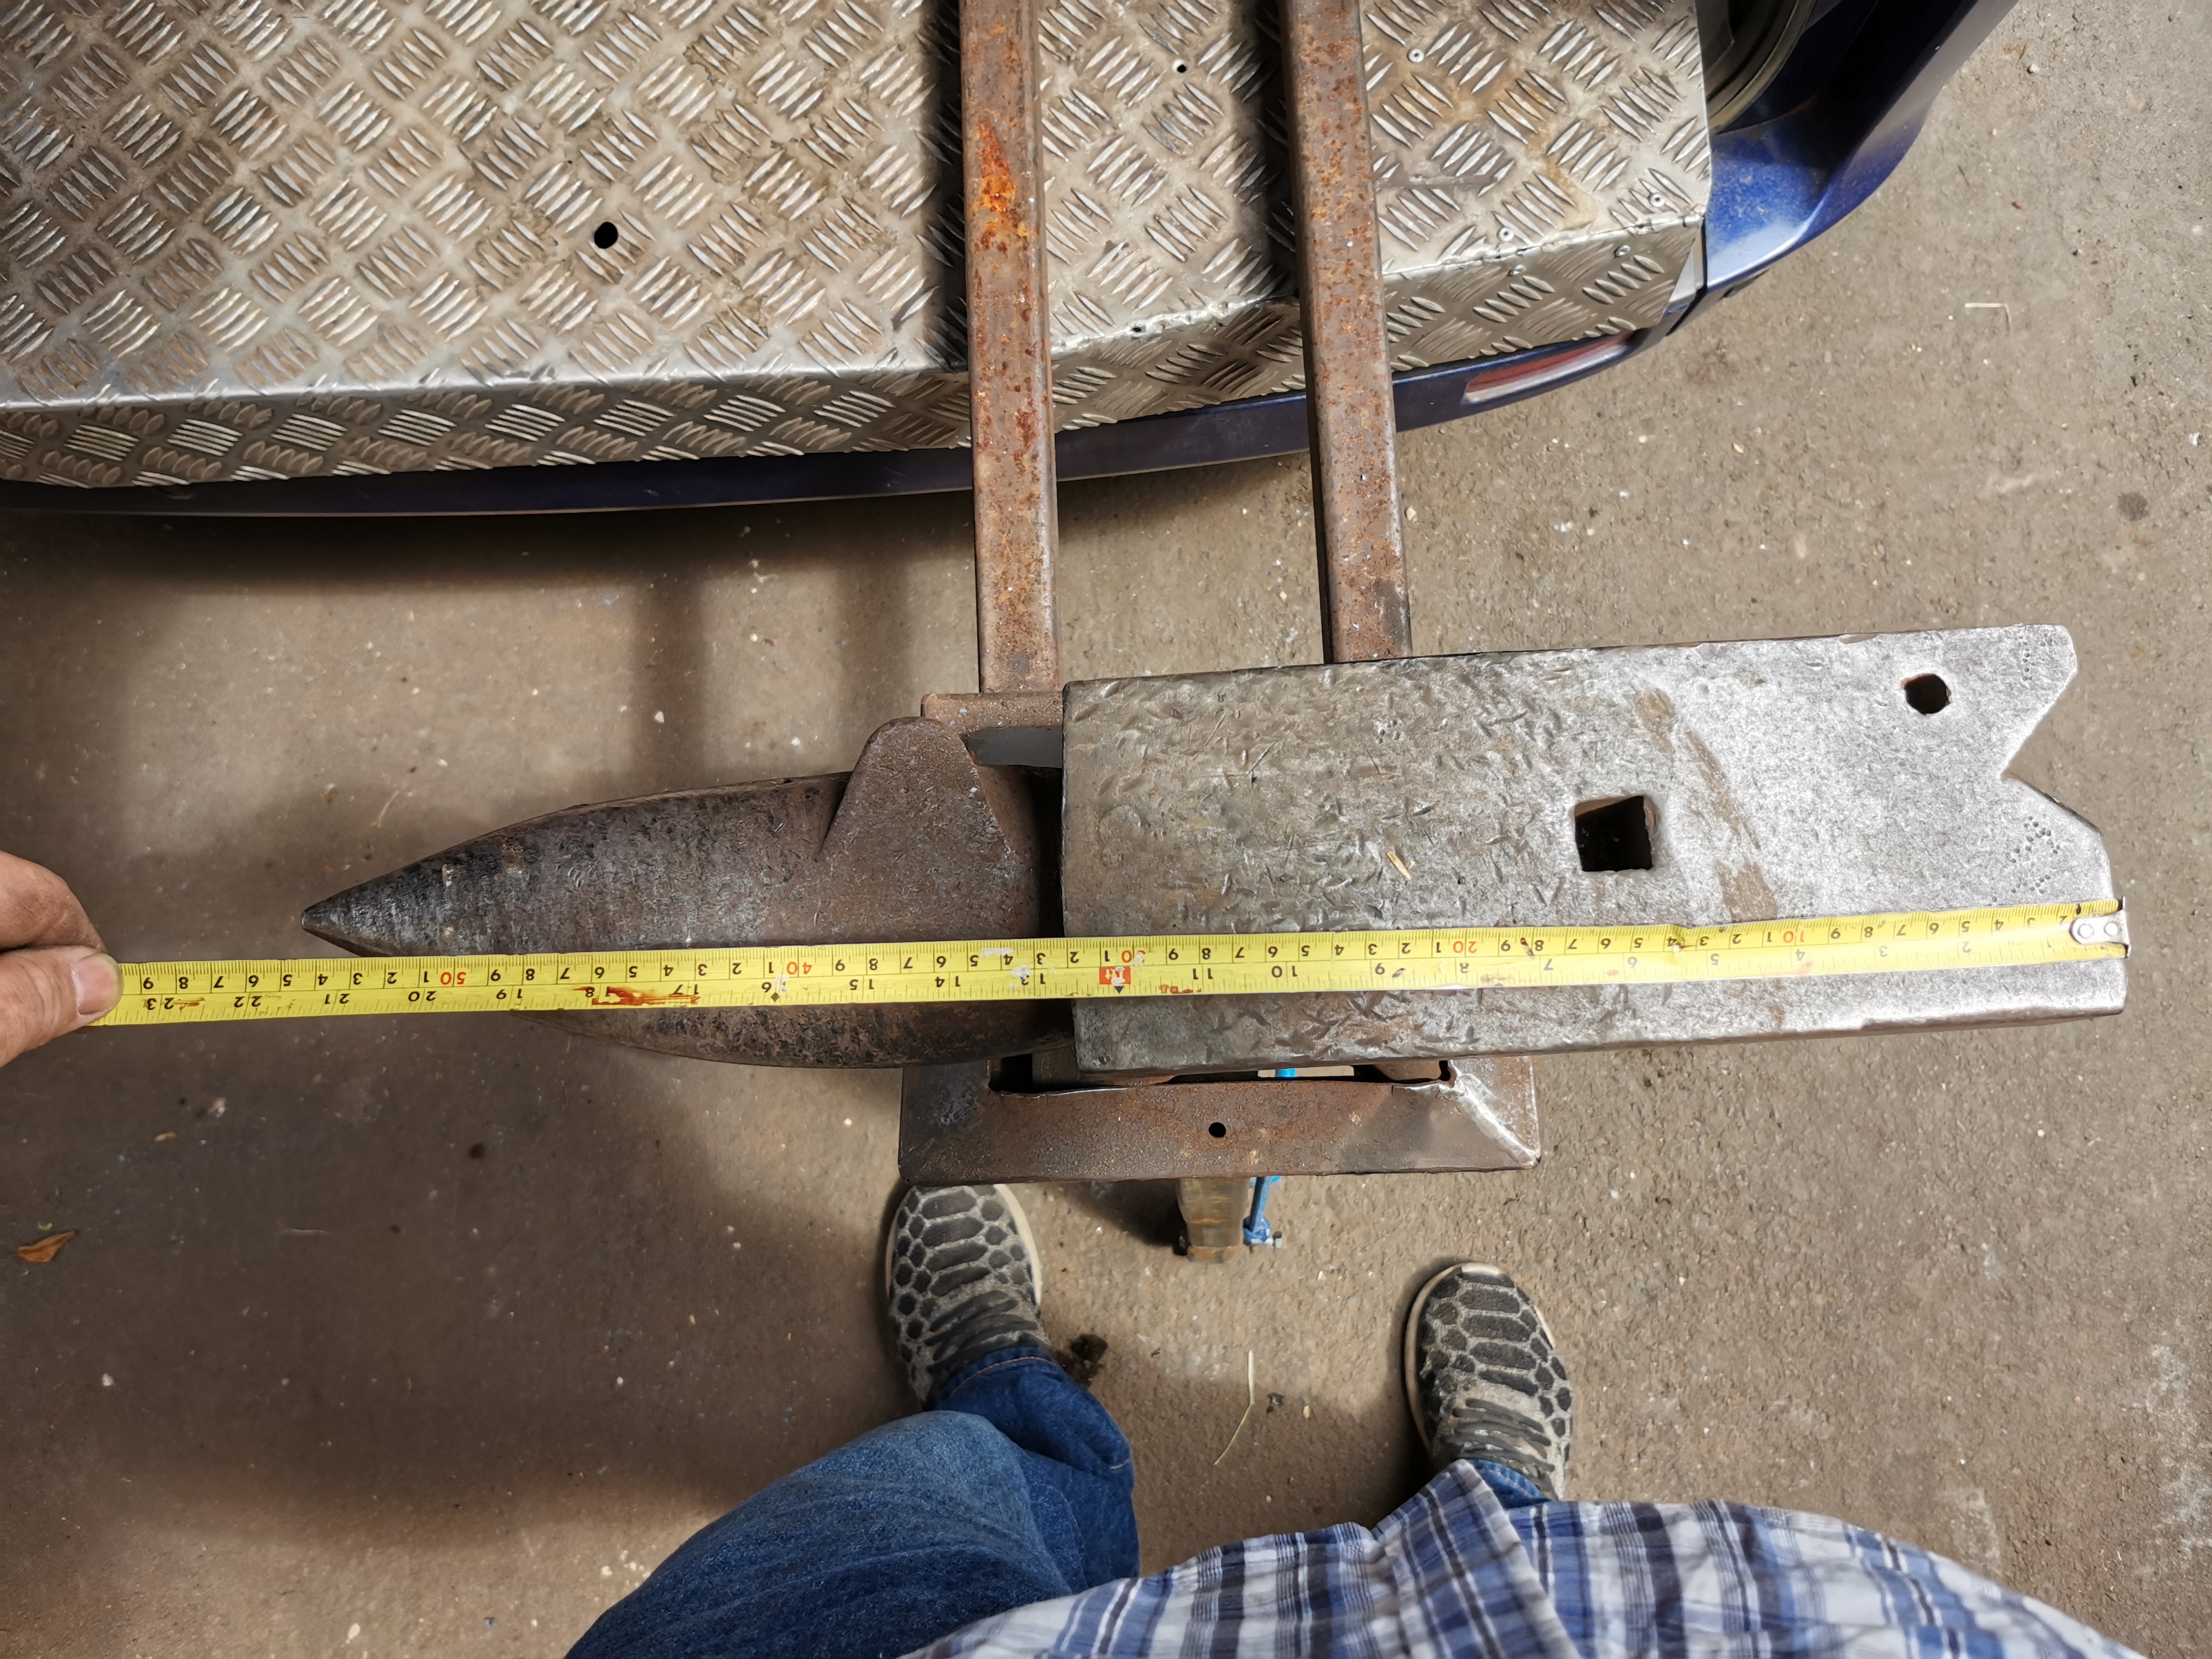
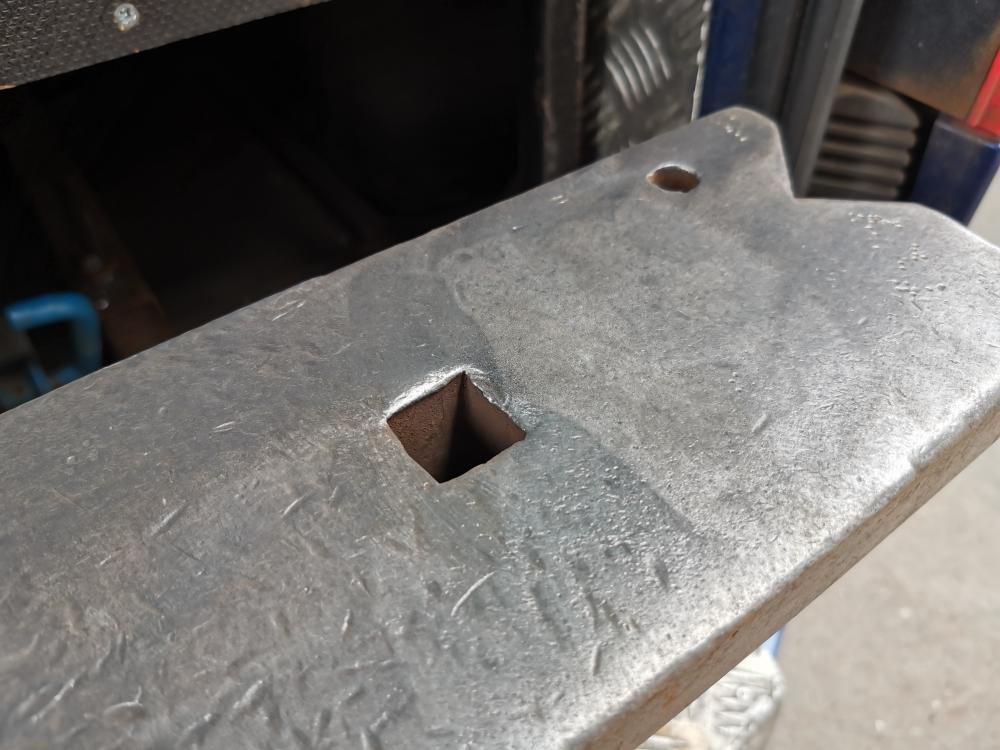
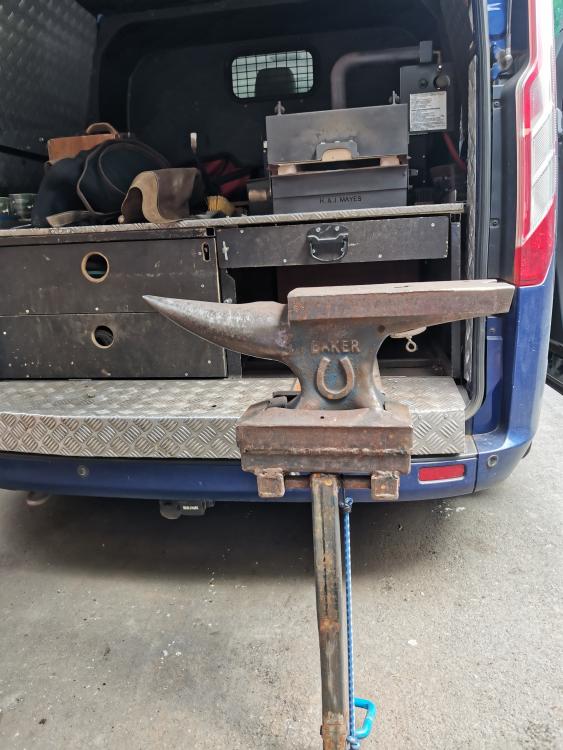
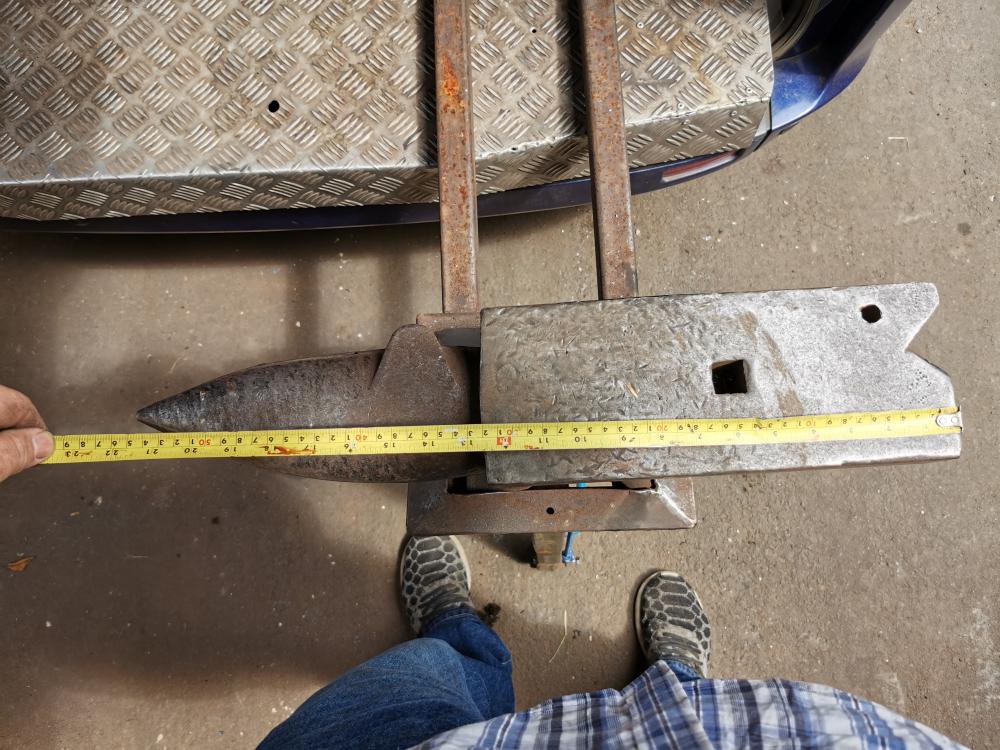
Bakers American pattern Farrier’s anvil, made by Vaughans, Stourbridge, UK. Used on the back of my van, predominantly for shaping and occasionally making horseshoes. Weight 80lbs (approx.) Overall length 21 ½” Width 5” Length of bick 9 ½” Height 9” Rebound area 1: 65%, area 2: 90% Price New £650 (paid £175 with stand) Bought from South Wales – 500 mile round trip. Had a great weekend away with my son, fetching this. We slept in the van, ate takeaways and soaked up the sun. A proper bonding weekend, with great memories, so at that point, the anvil had already paid for itself! I’d used a couple of these, over the years, when helping other farriers. It is by far the best suited ‘mobile’ anvil for me. This was a welcome replacement for the Alu-Anvil, which I just didn’t get on with. The only two downsides are the variability in hardness, across the table (second image). The large expanse of table behind the hardie hole gave approx. 90% on the rebound test, whereas the main working area of the table only returned 65% on the rebound; this area also marks up very easily. My colleagues Baker anvil also has a clear line, at the same position, where the mechanical properties differ (but hard either side of the line). It’s not clear what causes this, it appears to be either a weld line (two part construction?), or the effects of different temperature regimes (manufacture, or heat treatment). The second downside is the clipping horn; this addition to the bick, sits right in the way of my tongs should be, when drawing clips on the edge of the table. I understand the clipping horn is there, so that `I don’t use the edge of the table but it’s not the right shape. The previous owner made a couple of modifications, the main one is the V-shaped cut out at the heal. I thought I could work around this but to be honest I’ve found myself making use of the mod on many occasions.
-
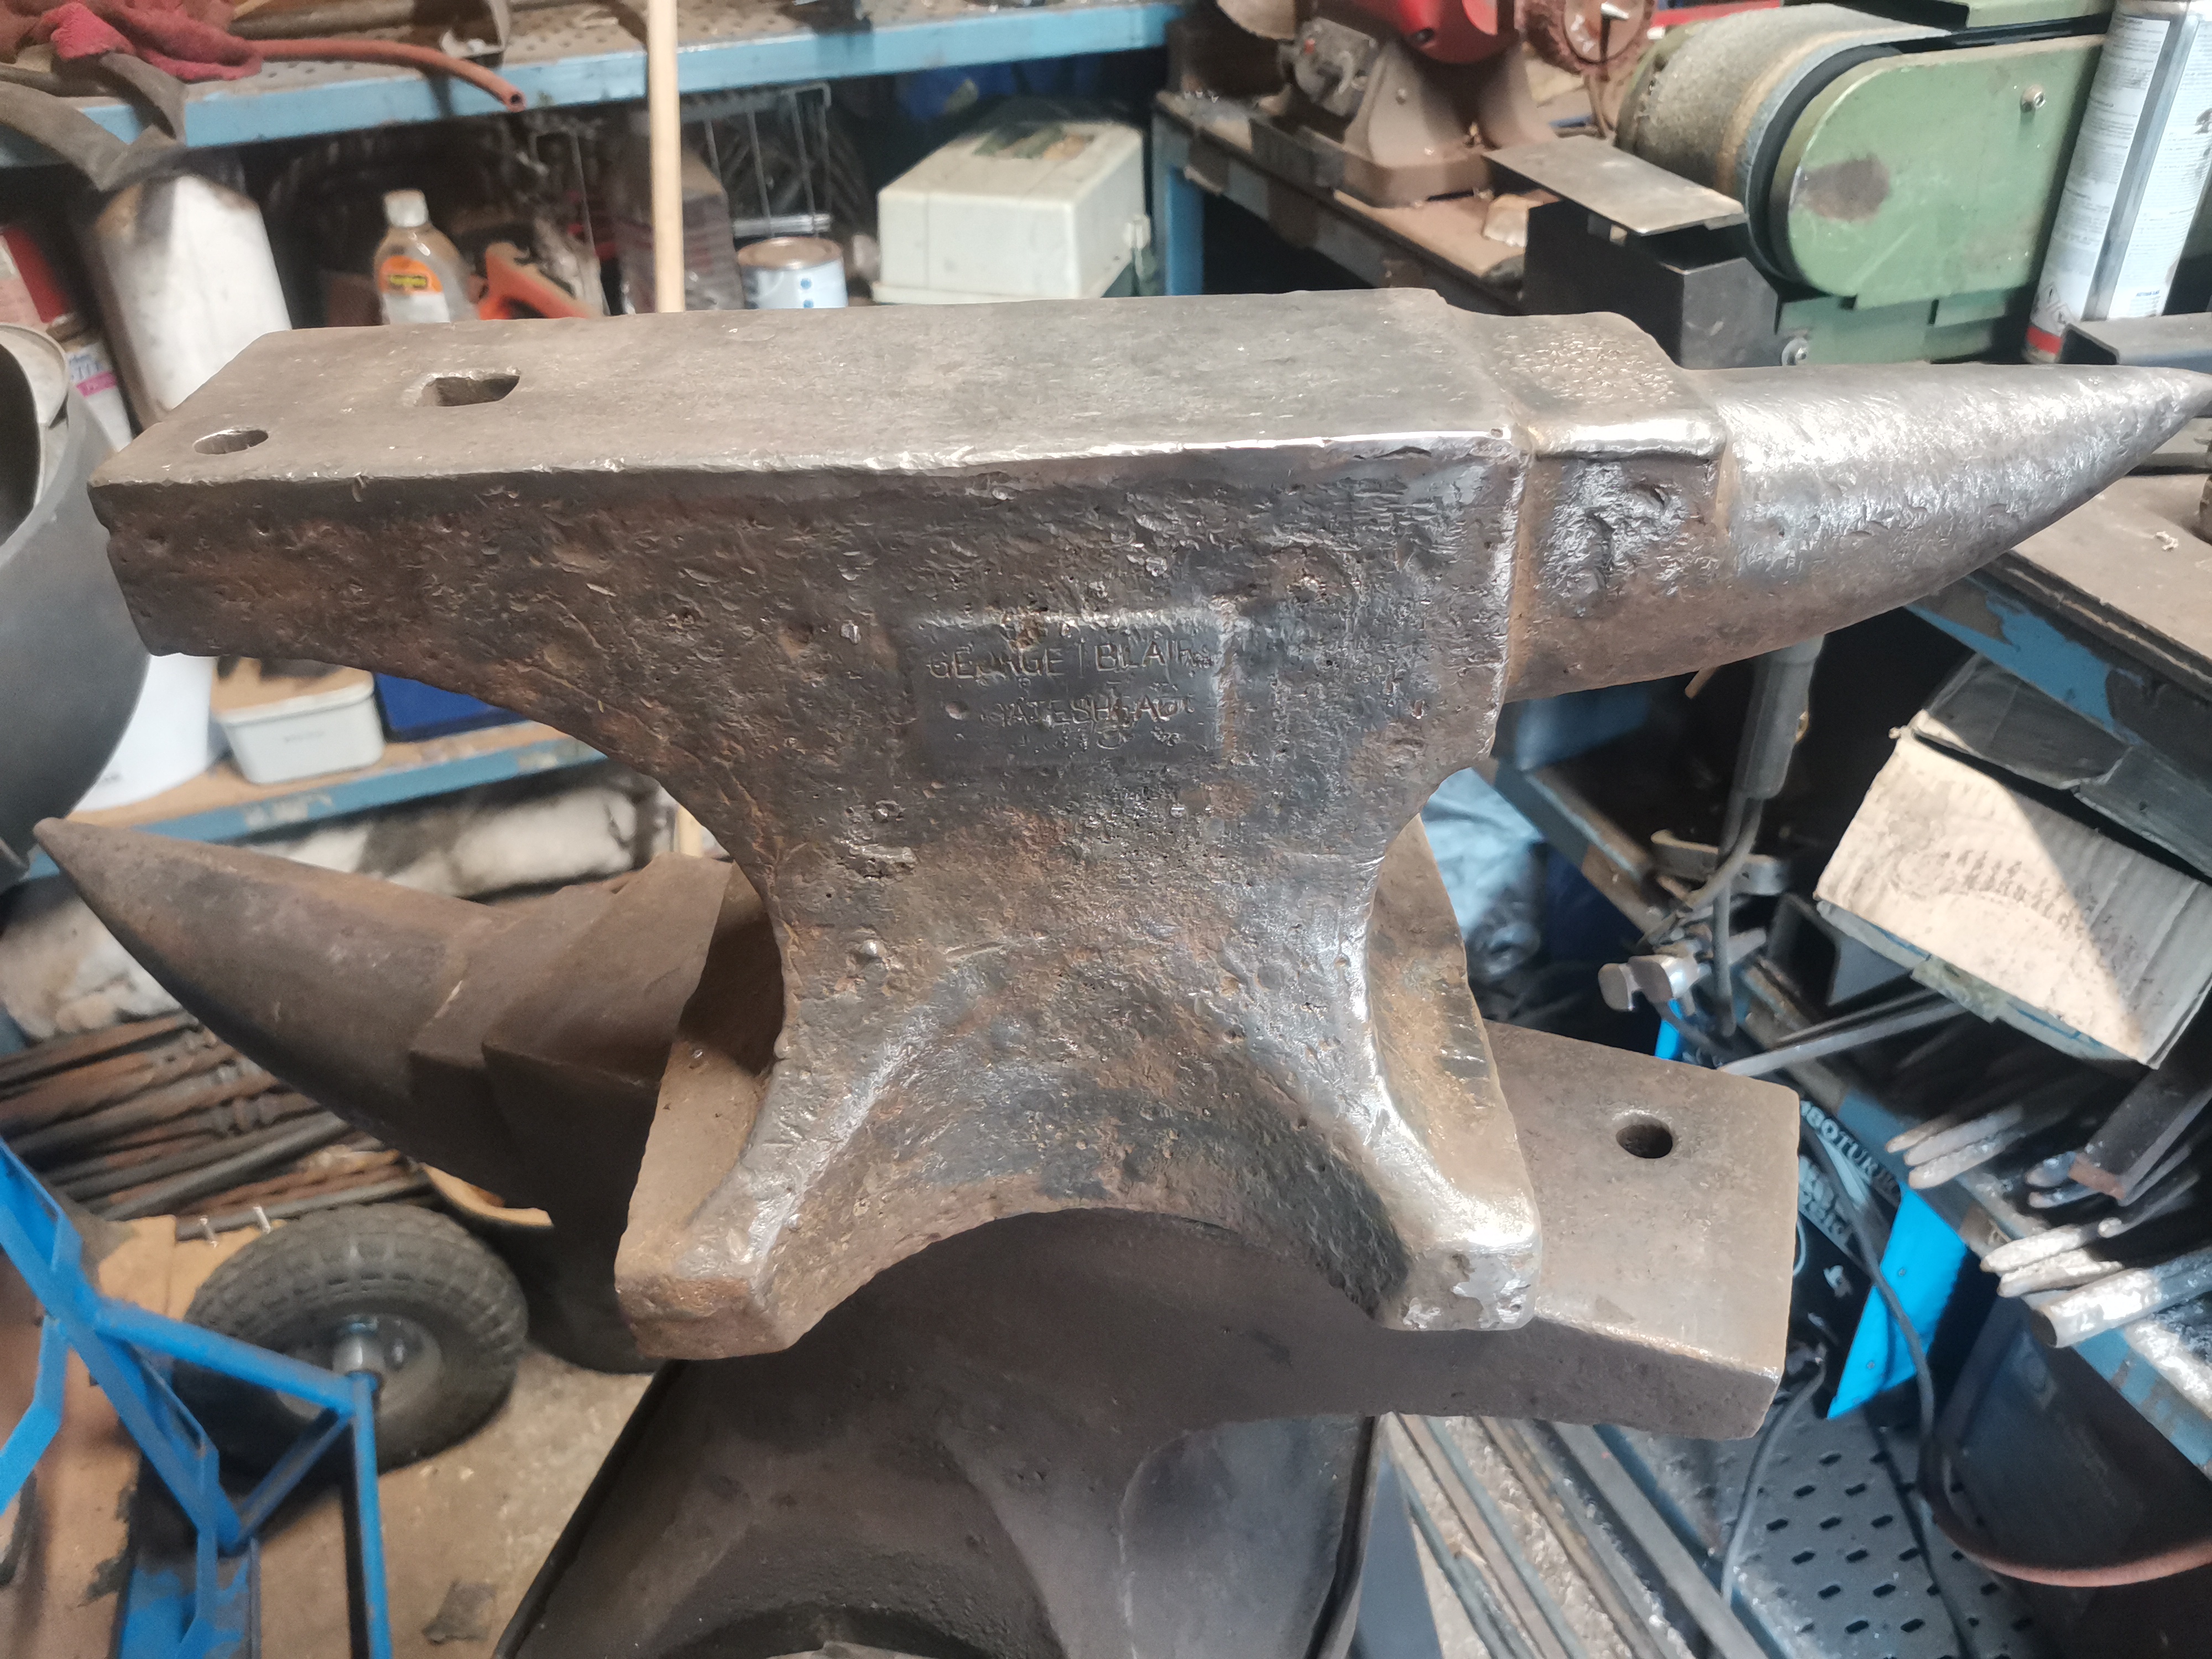
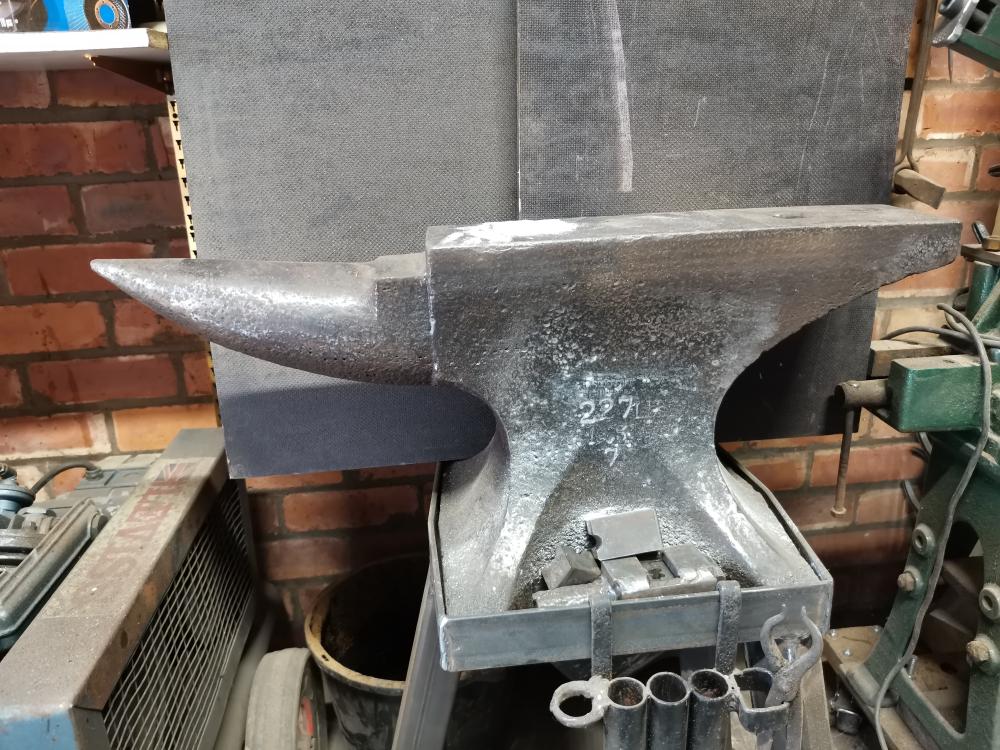
Soderfors 227lbs A brief review of a recently acquired Soderfors anvil. Weight 227lbs Overall length 28” Width 5” Length of bick + cutting table 10 ¾ “ Height 12” Rebound (12” drop) 90% Year of production 19?3 (illegible) There is a large number ‘7’ on the markings, not sure of the significance. This is up there with the best anvils I’ve had the pleasure of using. Although relatively new to me, the dimensions, weight and condition are perfect for my requirements. Primarily this is used for making horseshoes but is also used for tool making and small forging projects. The working face is in great condition, nice and wide with no dips or chips. The edges are in good condition, they have a small radius but are sharp enough for drawing clips. It’s hard, hence the 90% (approx.) rebound, so hammer blows have to be accurate. This is now my go-to anvil. George Blair anvil (Gateshead, UK). Weight 150lbs Overall length 22” Width 4 ½” Length of bick + cutting table 8” Height 9 ½” 90% rebound Bought (rescued) for £20, from a garage using it as a welding bench, approx. 30 years back. Used for shoe making until a few months ago. Superb anvil, no real wear and tear, no dips, or chips but not quite as wide, or long as I’d like. It’s given me great service over the years, now safely stored away.
-
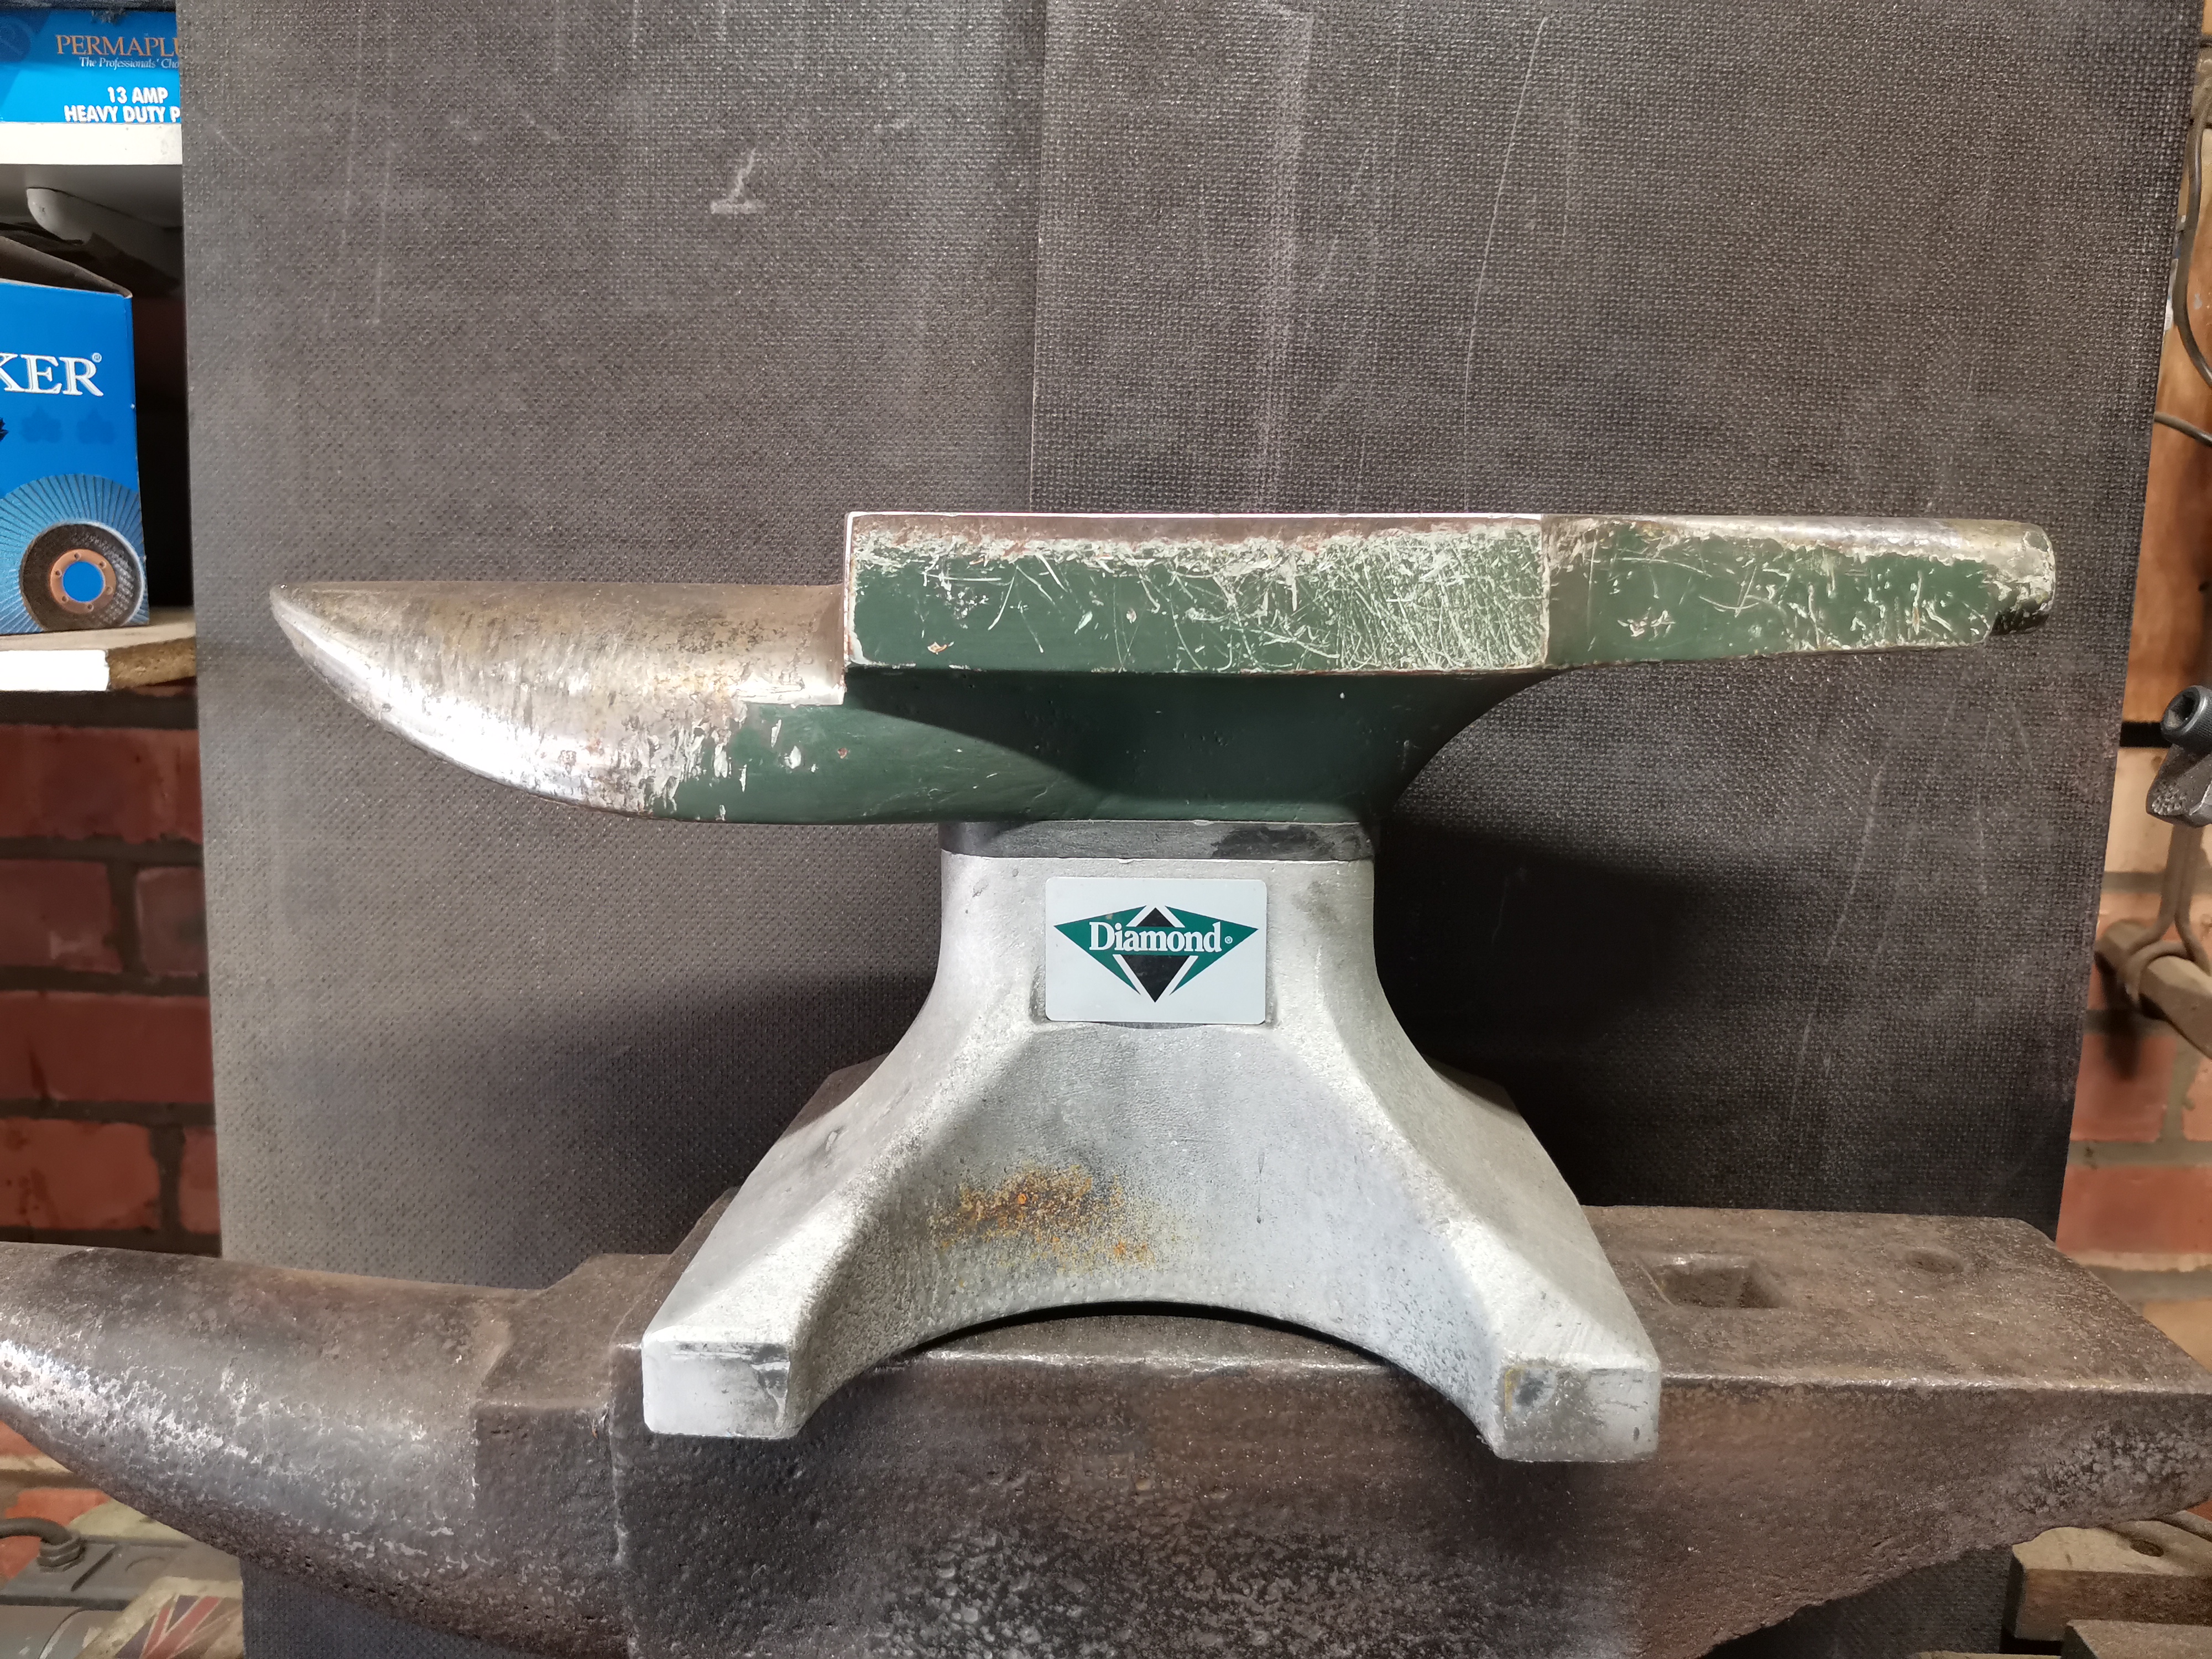
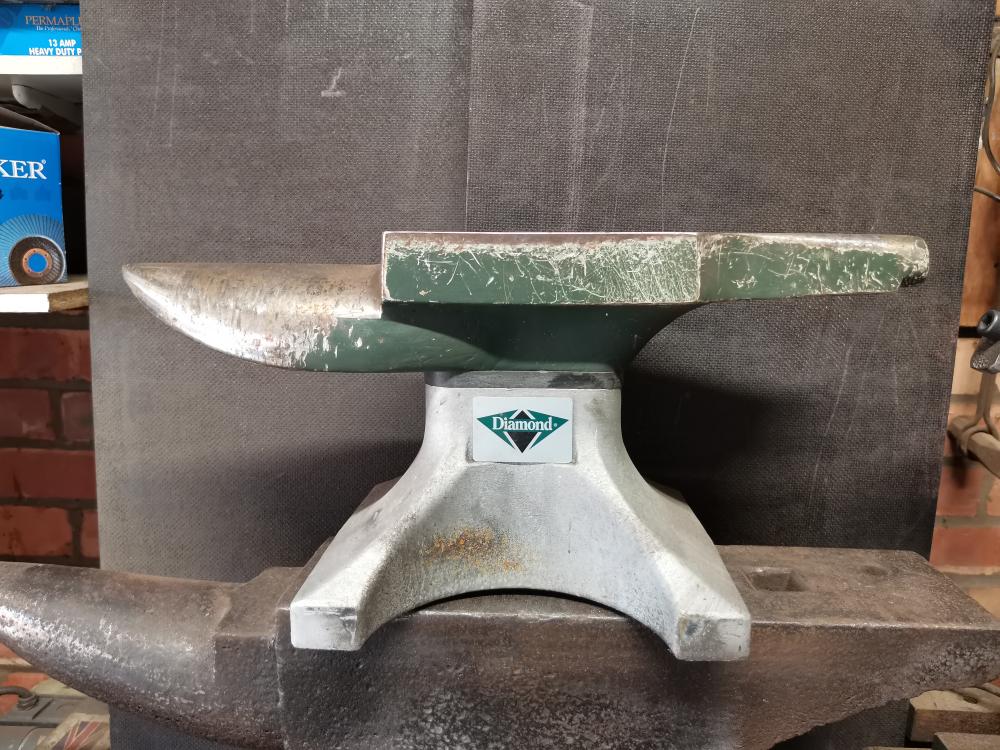
Diamond Large Face Alu-Anvil The following is a brief review of a Diamond half steel, half aluminium, Farrier’s anvil. Designed to minimise weight, while providing a ‘large’ working face, for use in the vans of mobile farriers. Weight 55lbs Overall length 19” Width 5 ¼” Length of bick 7” Height 9” 1” hardie hole Rebound approx. 75% (12” drop) Price New £630 I love the weight and mobility of this anvil. The wide face makes it easy to keep shoes flat when forging. Never used the turning cams on the heal, that’s what the bick is for. However, there lies the problem with this anvil, the shape of the bick… Given all of its positive attributes, I have been unable to get on with the bick, hence the purchase of the Bakers American pattern anvil.
-
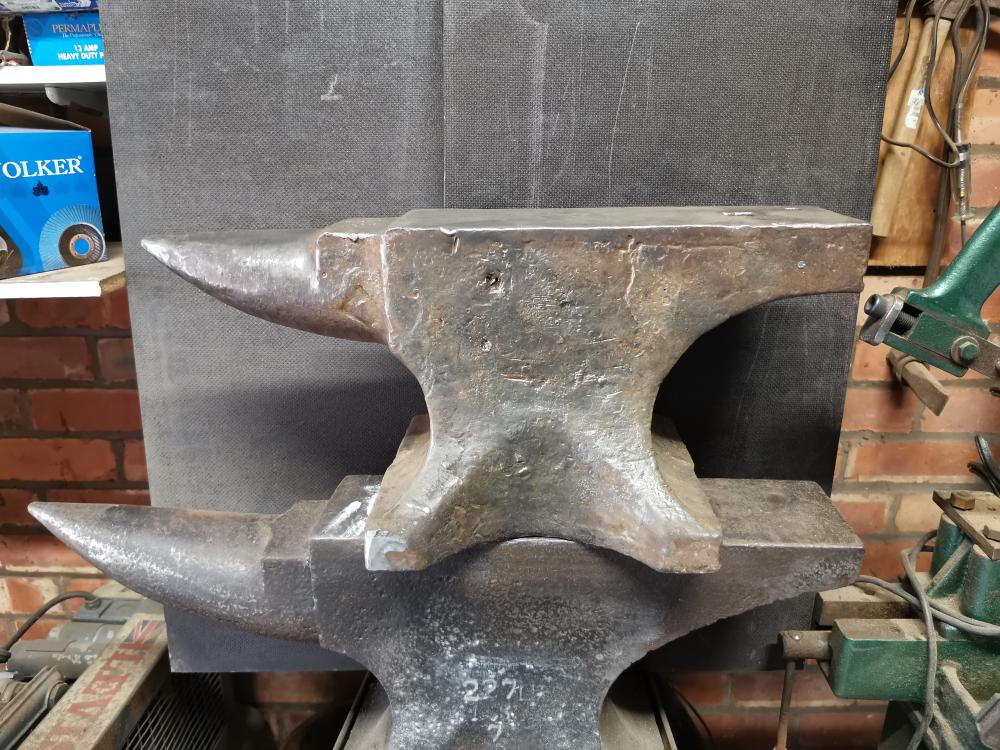
The Sodefors, so far, has been a pleasure to use. The George Blair has been a great servant but it doesn’t have as wide a face as I’d like when making draught horse shoes. The Blair is sat on the Sodefors anvil in the image but perspective doesn’t show the true difference in size. In terms of ‘performance’, they have a similar feel, both have hard working surfaces but my gut feeling is that the Sodefors face is harder – to the point I have concerns over potential for chipping, when using the edges to draw clips; no mishaps yet though. Where the Blair wins, is manoeuvrability. I know it’s not a prerequisite for an anvil but at one time I used to lift the Blair in and out of the shoeing rig, at each call, I’d never shoe another horse if I had to lift the Sodefors. I’ve since bought a couple of mobile anvils, one was a half/half anvil (aluminium base, steel top half) with a lovely wide face but a weird shaped bick; this was quickly replaced with a Bakers American pattern Farriers wide table anvil, once produced by Vaughans, Stourbridge, UK. This was my dream mobile anvil, after using one belonging to a colleague, hence when one became available… I have a further large anvil, in a forge at my Dad’s place. It’s a little worn in places, mainly on the edges but really nice to use. Not sure what make it is as I don’t see any markings. I’ll take some images next time I visit and ask for help on here with identification. I’ll also run some rebound tests for comparison.
-
I've been making horseshoes on this anvil for 3 decades but know very little about it. It came out of a vehicle mechanics shop, where it was being used as a welding table. Never bothered with identification but recently bought a larger Soderfors, which spiked my curiosity. The raised area plack has George Blair, Gateshead, 1945? Stamped but I can find very little information on the Internet.

-
My understanding was that phosphorus segregates to grain boundaries and embrittles ferritic steel. Therefore, in most cases, it would be considered an unwanted impurity in the alloy. What are the positive properties that it adds?
-
Stainless steels do oxidise, even at room temperature, albeit slowly. Where the composition of alloy contains sufficient chromium, rather than a thick visible iron based oxide forming, as is typical of non-stainless alloys, chromium oxide is formed instead. This extremely thin, continuous layer is transparent to the eye and provides a protective barrier between the alloy substrate and the air; this slows down/prevents further oxidation. However, if the temperature is high, the chromia layer will grow quickly and become visible, or different types of oxide layers might form in preference. Furthermore, if the reservoir of chromium becomes depleted, iron can be incorporated in the oxide and a less protective, thicker spinel oxide will form. Finally, if conditions are such that chromium doesn’t diffuse at a sufficiently high rate from the alloy substrate toward the oxide, chromium oxide again will fail to form. I am not sure exactly what the original post is describing but I suspect either the chromium oxide has grown to a thickness where it is no longer transparent, or that thick oxides, other than chromia have formed.