Paul Kin
-
Posts
146 -
Joined
-
Last visited
Content Type
Profiles
Forums
Articles
Gallery
Downloads
Events
Everything posted by Paul Kin
-
Thanks Latticino, I will look into the diamond hole saw. If its more then $30 it may be worth breaking down and getting wool... the problem is shipping. Its nearly the same cost as the wool. And Im not 100% sure what you mean by casting the burner ports for a burner block. Do you mean cut the holes big and shape them with refractory?? So my next question if I go this route, who wants to be in my will?!? Cause when the wife finds out... But more importantly, which refractory? I can get a pint of vusuvius super 3000 for $25. Most people on a forum for us Canadian knife makers (is that ok to say??) recommend it. A pint of ITC-100 is $96. I know its the best bet for ir reflecting but man oh man! Can get it in half pints but I calculated my forge to be 2.5 sq/ft. So pushing it for a half pint. Other option is a 9 lb pail of cast-o-lite 30 for $45. Surprisingly its only about $3 more for shipping and it wont freeze in transport like the others likely will. Also, with the cast-o-lite I can get a good thick layer then coat it with itc when money allows right?? As far as flux damage goes, I think I will use a stainless tray for welding so it shouldnt be a problem. I tried my best to do this on $0 but you guys were right as always! I really should have listened right away... I am sorry for that. I can be very hard headed sometimes (wife says always). Anyway, let me know what you guys think. I will probably have to wait another paycheque or 2 to go this route but maybe its worth waiting.
-
I fear the hard brick may give me more issues then just a heat sink dang...
-
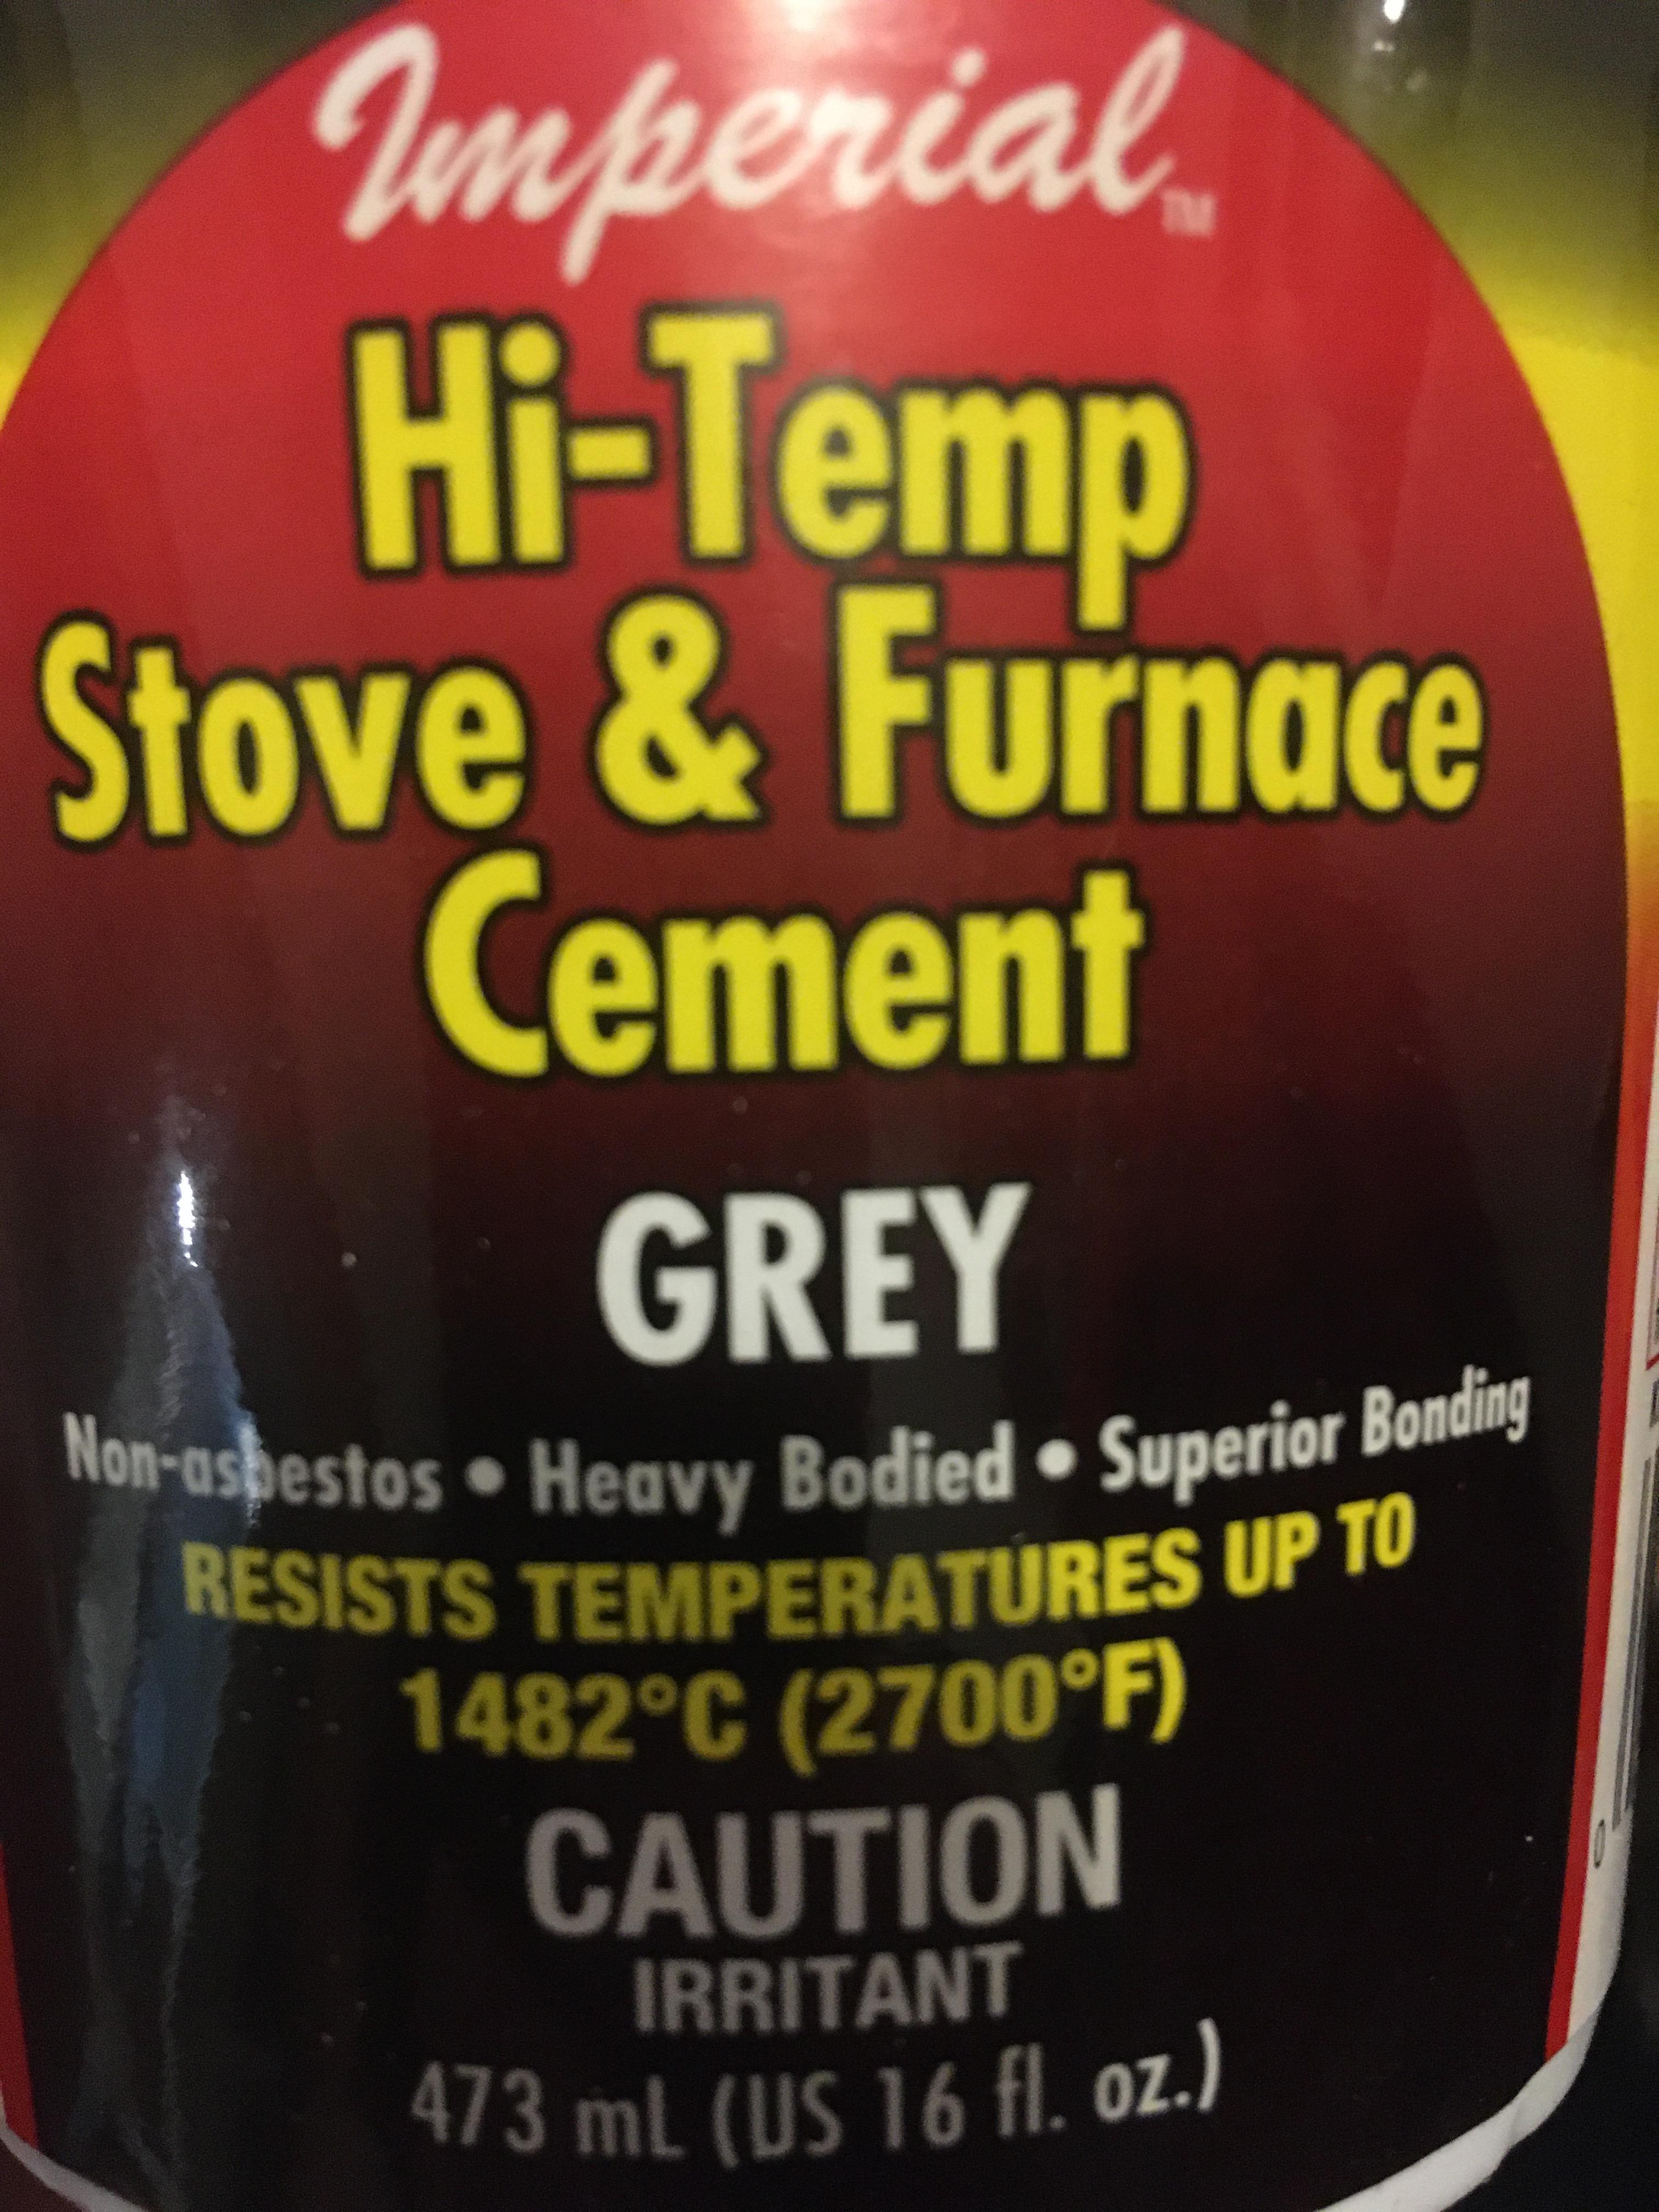
Also wondering, is this stuff any good for anything? right now I just plan to seal the gaps between the bricks. As its only rated to 2700° I assume its really not much better then the firebrick correct?

-
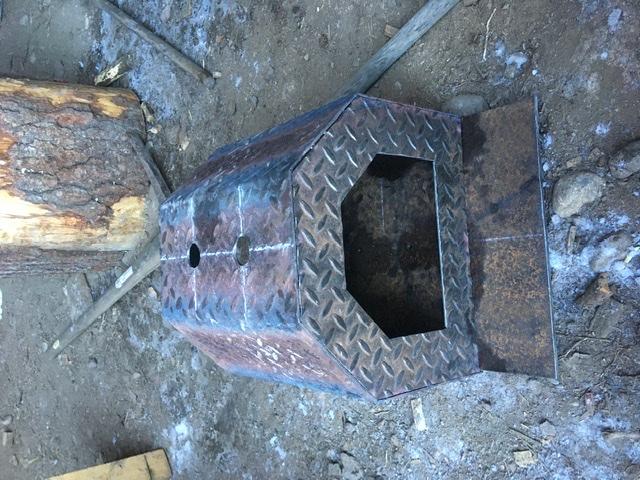
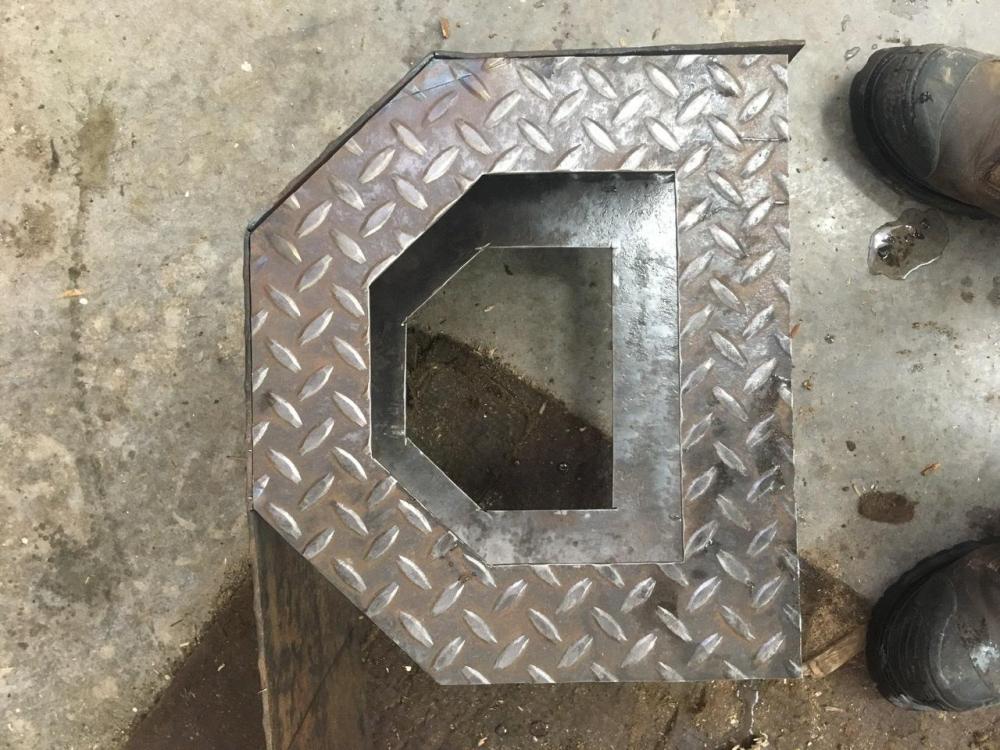
This is where I am at so far. As you can see, the floor is bolted on so it will be very easy to reline when these bricks inevitably fall apart. The burner holes are about 1/16” smaller then the thread protectors so I will lathe the protectors to fit and leave a lip to set their depth. Could file/sand them that little bit also if I had to. so far so good! Hopefully get the bricks in and mortared tomorrow. Then onto burner tuning! Anyone know why all my pictures end up sideways?? Im on an iphone if that helps.
-
I see! Or maybe its pearlite Im thinking of.. the stuff at gardening stores
-
Quick question, would something like vermiculite be a better insulator for the floor? Then just hard brick for the flame face
-
Goodness... I just needed some help getting my first gasser going! Haha just kidding! I fully agree Frosty. A little deep, but a very good philosophy! The kids are down for a nap so Im off to work to get the forge body finished off!
-
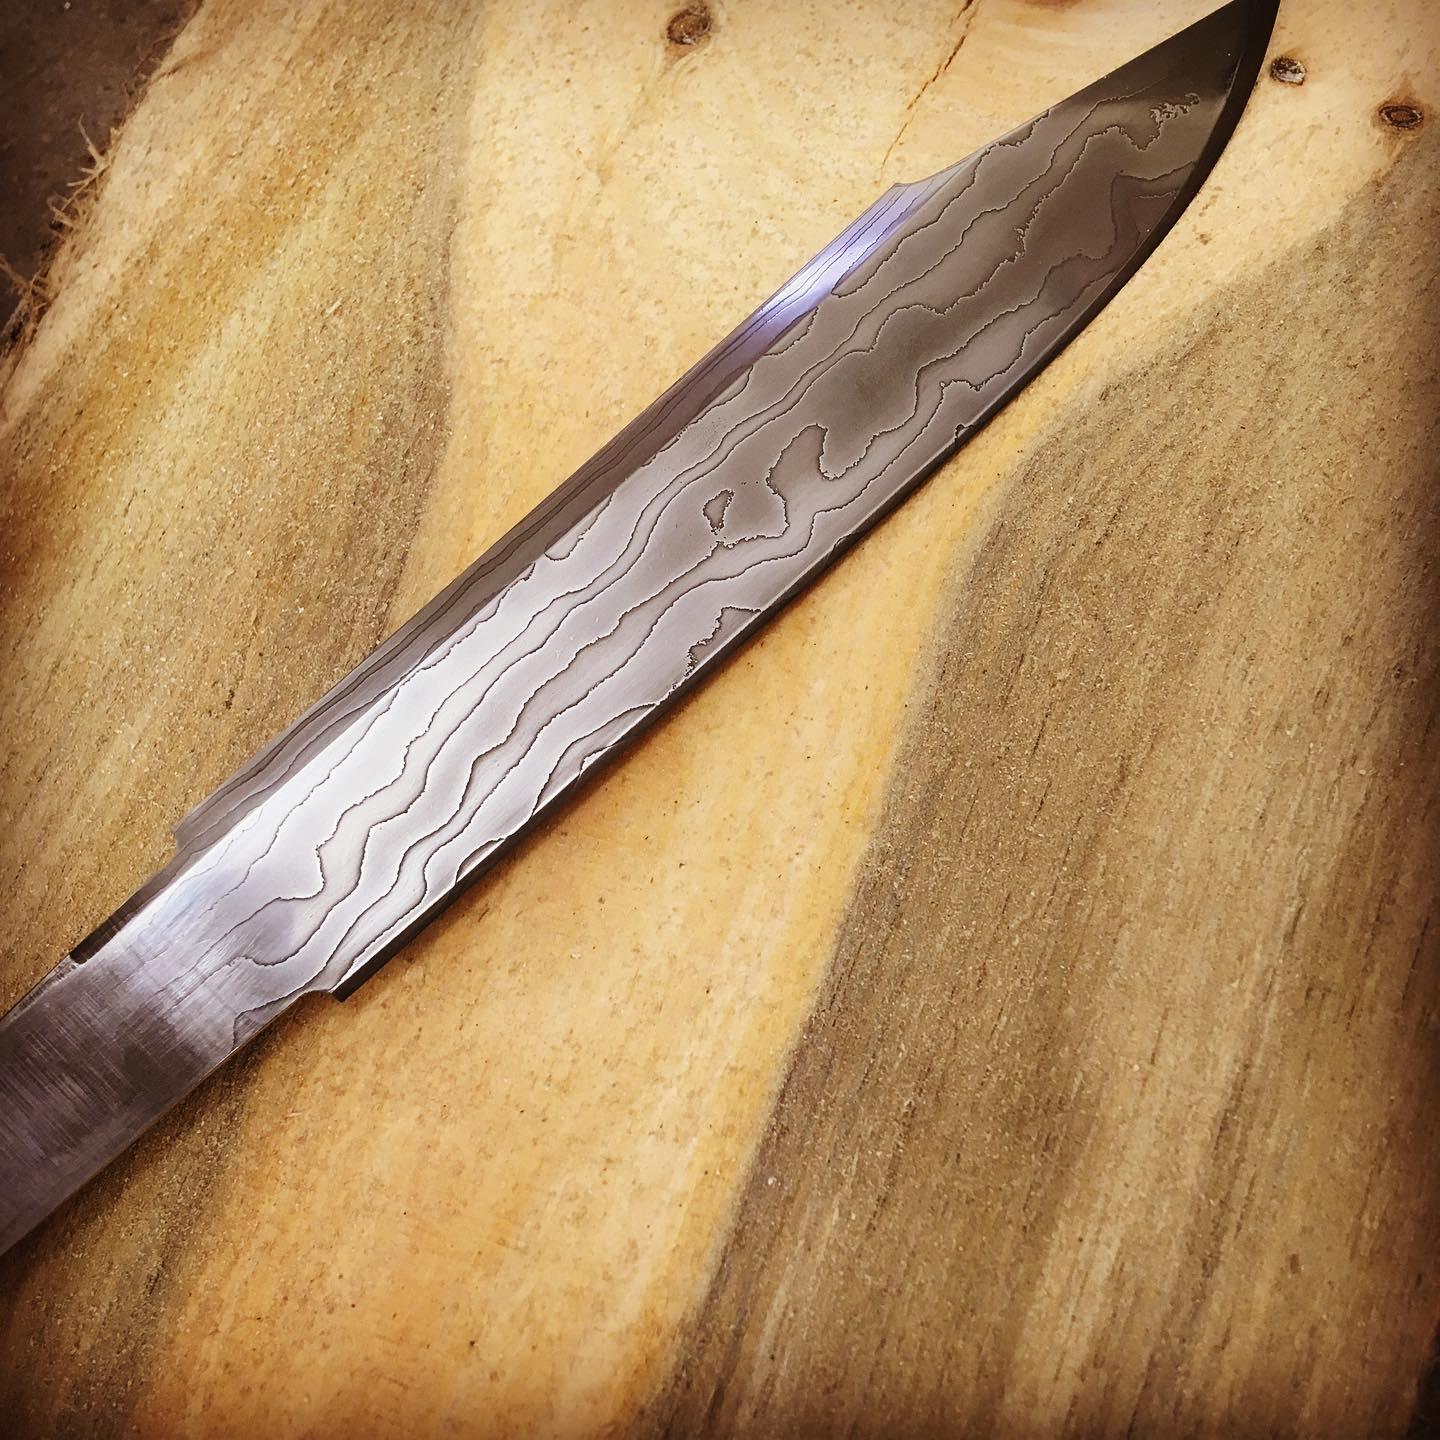
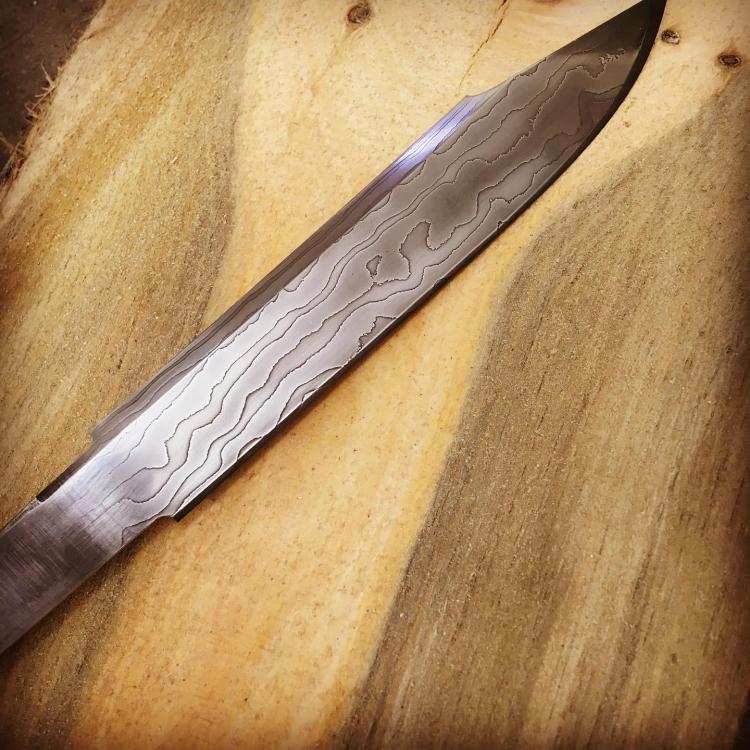
Thanks! Thats my first successful pattern welded blade. I will get more creative once I get a few more successes under my belt! Im about 50/50 bladesmith/blacksmith. I enjoy both. What I enjoy most Ive found though is teaching! Over the last year Ive got 3 others hooked. 2 guys and a lady! So I see what you mean by riding others rushes! Seeing them admire what they accomplished with only a hammer and a piece of steel that any NORMAL person would chuck out feels great. I dont know what it is about it, but its pretty exciting. But we arent normal people are we? I have learned not to rush yup! This has been in the design phase for months really... thats part of what I teach others as well. Patience is the hardest part of this craft if you ask me.
-
Hey thanks Mikey! Encouraging words from you guys means a lot! Ive been reading these forums for many years so I know who yall are on here. Criticism is also good! Could save my life one day haha. I got the burners finished up and fired up last night. They work! Forge isnt done so havent tuned them yet but I feel Frosty’s instructions are very clear so Im confident I can do it.
-
Oh Im not sure why that one sentence is in bold! It was not intended and I am certainly not yelling at anyone!
-
Haha I think I may have done to much research on burners and flares and whatnot... Ive read a lot about using the forges refractory to be the flare so the mixing tube is saved from heat damage. Its got me brain in a knot to say the least... As to why Im using the brick, well, the cost of the burner plumbing and the 0-30 regulator puts me about $70 above my current budget lol! Everything else is from other forges Ive built/scrounging. Long story short: over the last 4 years Ive gotten married, we had 2 kiddos, built a house, and then built my shop. And me being me, we did it all the hardest way possible of course! This is our first year that we can actually just do whatever we feel like instead of being crazy busy. But we are also putting every penny into “catching up” so to speak. Talk about life story!! I have however read of all the downsides of the hard brick... and I do get the cost of propane vs. proper forge insulation... I do want to use proper material but right this very moment I just cant afford it. But know that I really do appreciate your advise! I built this forge to be able to be re-insulated for when I can afford. I think you are thinking much to large! I run a woodmizer lt70. Just me and the one mill with all the supporting equipment. Its a big, small operation if that makes sense. I use 1.5” silvertip blades. Aka carbon steel. 1074 to be exact! I talked to the head coe man himself! I get my 15n20 from our local big mill. 9”+ bandsaw blades. Makes great blades! For instance: I have miles of the 1074. It does make great “payment” when I go to someone else's forge and swing hammers! And probably 10 feet of the 15n20. I HAVE been at this for a good decade and then some . But as far as propane goes, Im as beginner as it gets! this is my first real venture into it! Also, Im actually fairly knew to real bladesmithing. up until the last couple years its been more blacksmithing type stuff. But I am far from a professional!! I really appreciate it! Ive read and read and read and finally, theres just specific things I cant find exact answers to. And you have helped greatly so far!
-
Oh ok thanks Frosty! I think I might just aim them strait down for this forge for simplicity. Im struggling to figure out how to drill an angled, tapered hole in the hard brick. I will probably be building another one by next winter haha. I just enjoy building things. So... I rediscovered a plumbing shop that I completely forgot existed today... Ive been running all over town to every other place that carries plumbing supplies For days and forgot about this one. Ugh... Its tiny. All their black iron fittings are in a little 6’x8’ corner. Just so happens they have aaalllll the odd fittings! Except wye’s, but every single reduction T you can think of. Well now I know at least! And feel a little dummer then I was this morning.. haha. They also gave me a couple thread protectors! So I got the burners running this evening! Just have to finish the forge now. Hey now! Im a Sawyer and I get a few people a year asking to buy logs! But I get what you are saying and point taken. Sorry to waste your guys time! This is my first gasser and I was just a bit nervous to make a big mistake dealing with propane and all. I’ll post pics once its up and going!
-
So I am going with dual 3/4” T burners. I put them in the lathe last night and drilled/tapped them. My question now, where do I place them? The forge is 12” long. I am leaning towards position #1 in the pic in my last reply (pic is sideways for some reason so its top mounted at an angle toward the wall). Now as far as spacing... say 3.5” in from the openings maybe? That gives 5” between the burners. Im not to sure how to space them. 4” in gives 4” between which almost seems to close but Im not sure...
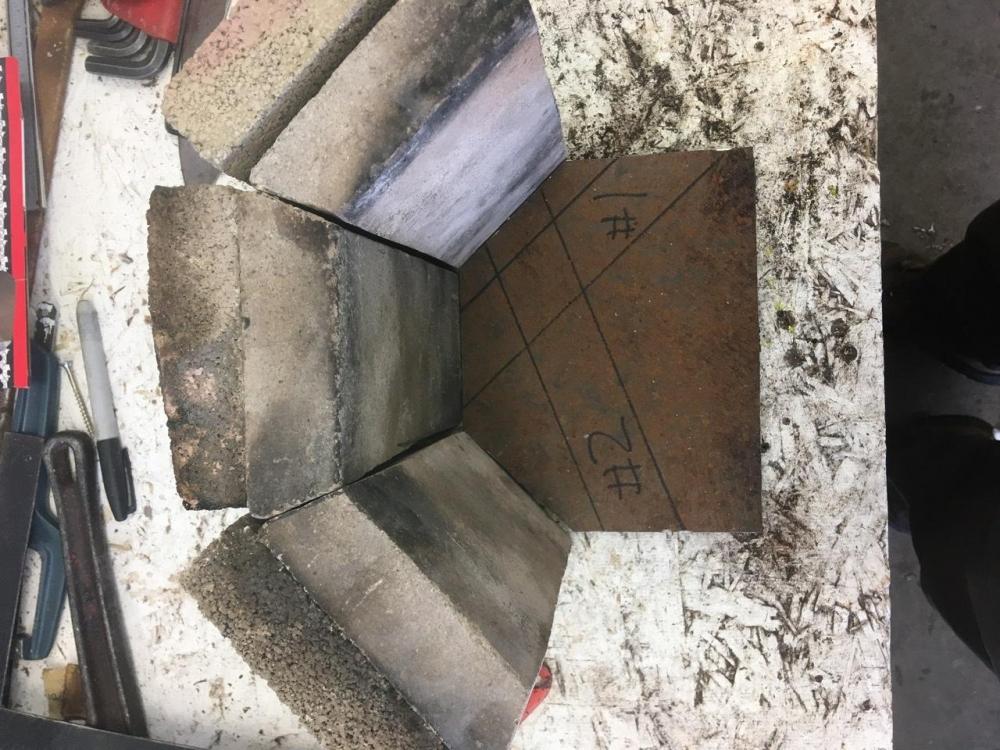
-
Thanks guys. I did consider dual 3/4” burners. And maybe I will just go that way now. Plumbers in this town can be hard to work with... I know those T’s exist, but they tell me theres never a reason to use something like that. They also told me that the only high pressure regulator I could use for a forge was their $100 one. Thats just the regulator... so off to the amazon it was for me! No one carries any kind of mortar either. Or 2.5” fire brick. Or ceramic blanket. Trust me, I really did try every store in town as I do try to shop local whenever possible. The highest temp mortar I could find was 2700° crack sealer for fireboxes. So the ifb Im using is just the lower temp stuff. The flame face will be hard brick. Like this: kinda make sense? I will seal the cracks with that stove cement for now. As for burner angle, I think I get what you mean Frosty. I feel like #1 in this last pic might be best correct? Latticino, anything I have to order from a store here, I also have to pay shipping as its not normal inventory. Plus about 10-25% more then online prices. Its funny cause I know of about 15 other smiths in town. Everyone just deals with shipping or gets stuff if theyre on road trips. Its mostly due to the “fact” that our local plumbers “know better” then us. But it is what it is. Sorry for the long post and the complaining! I really did do my research, planning, and parts searching. But I went throught this whole process last winter and got discouraged and gave up. This year, Im determined to see it through! Even if I end up with a not so awsome gasser, it will be a start at least!
-
Hey all, I am building my first propane forge! My 4th forge, but first gasser! Supplies in town are limited (understatement) so I am using what I can get locally until our next road trip. All we have in town is 9x4.5x1.25 fire bricks both hard and soft (low temp). So my plan: 2 layers of the 1.25” brick. Soft on the outside for insulating, hard for the chamber. I understand that this is not going to be as efficient as possible, but its all I have to work with... I can get refractory but its a 12 hour road trip to Edmonton so that will have to wait. Chamber size is 576ci aprox. Im going to use a 1” Frost-T. question on that, I need a 1.25 T correct? There are literally no 1.25”-1”-1.25” T’s in town though. I have spent days searching for materials for this project and months planning. So, could I use a 1.25-1” adapter and just port it with a die grinder?? Please?? Lol. I was even told at our largest plumbing shop that such T’s did not exist... so you see my dilemma... and yes I ran from that store quickly! Next, and probably my biggest question, burner position. I am wanting to do more pattern welding and get into semi traditional wrapped axes. These are my thoughts for burner positions: or should I just go top mounted and straight down?? Im leaning towards #1 but want opinions from people who actually know things! Thanks!

-
using normal wood
Paul Kin replied to mrkiddi's topic in Solid Fuels: Coal, Coke, Charcoal, Wood, etc
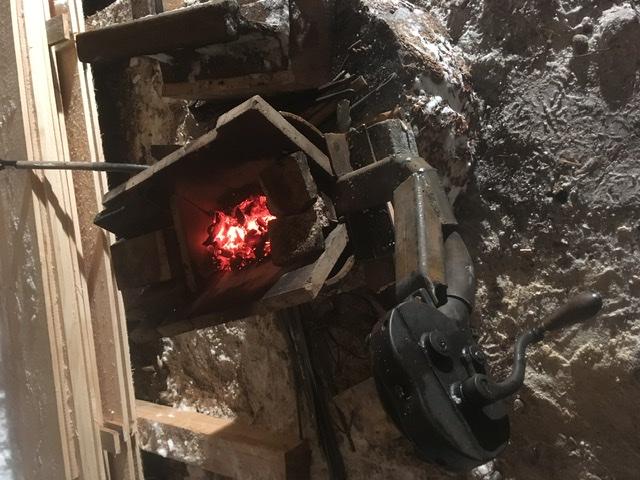
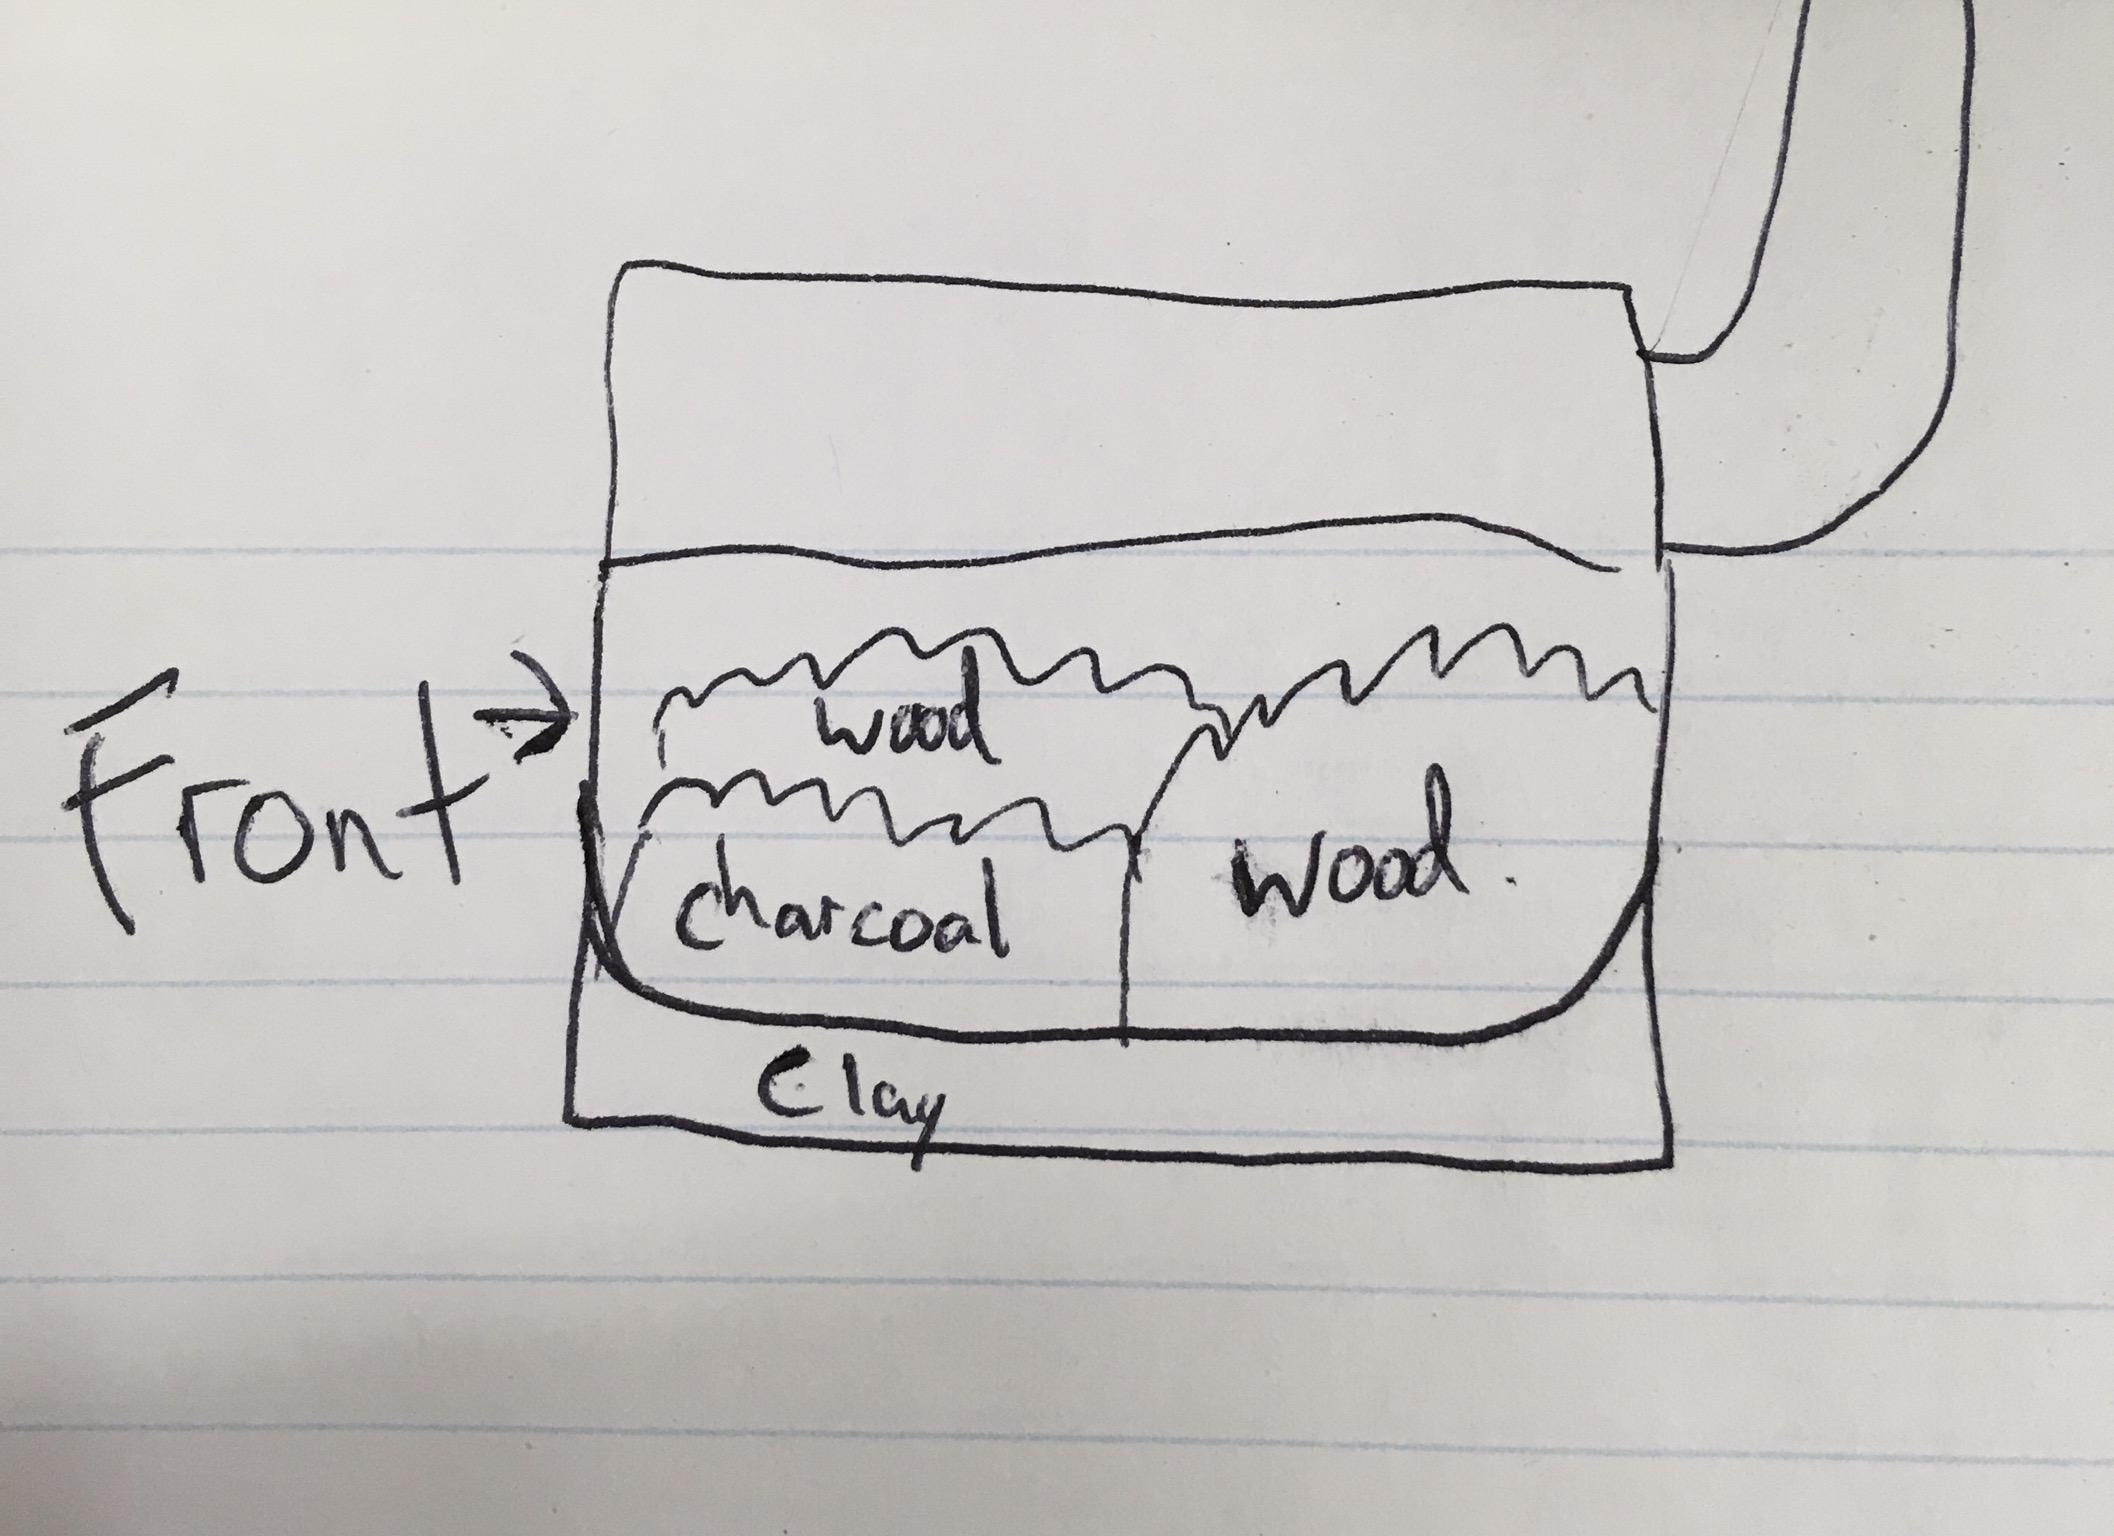
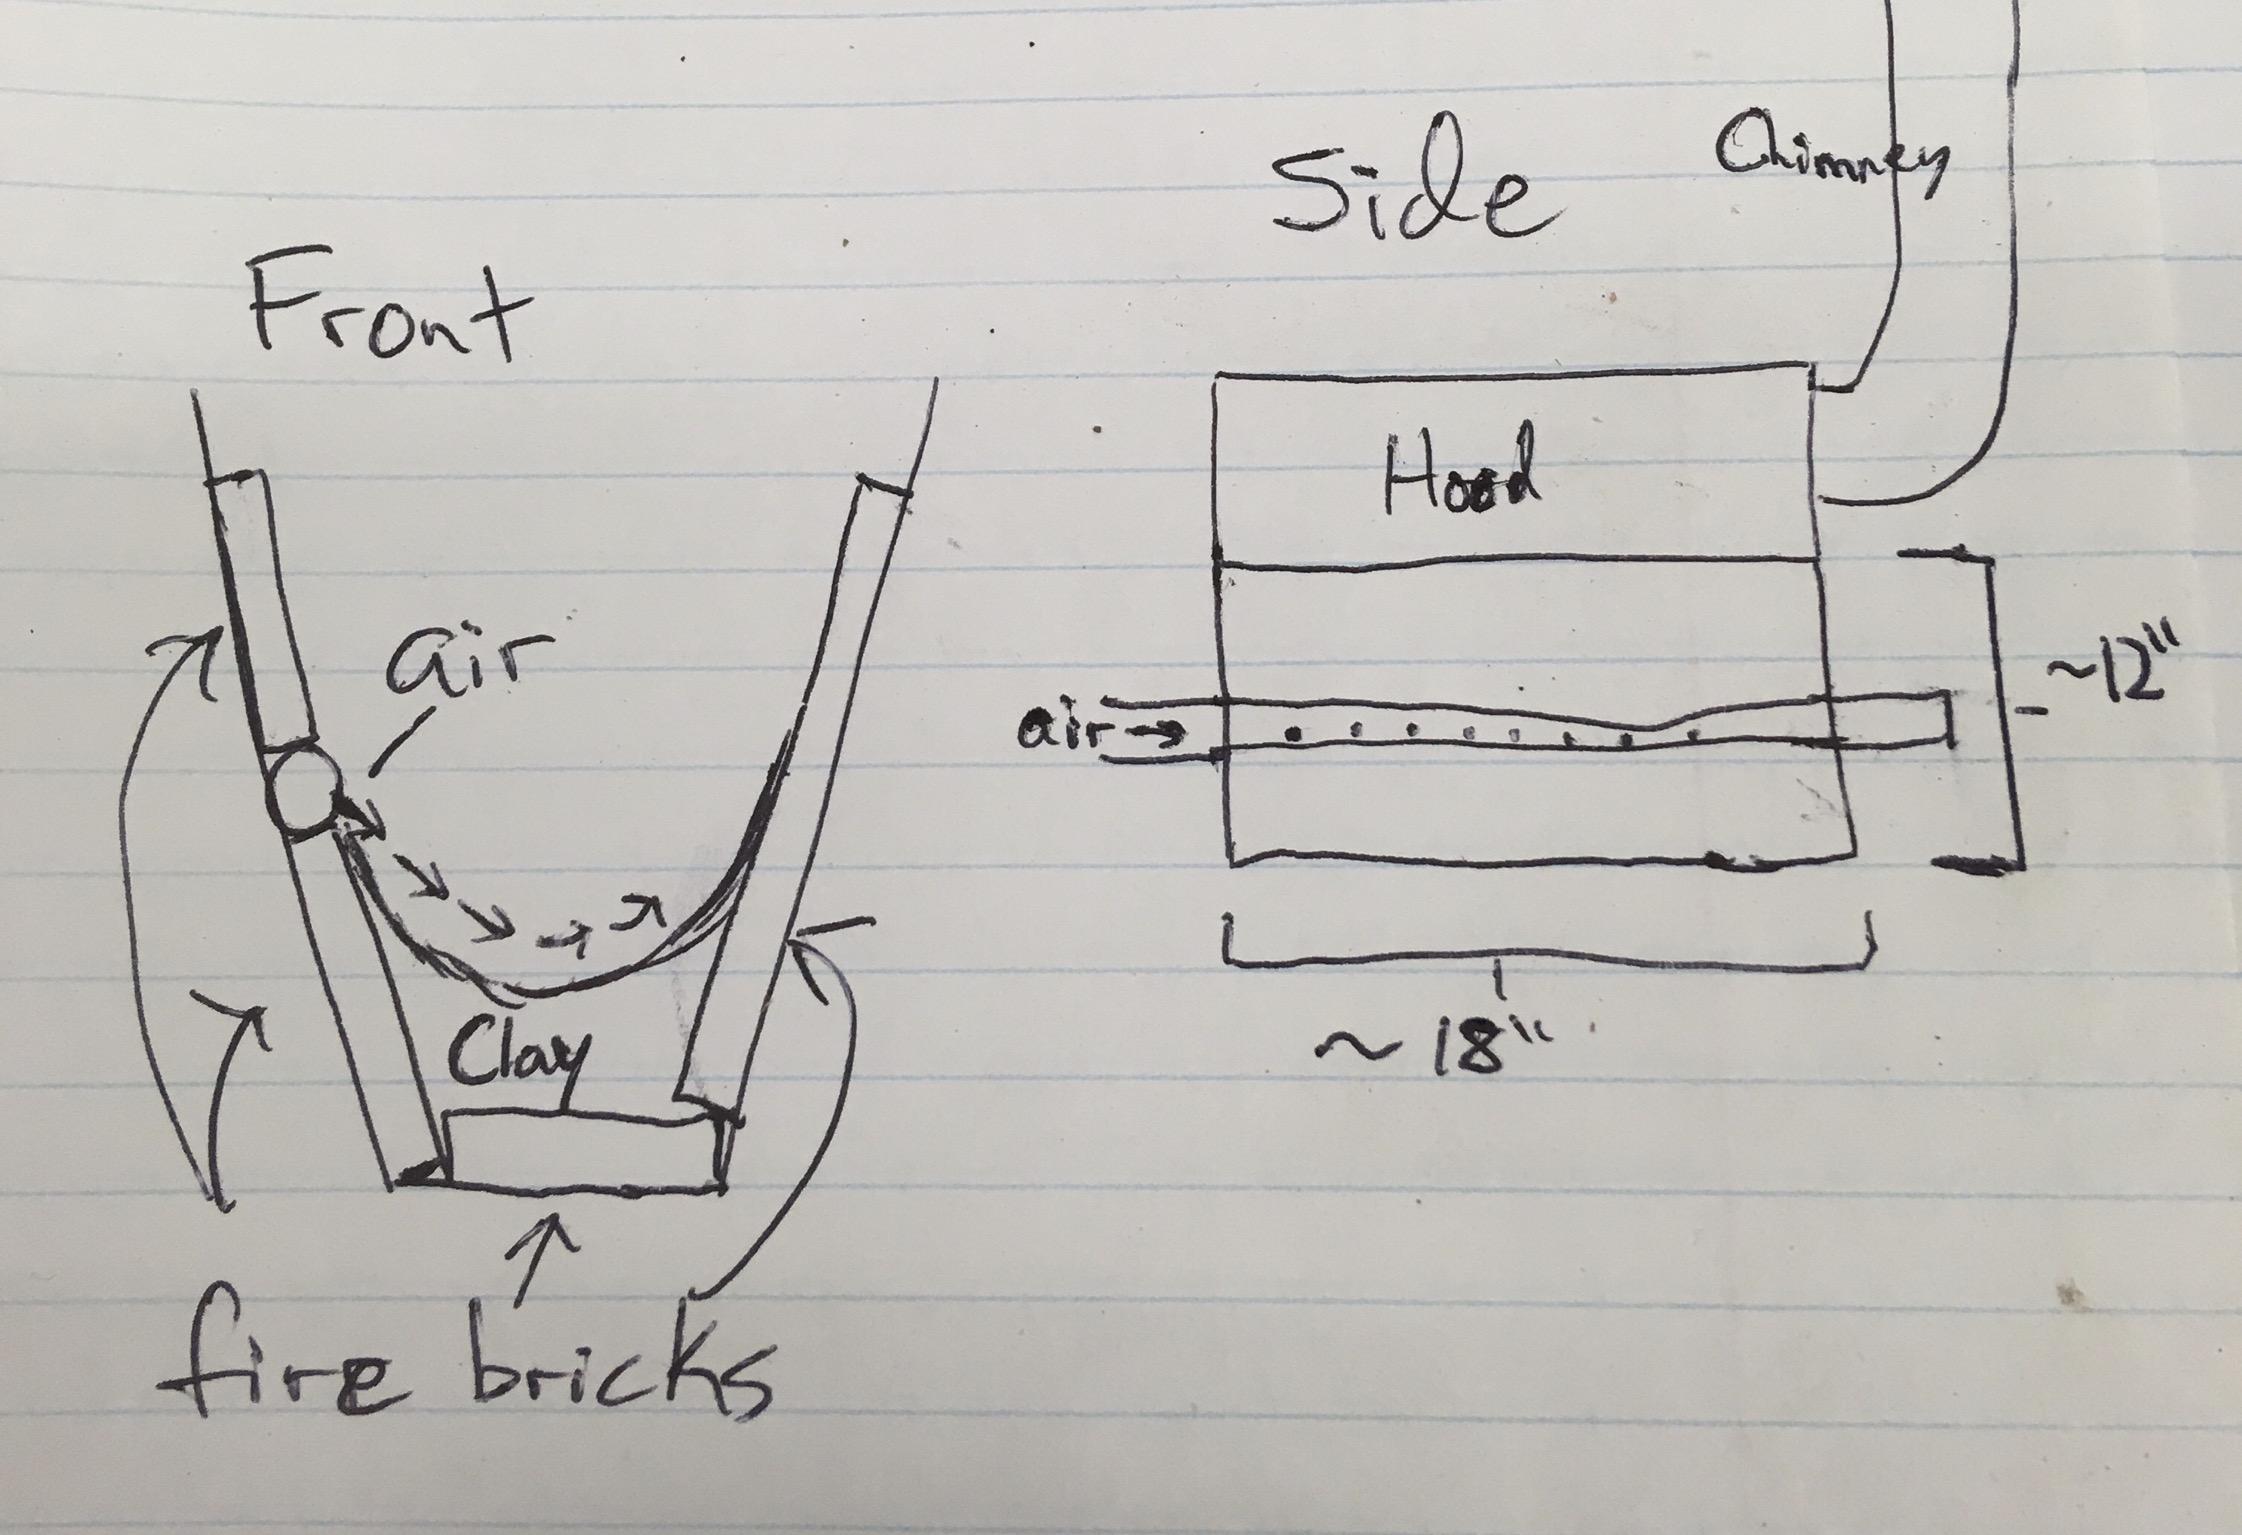
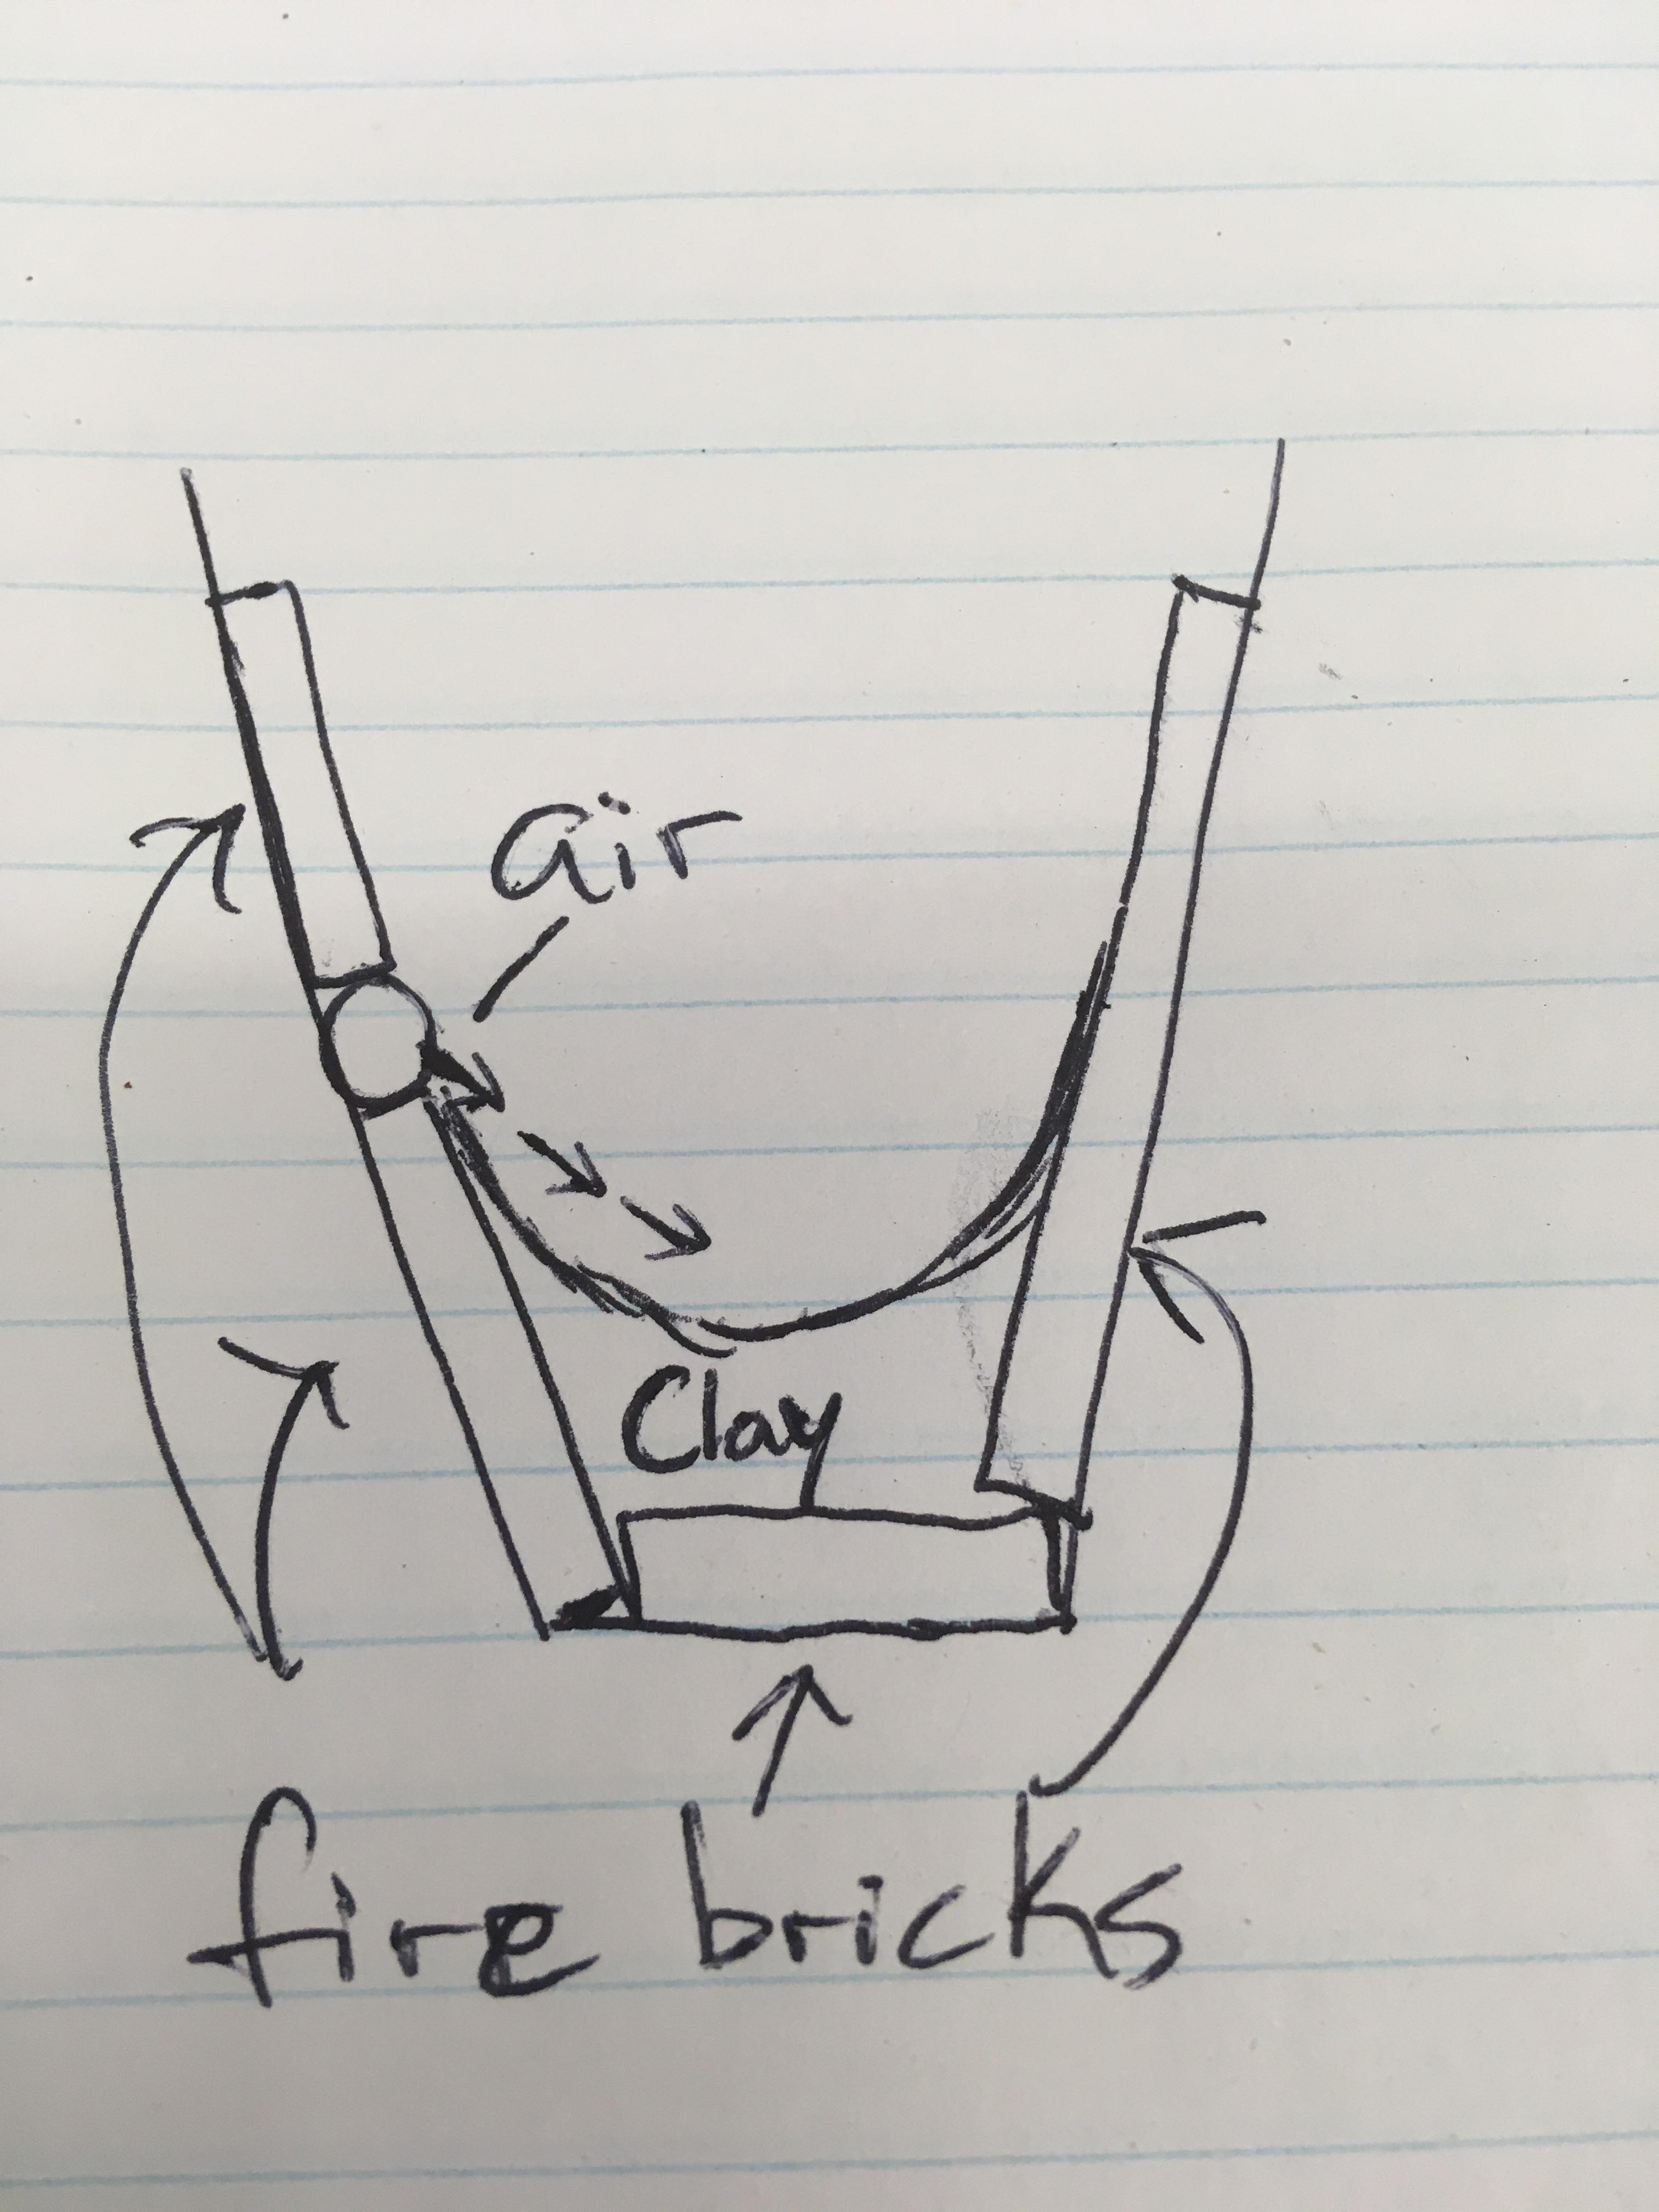
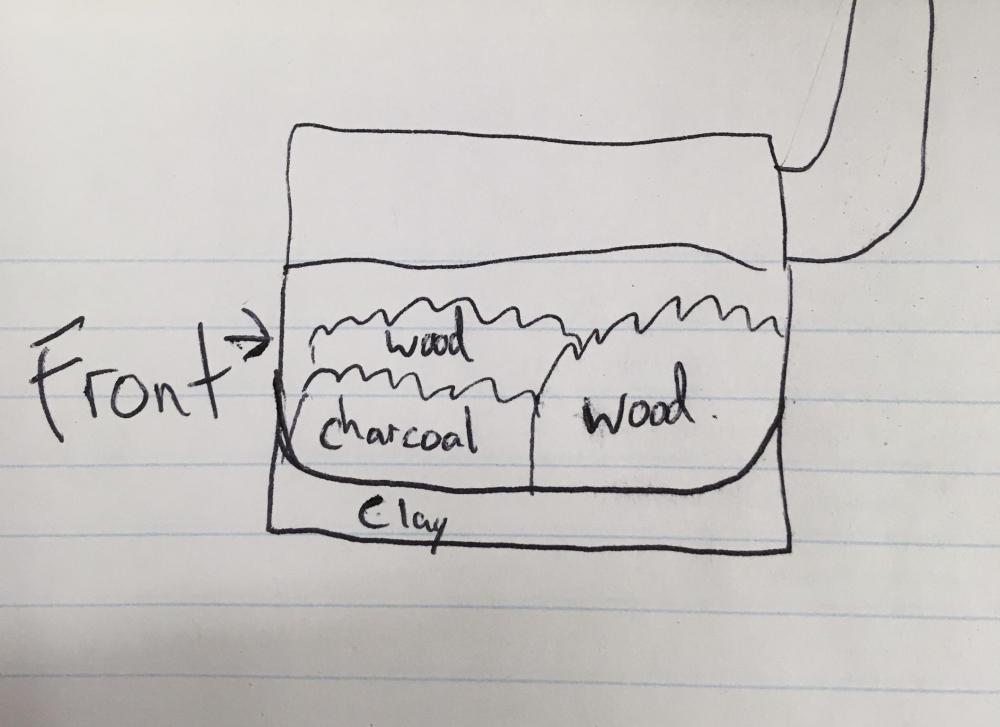
I think it really boils down to design. I use wood 98% of the time and I love it. I had a friend come out and we used my forge and he kept commenting how nice it was to not have to use tongs on everything cause there was so little radiant heat. He has a couple propane forges. His main one is an Alec Steele design. He says his forge puts out 10x the radiant heat. He also burnt up a knife we were working on cause he wasn't use to how fast it heats stock up... Now, I have been working hard to design an efficient wood fired forge though as I am a sawyer and clean waste wood its plentiful for me. I feel like it has paid off. Here are some really bad sketches of my setup. The length of my air pipe is adjustable kind of like the Whitlox. Note, I “coke” the wood you could say, then rake it up onto the fire.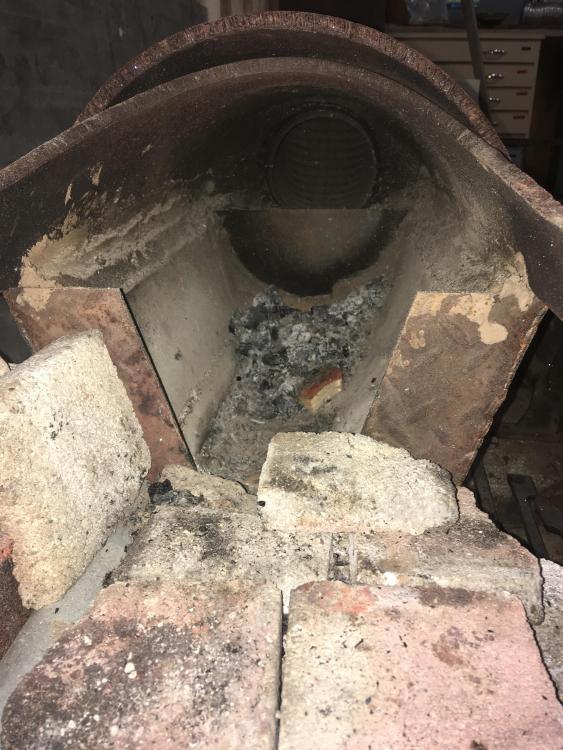
-
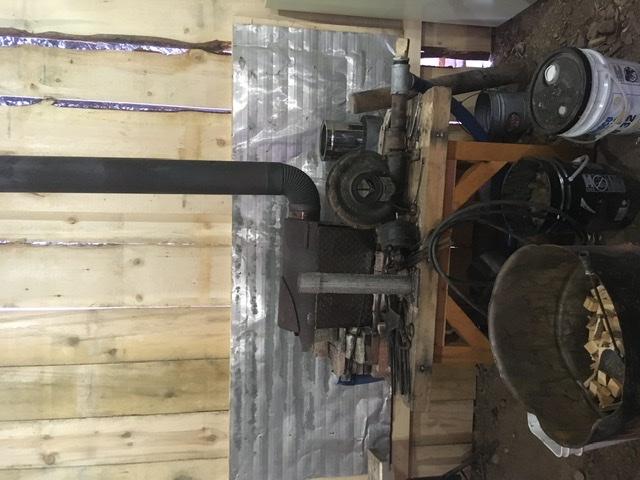
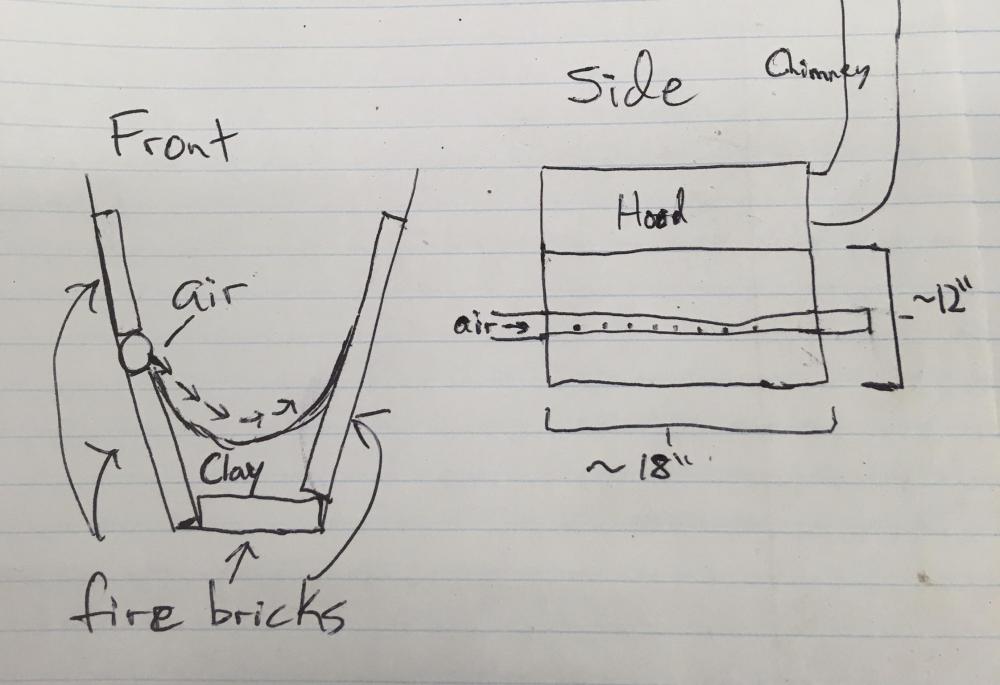
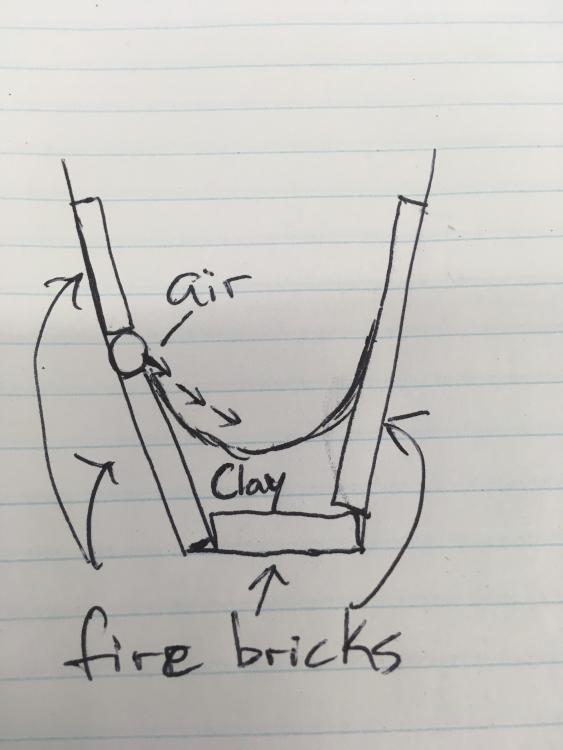
Agreed. Thats one reason I built the second forge. My fire had to be huge when I wanted welding temp. The new side blast is much more fuel efficient and is always hot. I have the air blowing at an angle downwards like some do with propane forges. My idea is to keep oxygen off of the work peice as much as possible. Heres a rough sketch of it:
-
JHCC thanks! I think its reported properly now... I did have a look through there quickly but I will read through it thoroughly asap! swedefiddle, are you talking about the Whitlox forges? Thats what I very loosely based mine off of. And hey if it gets steel hot, it’ll work! I really like my current set up but it will be to risky in the summer months with sparks. It has such a good draft that sparks go flying out the chimney! You know people in Telkwa BC?? Cool! Its kind of a bigger small town at about 1500 people so its not well known I’ve found.
-
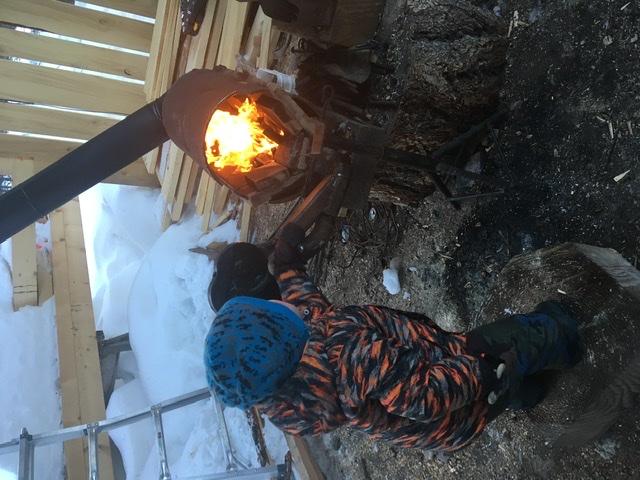
Thanks everyone! How do I send a report? Is it the little flag icon? Sorry, Im new to posting in forums and only have my iphone, no computer. I have no idea why the pics ended up sideways. The first 2 pics are the scrap bin mk1 forge. I switched to an electric blower in the middle of making the damascus because it was -15°C out and I was down to a t-shirt and sweating! When using wood you are actually using charcoal. Its actually quite easy to accidentally burn up small stock like leaves and such! You just skip the step of making charcoal batches. It takes me about an hour to make 10+ hours of fuel. I use a chainsaw to buck slabs into 1-3” chunks then a hatchet to cut them up. 1”x2” is what I shoot for. Its a good mix between good heat and efficient fuel consumption. I actually dont have any sketches... I usually dont plan like that honestly. I know I should but I’m just not good at doing that. I just form a plan in my head over a few days and go with it. But I will try to get some measurements over this week for you guys!
-
Oh dang... I meant to put this in the general section. Sorry! [Mod note: this thread has been moved to the Solid Fuel Forges section.]
-
Hello all! I figured its time to join the community so I can give back some! I’m new on here but I’ve been browsing the forum for years and have always been able to find anything I’ve needed. I love it! So a bit about me, I have been swingin hammers for about 15 years on and off whenever possible. We are finally settled down for good now, as my wife and I have worked for years to achieve. I’m a full time sawyer so I have an unlimited supply of scrap wood. So I decided to build a forge that can burn it strait to save the time of making charcoal. I have looked at every wood fired forge online that I could find and built one out of the scrap bin at work. It worked awsome! I even made some damascus with it. In fact, I almost stuck with it. But then the itch came.... I had to improve. So I started putting together the mk2 in my head. It had to be side blown, adjustable air, trench style, and noooo leaks! And boy did it work out well! So here are some pics! Thanks for looking! And I wasn’t sure where to put this post so feel free to move it.. thanks!