easilyconfused
Members
-
Joined
-
Last visited
Everything posted by easilyconfused
-
Just checking to see how many others are selling stuff on Etsy amid the jewelry. If so, we should look into a team or something to get ironwork out of the shadow of craft store pattern jewelry.
-
Thanks for the info. Now, how to get it off other than a forge since I would have to wait a few weeks to get back to the farm.... wire brush on a drill - nope, soaking in hot water with soap - nope, vinegar - nothing yet.....
-
Either works fine. I use the oven because my forge is 3 hours away but I can use the oven anytime so I want to maximize what I'm able to forge. The forge is quicker but dirtier if you're not careful. Also more prone to smoking and flash fires.
-
Yes. For normal iron, oils such as vegetable or mineral oil and waxes such as canning paraffin and beeswax are good food safe choices. For non food uses, some use linseed oil as well. For a longer lasting finish, use a clear metal paint. You need to keep the air from the metal. For stainless, you need to either do the above or passivate it back to stainless steel as it changes after heating to forging temperatures. Search for passivation of stainless steel. Others will know more about that part than I.
-
What about a diffuser? Or does reflectors work better in this case? I have troubles with photographs too.
-
I'd say your best bet would be to use either wood planks, pieces of sheet metal or another option I've seen is a barrel/tube assembly filled with sand and a plank on top of the sand to set the anvil in. If you made a large block like Brian's you could maybe use that. If you make the hardy block or whatever you come up with heavy enough, you shouldn't loose too much energy from the sand and such.
-
To keep the hing as large as possible, I'll usually drill a small pilot hole and then drift it to the right size.
-
Going to wire brush it and try again. Was just curious if anyone else had it happen.
-
Those are the scratches made by the scrub pad, no soapstone was used. The thing that gets me is that it looks like a really poor, bubbled and uneven paint job so people might get worried I was lying about it being oil.
-
the photo's don't show it well. my girlfriend described it as a plastic-y coating. In all my years I haven't seen it on anything done with heat and wax or oil. Just paint. I'll try and get different pics in different light and see if that helps.
-
Hope it shows the glossiness Coating after working at it with a copper scrub brush
-
-
-
-
It's the way it came out. I've never seen it go glossy and thick like paint before and was wondering if others had had it happen. It usually winds up black and a matte type finish that you can't really "see" like a coat of paint
-
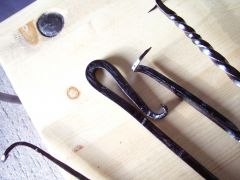
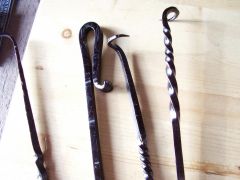
The last batch of steak-turners did something weird that I've never had happen to me before. It turned almost like a black glossy paint. Can't hardly dent any bubbles that formed with your fingernail. Copper scrub pad hardly scratches it. Has anyone else had this happen? It was hot rolled 1/4" metal soaked in vinegar and baked @ 550F in the oven until warm and the oil rubbed on and then put back in to blacken up for an hour or so. Started out patchy so I kept adding a bit more oil to make it more even. Looks fine other than the unevenness of the paint and bubbles from drips.
-
Thanks for clarifying. I was right.
-
I probably know exactly what you're talking about and may even do it. I'm confused over what's the edge and what's the other edge and the third edge has me back 360 degrees. :confused:
-
I'm a little confused as to leading up to the edge means exactly. Could you clarify?
-
Another point I don't know if I missed or wasn't brought up but with 1/8", there is such a thing as too much force as it will just buckle over anyways.
-
I find it interesting how people come asking for projects to practice only to learn it's not the projects but the practice itself that is what they should be looking for. Everything else comes down to whether you have the patience to finish the project you choose knowing the end result may not be what you hoped and have to start again. And yet, so many have been quick to just answer other threads with, S-hooks and nails and lots of them. I know I got told the same stuff in the thread Ted mentioned Rich pointing out it's perfect practice not just practice that makes things right after being told that I just needed to practice more without being given tips to aid in that perfect practice.
-
It doesn't matter what you practice making, repetition of the various tasks, not projects, and paying attention to what you're doing and analyzing how you're going wrong and improving is the important thing. You can practice making S-hooks until the end of your time and they won't improve if you just keep repeating the same mistakes. Some will tell you to keep making simple things and that's good for the start. Quick projects gives instant gratification and keeps you from becoming frustrated and allow you to see the problems right away. Don't just stop there though. Always keep pushing yourself. Just don't forget, no matter the project, they're all made using the same techniques so don't loose yourself in the immensity or the intricasies of the project. Always remember, every project is made using the same techniques that are in every blacksmithing book. That's why they're in every book. As for quick projects: S-hooks, Steak-turners, Hoof-picks for horses, Small hooks, Nails, Rivets, tent pegs, straight end pokers, Fire rake for your forge, simple S-style bottle openers. Look at blueprints on the site. Also, Anvilfire has some good projects too.
-
I had a similar style but recently went and switched to a duck's nest style. Since then, the sparks are way less as I've got a bigger air inlet than the holes drilled into the pipe like the Lively style. Less air velocity for the same amount of air which means the lighter pieces of charcoal don't get lifted out as easy. Another is a good hood with good draft and a long chimney so they go out before the top.
-
They just need a flat point, think flat-head screwdriver. Very nice. Keep practicing and soon you'll be doing them in 2-3 heats . Now toss them into some vinegar or wire brush them, spray some rust protection on them and test to see how they work ;)
-
I was thinking of using two 2x2 for uprights and running a rod between them from the foot pedal and having the spring on the other side of the 2x2. Then it would be like a stretch spring but on the other side of the uprights.