

BeaverNZ
-
Posts
353 -
Joined
-
Last visited
Content Type
Profiles
Forums
Articles
Gallery
Downloads
Events
Posts posted by BeaverNZ
-
-
Probably the best way is to just take it to a hydraulic shop and get it put on a test bed then there is no risk of damaging the pump/motor/or your self this will incur a cost but if the unit was free its an investment in the future use. A more risky way is to eyeball the gears of the pump for any scoring or dents in the gears, DO NOT conect it up with out a relief valve and pressure gauge and have the relief backed out so you can work up to a pressure setting. The max pressure/ model serial number is usually on a lable or engraved on the pump body. Take it to a hydraulic place is the best bet Cheers Beaver
-
Structural bolts are often called friction grip bolts meaning when they are tightened correctly the two surfaces they are clamping together have enough friction so the bolt is under no or little shear loading. Often the bolts are done up to a certain light torque and then tightened a set amount of degrees with a strong arm bar or a flogging spanner Cheers Beaver
-
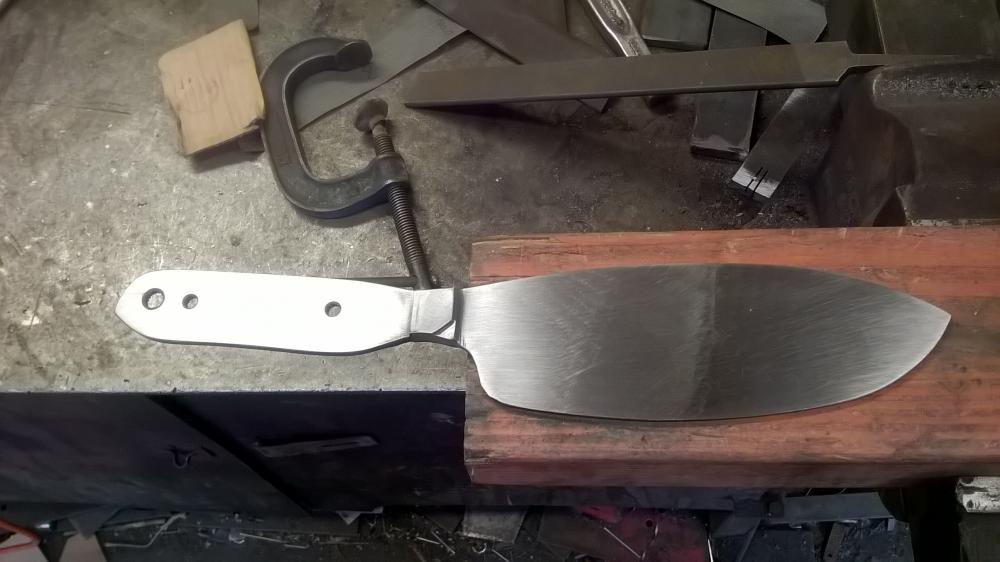
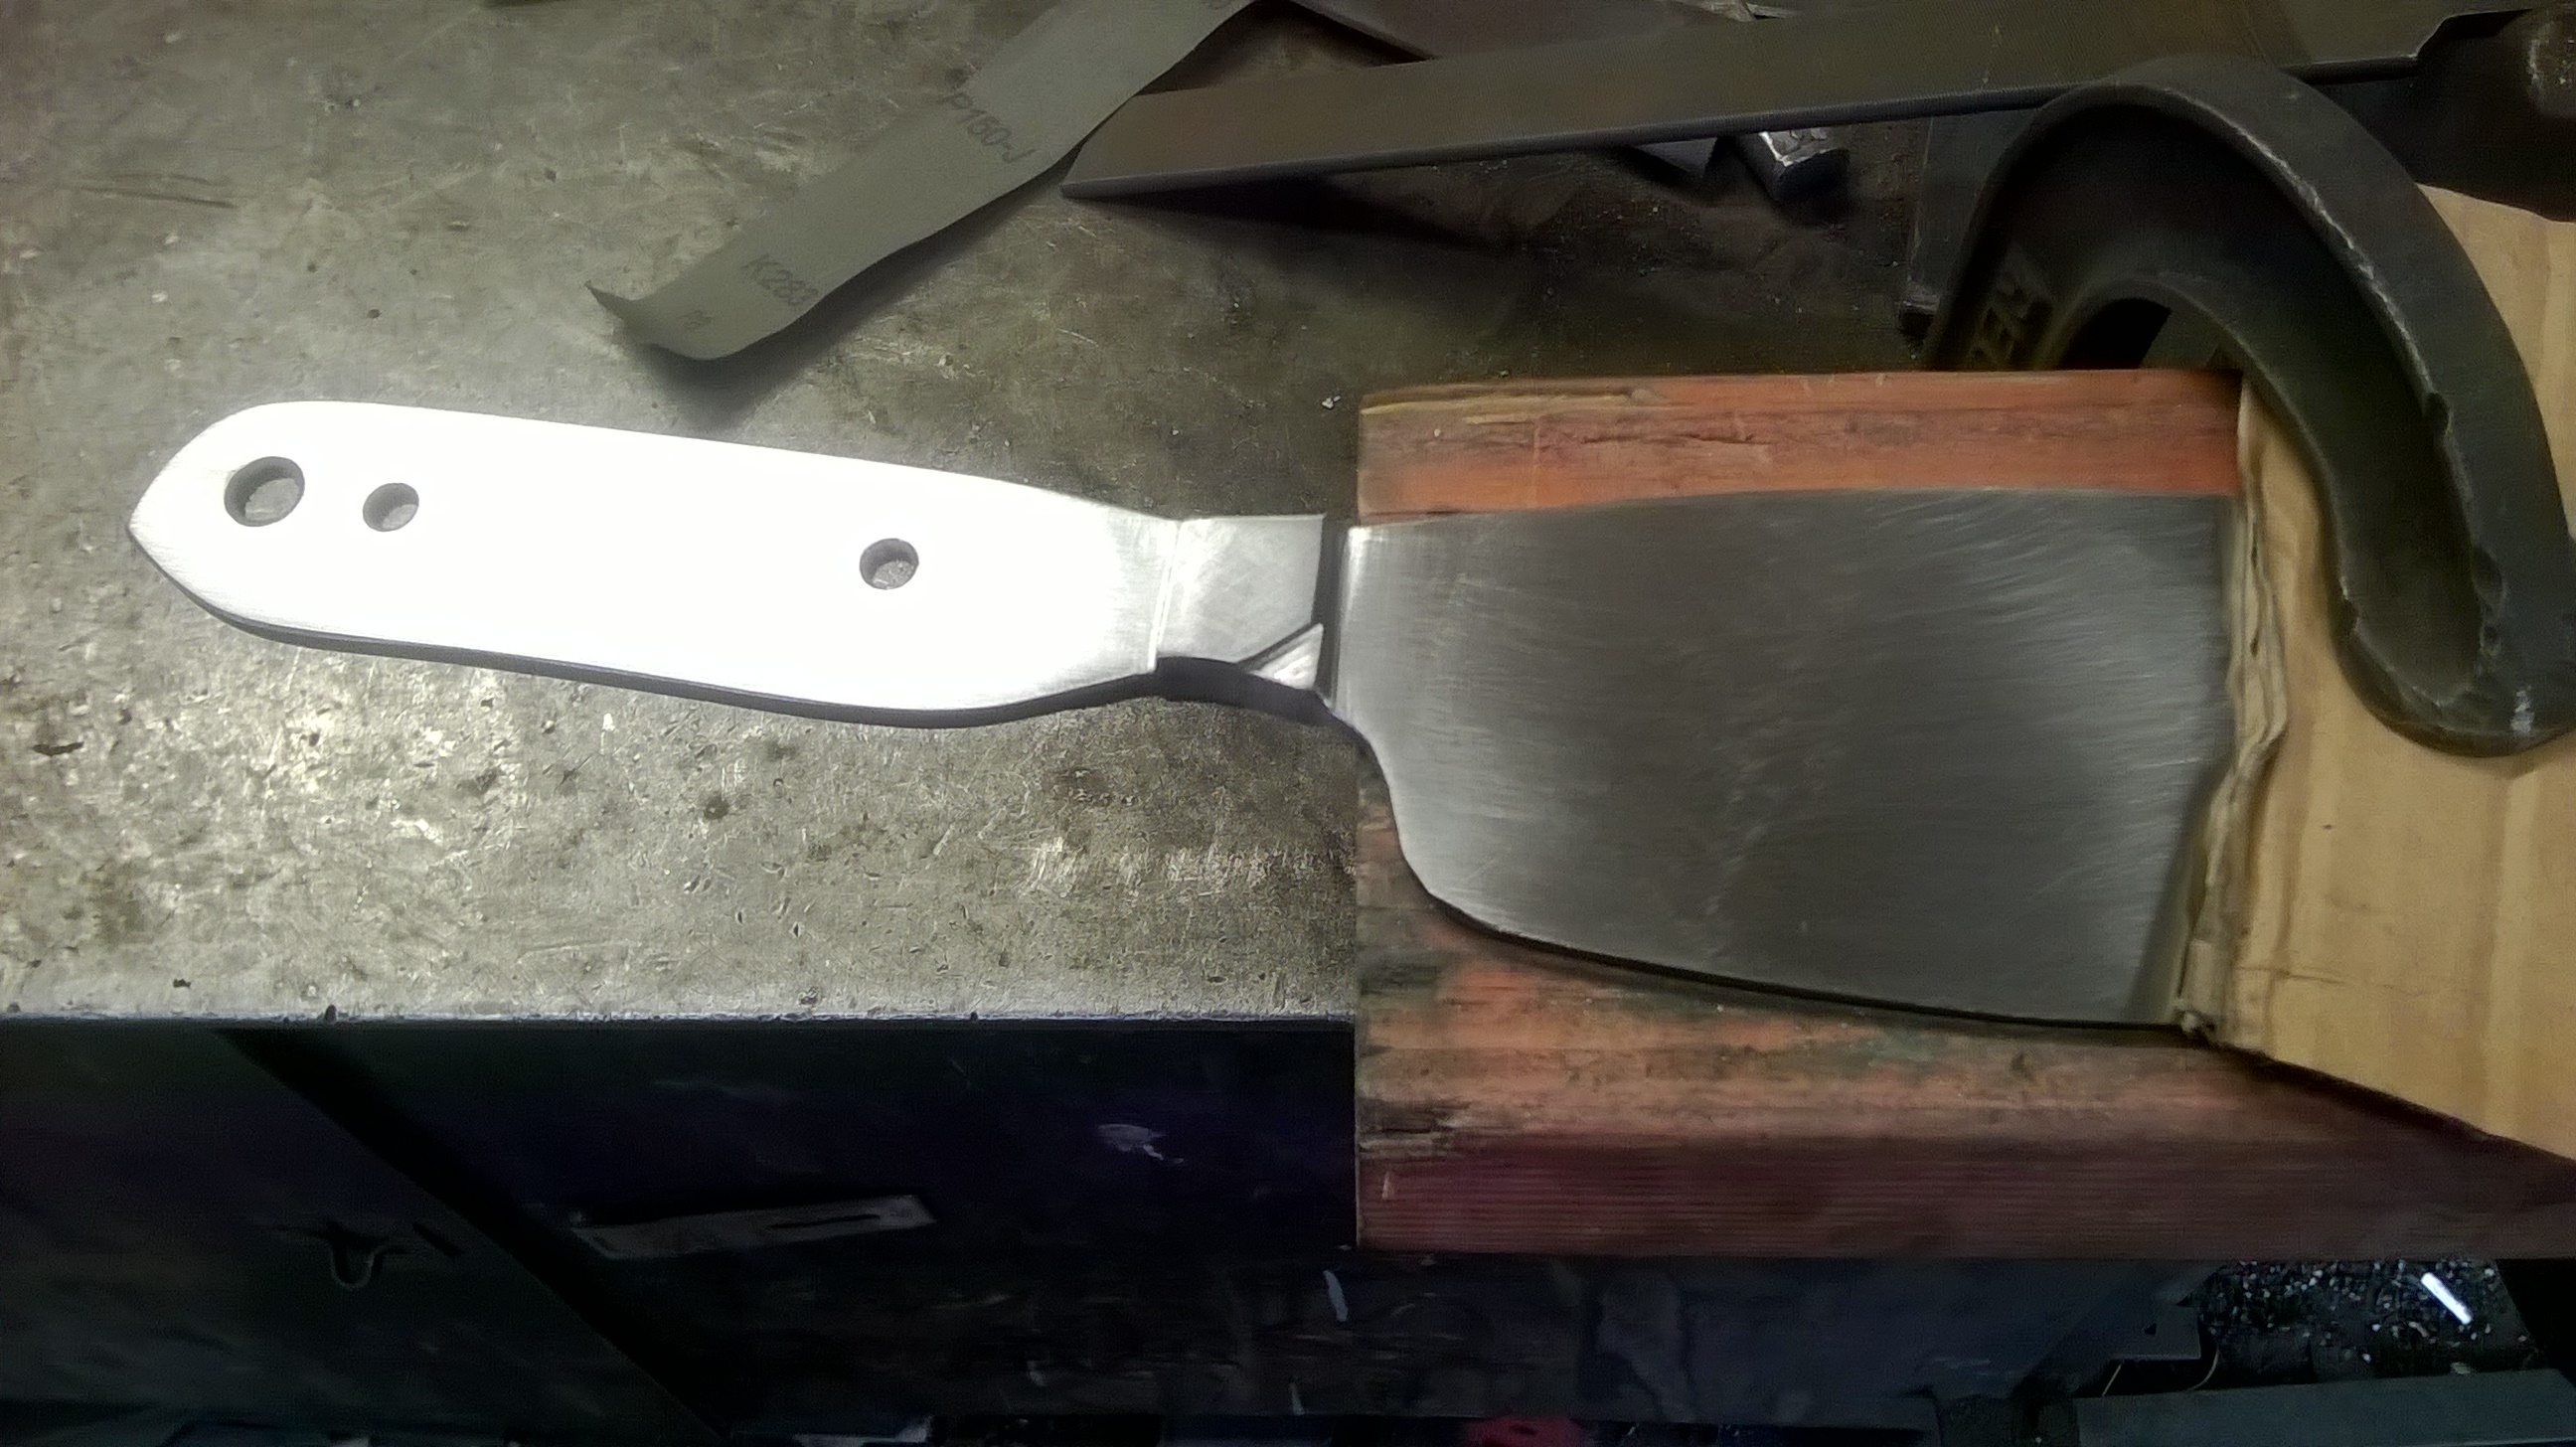
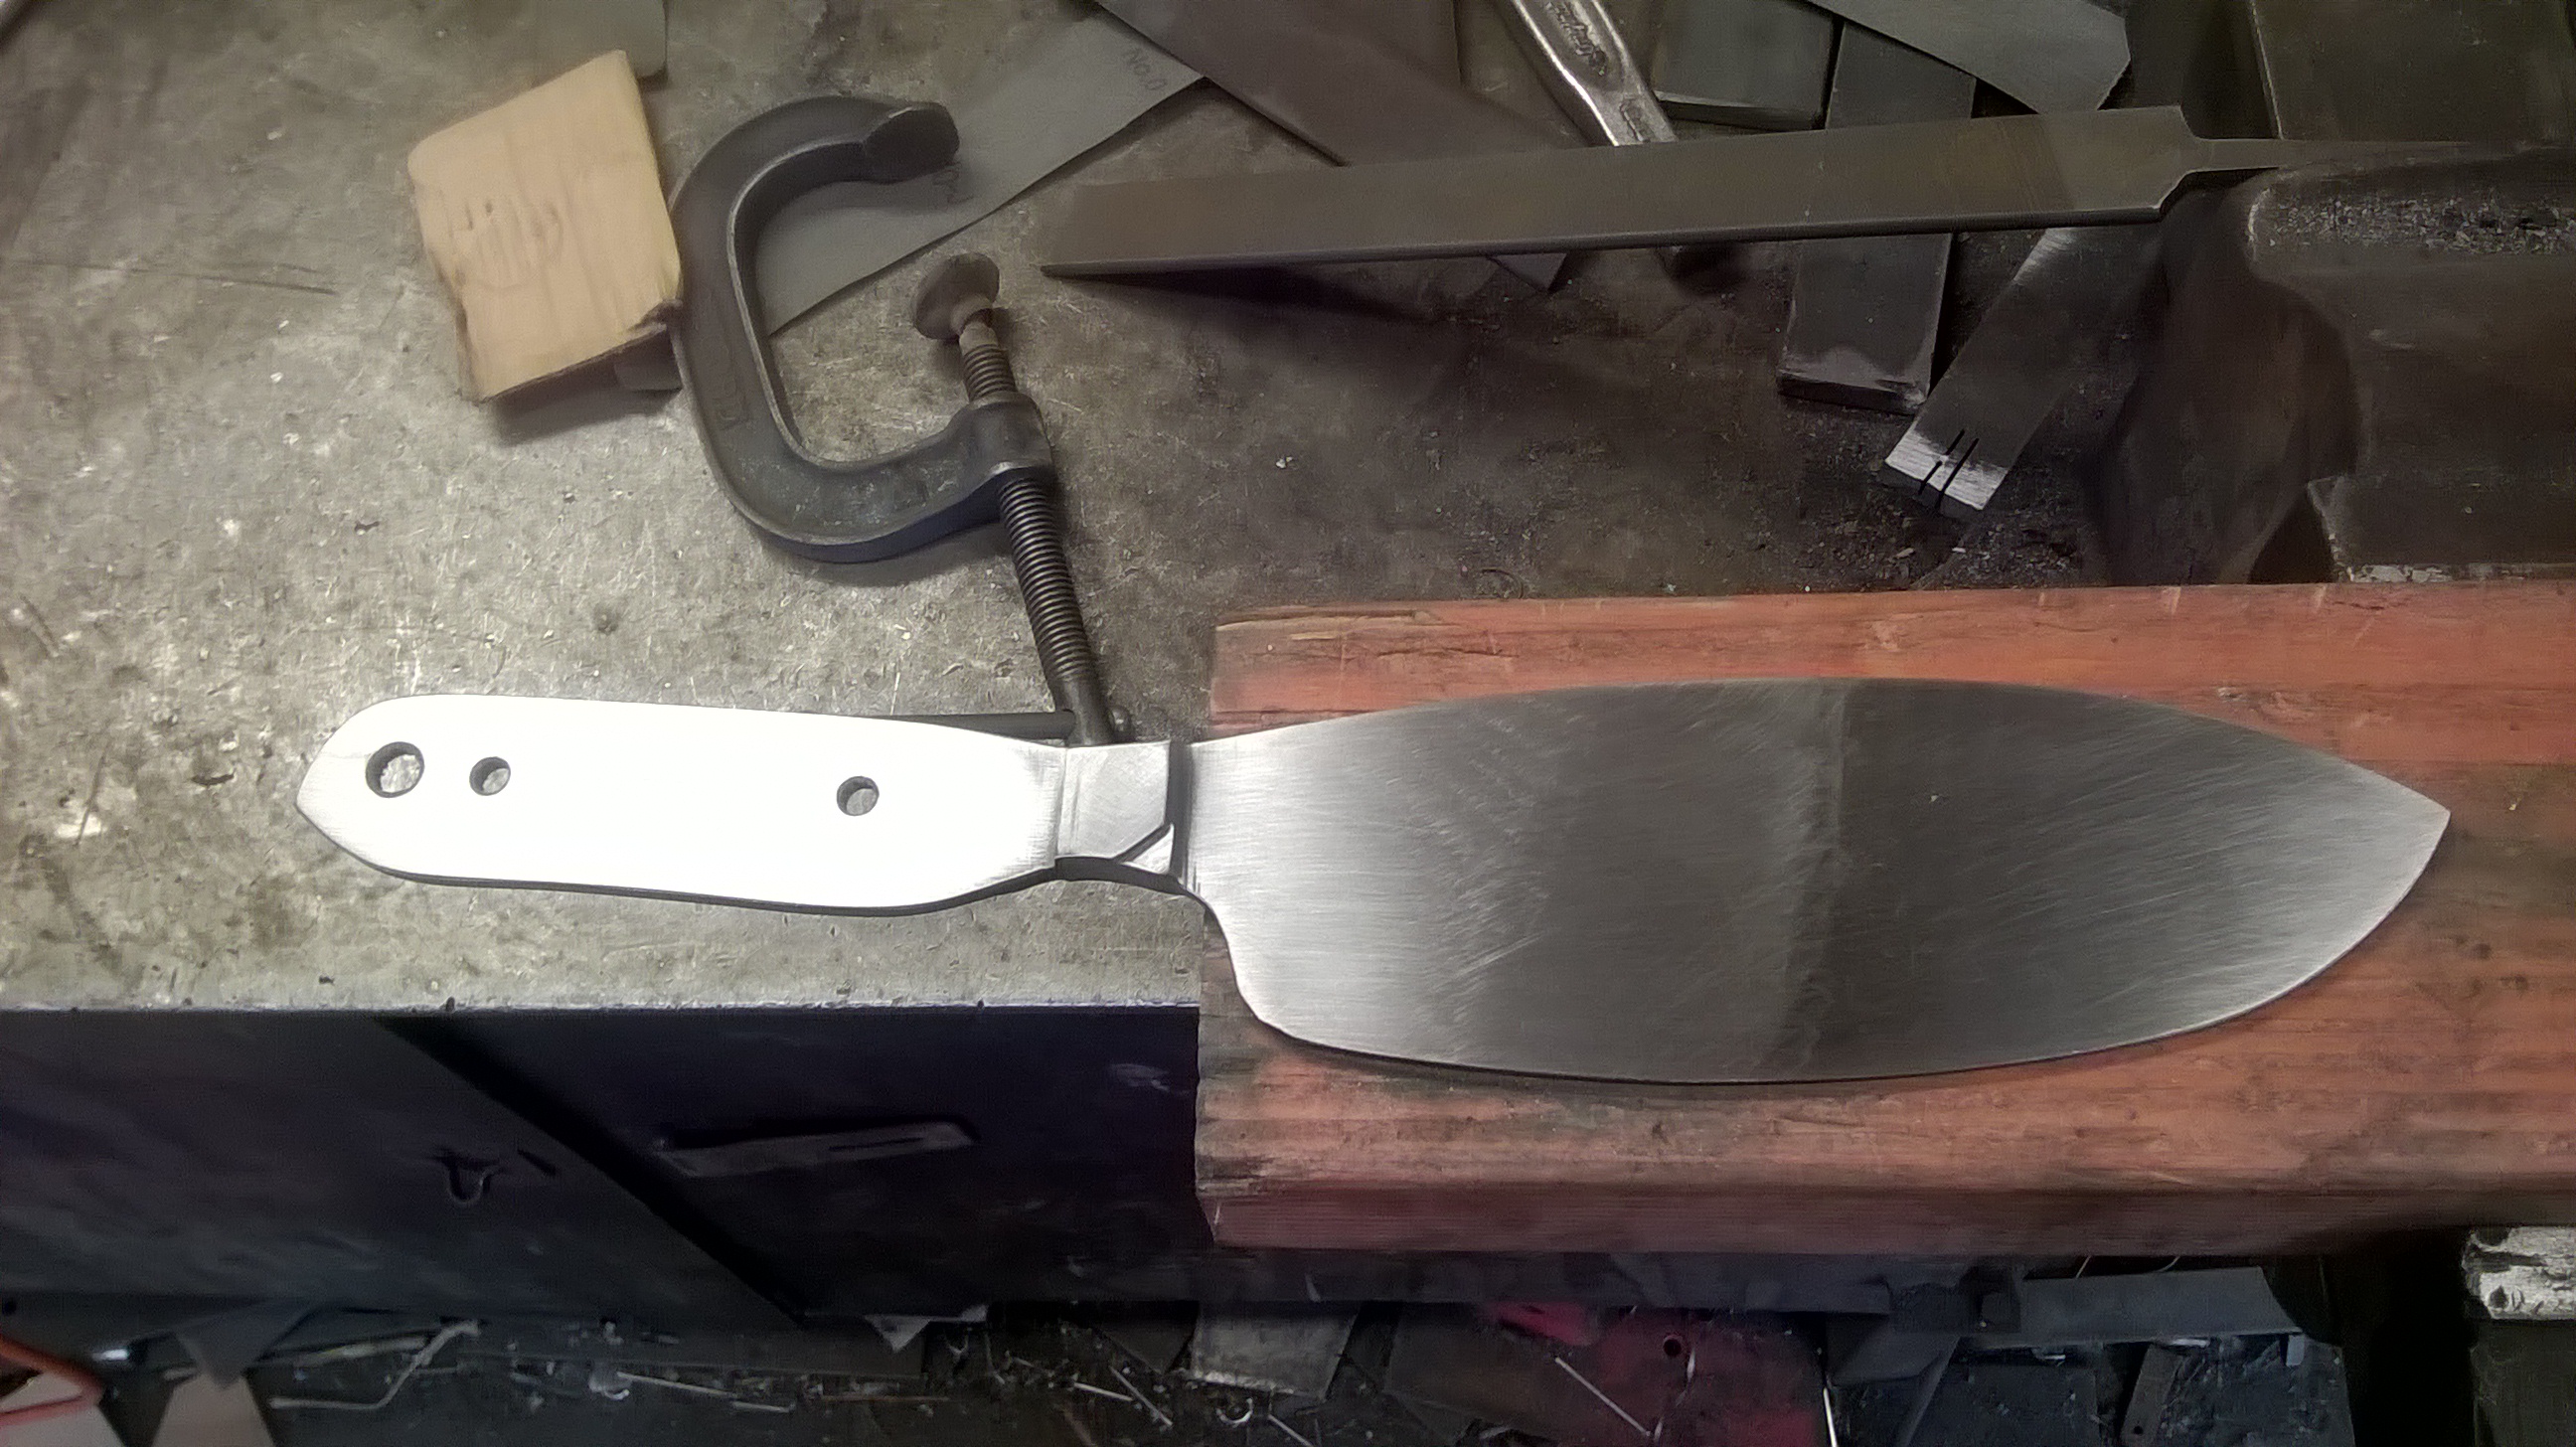
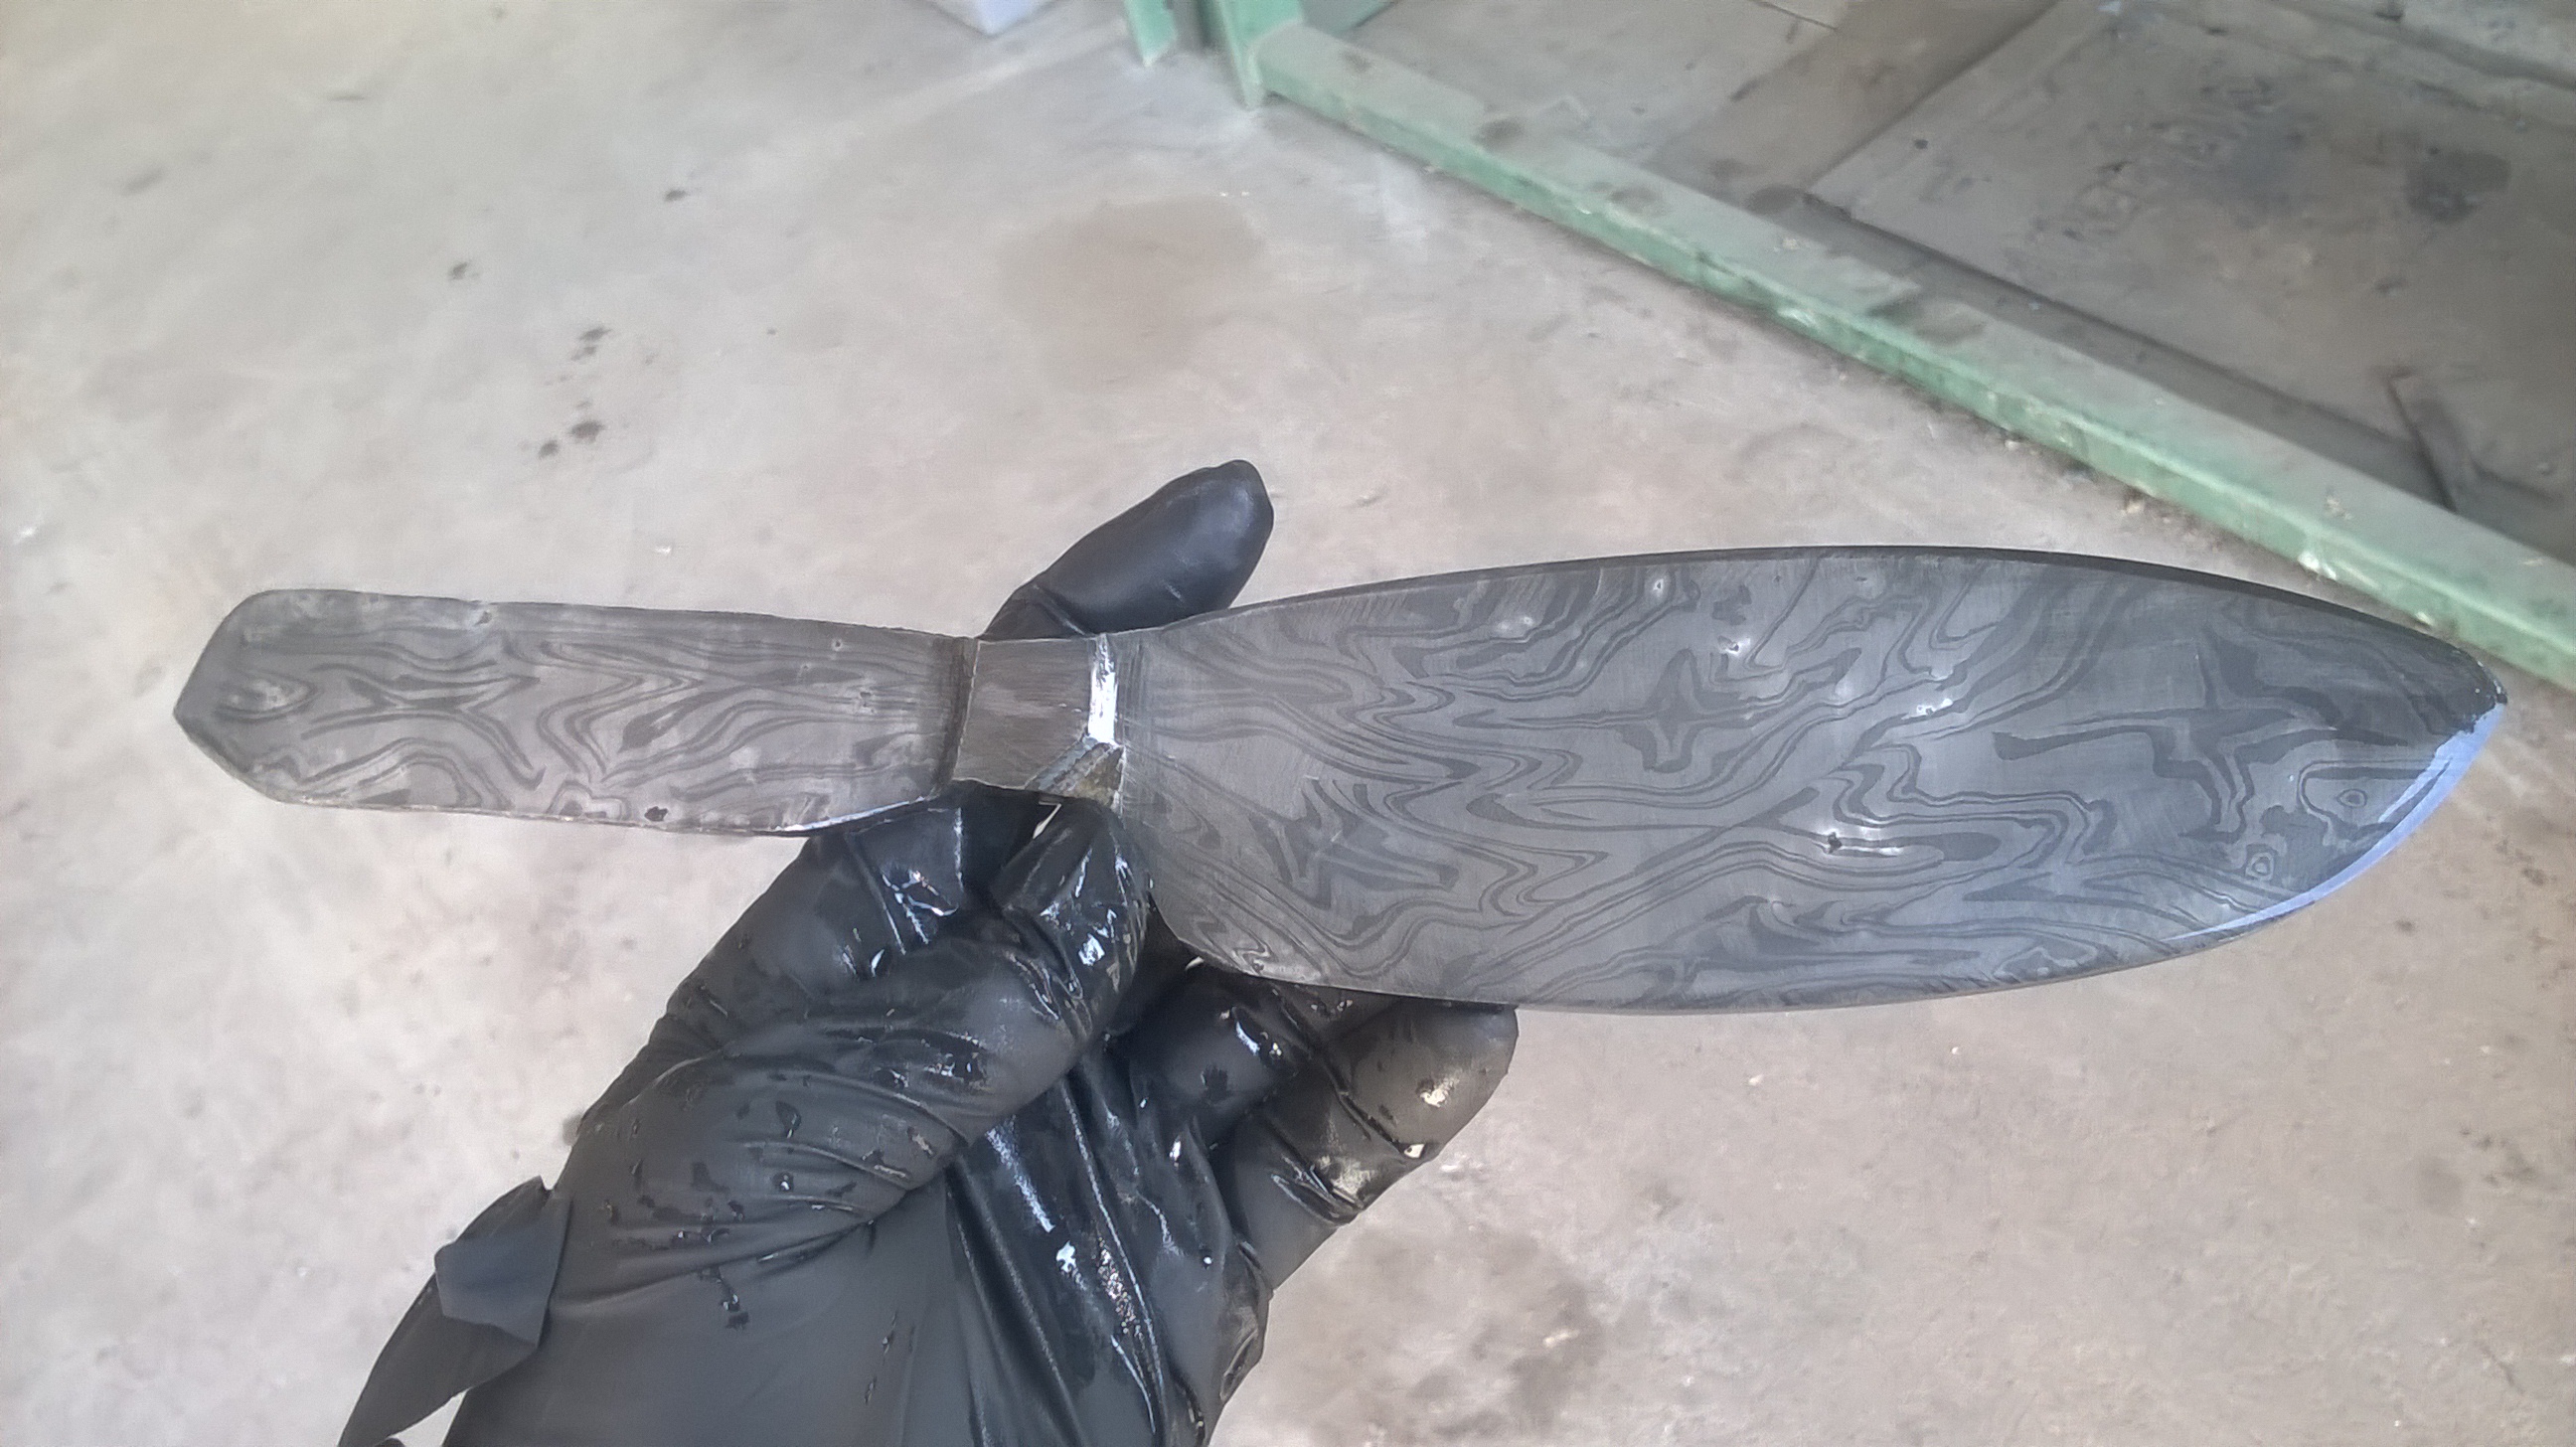
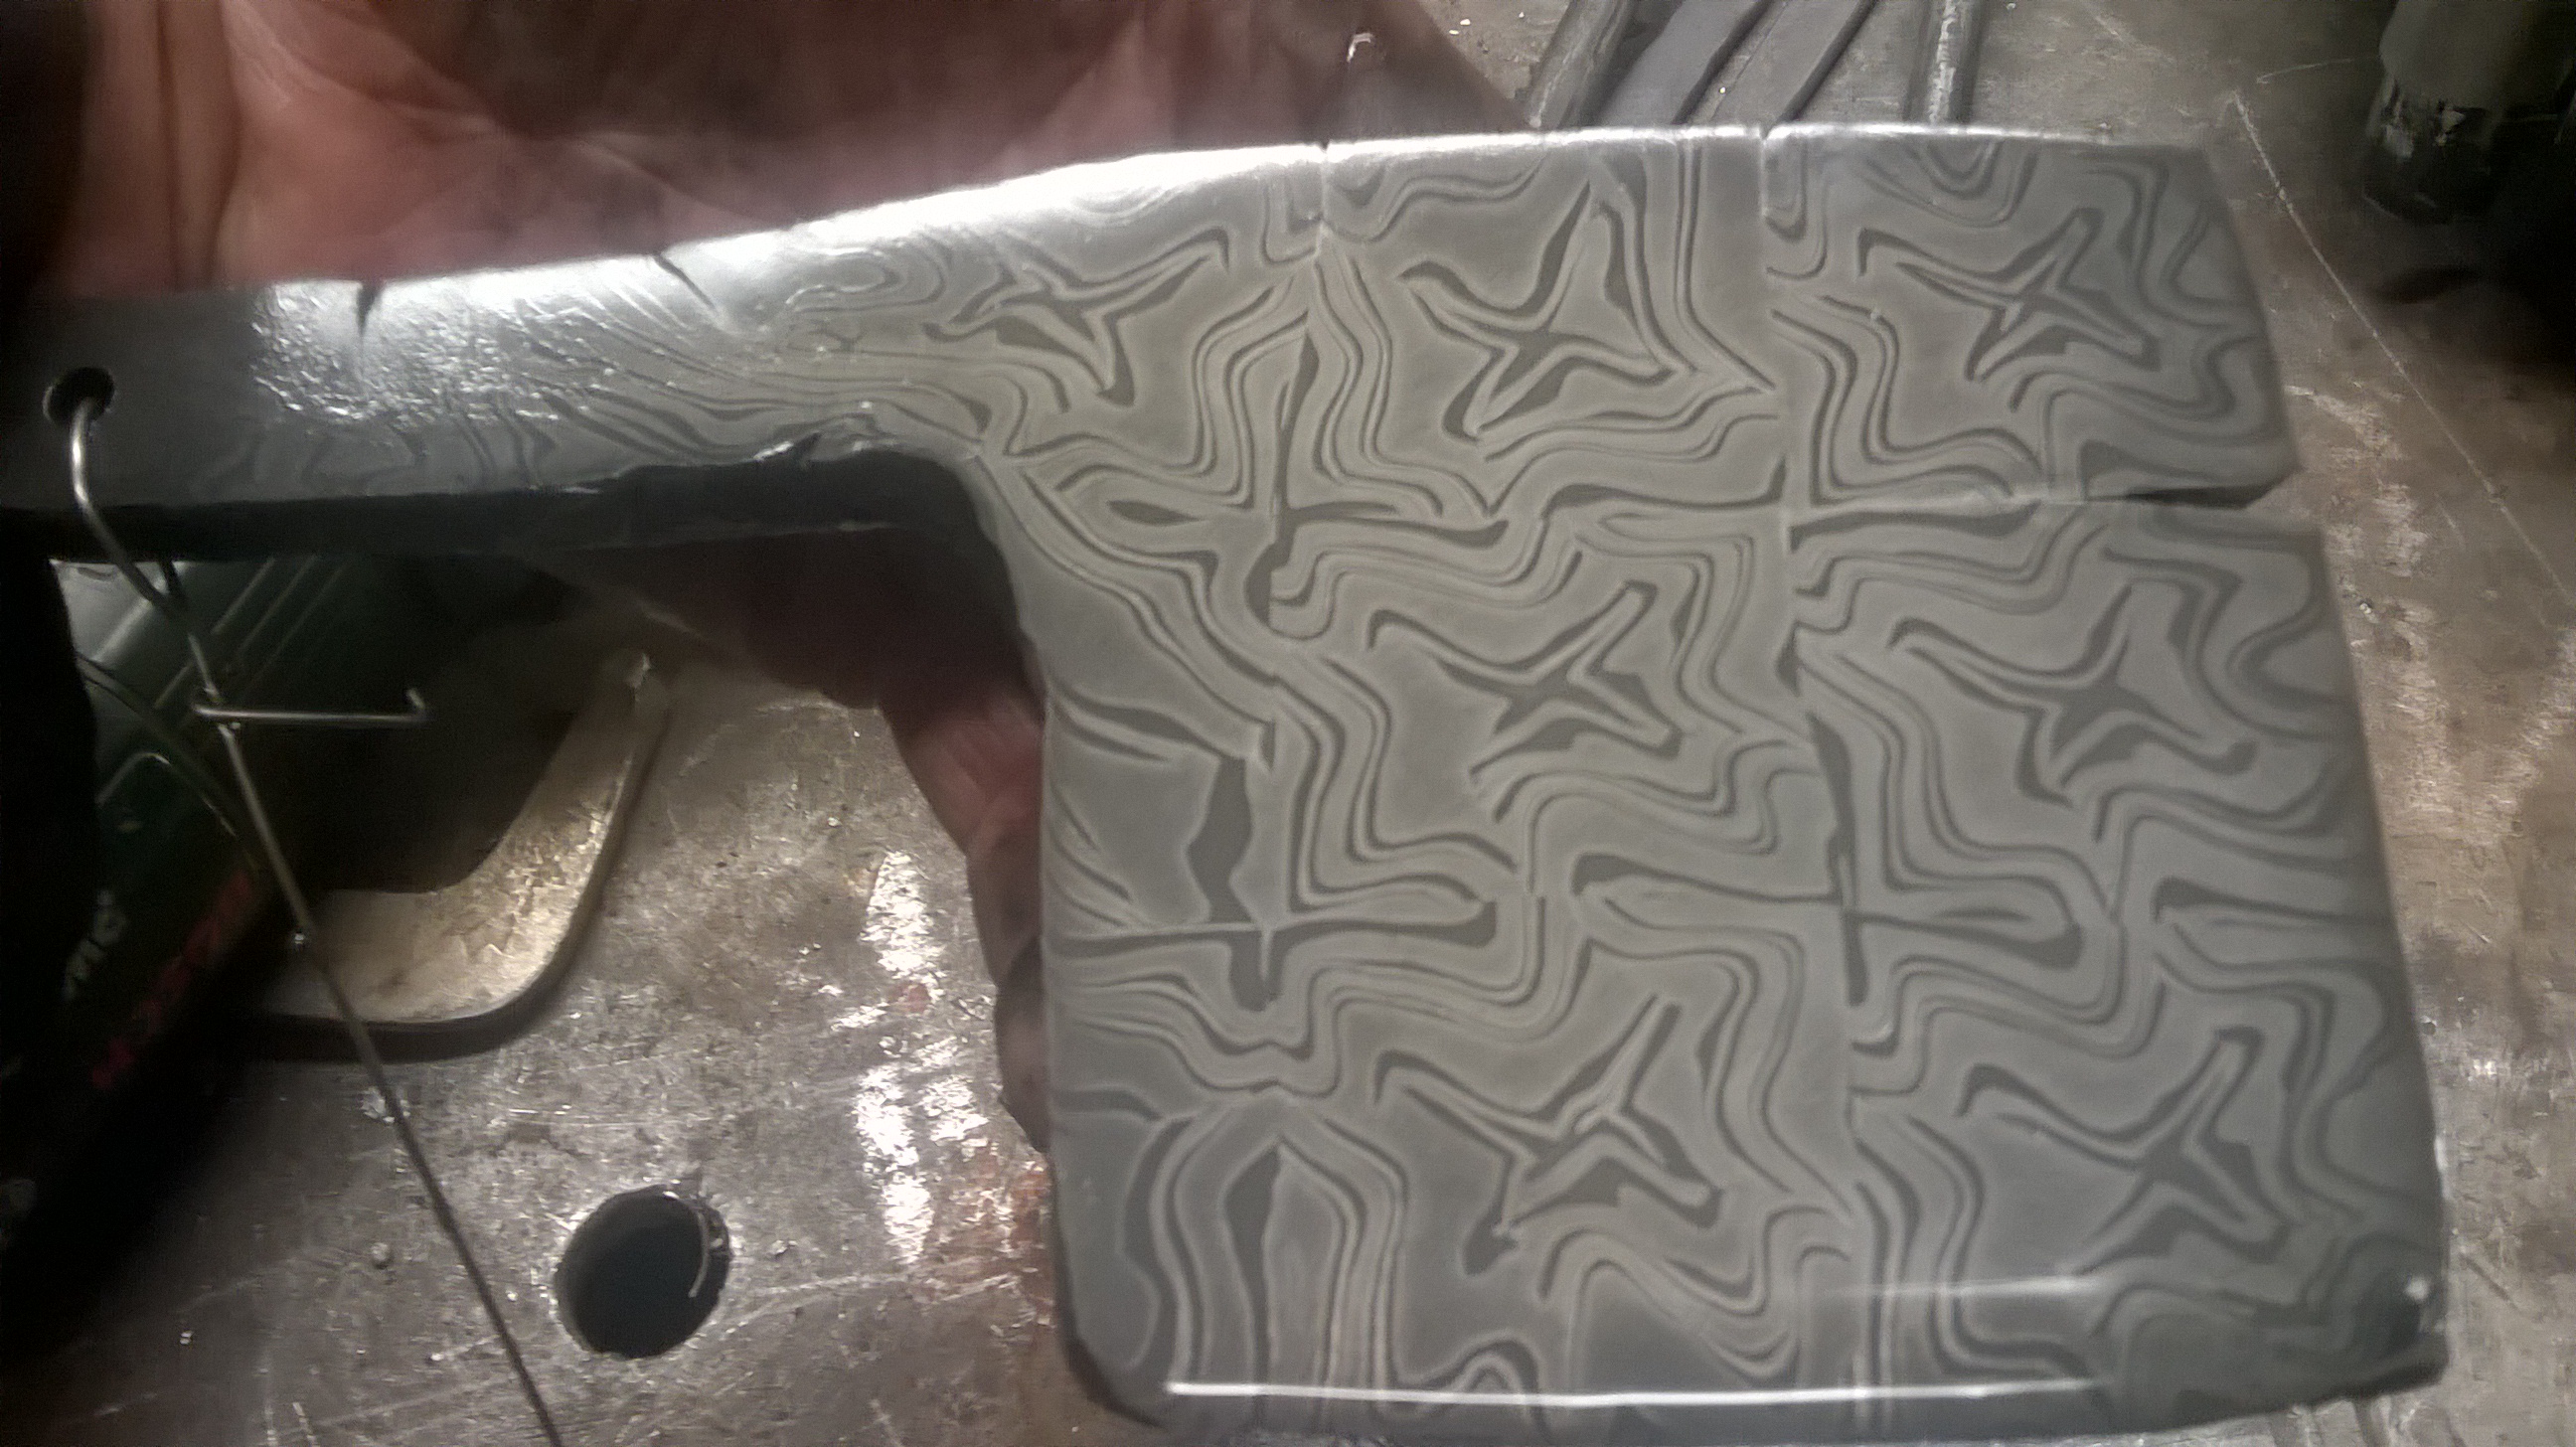
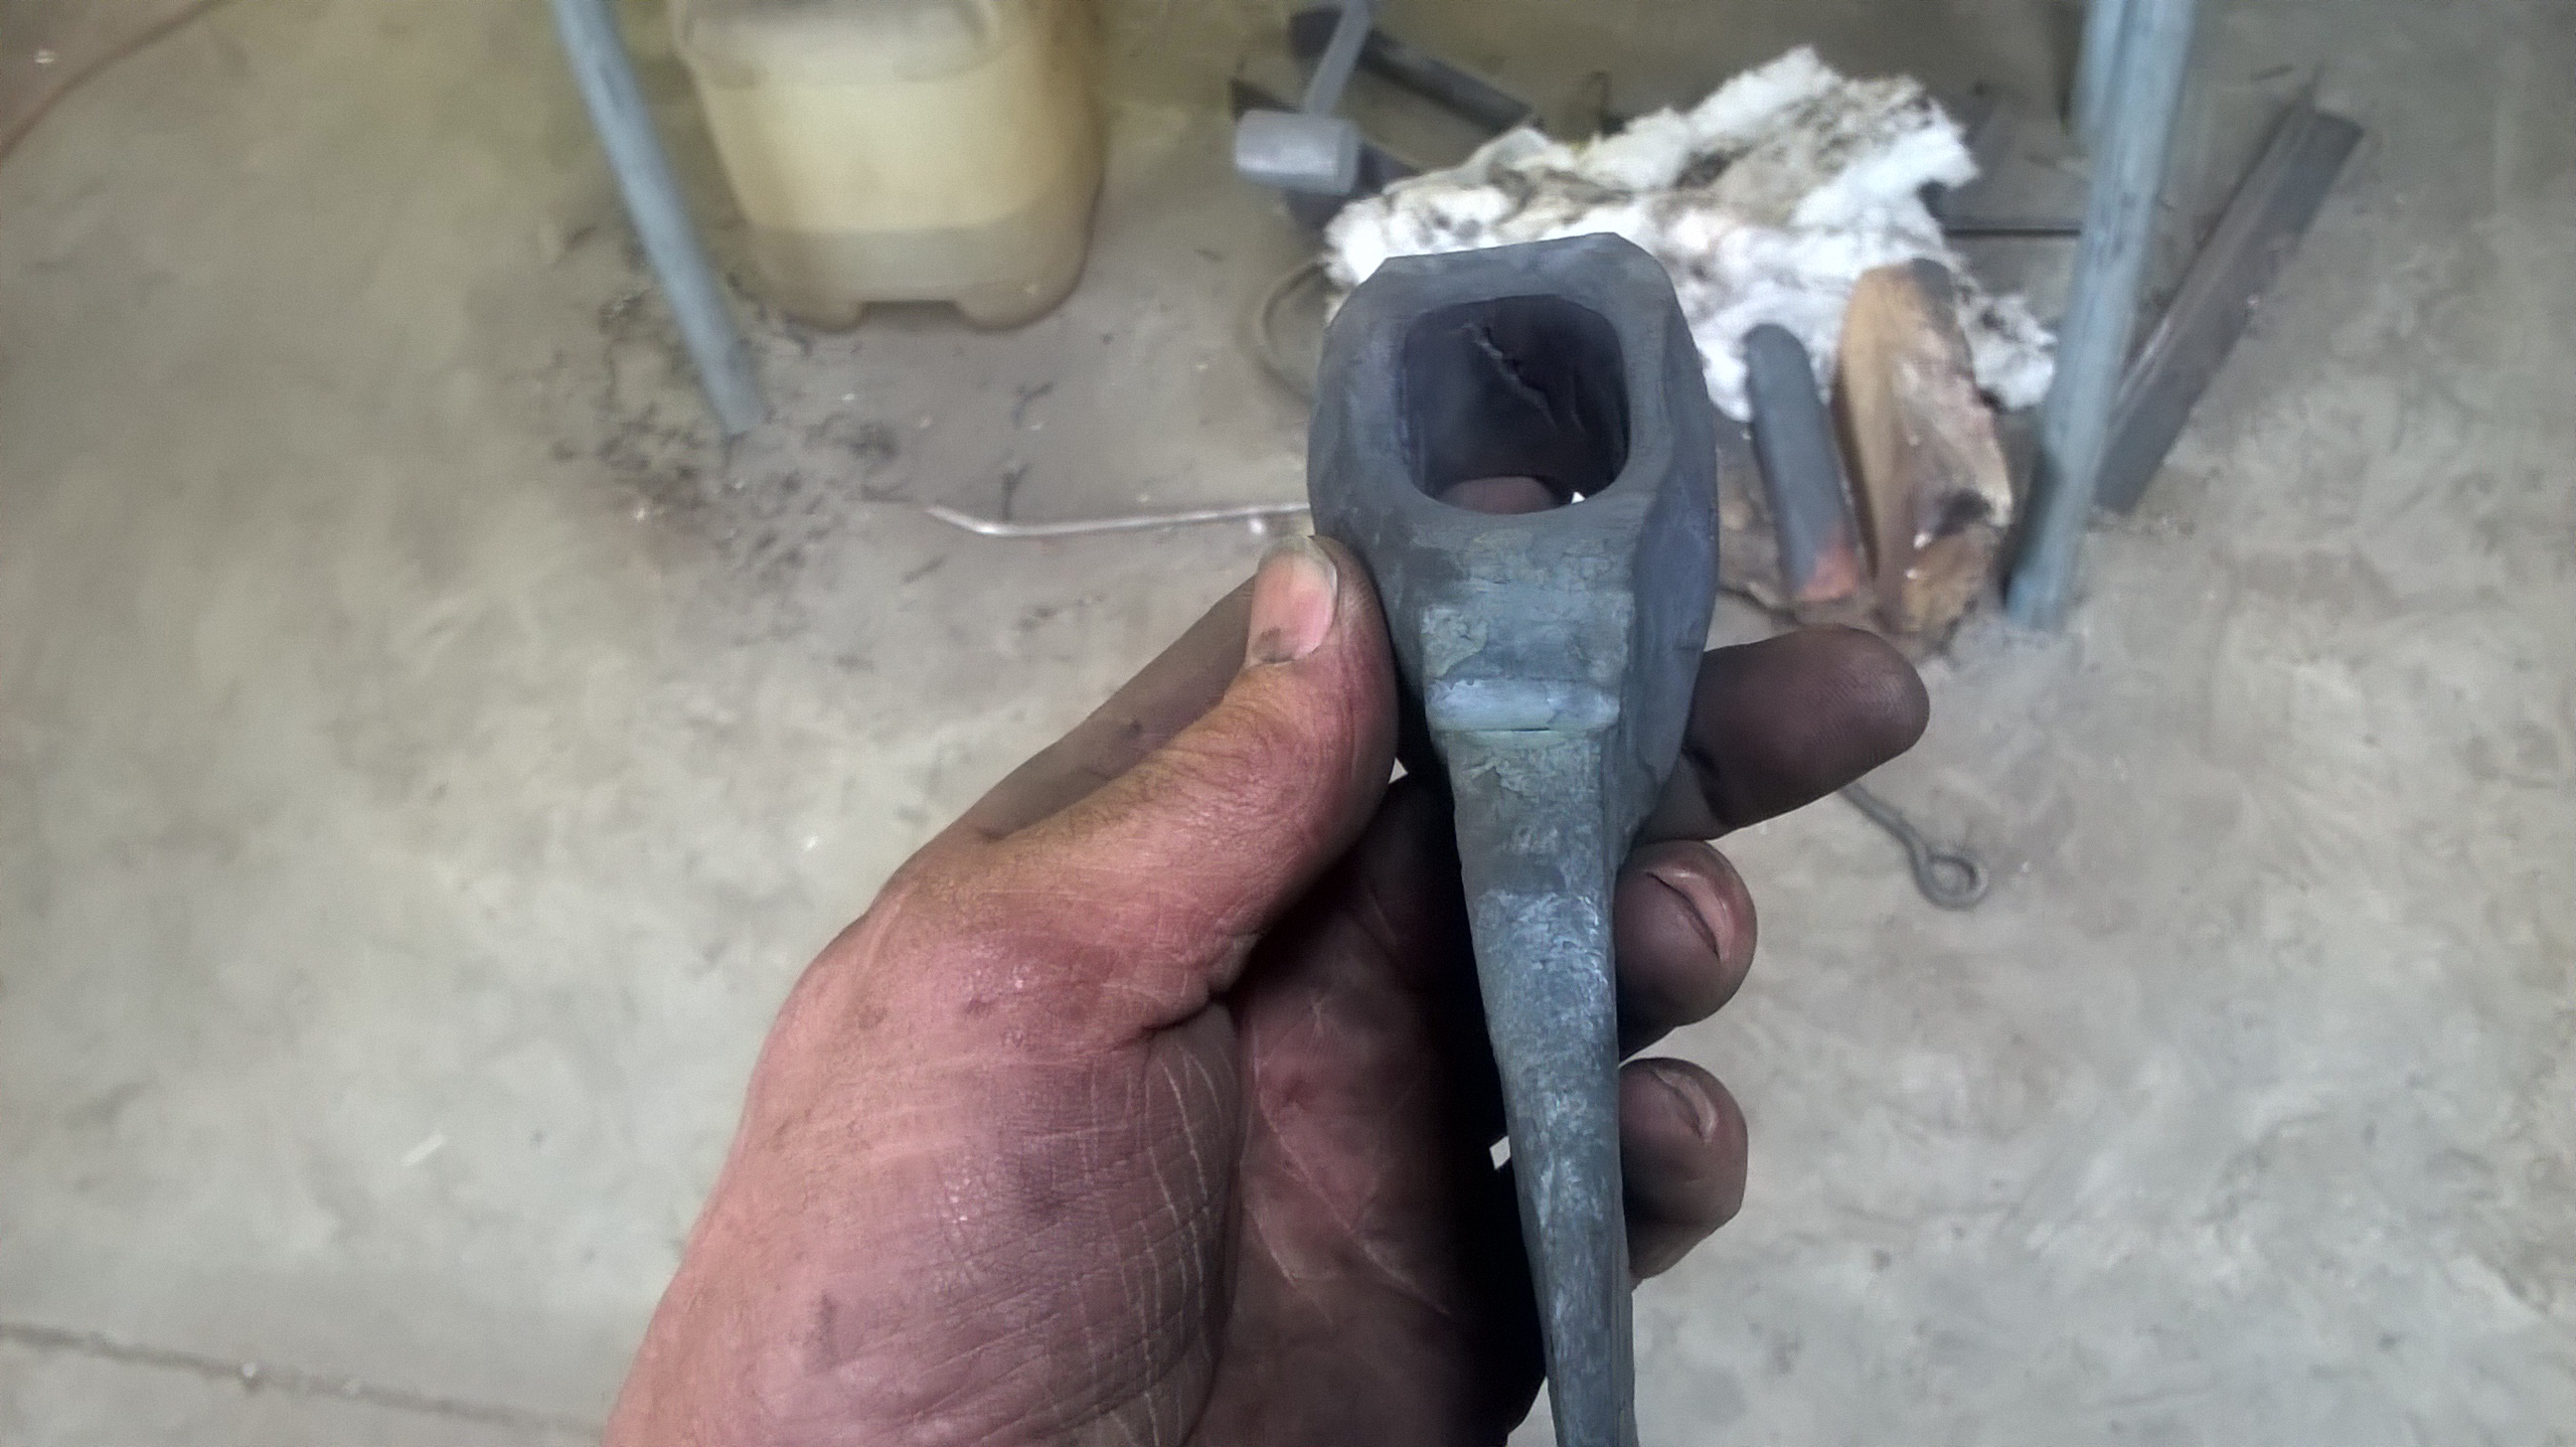
Im doing the worst part of blade making and thats the sanding etc I am thinking of doing a clear perspex handle since there is a star pattern going up the handle as well does any body have any experiance of this, the sander is just on a beer cooled part of the process. Its almost time to take a deep breath and heat treat the blade

-
Hi
have you thought about using a regulator and fitting the spring to a pedal or lever instead of the usual screw in/out to change the preload on the spring which would change the output pressure Cheers Beaver
-
The fabreka is a great score its outragously expensive thats probably a couple of grands worth
-
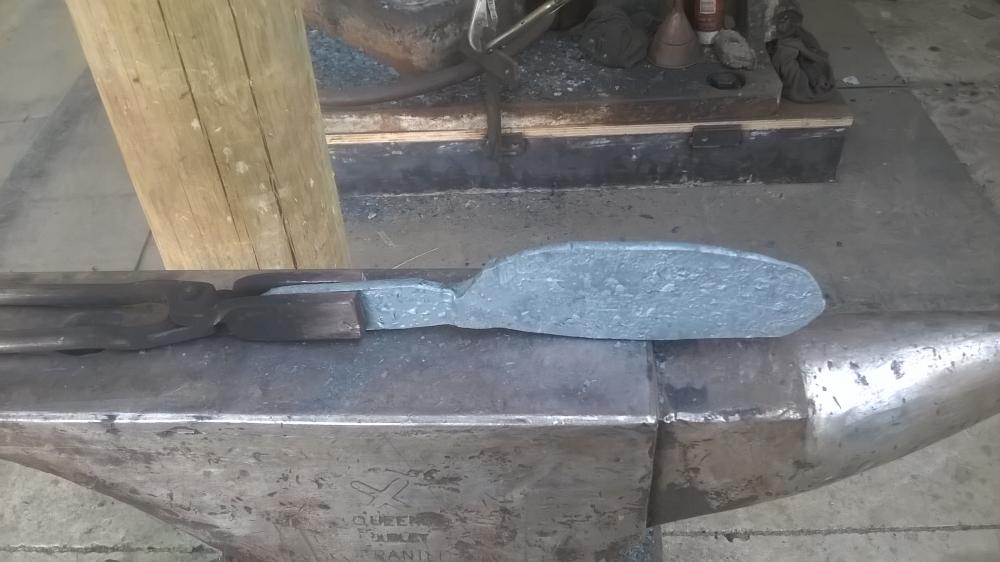
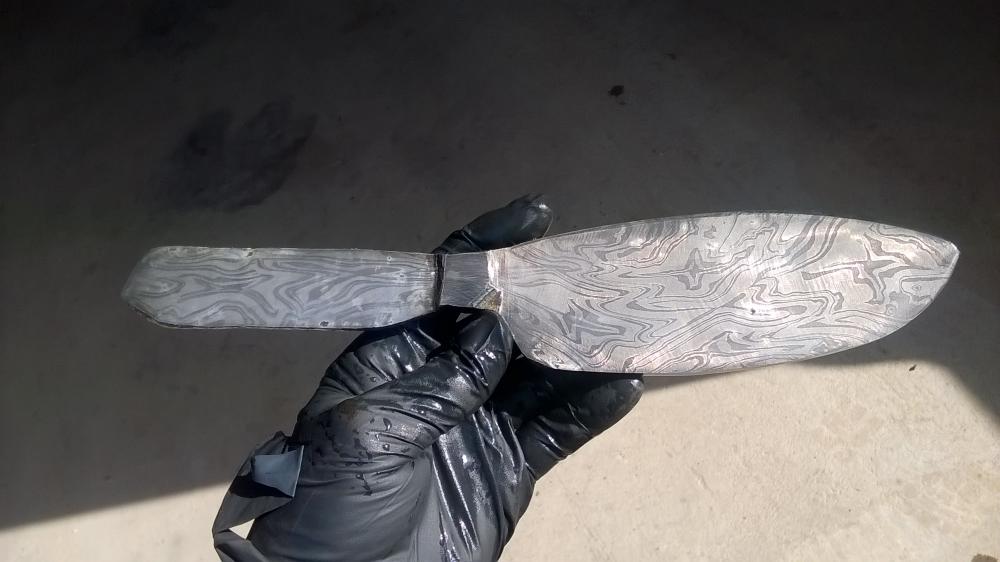
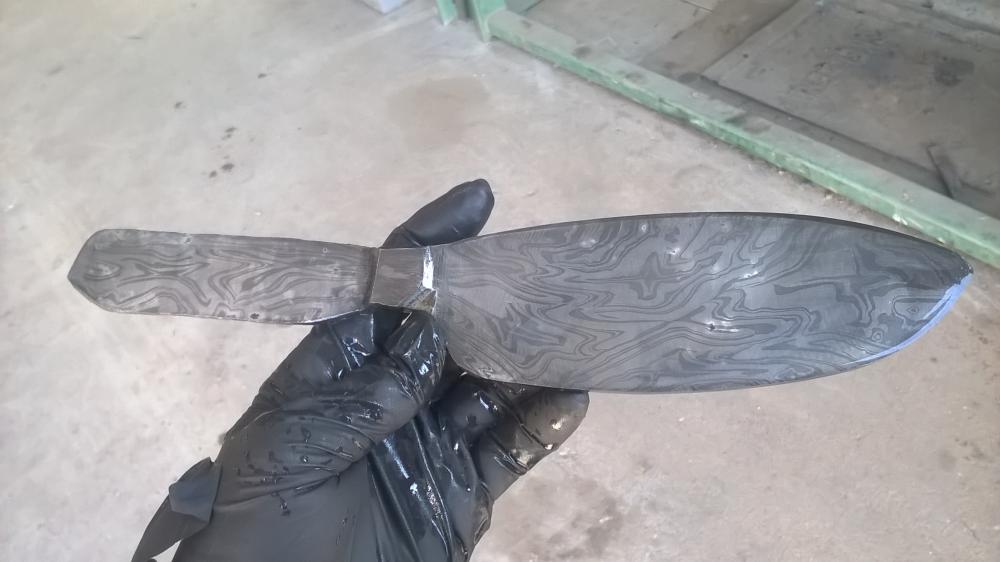
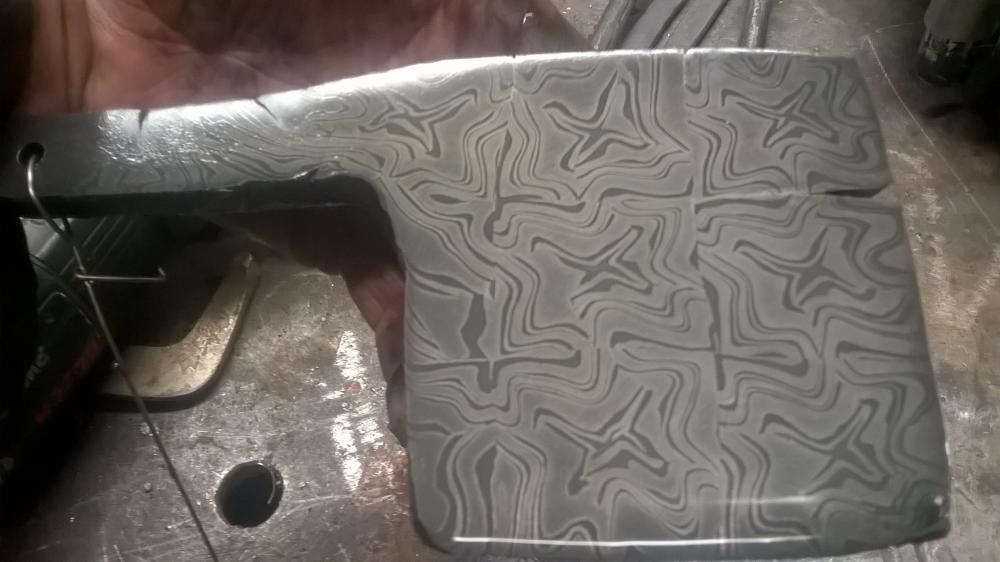
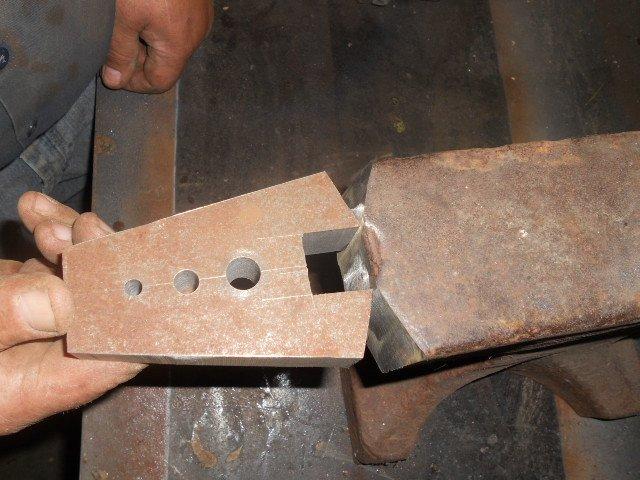
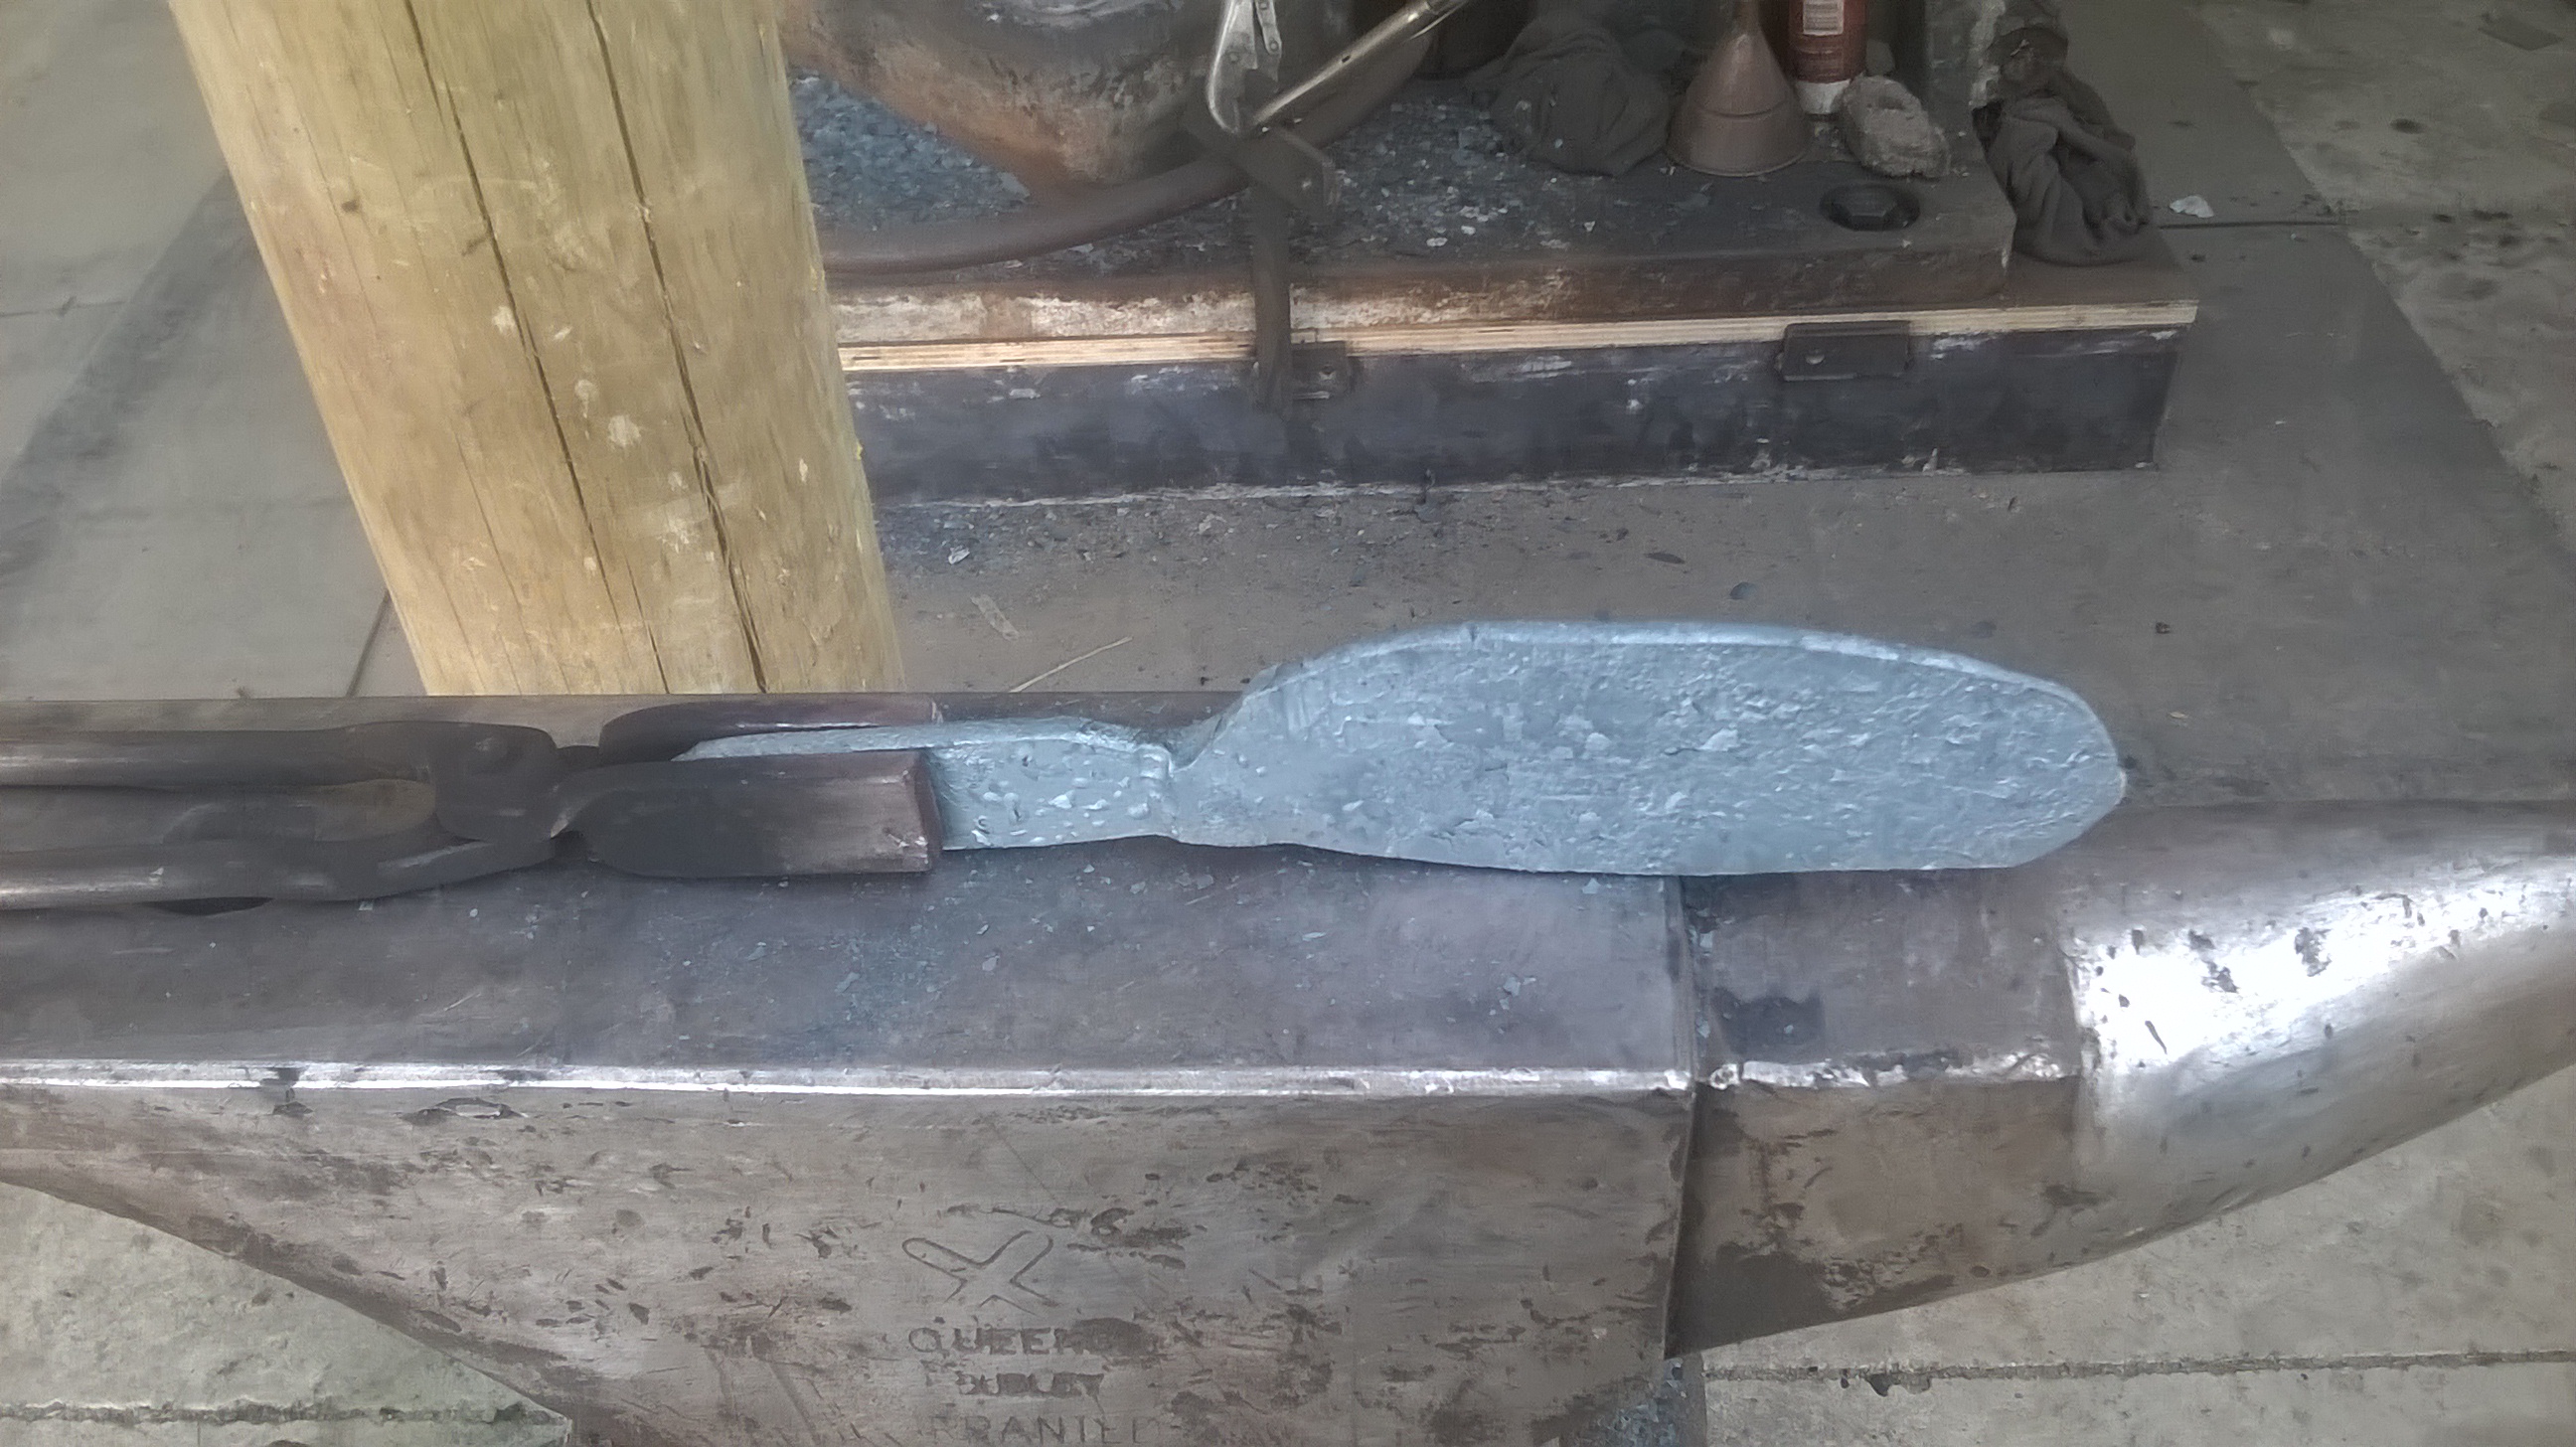
I have salvaged my failure from when I tried to make a cleaver with a nine star pattern welded billet the same as what Alex steel did a while ago. I was a bit miffed that the cleaver didnt turn out as I had some welds come apart when i was drawing out the billet but this makes all the work worth it again. The blade in these pictures was only roughly ground as I was very keen to see how the patern had changed I am prepared to exept failures as I am pushing my skills and the learning curve is steep. There was almost no hammer work done by hand it was done under the massey 2CWT Cheers Beaver PS this is made from large band saw blade and crane rail track which is 1080 steel
-
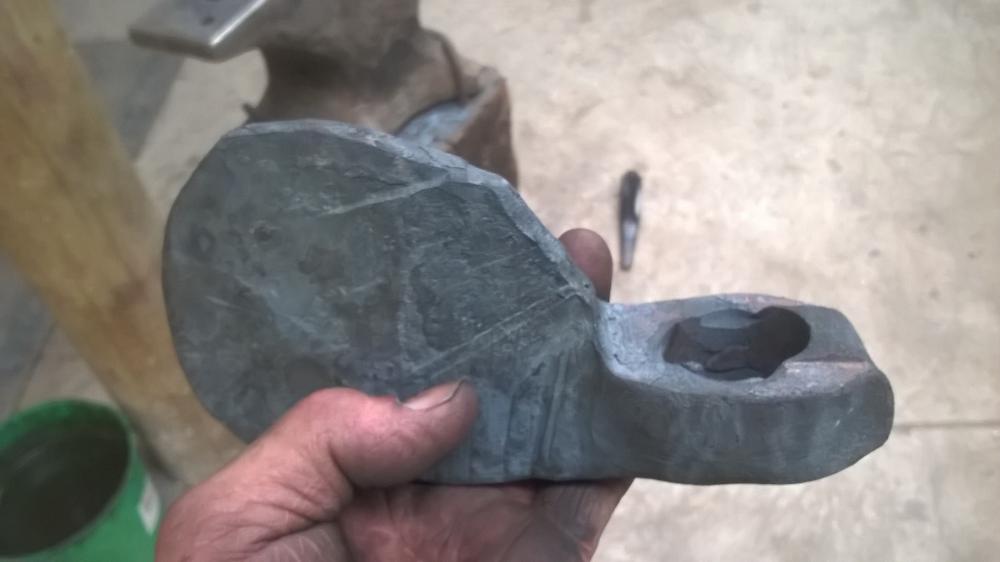
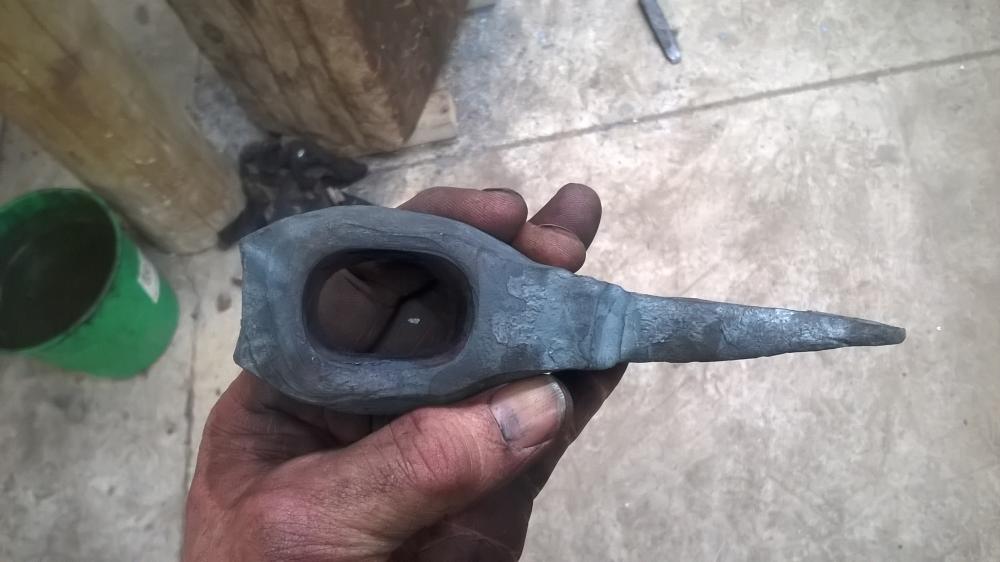
I have just had a go at making a viking shaped axe object its very rough needs the checks drawn out and only made from mild steel but Im happy it went mostly as planed I have just heat treated my cross pein hammers and will handle them tomorrow and have another couple of goes working on making the axe heads tidier and more finished. Ive been watching lots on youtube for technique It started out as a bit of 75x16 flat bar about 120 long, may even go really crazy and use something that will harden Cheers Beaver

-
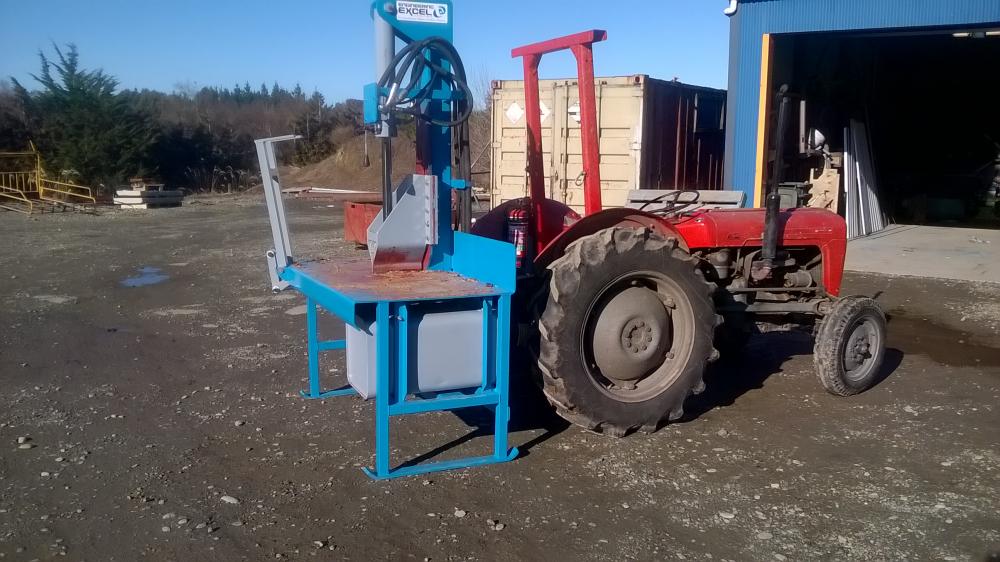
The log splitter has a 4" ram at 3000psi gives 16.8 tons force the pump driven by the Pto gives 80litres/min so about 3sec to extend 20" or 520mm and about 2 sec to retract
-
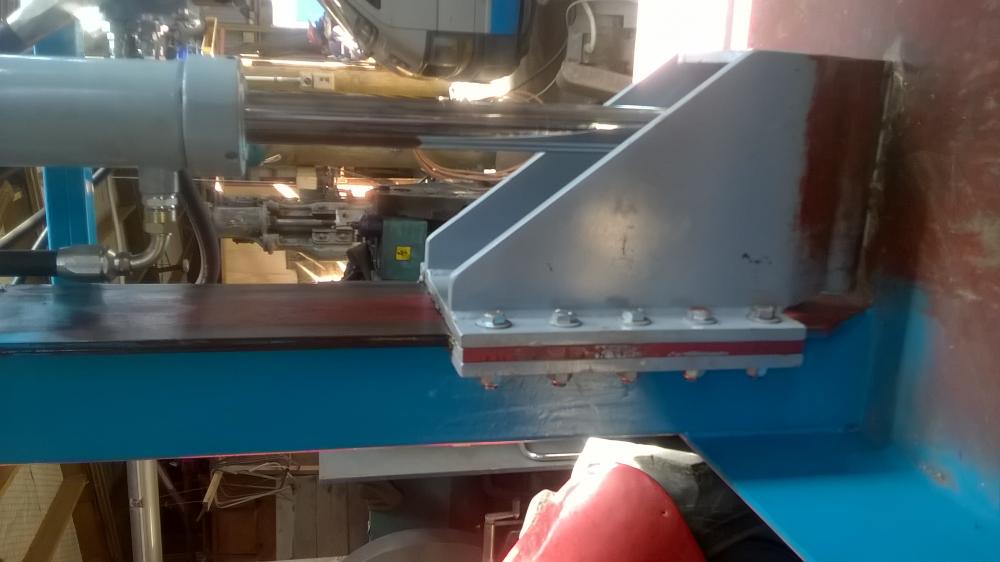
I have recently made a protype log or wood splitter and I thought the guiding system would lend its self to a good forging press which has a great amount of acess to the working area. It also has a lot of torsional strength as the frame post is made from 200x100x9 RHS and the guide plate is 16mm bissalloy 400 which is a wear resistant steel with about 3 times the strength of mild steel. Instead of the head having a blade there could a tool holding socket


-
I had simillar problems when shifting my massy from where I brought it, we had to lift it with the crane hook off centre on one side so it leaned over one way and had to use the "Flex" or spring in the roof for the last little bit of clearance. Then when it came time for install at my place using a Manitou mobile tele handler we had only 20mm or 3/4" clearance Cheers Beaver
-
Good Morning Beaver,
Yes, you are correct. There is a short Ton, a long Ton and a metric Tonne. All are different.
The point I was trying to make was, the actual power at the working surface is not a constant. If the Hydraulic Cylinder is turned upside down, you must figure the diameter of the Ram Rod and remove that from your surface area of the Cylinder piston. Mathmatics is a fun game. I always tease my Blacksmith Class when we are figuring out how much material for an eye, Pi x D. Cake R square, Pi R round. Sometimes you just have to be there!!LOL
Enjoy the journey!!
Neil
Hi Neil
The only time the ram spear size makes any difference is on the retracting force and and speed, It doesnt matter which way the ram is put the extenstion force is the same. If the ram spear is taken to the extreme and made the same as the bore it still has the same force it just becomes a single acting ram. Cheers Beaver
-
I got 16.8 tons 2x2x3.142=12.568 sq" x3000 = 37704 lb + 2240 (lbs in a ton) = 16.832 Tons. While yes using the working area of the tooling may be useful I feel its a bit meaningless if you had a sharp pin the force could be 100000 tons though it seems its comon practice in America to quote the psi generated at the working edge, A friend I know at a local hydraulics place had someone turn up with a cheap log splitter they had brought from a local hard ware shop it was american made and it quoted a figure of so many psi force but that was at the cutting edge it had little actual power and the guy got his money back Cheers Beaver
-
HMMMMM Nice Looking foward to seeing it running and registering on the reichter scale Congrats Cheers Beaver
-
Yes thats what I meant make the guide as long as you can as well. You may already know but any flexing caused by off centre loads if its at right angles to the ram spear eye will bend the spear unless of coarse you put a ball joint on the end Cheers Beaver PS dont forget to put an acess hole to install and remove the pin thats a trick for young players
-
Thats getting more like it , I think I would plate the two guide bars in completely to stiffen it as much as possible. Ps my drawings usually look like they have been done by a monkey with a burnt stick Cheers Beaver
-
Once I bought a hay budden which had a very similar problem. To repair it, we took a piece of 1-1/4" thick 4140 plate which we had and cut out a "second horn" end for it. It was set to where it gapped out a bit and welded it 100% on both sides. I also welded it underneath to make the lines flow under the heel. The end of the heel was then thinned to approximate the side profile of an original hay budden. I went ahead and hard surfaced the face of the 4140 piece and repaired the edges of the anvil while I was at it. I have lost most of my pictures in a computer crash but I found this one. One thing of interest is that there was a scan of a hay budden brochure which listed the tapered heel as an option back then. Not sure the multiple pritchtel holes were offered but I thought "why not?"
We have forged on the anvil quite a bit including striking on the heel area with a 6-8 pound sledge without breaking it off.
This looks like an interesting repair any more pics and info on the progress Cheers Beaver
-
Hi there obert
I just re read my post and there was a typo where i said draw off rale I ment to say draw off rate meaning the amount of gas that can drawn off from the gas bottle at a constant rate without loosing pressure, You can put the bottles in a big tube of warm water to stop them freezing but I have seen on good old youtube people making a temporary coke or coal forge which would probably be the most effective way of making enough heat for what you want and probably the cheapest too. PS that bottom flame looks like it has no where enough air, have a look at the burners section there is heaps of good stuff PSS I think the water fall if it is as you describe would be worth a go Cheers Beaver
-
Mmmm Motor bike frames Though they would be better if they were dirt bike frames LOL just kidding I am going to be building a yamaha HL 500 frame soon Im making a replica those frames look good Cheers Beaver
-
Hi there Musky The size of the tyre shouldnt matter much you will just have to change the size of the drive roller if the circumfernce is any differnt. When buliding some thing like this you can usually adapt the plans to what you have Cheers Beaver
-
I have a number two Norton fly press and the arm that the weights goes on is on an octagonal taper the just requiers a blow with a soft hammer to release it off so you can easily put the arms in a conveniant place to reduce the thwapage to an aceptable level (you can move to eight different positionson the spindle) Cheers Beaver
-
You could put a hydraulic ram in with a relief valve set only as a safety and maybe a hand pump so you could change the working height as you were worling Cheers Beaver
-
9 hours ago, Frosty said:
Any welder who's done overhead can tell you what burning ear wax sounds like
 and WHY you should wear ear plugs.
I only own one welding shield, helmet actually that will accept muffs. The helmet is a 3M Whitecap, supplied air welding helmet, with air conditioning, heat or cool. It's just heavy and cumbersome but it keeps the fumes out of your lungs. I've used it more painting than welding since I stopped welding the really toxic stuff.
Yes burning ear wax does sizzle and the worst burning smell is burning flesh especailly if its your own, My clothes that I usually wear I look like the rag man its a combination of being economical (read tight) and not liking spending money on work clothes and the holes in my skin heal up where clothes dont. I have the joys of having to resit my welding tickets this week two over heads one Flux cored and one Low hydrogen stick and a solid wire Verticle Cheers Beaver
-
Hi Obert
My father used to have a saying, Its your cow and you can do what you want with it. Now as far as repairing your anvil I repaired mine where some numpty had cut the side off with a gas torch by preheating it to about 100 deg centigrade and using a hard facing rod called hardcraft 400 which deposits a work hardening weld. I kept the runs small about 20mm or 3/4" and then heavily peened the weld deposit. It took me a about 6 hours to do the repair so as not to over heat the work face, My anvil is a wrought iron with forge welded High carbon face I did not seem to loose any hardenes or rebound and where the repair was done the hardcraft seems to be the same hardenes as the rest. Just remember if its difficult to handle cold its 10 times as difficult when red hot and I doubt the 2x10kg bottles will do it as the draw off rale wont be enough or the volume of fuel I would guess you will need at least 2x 45Kg bottles and big burners. I would also use kao wool or eqivelent as this is a very good insulator Cheers Beaver
-
The main welding fault when it comes to verticle welding with the stick welder and most other possitions as well as the operator has the arc length too long which makes the arc voltage higher. This makes the surface of the weld pool more fluid and difficult to control this also reduces the amps, so the end of the rod should generally be almost touching the work and with 3.2mm E7018 or low hydrogen rods about 110 amps with DC and about 115 with AC


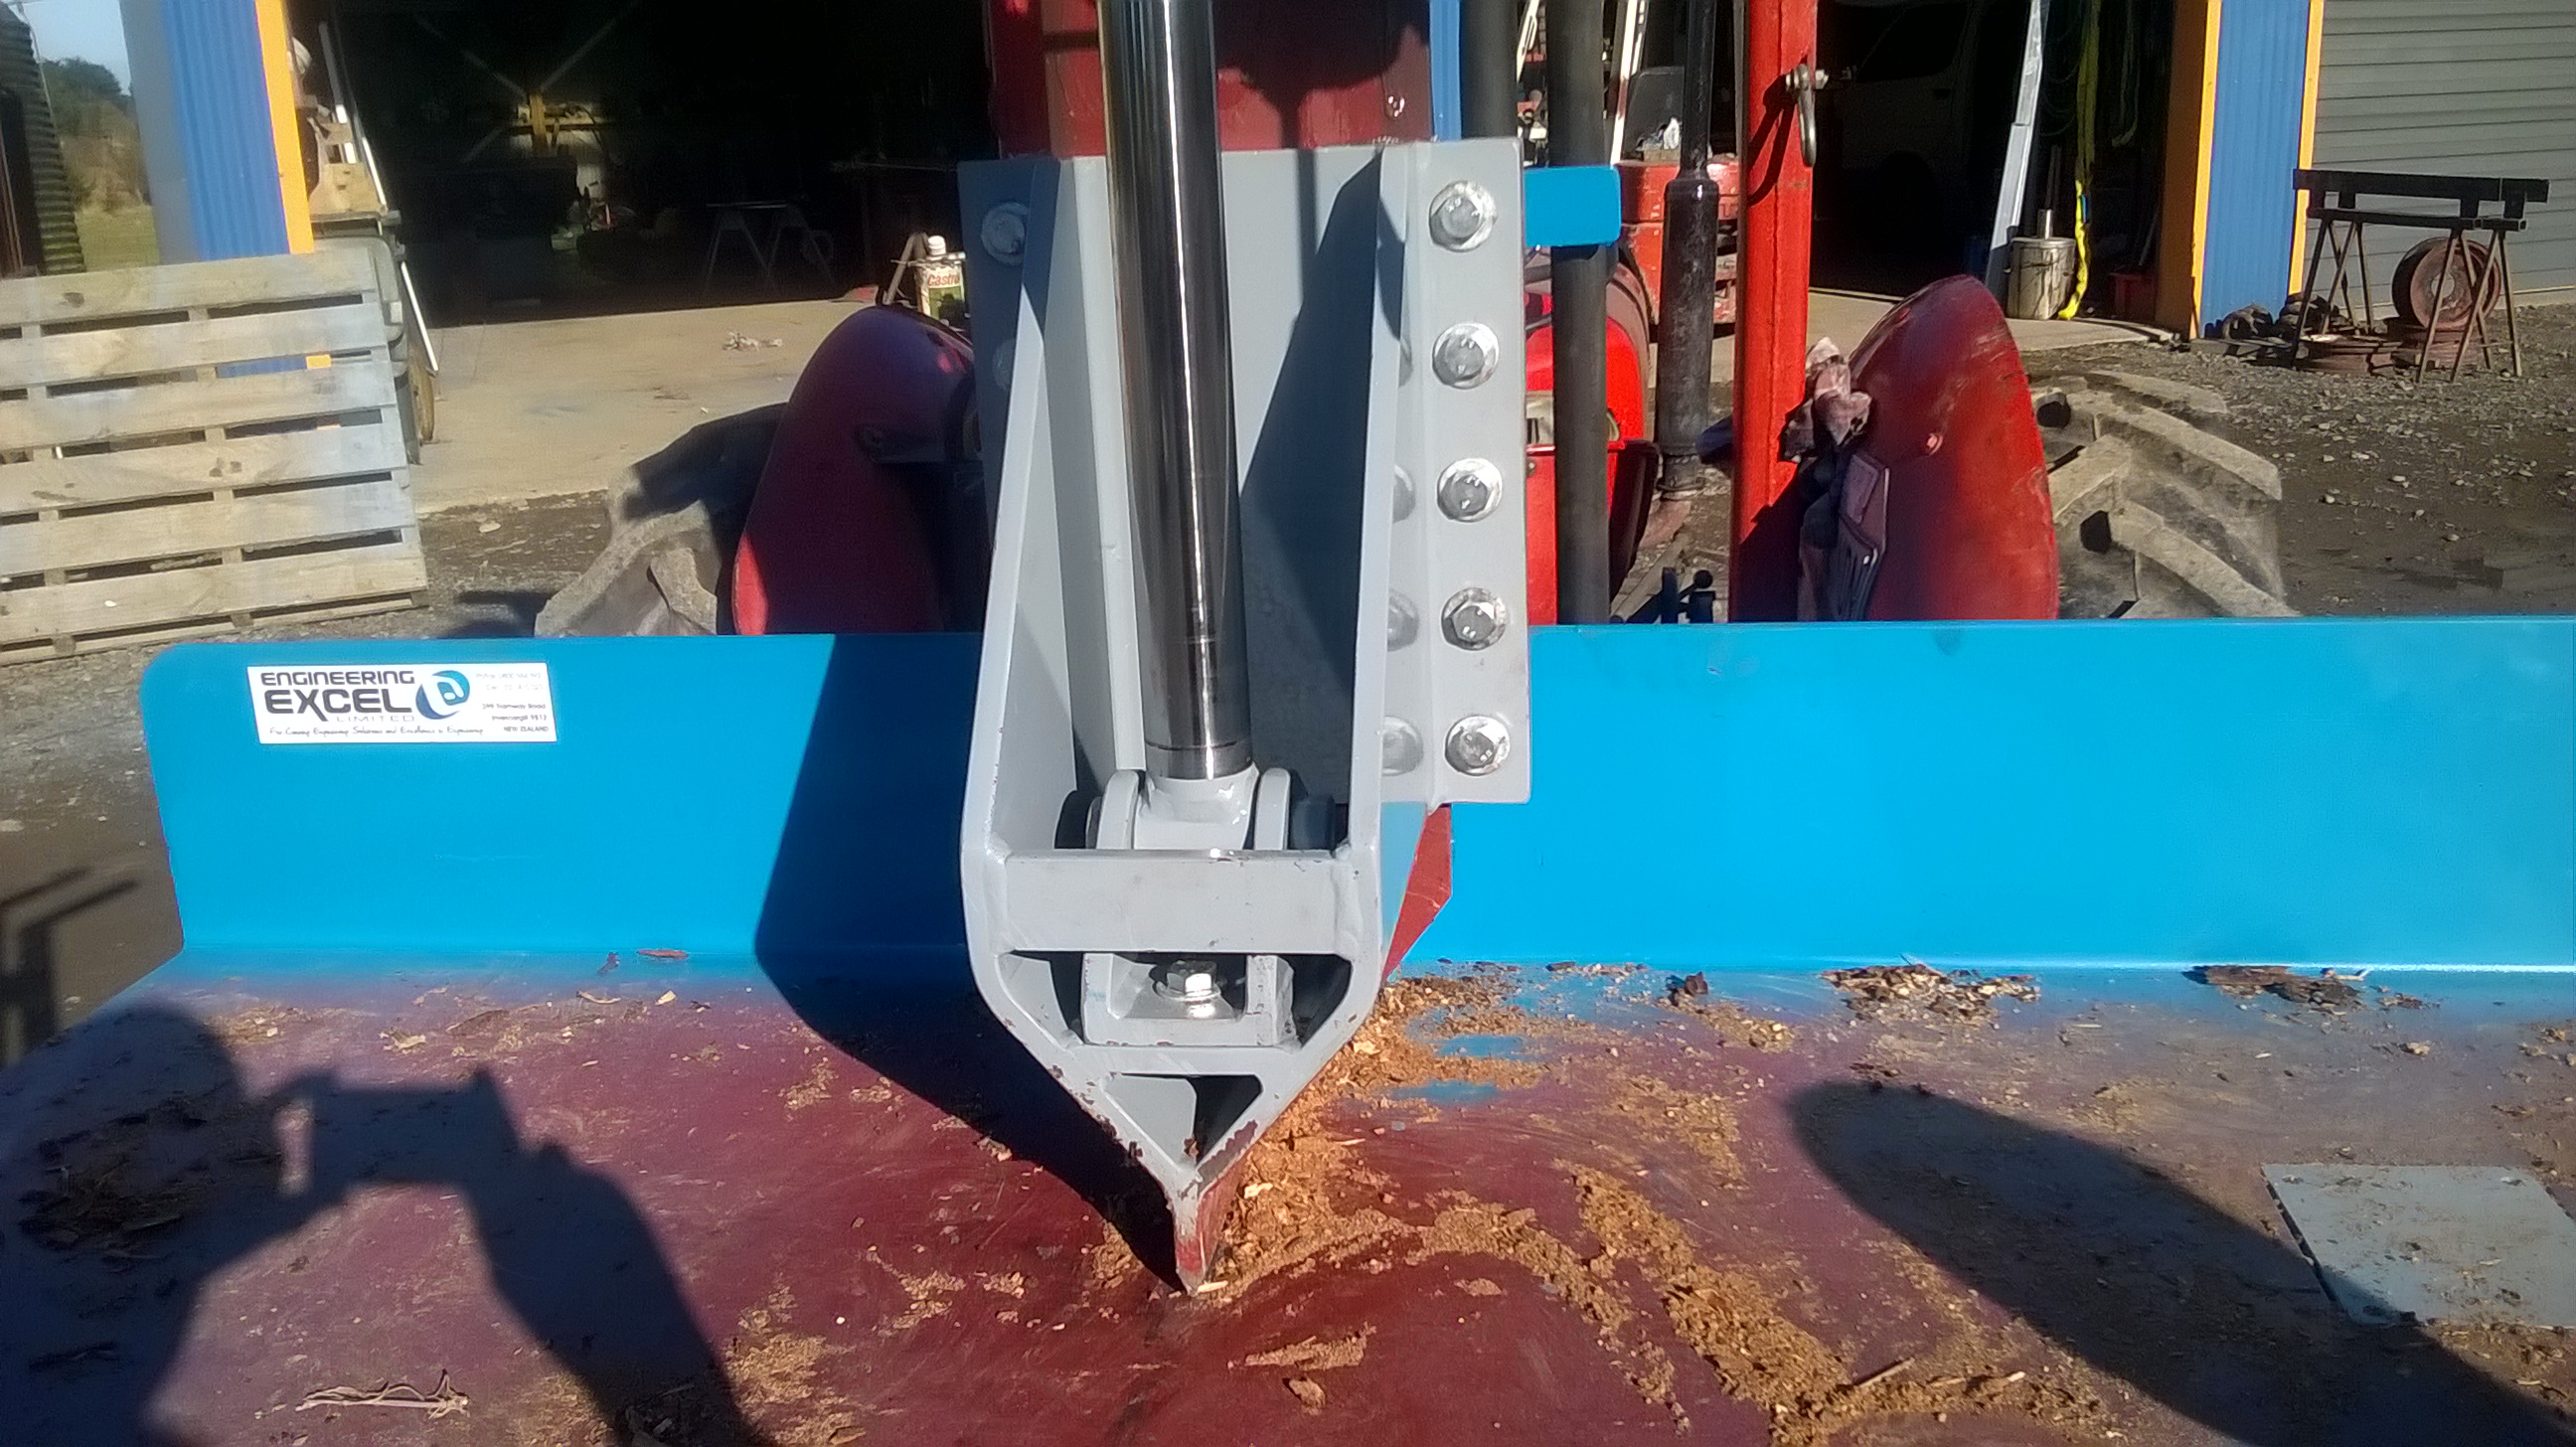


Wood splitter as a press
in Presses
Posted · Edited by BeaverNZ
Just make sure its actual tonage they are quoting and not some BS psi force at the cutting edge, some of the wood splitter maufacturers work the force on the cutting edge area. So say they had 10000 pounds force which isnt that much but Im making it simple if that had one sq inch that would be 10000 psi if you worked it out with 1/2 sq inch then it doubles the psi force makes it much more impressive on the sales broacher Go for at least a 3.5 or 4"-75or 100mm ram bore that would give you 12 to 15 tons depending on the hydraulic pressure developed Cheers Beaver