-
Posts
2,167 -
Joined
-
Last visited
Content Type
Profiles
Forums
Articles
Gallery
Downloads
Events
Everything posted by Latticino
-

I recommend repairing a roof with a DIY metal roof
Latticino replied to angiolino's topic in Problem Solving
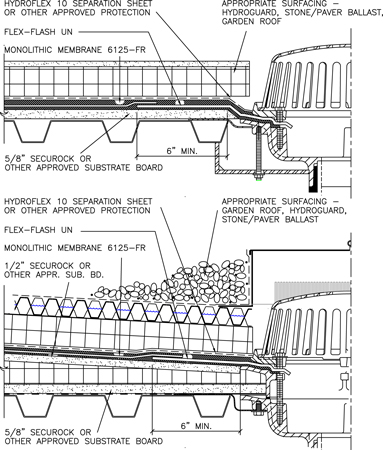
Are you currently experiencing ponding on the roof (significant amounts of standing water)? If so a better system of storm drainage piping might be very helpful. Still, there are no quick and easy solutions to this problem. Please be careful to monitor the condition of the structure and roof. Water damage like this can be life threatening if it goes too far. An EPDM rubber membrane roof typically does not require ballasting. Between that, the most likely required tapered insulation, and new storm drainage piping, this is not a project for a novice contractor. It also is a significant undertaking, so you will likely need a construction permit, which could mean needing engineering drawings. I suspect you will not even be able to afford those. Perhaps you can look into getting a grant? I think an asphalt roof can be retroactively ballasted once it has been made watertight. This should help with your wind issue. If you can get the existing asphalt membrane sealed correctly and then ballast it, it should go a long way towards addressing your problem. This is also a fairly easy DIY solution, though hard work transporting and spreading the ballast. Of course if you currently have ponding, that won't solve all your problems. If you can identify the locations of the ponding, you could also put in some new roof drains and pipe them to your storm system. Seems like a pretty sizable building. Aren't there other tenants that pay rent? The building should have some intrinsic value. Maybe discussing this with the other heirs would be worthwhile. -

I recommend repairing a roof with a DIY metal roof
Latticino replied to angiolino's topic in Problem Solving
This is certainly a better look at what you want, but you do realize that it needs to cover the entire flat roof, right? If you just think you are going to cover a small section (as I suspect you intend), unless you are very clever with channeling water and lucky with the existing roof slope, you will not remove the weather infiltration problem. You have already indicated that you can't repair the existing roof, so you will likely have trouble flashing in any new penetrations. If the perimeter of your new structure rests on the existing roof surface, and that seam leaks when your roof fills up with water, you are going to get water into the same gaps you had before. If you make new holes through the existing roof membrane to attach your structure to the building framing you will have new and potentially larger penetrations that water can come in. Of course if you are absolutely certain that your asphalt membrane would be weather tight if you could only solve the uplift of the material during high winds (and if you do have high winds, you best consider that in your design and in particular the method of attachment tot he existing structure) there may be easier alternatives. I can likely look up installation instructions for you if you don't have detailed ones for asphalt roofs. I'm a mechanical engineer so I don't really have this at my fingertips, but have you ever heard of a ballasted roof? Look it up. I still don't understand why you are personally responsible for repairs if you don't own the building. Unfortunately I don't read Italian, so I am not certain whether the photos are of framing systems the OP has built, or just examples from the internet of frames he likes. They all seem sturdy and well constructed, but the critical connection points to the existing structure are not shown. It is a lot easier to set such frames down at ground level than it is 30' up in the air without a crane or an experienced crew. -

I recommend repairing a roof with a DIY metal roof
Latticino replied to angiolino's topic in Problem Solving
Hard to tell with the translator if you are being sarcastic. I have tried to be straightforward and answer your question to the best of my ability. The firm I work for designs many roof upgrades and repairs, and the architects I discussed your "solution" with were uniformly appalled. Around here you would certainly need a building permit to put up the kind of structure you are contemplating, the cost would most likely far exceed the roofing update with EPDM, and you would need professionally stamped drawings certifying that the design met code requirements (which you would be very unlikely to get since the concept is flawed). I suspect it is the same for Italy. -
An improved ash dump and side sucker hood would be the only changes I would make to this initially. Eventually you might want to reform the refractory casting around the bottom air outlet or put in a metal firepot to help in localizing your fireball (I have even used hard firebrick for this, but it should work as shown for general forging duties.
-

I recommend repairing a roof with a DIY metal roof
Latticino replied to angiolino's topic in Problem Solving
Sorry for your troubles, but I still don't see how the EPDM roof (ideally with correct tapered insulation and updated roof drain solution) will cost substantially less than the structural work you are contemplating. I appreciate that you like to build things yourself, but hopefully you understand that some things are not appropriate or cost effective to DIY (Did you ever fabricate your exercise equipment?). It sounds like you may own the building (my condolences). Please note the following: EPDM ($4.25–$12 per square foot): This is the rubber roofing material with the longest track record, and EPDM rubber roofing is also the most cost-effective. It has a life span of at least 20 years, but under the right conditions can last up to 60 years. I don't know what the building itself is worth, but if you don't get that roof fixed, the value will certainly drop. If you have other tenants you may end up being liable for damage to their property or person. -

I recommend repairing a roof with a DIY metal roof
Latticino replied to angiolino's topic in Problem Solving
Best regards right back to you. Listen, I'm a professional engineer and I'm giving you some free engineering advice. You can take it or leave it as you like. If whatever translator you are using made my earlier response to complicated I'll simplify: Cutting into an existing roof to put on an addition is a job for a professional contractor, architect and structural engineer. If you take a shortcut and DIY the work, who takes on the liability if there is a failure? I have a friend who got a substantial settlement when a contractor's ladder blew off a roof, fell and broke their leg as they were walking next to the shopping center where the construction was going on. What will you do if a section of your metal roof gets blown off and kills someone? How will you rig the, likely, 4" x 4" tubular steel columns and beams up to the roof (and in place once you get them there)? Will you be renting a crane? Will it be welded or bolted construction (if the former, how will you power the welder on the roof, if the latter how will you certify the bolts will be correctly torqued and hold)? Do you have insurance for the additional workers you will need for this? Actually there are too many potential construction issues to cover... Do you have any idea the implications of "cutting the reinforcing bars"? Got to assume they are there for a reason. Your strategy of putting a pitched roof above the flat roof will not work unless you can either cover the entire flat area with a pitched roof cover, or can build walls from your new roof to the existing one and bond them well enough so there will be no leaks. You have already established you don't know how to waterproof the existing system, so how will that change? I see two paths here: If you own the building, take out a loan and get a proper, new flat roof installed. As previously noted I would recommend a monolithic EPDM membrane. If you don't own the building, and the landlord refuses to make it weather-tight, move somewhere else. -

I recommend repairing a roof with a DIY metal roof
Latticino replied to angiolino's topic in Problem Solving
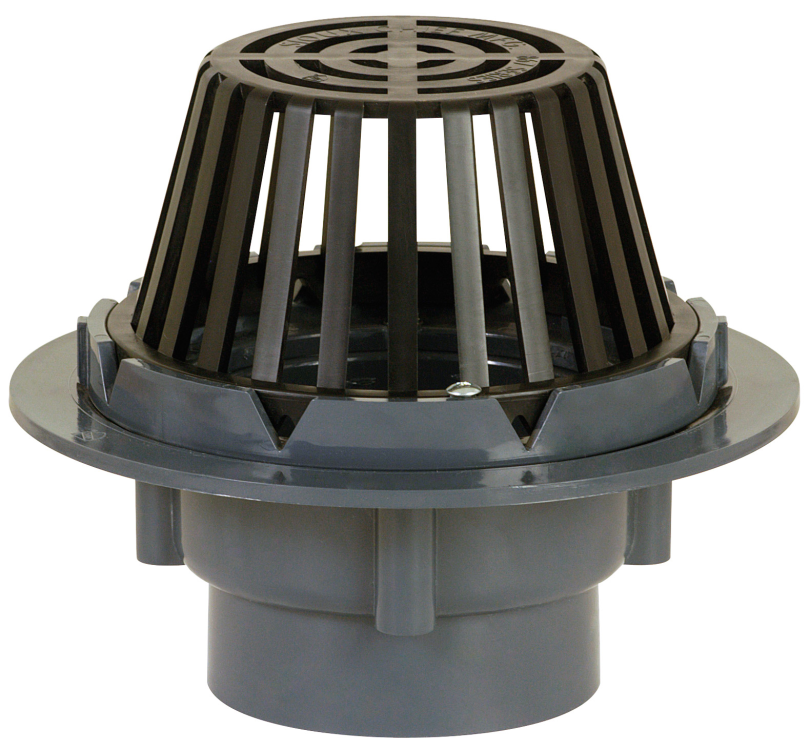
In my opinion your strategy is asking for a LOT more trouble than either it is worth, or for the work you will need to put in. The proposed raised roof (above the existing flat roof) will be subject to weather loads which will require a structural engineer to perform calculations to ensure the new structure is adequate and the tie-ins to the existing can handle both the weight and moment forces. You will be making new penetrations through the existing roof for each new column as well. What makes you think you can make those any more water tight than the existing roof? Also, what keeps weather from running along the rest of the roof into your new "shed" area. In my opinion this is an extremely bad idea. This is work for a professional roofer, not an amateur. Flat roof waterproofing is a serious challenge. Your pitches have to be correct to the roof storm system drains, and those drains have to be correctly designed (both primary and secondary) and properly maintained (I didn't see ANY roof drains in your photos). Leaks can be very tough to locate as moisture tends to run in a variety of directions due to the building structure under the roof membrane. You can even get water damage from interior condensation under some circumstances that has no relation to water leaks. If I were the building owner I would be looking to remove the existing roofing over the entire flat area and replace it with an EPDM roof membrane and a properly designed storm system. Why are the plumbing roof vents so outrageously tall? -

Oatey high heat (2500 degree) furnace cement bubbling
Latticino replied to smeeldog's topic in Insulation and Refractories
I have used Satanite for an inner liner (though Kastolite is much better in almost every way). You definitely should apply Satanite in multiple thin layers. Mixed correctly it can be troweled on. I think I used at least (6) layers when I did it and barely got a 3/16" thick skin. It will work to encapsulate the glass fibers from the blanket, but really not that much more. It will be prone to cracking from thermal shock and will also be quite brittle (so watch yourself carefully when manipulating the crucible, and make sure you leave plenty of space for your crucible tongs). Good luck and be careful. -
Sorry for the typo... Still at least I tried.
-
Have you checked with Pacific Refractories in Peral City, HI?
-

Welding axe bit takes many heats to blend
Latticino replied to Campbell Iron's topic in Axes, Hatchets, Hawks, Choppers, etc
Two recommendations: I do typically put the bit much farther into the mild steel body, unless a special construction where I want to reveal more of the core (i.e. a pattern welded bit). This also helps with getting the full package up to welding heat without burning off the HC bit (ask me how I know...) Make sure you scarf the ends of the two sides of the body where you are putting in the bit properly. Hard to tell if you are doing this in your photos. It is tricky, but I usually try to work that scarf down as cleanly as possible in my first welding pass (or second at most). Be careful, since the ends of the scarf are thinner, they cool rapidly down from a welding heat. You also need to flip the billet over after you get a few hits on each side so the anvil side doesn't suck out all that heat. Note that when heating for welding it will certainly help to have the rest of the body hot as well so the heavy sections don't suck out the heat from the weld surfaces. -
Looks to me like the ventauri burner is connected to some form of multi outlet burner head as an aftermarket modification. If that is the case you may not need a longer mixing tube, as the current configuration may have enough mixing as is. However, that part of the assembly may put too much of a backpressure to flow to not allow enough air induction by the gas jet. This kind of setup needs a lot of testing and tuning (see the NARB burner threads for details). This is one of the reasons I run a forced air burner. A couple of things to try before dumping this burner and swapping out: Definitely get an adjustable regulator. Even some of the great burners can't run "all out" (at maximum gas pressure) until the forge chamber is heated up enough to speed the flame front. Typically that results in the flame lifting off the face of the burner, so may not be an issue here, but still worth checking. Start your burner at 5 psi and see how it responds. While the orifice size may not be able to be adjusted, the position might be. If you can shift it back and forth in line with the burner axis, you may be able to get to a point where the gas jet induces air more efficiently. This is known as tuning the burner. Open the air gate fully Secondary air induction is certainly worth considering, but I don't see how it can be varied with the existing setup.
-
Depending on how you plan on using your hammer, the dies don't necessarily have to be that hard (and as you alluded it would certainly be a mistake to harden too far). In fact I took a class from a professional smith who runs one of his hammers with mild steel dies that he only hardens with Super Quench. Theoretically you shouldn't be abrading away the surface of a hammer die in the same way you do by sharpening things like Knives and axes, so a relatively shallow hardness is acceptable. I certainly witnessed him using this hammer to straighten out cold laminated steel knife blades with no apparent damage to the dies. That being said, from what I can tell I would expect 4340 would make great dies for your hammer. If it were me, I would perform my own anneal on the stock to make sure it was as soft as possible to allow easy shaping and harden and temper afterwards. Since I wouldn't be concerned about maximizing hardness, I would quench in a medium speed oil and temper immediately after stock drops down to 140 deg F. Note that apparently there is a variety designated 4340H that can be subject to quench cracking, so extra care might be needed if you have that flavor.
-

JLP Blacksmith Teaching Center.
Latticino replied to jlpservicesinc's topic in Building, Designing a Shop
Jen, Custom thimbles is the way to go, but you aren't going to believe how much they cost (I am still struggling to get an "industry discount" for one and they initially want $1K+ for the custom double wall one I need for my wood and shingle roof). Please be careful to check with your local code regarding the specifics, but typically you need to have on the order of 18" clearance from any combustible construction and terminate on the order of 3' above an adjacent roof. Non-combustible metal roofs are a bit easier, but i would look carefully into the insulation near the penetration location. You might want to cut it back at the location of the flue. Depending on construction and conditions you may want to look into guying the stack above the roof. Are you going for a single penetration serving multiple forge hoods? -
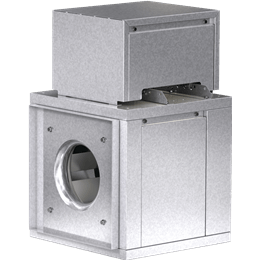
Yes, an inline, belt driven fan like the Greenheck BSQ (below) will certainly work to exhaust a significant amount of air. Needs to be correctly sized to match hood and stack configuration. However, with a 30' rise you shouldn't need one. A fan powered system does work nicely for a school setting where you want to combine multiple exhaust flues for a single roof penetration.
-
As Billy noted, the codes are the critical point. In particular, pay attention to the local mechanical code for proper penetration of your shop wall or roof as well as the one for minimum height of termination above an adjacent roof. Remember that if you install a system that is not code compliant, you may have difficulties with your insurance in the unfortunate case of an incident. A building inspector could also ding you. Also, don't forget that you need makeup air for any exhaust. Fortunately an open window or door is usually enough for that. I am not a big fan of motorized exhaust for forge flues, unless there is no other choice. With a 2 story rise, you should have more than enough draft under proper circumstances.
-

Anvil ID -- beat up Vulcan?
Latticino replied to Omars Forge's topic in Anvils, Swage Blocks, and Mandrels
Vulcans have a fairly thin forge welded tool steel plate on the working surface. Usability of this one is predicated on whether this plate is still intact or starting to break off. If you tap all over the top surface and hear a noticeably "dead" spot, that can be a good indication of a failing top plate. With a failing top plate I wouldn't charge more than 1 $/LB. If the top plate is intact, in this condition, you may be able to get between 2 and 3 $/LB (though anvil prices do seem to be starting to drop again). -
You might also want to consider going the cannister route and using 1095 powder (you could even "San-Mai" that around a 1095 core as well). A Western style heavy cleaver is going to take a bunch of stock. An Eastern style, light vegetable cleaver considerably less. I'm one of those who likes to switch to a lighter hammer to set welds. Two reasons for that. First, in the excitement of getting my first weld pass to stick, I want to force myself to use a lighter tap that sets the weld without knocking it apart. My 1.25# ball peen does this nicely. The second is that you can certainly make lighter blows with a heavy hammer, but it either takes a bunch of effort to hold back some of the weight, or requires you to choke way up on the handle (which gets your hammer hand awfully close to the screaming hot metal and spitting flux). I suppose if you are using a 2# hammer for general forging hammer control won't be that difficult, but I tend to use a 3 or 3.5# hammer for the larger stock manipulation I typically have when I forge weld (pattern welded billets, axes, hawks...). Someday I hope to get into more ornamental smithing, and this may all change. Do what works for you.
-
Very nice work for your first forged blades. The proportions are very well thought out, though I usually prefer the heel to be a little closer to the front of the bolster. The poured bolsters and caps are particularly nice. Did you dye the antler yourself, or did it come that way?
-

Quick Holiday Gift Project
Latticino replied to Latticino's topic in Blacksmithing, General Discussion
Thanks Frosty. I got the hammer used with (3) dies (flat, combination, and "ball shaped"). I found the hammer too small to effectively use the combination dies on any reasonable size stock. The flat dies were better, and if I make more tooling I might try using those again, but the distance between dies on this little hammer is kind of short and the hammer hits with pretty quick, light, blows - so not ideal for using tooling. The "ball" shaped ones are supposedly omni-directional or some such thing. I suspect would work pretty well for sheet metal work, but I don't really know how to do that (yet). I've thought of repurposing them into a kind of Japanese knifemakers set, but haven't gotten around to it. The dies I've made the most use of are a set of their drawing dies that I bought direct from Anyang. These work a treat on stock up to around 1.5" diameter. After that it is a little slow going. -

Quick Holiday Gift Project
Latticino replied to Latticino's topic in Blacksmithing, General Discussion
Two by hand and two using my little Anyang 33. Could have done it all by hand, of course, but why not use the tool if you have it. Someone better with a power hammer (or maybe a bigger hammer) could probably get it down to two heats, but I'm hardly an expert. -
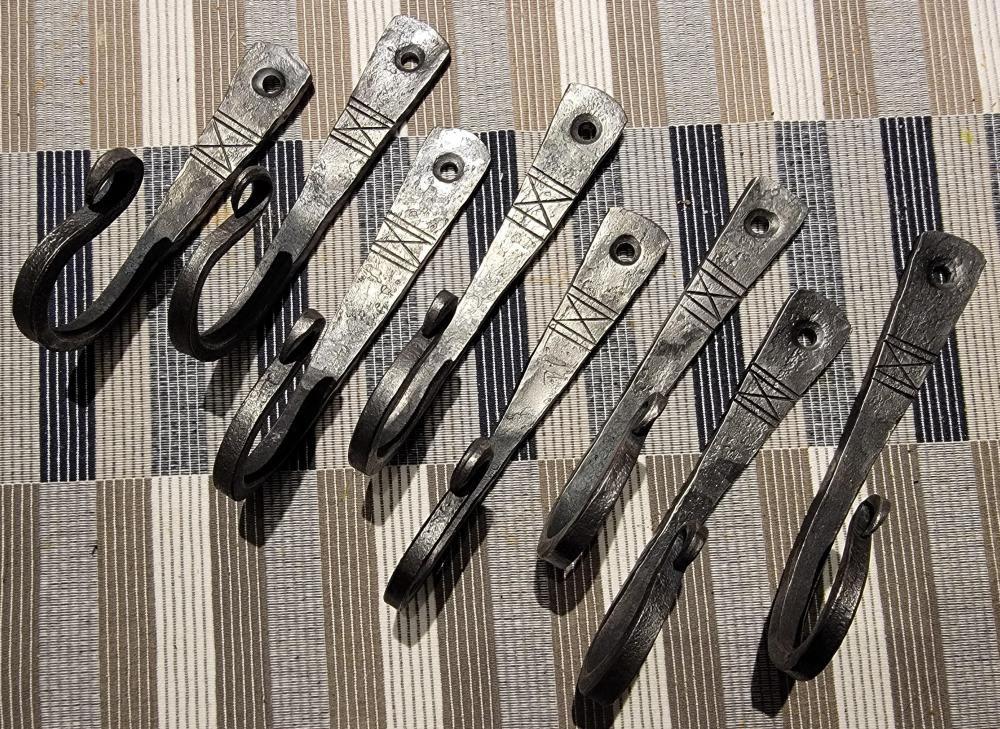
Just a quick run of hooks to give to my team as end of year holiday gifts. Simple and effective. Forged from 4" of 1/2" square stock (because that was what I had). Tried to keep it down to (4) heats, but at times had to add an extra one to true things up and set the divot for the drilled hanging hole.
-

Double joint Compass (steeled wrought iron).
Latticino replied to jlpservicesinc's topic in Member Projects
Nice work JLP, as usual. Even the failures look viable, though not up to your high standards I suspect. Going for some form of ornamental rivet? That will be fun. -

Pattern Welded Spear
Latticino replied to Latticino's topic in Spears, Arrows, Pole arms, Mace/hammer etc.
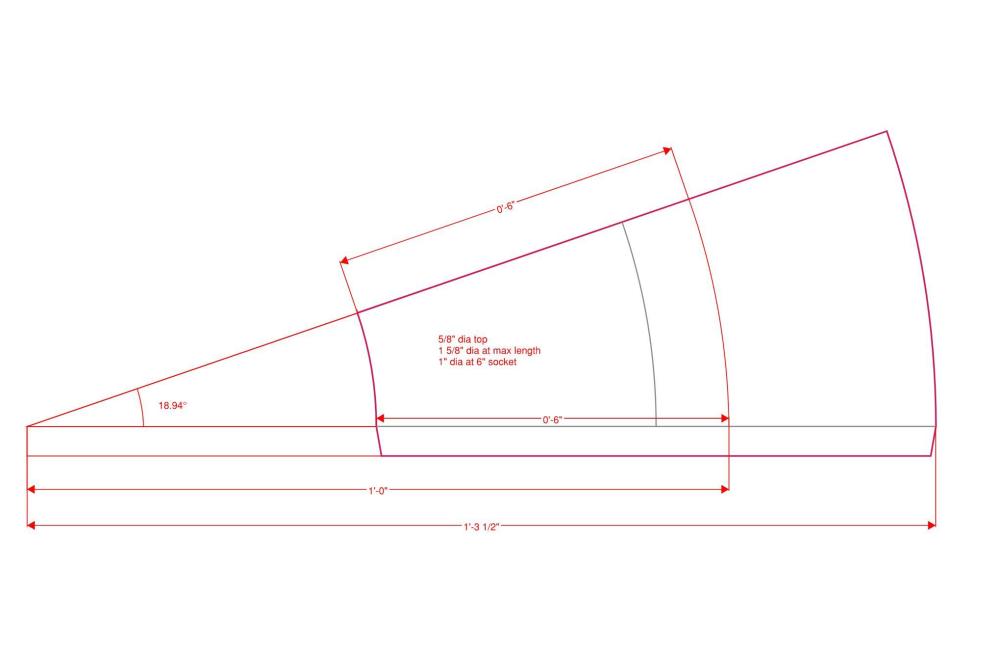
George, Good questions. The socket was made separately from a sheet of ~3/16" thick wrought iron which was then forged to the assembled spear blank. The core of the blank needs to extend past the blade around 3/4" with a stub tang. This then gets hot fit into the top of the pre-made socket right before forge welding the final assembly. Note that the transition between socket and blade becomes much easier if you have the core section of the blade, at least, slightly larger than the diameter of the OD of the front of the socket. That was the major mistake I made in my piece, and resulted in me flattening the center of the spear blade rather than having the full central ridge I had been intending. A flattened center is still acceptable and even traditional, I just had to pivot during the grinding to maintain proper distal taper. If you use wrought iron for the socket be careful of the "grain" orientation of the wrought. Unless extremely well refined, it should be set to wrap around the circumference rather than longitudinal. This helps to limit splitting along the socket length with the relatively tight bends required. Some of the smiths in the class elected to use forged black steel pipe instead of forging a socket from sheet when they had difficulty with the latter. This was a lot simpler, and afterwards it was hard to tell the difference. A decent swage block or bottom swage is your friend for this. I brought the attached pattern with me that I drafted up in advance (Print to scale on a 11 x 17 sheet. I'm not sure if the server will accept attachments, I will try to also include an image). Please note the overlap "tab". I forged bevels on each side of the socket to gain a little extra width for that overlap and made sure the "thick" sections overlapped, and the bevels served as scarfs. The socket should be forged a little smaller in diameter than the eventual plan to allow for some adjustment as the process goes on. I ended up using a 5" socket length due to the heat treat oven restrictions. Please note that this socket design was made to match my bick and mandrel. Feel free to change to suit yours. Overall spear head length, including socket, is just over 17" if I recall correctly. Look forward to seeing yours. Socket template.pdf Frosty, Agreed. This is my favorite type of vacation. I felt like I came back with new skills that I can apply for the rest of my time black/blade smithing. Don't be jealous, just do it. There was one guy in the class that must have made a bunch of money along the way because he said that he tries to take between 10 and 12 classes per year! Now that made me jealous. I'm lucky if I can fit in one or two. I think one version of heaven for me would be to be taking craft classes almost full time. Improving my skills, learning from new instructors on the way, and hanging with like minded individuals. Certainly the students all came from different walks of life, and had widely different perspectives, but all had a true passion for the craft (which shows in the final products). -

Pattern Welded Spear
Latticino replied to Latticino's topic in Spears, Arrows, Pole arms, Mace/hammer etc.
Thanks again for the feedback. Really appreciated as I'm not sure my friends' and coworkers here understand or appreciate what was involved. Frosty, I try not to consider the overall cost of the vacation to keep from being depressed. The school rates are in line with similar others at around $830 for the week including material fee. Then there were hotel fees, meals, travel expenses... I'm pretty certain I could have commissioned a spear head of equal quality for what I laid out for the week, but for me it is more about the experience than the end product. I got to work with a great group of guys and learned a bunch about what I am capable of making. Next one will be even better. The transition between the socket and spear body is difficult to execute well, and basically sets the stage for the rest of the spear geometry. I was lucky enough to get to handle a fair number of original Viking artifacts (several spear heads and one small axe) at the class that were brought in by a collector. Even with the centuries of corrosion I was able to take tracings and some thickness measurements. For the next I will try to be more true to the originals, particularly in terms of the mentioned transition and associated distal taper.

