
smeeldog
Members
-
Joined
-
Last visited
-
Oh man how did that curling accident happen? Sorry to hear you still notice it. BUT, feels good to be posting again.


-
No prob frob just need a sec to figure that
-
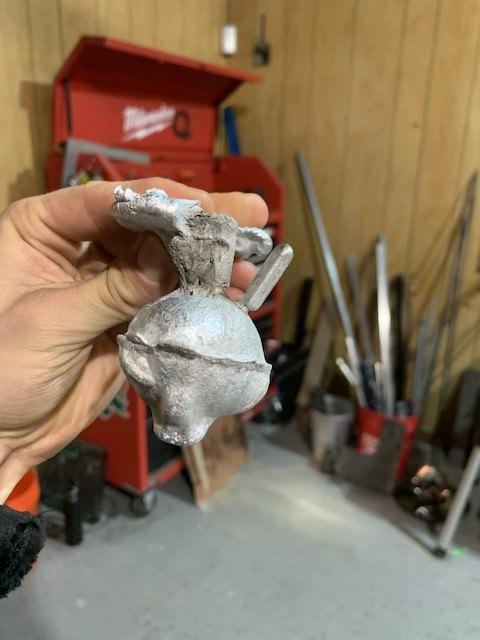
Hey Guys! Sorry for it being so long, truly. I hope this finds you both well. Before I get started, Frosty- I ended up making my own flask with a mig welder, some 2 inch angle iron and two bolts on either side welded in place with nuts to keep things tight, my tolerances are alright but youll see i have a noticeable seam on my object, so ill end up making another. Id like to make a new one that allows for a top pour, dunno if thats the right term but I am currently pouring from the large open side, the side i pack the casting sand in. The past year has been what feels like a whirl wind. I have continued with the forge somewhat, been still diddling around with metal work. I can share anything youd like if you have questions about what i make or do. Been working over the past year as well, I build/ climb concert stages to pay what bills I have (still live w/ parents) And finally a couple months ago i blew up my right ankle, tendon and cartilage in a fall i took downhill longboarding down a mountain in TN. So the recovery has been a slow process up until now but today I just got to start "walking" again without crutches. So thats pretty sweet for me. Below are pics of my first cast. Again its an artifact from a Japanese comic i've read all of, its very, very good, its called Berserk by the late Kentaro Miura. Since my first cast I have made more egg lookin things, each one coming out with less work i have to put in to make it look good enough to give to someone. IMG_2011.HEICIMG_2006.HEICIMG_2007.HEICIMG_2008.HEICIMG_2009.HEICIMG_2010.HEICIMG_2022.HEICIMG_2017.HEICIMG_2018.HEICIMG_2019.HEICIMG_2020.HEIC IMG_2021.HEIC I also meant to add that the first pour was done using the one and done negative plaster cast. Another reason for such poor quality, i did plenty of grinding and tig welding up the low areas and then grinding back down to get the shape I wanted. Also did some detail work around the eyes and mouth with a Dremel and hand files.
-
Greetings again everyone, or at least everyone that participated in this thread. Just would like to breathe one more breath of life in it and say that I just poured my first mold the other day and have spent the subsequent days polishing it up. It went pretty well, I had someone there with 911 on speed dial, wore pretty much all leather and did a lot of saying "well, we will see how this goes". The total time from start to finish was about two months, probably closer to two and a half, but you know, I wasn't really keeping track, maybe I should've been. My mold which was made of around 65-70% plaster of paris and the rest fine sand, held up well enough to not destroy the outcome of the pour, and now my next task is to see how much less work I can get away with after pouring my next. I am going to switch to greensand casting, though I am unsure about how I am going to make my own basic metal flask that uses a fine enough system to not cause any mold deviations when going to take my pattern out initially, as well as getting the cope and drag back together exactly where they were to start. Anyways, I really just wanted to say thank you guys for the help, wouldn't have been able to do it without you. Or maybe I would have and it would've taken me a year, so thanks for sparing my life. One last question, do any of you know of any graph or system that will tell me how smooth and polished I need my items face to be to allow for a cleaner cast with petrobonded sand and if different metals will pick up different details from the sand pattern negative? Id like to cast like 10 more of these things but want to obviously minimize clean up time. and if anyone is curious, I made an aluminum behelit from the manga Berserk by Kentaro Miura.
-
Buzz, that is why I bought 20 pounds of the stuff, lololol. And gotcha, the channel leading to a hole in the bottom is a great idea, I will also be toying around with the idea of angle grinding the bottom off to make three separate parts, adding latches sounds like a good idea, for at least the middle connecting down to the bottom/ floor. Also I have too assume I'm right in imagining 74 is now cubic inches of kastolite coverage, mainly because you didn't say that unit is the wrong unit to go with, after having multiplied my square inches by the intended thickness of the kastolite wall. Anyways, thanks a bunch man, next time I'm your way I'll buy you dinner that goes for the rest of you too.
-
Yes the plan was to have the floor and ceiling inside the melter body itself, the ceiling is removeable due to the design of the prefab- it is just a top with handles and no hinge, but I dont see how I could do this with the floor. Though I understand the problem that causes for when crucible does fail. When you say "you can just replace the flat floor the cylinder sits on" what are you referring too? The crucible is going to sit on a fire brick which will be on top off the floor of the melter, are you suggesting i come up with a way to make the floor separate from the walls of the melter body? (which is a cylinder) I am sorry if I am missing something. Also last thing (for now) that has to do with numbers, and I get it, I am dense, I am doing what I can to change that. But is 74 now cubic inches of kastolite i need to mix to get the correct amount of wall coverage?
-
I do have a problem with reading and not thinking about what im reading makes sense, and assuming everyone knows something I don't, though this is still probably true. I didnt include the wool into the dimensions because I figured having extra powder couldn't hurt. I agree shorter and fatter would be better, allas this was a prebuilt, though I know how to weld, I think my dad was itching to get goin, and well he can't take all the blame of course (or even most of it), but its funny where we have ended up, we do have a crucible that I think should fit. so 3.5 being my radius, and taking out 2 inches for the floor and ceiling, 10 inches is height, comes out to 296 sq in, 296*.25 = 74
-
I might as well add this here before it falls into obscurity since I wrote it on scrap paper. The formula I followed was cubic inches of inside the melter, multiplied by intended thickness (.25") divided by 19.2 which JHCC has posted before is the number of cubic inches in a mixed pound of kastolite. so 332.6 x .25/ 19.2= 4.3 Im just going to get 7 for when things get weird. thanks everyone
-
loud and clear, is kiln wash then needed for kast o lite then, I understand one main reason to use ITC-100 is for its resistance to flux, and then there are the benefits of added efficiency.
-
Hey this is a great thread, I too had trouble finding this info. I think I have 168.25 ci of walls to cover in a 1/4'' layer, how many pounds should that take would you reckon? Hope life has been good since this post -Owen
-
And hey, will do, thanks again.
-
I did not clarify that well enough, I knew how and why I needed the inside area for my forge, but I just couldn't find any info on square inch coverage for satanite online, and didn't know how to get that answer
-
OKAY- so here is my update so far, I have decided on what I am going to get and use, and this will be my process if you feel like vetting it, I would appreciate it, there are also some questions i have, they will be bold- In order- melter wall, (two layers) of 1 inch thiccc unitherm Ceramic Fiber Insulation blanket (8# Density, 2600°F), which I will butter and rigidize whatever insulation walls are exposed and will get coverd in satanite, and finally ITC-100 as the final protective coating. Can I cure rigidizer quicker by heat lamp after I apply it? Or is that too broad a question, if so how could I phrase it better. is a 20 pound bag of satanite enough to cover? I know I am going for a 1/4 layer, made up in multiple layers, letting cure and dry between each. My melter has a diameter of 11" a circumference of 3' 1'' and a height of 14'' (without the wool) am I too slow and should figure this math out easily? finally, I'm confidant a half pint of ITC will cover that inside area of the melter, considering I am just painting on a layer, or am I wrong? I think I got through to my dad, I ripped out the old stuff from the melter outside with a particulate respirator on, gloves, glasses, and when I got home I washed all my clothes. Thanks for your help everyone.
-
This is all really good input, I really appreciate your time and effort into setting me on a good path, I will do what I can to find a course, invest in better PPE, change my material to aluminum, and get some kastolite. I will be sure to update you on this thread once I am there. thanks again me bruddas. excited to see where this goes. I forwarded your response to my dad frosty, thanks.
-
Alright, this is good. Thank you both, I'm glad it is obvious to you both I am fairly green when it comes to metal working. What I have is a melter, and my intention is to first melt brass in it. I had a hunch the oatey people did not know diddly, yet I listened to them, I know close to diddly. We have more wool on the way, it sounds like I should cut my losses with the product I have and order something with a higher heat rating, and in a different category of refractory in general. Any specific recommendations? Should I need the high humidity setting and curing stuff for southern NH, we have a propane burner heater in the shop which is bound to add a lil moisture. I understand my errors with heating the water in the cement too fast, without giving it enough time to escape out before applying higher heat. Like I said in my first post I think I could've applied this cement in a better way, though thats not here nor there considering what we are discussing. Also my dad is not convinced that we need to even use refractory and is teetering on the idea that koawool particulate is that dangerous to breath in, and once the initial dust gets blown out of the wool you dont need to worry much about getting poisoned. This can't be true right? It is a very bad idea to have untreated insulation being used in your furnace? Thanks again.