Gijotoole
Members
-
Joined
-
Last visited
Everything posted by Gijotoole
-
My thoughts are that the weight is the weight. If it says 96# then it's 96. If you look at a side profile of the future, it has a much more robust neck (what's that part called?) than a, say, 112# nctool anvil. I attribute that to the lighter-weight base and moving the delta (left-over amount or difference) to support the top portion, giving the future a unique ability to support the face with a larger waistline (I'll call it that) than a typical farrier's anvil of similar weight. You could also look at the dimensions of said anvils and see if the 112 cavalry is of similar proportions to the 99# future II. Maybe pnavarro can give us some data to go off of. I ask you to go to texasfarriersupply.com/categories.php?cat=41 and look at the profile of the futures and farriers anvils and think about that. Mr Hale, in my inexperienced and unprofessional time with this hobby of mine I have read about farriers anvils being more "springy" than a regular (London or Austrian) pattern anvil. I have no experience my anvils are a Chinese special and an über-old bick iron in the 80# weight class that I found in a scrap metal pile. I love this stuff.
-
The texasfarriersupply.com website says it has a gasket between the two sections to reduce noise. By putting an aluminum base under the steel face you can focus the weight into a larger working surface and stem (neck, web, whatever it's called) instead of distributing the weight into the base and leg-thingies. I see where it would be a good idea and provide good support for the face, unlike most farrier anvils which have a narrow stem, neck, web (there's that thing again) under the larger working surface. I'm still new but I see the logic. I just don't know how it works with two pieces of drastically different metals (ferrous and non-ferrous) stacked on top of eachother and a gasket which is a potential source of force-robbing empty space. Does anybody have any experience with these?
-
Sooooooo, I'm going to get a new anvil after I move. These seem like a good option-putting mass under the face and reduce some of the "spring" of a ferrier's anvil. What say you?!?!
-
Here's a shot of my old knife grain And here is today's
-
Okay, yesterday I pounded two separate coil spring pieces into equal-sized billets. I then heated to orange three times and set aside on a vermiculite board. Today I heated, one at a time, to non-magnetic and then quenched one in motor oil and the other in cold water. I waited until they were cool to the touch and then ran them through their paces: the file bit into both of them, but just barely; the water-quenched bar snapped easily with VERY fine grains inside, almost that of it's coil spring parent (yay, me, I think), the oil quenched bar deforms plasticaly and just won't break. I'm assuming that this test wants the steel to be annealed/normalized (one of those terms) at least once, and then quenched in water at it's lower, non-mag temp. I was really impressed with the grain size this time-no cubes visible, it looks like dark gray plaster. I'm guessing the springs are 4063, per a document I found on knifeforums, so I don't expect it to skate a file when hardened. What say you, experts?
-
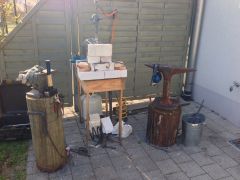 I have an ASO given to me by a friend, mounted to a section of telephone pole, a rather large (80#) bick with excellent rebound - steel I'm sure, and Gretchen, my home-made trashcan forge. She works great!
 -
Nick, I'm attempting to make one of those this weekend from a big tent spike (~1.5" x 4'). You also have an awesome moustache.
-
Mr Powers, I have no idea what you said up there. I'm going through the Knife Making 101 thread with Mr Sells and Mr Hale. Even some of that is a little aloof but I understand most of it. I have a 4-day weekend coming up for St Patty's Day so I'll try to refine my little paring knife and, if nothing else, make another neat looking mistake. I don't have a welder but I should have one after I move in a few more months after all of my stuff shows up. Again, I appreciate the help, gents. Have a great day.
-
Good point, missed that fact. Hammer, normalize (x?), shape, harden, finish. Before I have had a chance to read I am assuming normalizing will help the steel "settle" or relax which should help me with the final product. I want a nice, fine grain, that won't rupture and has a smoother bond internally. The red, cool, red, cool cycle will relieve the stress and help the fine grain structure.
-
I was under the impression that hardening could make the metal warp, so I thought harden and then grind to final shape. I guess that's a no. Like I said, I'll do more reading on it. I'll check back often.
-
Fellas, I'm not disappointd in the outcome at all. I think it's impressive how steel acts. This project was a throw-away attempt anyway. I just wanted to see how thin I could get the metal before I started to run into issues. I don't even have a belt sander or a grinder aside form my dremel or a hand file. I'm moving soon so those will be acquired on the gaining location. Steve: I have absolutely no experience in this sort of thing but I'm starting to read up about it via IFI threads. Rich: I used motor oil to quench my chisels and punches, I just wanted to see if the water quench would break it while submerged. JMC and Storm: I'll read up on said theory behind blades and the treatments involved. I'm interested in the "whole knife thing" but right now I am mainly working on making tools to be used with the forge and I'm more interested in the tools and simple stuff than perfecting how to make a stellar blade. I'll still try to make them, but they won't be pretty. I appreciate the advice. I'll peruse the other forum threads, I was just excited to break the blade and see the guts of the steel. I'll work on a fine grain through quench techniques and thermal cycling/normalizing (if I can use those terms interchangeably). This stuff is neat!
-
First time making a knife using my gasser (waaaaay too much air) and a coil spring. I quenched in warm water and took it inside to clean it up. The blade was a bit warped and I thought "if I try to straighten it, I'm going to sna that thing. I wonder what it looks like inside..." Crack. More like a crinkle-ping. It's amazing to see what happens to steel internally when it cools quickly-exact same effect as rocks; phanaritic or aphanitic formation of the crystals. I'm impressed with how a little science goes a long way. I've already started on my new paring knife. This time I'm hardening, grinding, tempering, finishing. You knife makers are something else. Don't know how you all do it consistently, hat's off to y'all.
-
Found this one locally, in Germany. One side is stamped "35 k/11" in a nice script. The other side says USA in plain font, perpendicular to the face.
-
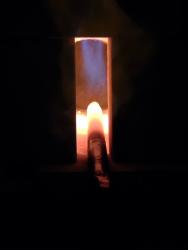
Aaaaaallllllrrrighty then... I got Gretchen up and running tonight for her first heat. There was quite a bit of steam blowing out the unsealed back - glad I left that untreated. I got it up to red, then cooled off so I could stick my hand inside, then up to orange and now it's off for the night and blocked up with bricks on the front. I noticed a small crack on the top center of the opening, so I'll patch that up if it gets ugly. Tomorrow I'll try for a white heat to see if I can weld with this setup. It took 8 minutes at 5 psi to get a glowing orange out of a 9/16" bar of mild steel. I'll really get it going tomorrow, depending on what damage I see tomorrow. I'm a bit apprehensive about thermal cycling and my inexperience. For my rookie happiness:
-
Here's an almost-finished shot of the drawbridge kid... Lid. I meant lid.
-
So I finally got a list of stuff I needed and found a trusty vendor to ship that stuff to Germany (thanks, Mr Coe) and got to work. I used a 9.5" "simple human" type stainless can for the body. I removed all of the plastic hardware and stuffed it with 2" of ceramic blanket before giving it about .5" of kastolite 3k. I then finished it off with a wash of Matrikote after the kastolite sat for about a day or so. I'll fire it up tomorrow for abut to see what happens. Hopefully it won't spall or crack too much. I had a hair dryer on it and sat it in front of a radiator to get the extra water out. The chamber comes out to about 300 cu in, so the mod sidearm from Zoeller should do it. I put the burner closer to the front and turned the kid into a drawbridge-type door in the back, with wool and kastolite. When it closes, the extra unsealed wool helps to fill the void-keeping the heat in. Of course, all the pics are sideways.
-
No, I opted to build mine from supplies ordered thru Mr Wayne Coe and a stainless trash can I purchased on the cheap. However, If I were to do it again, I would order the forge from devil, since they have free shipping (to Germany) and plus-up the capabilities from Mr Coe since he is so helpful and has decent prices.
-
I'll try a little thin mix for the blanket. I'm using 2" of insulating so: make the first round with plain old blanket, cut a bit long so it "stuffs" into place, then I'll soak the inside layer in a really thin mix of the kastolite 3k to help harden the blanket, stuff it, then spread the thicker mix onto the blanket once it's dried in place. Frosty, what do you recommend as the mix ratio, half the prescribed amount? 3/4? i'm chomping at the bit to get this stuff in and get to burning. As always, thanks for helping a lost soul in Germany with no supplies...
-
As titled. I ordered a gob of supplies from Mr Coe and am eagerly awaiting the arrival. I can't afford the $90 on blanket rigidizer, so... Any ideas? I understand the real stuff to be about 30% silica or something, but what can I use that will "get me by" while coating the blanket with the refractory? I thought about a really thinly mixed refractory, and then going over it again with the thicker mix once it's hardened. You're all much more experienced than I am. And smarter. And better looking. And stronger. And (pick something else).
-
Yeah, I've looked all over the place. It's real hard to find those kind of "specialty" stores here. Germany hasn't had every store of every type logged like the U.S. has and things like gun shops pop up in the wierdest places (a house in the middle of a residential block) making me wonder about zoning... I spent enough time trying to get my interest going and have decided that it's not worth reprtitive trying with mediocre supplies. I tried some of the local boiler plants and some of the breweries but they looked at me like I was an idiot - I don't sprechen deutsche very well.
-
You may be surprised how few and far between they are. I live in Bavaria which is quite a bit of farmland but not many livestock. I have checked out all of the local, and not-so-local pottery and home improvement shops and the closest I can get it schmottemortel (fire mortar) which has a high burn temp but also a huge thermal mass. What they refer to as refractory is usually ordinary high-temp/thermal mass mortar or boiler putty which has a lower melting temp (1800*f) than what I want to reach. I placed an order with Mr Coe for wool, satanite, IR wash, and some soft bricks. I'm just waiting for it to come in the mail. I can get a small stainless trash can for 12 euro and use that as a body. It took me months of looking, digging, rummaging, driving, and experimenting until I figured out that I just needed to commit to the investment-might as well build it myself while I'm at it. The little brick box I have now works but it's falling apart quickly.
-
I have a motorcycle, so the gas shouldn't be too bad, I think. I didn't consider bringing extra stock and getting my tools squared away. I have access to a local scrapyard that is filling up with garbage cars and tools (that I can use for forging parts). I think I'll bring a footlocker full of hex wrenches and leaf springs and see if I can cut a sway-bar or two to make it a bit more manageable for shipping. I appreciate the help, folks. I was already tracking the "stay close" thing. I had a friend from Hawaii a while back and he said the same thing. He's an electrician down there on Oahu so I'll be looking him up to see if he remembers me. Again, thanks for the help.
-
We're going to honolulu on Oahu. I'll keep looking for people down there. Thanks, guys, I didn't know there were so many horses.
-
I looked in the groups section and didn't see anything in Hawaii. I should be moving there this summer. Does anybody live there or know the difficulties with the trade on the island? Thanks.
-
Allen wrenches, whatever you call'em. I thought I read they were usually made from some kind of tool steel. They're practically giving them away at the local scrapyard. There's a big footlocker full of tools and there are tons in that box.