nicole
-
Posts
146 -
Joined
-
Last visited
Content Type
Profiles
Forums
Articles
Gallery
Downloads
Events
Everything posted by nicole
-
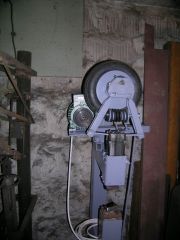
Hi All, I have been working on my heat treat oven over the last number of weeks here and there. It is loosely modeled after a paragon. The control box contains a fan, soak/ramp PID, a 40 amp solid state relay on a heat sink and a fan to keep things cool. The oven shell is plain sheet metal and the bricks were K23. The scavenged heating elements I used were laid into grooves cut in the brick and held in place where needed with little stables I made from excess heating element wire. The inside chamber is about 4.5 x 4.5 x 9 inches dimension. I am using it to heat treat little tools I am making and can run it up to 1775, though it takes 30 minutes or so to get up there. Yes those are scavenged bed frames for the door frame....
-
well I hope you find those lesson Yahoo2! I am going through withdrawal now because I cant find western red cedar in florida. At least not yet :)
-
I am left handed but am a bit stronger on the right side. It doesn't bother me to switch off hands every 5 heats or so and it keep me from getting as tired..I miss just as much with hammer in either hand :) Eventually I hope to have more stamina but now I am pretty tired after only an hour
-
Thanks for the encouragement all, and I do have to add that the way things were set up, you more or less had to come out of those classes with something in hand. There was plenty of little bitsy things they did in advance to speed things up.. for example, cutting blanks..turning handles and placing ferrules, shearing sheet metal for the final bands.... so that sped things up and made it possible to focus on things like forming tools, grinding/honing them...or practicing stave jointing as the case may be. Next is to take the experience and translate it into my own shop..MT, what other classes did you participate in? LastRonin- get this- one of my instructors was named Cooper ;)
-
Thanks for the feedback guys. John about Tillers- I found the level of expertise and interest in historical aspects of the craft to both be high. At least some of the instructors at the school are volunteering their time, which to me means they really want to teach.. and it showed. Tillers does..international outreach throughout the world and appears to have the philosophy of teaching one to fish, rather than providing fish. I was happy to see my tuition supporting this effort. Bigfoot, we discussed where to put the bevel when we were making those and some folks, yourself for example have a different way. I was "blessed" with never having used either a hollowing knife or a scorp until I did this work and after a bit I got the hang of it and both tools really worked quite well for me (the only chatter was my teeth on a cold Michigan morning :p )
-
started the base for my little HT oven tonight. The circuit seems good..just need to cram it all into a box..
-
While this is not entirely metalworking, I thought I would share. I just got back this past week from two classes taken up in Michigan at Tillers International. (great place) The courses were coopering tools and white coopering. The pace was seriously fast and to get things done I did not try to make the tools pretty..the goal was to make them work for the next class, which they did. The steel for the scorp and hollowing knife was O1; we used 1095 for the croze's cutter. Coopering a bucket (piggin) was a chance to learn some challenging handwork; our only measurements were made using the gauges shown and some calipers. The wood was red cedar split from fence rails, I used a flat drawknife and hollowing knife to shape the staves, and then used a floor standing jointer plane to create the beveled side of the tapered stave. The straps are riveted steel sheet metal bands. When I get a chance I need to clean up the piggin a bit, but after a good soak it held water :) I will be making myself a drawknife soon..I see a homemade slacktub in the future.. N
-
croze, inshave, scorp and gauges are made :)
-
Well, I would like to summarize where things stand on this crazy project. Wrapping the screw turned out to be a bust. It was just too hard to control motion of 3/16 stock on a 1.5 inch shaft, with uneven heating. One of the things we did try was to heat in a muffle, and maybe there was some impatience as the part was so big it was really hard to bring everything up to an even temperature in a reasonable period of time. Fast forward to compromise #1: machine the screw with a square thread, and then wrap it with keystock, remove the spiral and braze/weld it into a piece of pipe to make the screwbox. Machining the screw, no problem. But things got a bit doomed when I did the math. The screw was cut on a lathe with 4 turns per inch (the lowest available). With 4 tpi and square threads, I needed to use 1/8 keystock. So I wrapped the thread and it became especially clear that brazing this in a forge was going to be messy and the bitty little threads would likely get fouled so..trying an idea my mentor successfully used for a larger thread box, I took the pipe and milled slots in it and tried to MIG the thing together from the outside of the pipe. Too small, too much spatter. Then I tried TIG. That would have worked better if I actually had some experience with TIG :). So by this time I had evolved pretty darn far away from anything remotely resembling a traditional method. Compromise #2: The other day I went into the machine shop, bored out a piece of 2" steel, ground some cutters for a square internal thread and turned the screw box. I have learned quite a bit about the thermal properties of steel and techniques and strategies for fabrication over the course of the project. But no payoff in terms of the goal. I will come back to it, and when I do, I will restart this thread! In the meantime, this weekend I will continue working on my franken post vise, which has one heck of a screw and screwbox, made in the modern way. Thanks again for everyone's comments, suggestions, interest and especially encouragement. Nicole
-
the woodshop is nearly done..mobile bases welded up for everything and dust collection. Now back to that post vise...
-
Thanks Eddie, I am not done yet :) The next iteration will be simpler and stronger.. N
-
Yahoo, no worries on the delay! The bearing discoloration did not rub off. Prior to the test I washed it with dish detergent and then rubbing alcohol. So for now I will stick with it likely being 52100. Looking it up it is something I can harden up rather nicely it seems. By the way I found an interesting link on bearing materials here: http://www.precisionballs.com/ball_material_selection.php
-
Hi Judson, thanks for the recommendation on using a more suitable steel. I will look into H13- HW I like the idea of salvaging the dies and will think about making some insert tooling.. this should cost a heck of a lot less too. John your analysis makes a lot of sense to me. I guess I had to make and try the tool without premonition to get this far :) Ridding the bottom piece and making it flat with a guide or spacer is great! My original design intent was simply to be able to simultaneously mark two sides, cutting down on the work. Being neither smith nor engineer but somewhat lazy I thought this attractive. Vaughn, I will redo that top part and give it some beef, and as per others suggestions make it from something that does not mind heat. All- I really appreciate your collective wisdom and help with this! N
-
Well the verdict is in. Not good, overall. I was able to chisel a slit in 1/8 stock, and there was no problem with sticking (too thin to stick I guess!) when I went up to the thicker stuff. 3/8, and a railroad spike...not too much action- poor penetration into the stock. I milled the chisel parts at a 91 degree angle to put a very slight taper on them, then I hand ground the very tip to approximately 60 degrees. I took a look at my 4140 die and found the chisel points had bent. From the pic you can see they got pretty warm too. The dies were not heat treated. I am pretty sure this needs to be rethought ..
-
Jim, Frosty thanks for the forewarning about things getting "stuck".. thinking it through, a straight shank is what I would design if I wanted it to get stuck- tweaking is something I like to do.. so out with the straight shank. If I put a bit of a taper on it a little tap tap should free the part (wishful thinking) I will try this..HW, thank for that sideways 8 point- I had seen that and it was my inspiration for making this sideways square profiled die. I will be sure to relieve corners and all but cutting edge! Frosty thanks for the rope-die design, I need to think through it a bit more. Jim, Stephen thanks for the points about controlling position and depth. I could probably make a small set of little saddles that will control depth. And position, for now, will be based on my incredible sense of aim hehehehe. Thanks for your help guys! I will post a photo if I get something that works! N
-
Hi All, I just made a smithin magician clone and want to make a die set for it that would let me slit stock so that I could then have a starting point for drifting some holes in it, or use it to set up for making a basket twist, for example.. I attach my crude sketch; the idea is to have the central "chisel" terminate in a 60 degree angle, but the "shank" is more or less straight.. it would accept stock as large as 1 x 1" though I do not foresee doing anything nearly that heavy. I can just make it and try it, but I figure someone has probably looked at this. thanks for any comments!
-
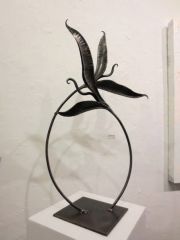 These are lovely Zach- "hungry" is my favorite!
 -
 How thick was the stock you were working in the video? I have power hammer envy..
 -
It looks a lot like the one in the link below.. http://www.fervi.com/eng/hardware/bench-vices-clamps-and-anvils/anvils/c45-hardened-steel-anvil-pr-7232.htm
-
I tried Yahoo2's saturated salt treatment with this bearing, pic attached. (Cleaned bearing with detergent, alcohol, then soaked 24 hours in saturated table salt) The bearing is obviously darkened where it had soaked. I know it is possible for ss to corrode, but I do not have a sense of how to interpret the result. N