nicole
-
Posts
146 -
Joined
-
Last visited
Content Type
Profiles
Forums
Articles
Gallery
Downloads
Events
Everything posted by nicole
-
 Lovely!
 -
Thanks for the feedback folks I have more or less gotten it together...not sure if I like the way I handled the shelf..painted deep blue to represent water with ripples..but this is v 1.0 and I just need to sit with it a bit.
-
Hi Gergely, Bikecop thank you; lots more to do.. :)
-
Hi All, I am working on a coffee table that will have sides that are basically a "swamp scene" and a top that will be made from local hickory. The bottom shelf will be determined.. I am thinking of using wavy 1/8 x 3/4 band stock that interlocks to create a water with ripples effect..need to try it and see how it looks. Here is one panel, in need of some cleanup but it shows the idea, It contains cattails, some fiddlehead ferns and some other things that I don't know what to call LOL. The cattails were made with some pipe fullered down to make sausages what were closed up around 1/4 rod stock..the fiddleheads were 1/4 rod stock scrolled up and scored with a chisel. Nicole
-
Chinobi thanks- I am a bit of a barbarian. I sandblasted the piece, LOL. Then I buffed it on a wheel and wiped down with acetone. I tried a patina with sodium chloride, acetic acid, ammonium hydroxide and ammonium chloride that was "supposed" to give purple :) but ended up with a rose color..interesting.. but at the end of the day I think the pattern is too fine. Steve- I am going to try your idea- it really makes a lot of sense..I want to try and avoid overworking the look. Patrick thank you I will play with both FeCl3 and some heat- I have used flame techniques on plain copper and enjoyed the effect...maybe I will try it on just the leaf. Onward :) Nicole
-
Hi Will, thanks for the comment about the reinforcement. Get this- I did reinforce the other piece of channel, but now for the life of me I can not figure why I did not notice I failed to reinforce the side with the bearing surface. Good call :) When we were trying to wrap the threads, we tried a muffle on a hot coal forge, and we tried it in the gas forge too. Couldn't beat the differential expansion of the keystock versus the much heavier rod it was wrapped around..thinking out loud I wonder what would happen if the wrapped part was brought up to temp very very slowly...but the vise is done and at least for the near future, I have moved on LOL. Now in regards to purple, it is my favorite color of course, and it is always easy to tell my shop stuff from all that boring grey, black blue and green out there ;)
-
TYVM Chinobi- my "surface prep" was a small cratex wheel on a dremel type tool.. and then I popped it in the ammonia bag. I am wondering now if the wheel muddled the surface and/or left a residue behind that interfered. I will clean the piece up, pickle and repatinate, see how it goes! N
-
Frosty, thanks I will see what I can find. I like playing with chemicals. Bigfoot, I agree- today I tried fuming it in ammonia once more, and that did seem to intensify the pattern, but overall it is muddled and does not have the kind of stark contrast I hope to find. Maybe a few more billets? :) N
-
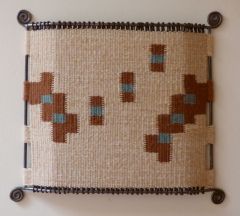
Hi all, here is another bracelet I made from my first mokume billet. I think it need to be a tad bit longer for the best visual when it is worn, and so starting with my wrist I will learn how long a part needs to be before bending around the form. I have a question: does anybody have a favorite patina recipe that will make this really pop? Background: this mokume is copper/cuprous nickel. The patina I used was by fuming it in a bag with ammonia and sodium chloride. I have found a number of recipes for other patinas, but anyone that has a favorite, I would love to hear about it. Nicole
-
Oh my Chinobi, I never did cut my billet lengthwise- I can still do that- and will! TY Nicole
-
Hi Steve, Ian and Frosty, thanks for the comments. As I look online at different samples of mokume I notice the incredible range of colors, textures and contrast that folks can achieve. It seems endless for the possibilities! On we go...
-
Hi All, This is my first piece of mokume, a simple cuff bracelet. The billet was made from 16 circular disks that had a copper core and were clad in cupric nickel. After forging out the billet to square and about 8" long I cut it in half, and did a series of alternating 120 degree twists, then forged it round, then into a rectangular profile prior to bending around a simple form. I messed around with finishing it and found I liked the look with ammonia and table salt. A few dings here and there and I had to grind away some delamination that arose when I bent the band around the form. It seemed to cool off awfully quickly so maybe it was too cold. Anyway, today I made another billet out of copper and nickel silver sheet stock in a torque press..2 hours at 1850 F. I will play with that next...I really like this stuff!
-
 Lovely collaboration!
 -
Thanks for the information Will. I've no clue about the manufacturer; no obvious marks I identified on them. I still have to spark test against a standard. I do have access to a PH so...I can always draw some out, see how it behaves! Nicole
-
very nice work!
-
thanks LSmith; Michael the hold down has a slot milled in the hardie for a wedge.. I need a bit of chain I already lost it LOL. Dave, thank you..in this moment I am happy its complete but the real fun does start now.. using it, seeing if it need tweaks.. Nicole.
-
Oh my, LOL here it is. I also have a pic of my anvil mounted on the same stand. I need to make the stand wider or put some sort of flange on the bottom. Torque on the vise screw destabilizes it...
-
Well, it is more or less a finished project; just need to work on the mounting to the wooden stand I am making for my anvil, tongs and tooling. The vise is fabricated from 4" channel; the jaws are 8", the screw and box were machined with square threads 4 tpi, the spring is from an old leaf spring annealed, forged, hardened and brought down to spring temper. I have a roller bearing between the head of the screw and the face of the moving jaw. The vise appears to work just fine, but just getting started with it. I owe a lot of thanks to my mentor Steve for helping me get through this and especially the patience shown in trying to create threaded screws and threaded box the old timey way (which did not really work out for me). In the end, it would have been cheaper and far faster to get a real post vise at a meeting but then, I would not have learned as much :)
-
Frosty, regarding tooling, repousse is a bit down the road for me. I don't even have proper hot and cold chisels yet! I will keep my eye open for spring stock like you have mentioned and I have started scavenging up bits of old tools at fleamarkets here and there. I am becoming quite the packrat :)
-
I bet it was beautiful yahoo2- some of the colors and grain I have seen are really dramatic, and when I track down a source I will be sure to post where I have found it. Frosty thanks for the encouragement :) N
-
Ty Mitch, Rashelle; tooling..I have made one piece so far, it is a little 1/2 drift that also has a 1/4 punch at the end..I need to test it but I am working on a slitting chisel too and will post those. I need to see more pictures of tooling myself so I actually can copy things to make my own! Nicole
-
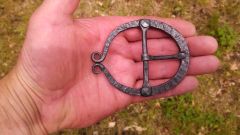 Its lovely Jeremy. How did you texturize the face of the buckle?