

Eddie Mullins
-
Posts
601 -
Joined
-
Last visited
Content Type
Profiles
Forums
Articles
Gallery
Downloads
Events
Everything posted by Eddie Mullins
-
So its that time of year, Christmas is fast approaching. If you could pick any smithing related item, sky is the limit, present to get from Santa what would it be? I'm also trying to give my wife ideas. What would you suggest to your significant other or family as some reasonably priced gift ideas for the new? or verteran smith?
-
Anvil face surface hardness- Lost
Eddie Mullins replied to Fatfudd's topic in Anvils, Swage Blocks, and Mandrels
There is a shiny "sweet" spot develing over the body where I do most of my hammering. -
What Design/Drawing Tools Do You Use?
Eddie Mullins replied to Rick Barter's topic in Blacksmithing, General Discussion
This is an old thread but an excellent one. Lots of good info here! I'm getting my feet wet with sketchup and drafting / sketching by hand more complex projects, expect questions from me shortly, just doing my homework right now and found this gem. -
so you want to build a peacock
Eddie Mullins replied to scrapartoz's topic in Metal Sculpture & Carvings
ANother gret WIP - I'll be watching as it comes together. I wish more would do the same and share pics of their work. Thanks! A question, was the fan a large ring with a section removed and then inverted and welded? Was the ring formed or found? -
Anvil face surface hardness- Lost
Eddie Mullins replied to Fatfudd's topic in Anvils, Swage Blocks, and Mandrels
Very interesting reading. I know only enough of these things to sound foolish, so will keep any comments to myself : ) . My one and only anvil, although nice and flat does have minor pitting in the face. I have debated several times dressing it up, but have decided to refrain as my finished work does not suffer and the asthetic of the anvil is not worth the loss of material or potential performance to me. I do still find myself envyous at times of anvils with clean faces though. -
Glenn - Thats one of the tools on my ToDo list, simple and very versatile. I don't have pics at the moment, but my scroll and other forms are mounted on angle iron and used in the vise. I think this is fairly common practice from what I have seen. I did find a interesting use for my vise this summer. I needed to pull the tire of my riding mower to install a tube. I clamped a 3/4 round bar vertically in the vise, slid the tire over it as it had a 3/4 in axle and used half a flat jaw tong blank I had been working on but not finished to slip the tire off the rim. This reminds me, I still need to make spacers.
-
Dave - I certainly can relate. The smith that helped me get started is now going part time and has taken a different job. My wife is a wire artist among other things, doing craft shows, so I see that side of things too. However I have to agree with a lot of what John said. Its takes more than the talent, there's lots of variables and they don't always align.
-
Smokers get all the neat gadgets, but I guess I'll just have to admire. Nice work on that piece.
-
Oxy Fuel Torch Uses
Eddie Mullins replied to Eddie Mullins's topic in Welding/Fab General Discussion
andrew - more good info. I have tried to find consumption rates, I must not be looking hard enough. I actually found a propane set up with the tank, but discivered just what you are warning of, the LWS will not refill the tank without a recipet and the seller didn't have one. The other thing I have ran into is that no one locally will sell a tank larger than an 80 CFU, they only lease the larger ones. Its over $250 for a 5 yr lease. Part of the savings upfront for me will be that I want have to buy/lease the acetylene tank, and from what I understand, using a rosebud for heating requires a large acetylene tank where as my 20lb propane bottles will do the job. -
Oxy Fuel Torch Uses
Eddie Mullins replied to Eddie Mullins's topic in Welding/Fab General Discussion
DSW - thanks for the link to the plans. HWoolridge - I hope to learn to weld later on. Your post reminded me I have a friend an hour or so away in his 70's that has done a little of everything including race motorcycles years ago. He has, or use to have an oxy acetylene set up he welds with. He was also a weld inspector at one point for a pipe line so he knows a good one. I may just have to go pay him a visit : ) . -
Oxy Fuel Torch Uses
Eddie Mullins replied to Eddie Mullins's topic in Welding/Fab General Discussion
OK - that video was awesome! BUT - now I need to know how in the heck to make one of those stands!!! I had wondered just how I would manage heating with a rosebud and then needing to put the torch down to work the material, this answers that and reduces fuel consumption, my other concern. SOOOO - who knows how to make one of these??? (I haven't asked the All Knowing Google yet, but will be ASAP LOL) -
Starting out on a rough note
Eddie Mullins replied to ChiefCodeX's topic in The Business Side of Blacksmithing
I'm only ~8 months into this obsession, so I can't offer the wisdom that the others have, but as someone trying to learn and practice all I can, I found that the projects on Anvilfire were great practice items. Theres lots of good info there. The blueprints here are also good sources of projects. There are also other sites on the web with articles, not to mention all of the free ebooks out there. I also bought a CD with like 30 out of print books on it for about $5, as well as other printed books. I have more reading than I can possibly get to but would reccomend Lorelei Sims Backyard Blacksmith as great book to start with, you might check with your Library. I will confirm though, that although books and articles and youtube are great, time spent with a blacksmith who can show even simple things will help tremendously. That and time spent at the anvil are invaluable. I forged everday for about 30 days straight after I built my forge, and fairly ofter for the next 6 months. This is only a hobby for me, but I only sold my first item a few weeks ago, after about 7 months of practice and at 40 years young I am still just but a babe learning the ropes of smithing. -
I started out with a hair dryer and then upgraded to a bathroom exhuast fan : ) . I bought a reohstat but have not installed it as I have a simple solution that has worked for months. I simply adjust the position of the fan to the pipe, the same can be done with the hairdryer. Rather than attaching it to the pipe, a simple shelf to support it will allow you to move further or closer to the pipe will regulate the air flow into the pipe.
-
Just wanted to say thanks to the contributors of this thread, I didn't ask the question but have learned none the same.
-
Oxy Fuel Torch Uses
Eddie Mullins replied to Eddie Mullins's topic in Welding/Fab General Discussion
Stephen - thanks for the reply. It sounds like you have a great resource in your local guild. I think I am kind of in the same position as you were, I've got some ideas, but just don't know for sure what can be accomplished with the torch. You provided a nice list of possibilities which is what I was hoping for with this thread. I'd like to find out what smiths are using them for and what added benefits or options they bring to the shop. -
Oxy Fuel Torch Uses
Eddie Mullins replied to Eddie Mullins's topic in Welding/Fab General Discussion
DSW - Victor is sold locally but I am told the new stuff is not as good as it used to be (no longer made in the US). I have read the Harris torch works better for oxy propane, but don't know that to be fact. The lifetime Smith warranty is tempting also. Hobart is another brand available locally but I don't know much about it. I do plan to just get a dedicated acetylene regulator if and when I and it. Since I'll be starting with an oxy propane rig, I'll have the grade T hose for propane to begin with and I want have to buy/lease an acetylene tank. I have used an oxy actelyene torches in the past, but that was prior to my smithing hobby/obsession and it was for cutting only. I'll definitely have a learning curve. -
Very nice, I think it looks great, love the choice of wood for the handle, but have to wonder how it feels in the hand due to the conture in the center.
-
I have gotten the idea in my head that I NEED an Oxy Fuel torch. I have it in mind that I would find it useful for new techniques such as isolated heating or working on larger projects than my small forge crowed smithy can currently handle. I was hoping I could get some feedback from some of you that incorporate torches into your bag of tricks. What do you find that it gets used for other than as a cutting tool? What options/techniques might a torch open up for me beyond my small coal forge? BTW - we can talk torch specifics if you'd like also. My current thought is to start with an Oxy propane set (for heating and lower initial expense) and latter add acetylene capability as well (for welding).
-
Thanks for sharing your work.
-
forging railroad spikes
Eddie Mullins replied to L. M. REESE's topic in Blacksmithing, General Discussion
Thanks, I'm thinking this technique might come in handy in a few different applications. I'll have to add it to the list of things to try :) . -
forging railroad spikes
Eddie Mullins replied to L. M. REESE's topic in Blacksmithing, General Discussion
I may be over simplifying this as a newbie, but I recently decided I wanted to make nails, so made myself a header and went at it. 3/8 isn't very big, couldn't you use the same approach as heading nails? You might have to start with a little larger than 3/8 stock if that the size of shank wanted. As Jim suggested, 1/2 round miight be just about right. Frosty - the device your describing sounds real interesting, but what is "the right shape" not to let the stock slip? -
Heres a couple of pics
-
I am also looking to buy my first torch mainly for localized heating. I am leaning toward oxy propane and have actually found a used set with oxygen AND propane bottles for $200 locally. I'm not sure I can passi it up for the price even if it needs to be rebuilt, but as long as its in good working order with no leaks, what would be the need for a rebuild? Don't want to derail this thread, maybe I should start another...
-
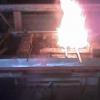
The saga continues : ). Since I promised pics I thought I'd provide an update. I built a better holdfast for round stock, or at least a good prototype, maybe I'll post pics of that later. Well I started splitting down the 3/4 round and made some progress, but kind of got stalled out again. I think I'll like this approach, but have not quite got the sequence right yet.... so today I decided to try bundling smaller round stock and forge welding a trunk leaving the bottom and top free for roots and limbs. I'm still developing my forge welding voodoo so opted to give it a go with simple bundle of four 15" long pieces of 1/4" round. This was an exercise in forge welding as much as anything, and I was at least partly successful. Here's a pic of my most recent effort, not the finished product I am shooting for yet, but I am at least closer to my target.
-
Guillotine tool - round 1
Eddie Mullins replied to Eddie Mullins's topic in Tools, general discussion
More good feedback. I was planning to use this material for the dies, but with other material welded on for the desired shape. I realize this is not ideal, but is the material I had available and I wanted to avoid buying a 20 ft stick of something before I even knew what I wanted. Since this stock was in hand and no use planned for it, I consider this at worst a learning exercise. I was trying to provide flexibility by making it as tall and wide as I did, but see that this does pose some challenges or possible issues now. I may very well just build another, but want to put this version to some use at least first, as I have never used one. One thought I had was to maybe and additional bottom dies as spacer to allow for height adjustment, at least while I am feeling things out.