Dale M.
-
Posts
277 -
Joined
-
Last visited
Content Type
Profiles
Forums
Articles
Gallery
Downloads
Events
Everything posted by Dale M.
-

Can I use galvanized pipe in my brake rotor forge
Dale M. replied to Nick Esposito's topic in Solid Fuel Forges
Get thought process away for traditional hardware stores and look at farm supplies or industrial suppliers or warehouse businesses that are plumbing suppliers.... Found what I needed at local farm/ranch/industrial supplier and cheaper than Home Depot and Lowes (who did not have all I needed in stock) ... Dale -
Thanks for the positive comments.... As for power to blower, there are many considerations, mostly it will depend on how forge perform when I get some decent coal to build a really good fire.... As for blast/draft gate on fan output verses motor speed control, well its sort of same situation as above... I expect to do some tweaks as situation dictates.... The lip of the table is about 1-1/2 inches above lip of fire pot(brake drum).... The thought of reducing lip height (for small section for better access angel to fire ball has crossed my mind..... Was actually considering using a section of 2 inch or 1 inch flat stock along one side, but it sort of got away from me in the heat of the build... Does not mean I can not come back and reduce height for a bit of the side section if necessary... Dale
-
If you are looking for a BAG like this on right.... Search internet for "coal bag" "linesman bag" "tote bag"... Maybe here.... http://www.carryology.com/2010/08/12/market-totes/ http://kk.org/cooltools/archives/003570 I have one like in right side of picture and it very strong with heavy canvas sides (lower portion) and double bottom and built to take real wear and tear.... I use one for hauling tools and materials in and out of gold claim.... I got my through Duluth Trading, but unfortunately a check of their store front shows the no longer carry that particular bag..... A way to do a visual search for appropriate bag may be to go to GOOGLE and click on IMAGES and use search string for "canvas tote bag" or "coal bag".... IF you see something you like click on image and it will take you to a web site, most likely a retailers.... A search for linesman bag turn up something like this... IF you are looking to pick one of the tote bag style locally (but you pay a lot for the Klein name - over "generic" bag)... http://www.homedepot.com/webapp/wcs/stores/servlet/ProductDisplay?productId=100647839&storeId=10051&langId=-1&catalogId=10053&cpncode=34-2920036&srccode=cii_79916502&cm_mmc=shopping-_-WhereToBuy-_-D27-_-100647839#.UOiyS6zNmSo Dale
-
Something nobody really seems to be thinking of is some cars have small compact blower that run on 12 volt DC and with a reduced output if run on 6 volts (simple battery charger will power it directly) .... http://www.iforgeiron.com/topic/31104-forge-101-or-first-time-forge-build/ Dale
-
Hi all ... This is my first attempt to build a forge... So I will call it Forge 101 I will start by saying I have just about exhausted YouTube all the videos on forge making and read quite a bit on how forges operate and decided first attempt will be a brake drum forge... Also by putting on a cart it becomes portable as I have not decided where to setup a permanent smithy… I acquired a brake drum off rear of a pickup truck and old propane BBQ which sacrificed its life for a cart/stand to build forge on... Pictures in this build series are as follows... 001 Salvaged propane BBQ stand. 002 Pickup truck rear brake drum. 003 Sort of first mockup to see how things fit (perspective). 004 12 volt Nissan heater blower. 005 10 gauge steel sheet for hearth floor. 006 3 x 1/8 inch hearth sides. 007 Everything tack welded together for initial fit. 008 Blower motor with draft gate. 009 Blower motor mounted to stand. 010 Weld in tank bung. 011 Bung and drum (one could say "all bunged up"). 012 2 inch plumbing parts to form tuyere. 013 One could say "it's all screwed up". 014 Everything fitted together. 015 Cut out from hearth floor repurposed as bottom of fire pot. 016 Grate fitted to fire pot. One real thing I found is people on Youtube make it sound so easy or cheap to buy the plumbing parts... Well after intense I-net search, it was determined that "black iron" (non galvanized steel) is cheaper then galvanized steel pipe and you just can not go to local hardware store and buy 2 inch stuff... I actually found local ranch/industrial supplier that beat the prices at Home Depot and Lowes and still the piping cost me about $45-50 ... Although they were out of the 2 inch floor flanges I was able to get weld in tank bung for two inch pipe in place of floor flange (and a couple of dollars cheaper than floor flange) The concept that $20 spent at local hardware store for the 2 inch plumbing is just a myth... Most of the hearth materials were chosen for cost and if they transmit too much heat, there is always the option to line hearth with clay.... The 12 volt DC heater motor run great on 6 volts (powered by battery charger) and transfers a lot of air with dampener full open.. I have fired forge off with charcoal (real wood) but was disappointed in the amount of heat it produced but in an hour it can consume a lot of charcoal if you have draft set to high.... Something I am considering is to put foot switch on fan motor to shut it off when I step away from forge so fire will die back some and reduce coal consumption, just like old time blacksmiths would quit the bellows (or centrifugal blower) to step to anvil and form the metal.... Thanks for looking... Dale
-
Maybe your fire is not hot enough to cause the proper amount of updraft (convection) to draw smoke up hood and chimney.... Also if fire pot was closer to back wall it might help with convection.... Dale
-
Need more ideas.... Look here and scroll through the many images.... Should spark some concepts in your mind... https://www.google.com/search?hl=en&safe=off&tbo=d&authuser=0&biw=1024&bih=666&site=imghp&tbm=isch&sa=1&q=chimney+caps&oq=chimney+caps&gs_l=img.12..0j0i5l4j0i24l5.1275580.1276137.0.1281029.5.3.0.0.0.0.313.493.1j1j0j1.3.0...0.0...1c.1.MdY2yWudhek Dale
-
If you need to raise bottom of fire pot a layer of clay (clay and Portland cement mix) or refractory fire brick would do it.... Dale
-
Local museum has blacksmith shop with two forges..... Chimneys are just 12 inch stove pipe and for cap its just a square of sheet metal bent to a "U" shape and inverted and pop riveted to sides of chimney pipe.... You could also get inventive and use metal snow coaster disk or garbage can lid, and mount it on top of chimney pipe with some strap steel (or circle of expanded metal - will keep birds out).... Dale
-
You could make your own swedge block.... http://www.iforgeiron.com/topic/30718-swage-block-for-making-hardies-for-your-anvil/ Dale
-
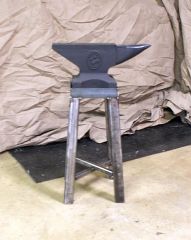
 Finished anvil stand of 2x2 in square steel legs and Vulcan 100lb anvil.
 -
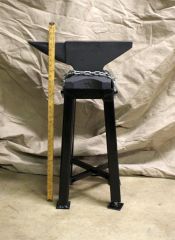
Anvil is 100lb Vulcan and top of anvil is 32-1/2 inched off of floor (about 1/2 inch higher than my knuckles).... Base of anvil is a 9 inch square and area that stand occupies on floor is about 14 x 14 inches... Seen a lot of pictures of anvils on small blocks of wood "build ups" and stumps... Not sure if Camera angles here may be deceptive... I have torches, grinders and MIG welders I can always change it or build different one if necessary, got to test it out before I start a rehack... I will admit splay angle came out at about 5° and I really did want something closer to 7° though.. Square tubing for legs is 2x2x1/8 inch... And I will bet you are going to tell that is wrong too.... Dale
-
Yeah... Was over think the part about the rim of disk brakes drum/rotor... Will do picture sequence of build soon... Only have old propane BBQ stand (framework) to support top and brake drum and blower/fan from Nissan 240z... Runs nice and slow on 6 volts so may not have to throttle it down to much (but will have to build damper for it anyway).... Need to scrounge "plate" for top(hearth) and materials for tuyere(sp?) .. Anyway do not want to highjack thread any longer... Need to spend the time scrounging parts.... Dale
-
Glenn... I seem to have same brake drum as yours that I will be attempting to build forge with (play by play assembly to follow later)... And was wondering about your thoughts about removing outer rotor surfaces and keeping just the "pot" area... Dale
-
Here is what I decided to do about adjuster.... It only has to move up/down about 1/8 inch at most to find "level" on my shop floor, but has movement of about 1/4 to 3/8 inch either way.... This is what finished stand turned out like... Will probably put it all together later today, paint was still not quite dry last night... Dale
-
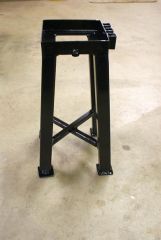 Finished anvil stand... Left front leg is adjustable to compensate for uneven floor...
 -
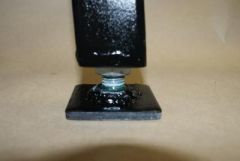 Adjustable corner leg on 4 legged anvil stand...
 -
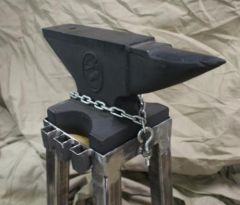
Here is latest update... I have added some hardie tool holders on one side and if I do not use them for hardies I may use them for a place for tongs or some other sort of tool... Also with wood insulator between anvil and stand i have a couple of unexpected trays for "things" at sides of anvil base... Added large nut (1/2 inch - ) on each end of stand directly under heel and horn so I can chain the anvil to stand.... Eye bolts are 3/8 inch and drop through nuts, they are something I had in "parts" bins.... Still wrestling with adjuster problem for leg..... Dale
-
Well the finish welds are done on the upper portion and the cross braces lower down.... PIcture was taken several days ago before I made the initial post.... As for deadening sound transfer I was considering a piece of 1/2 inch bitch plywood I had intended to put between anvil and stand although RTV sounds pretty good...... As for tool holders.... Was consider three pieces of 3/4 inch ID square tubing welded to one side with about 1 inch between them for hardie tools (same size as anvil hardie hole).... And maybe on other side 3 pieces of 1x1 inch ID square tubing for what ever.... This would give me six locations to drop things into.... I might add a couple of tabs to stand located under heel and horn to put a couple of "J" bolts or "eye" bolts to pull chains over anvil base to secure it to stand... Still not sure on this... As for 3 legs vs 4 legs I hear what many of you are saying and I under stand why, but for some perverse reason I always had in mind a 4 leg stand... I think I will go ahead with it as about all the major welding is done and will use a 3/4 bolt and nut and cut one leg short and put in adjuster.... Really not wanting to bolt anvil/stand to floor at this time as I don't have a dedicated work space yet.... As for usage, that is a unknown as I'm just starting out and do not know what direction my interest will take me.... Luckily I have a local group here that meets once a month to hammer steel (iron).... And a gentleman has offered to "coach" me some as I try to progress.... Dale
-
DISCLAIMER: I am new to blacksmithing but not new to "mechanical things" or "fabrication"... I have been reading for weeks on internet forums and looking at many images of anvil stands and have come to conclusion there is no definitive answer what constitutes a "proper anvil stand"... I have seen single pipe columns and single vertical 'I" beams , and three legged and four legged welded steel and traditional wood "stumps" and laminated 2x4 and 4x4 and large (300 lb) concrete stands and various indescribable concepts.... I have a 100lb anvil and have fabricated a 4 legged stand and am having trouble leveling stand.. Ahhh!!! Everyone will say the "one leg to long" syndrome.... But not so!.. it seems no matter where I put it on shop floor, its not lever, the floor that is, after having marked legs for "adjustment" many times I can not determine what is longest leg.... Seems to be all legs are same length and floor is really the problem... In graphic above the stand is mocked up and tack welded together. Legs are 2in square tubing and I intend to put a pad (3 inch square) at bottom of each leg so it is not hammered out of shape or beat into floor and permanently scaring floor.. So would it be ok to make one leg adjustable?... Its no problem to cut one leg short and add threaded insert and weld a bolt to one of the pads.... Would this be a problem or would this adjustment concept be beat into nothing useable over time... I was thinking something robust like a 3/4 inch bolt.... Also is it necessary to chain anvil down to stand as it sits in a upturned angle iron base and can't "walk" off stand.... Dale