
larrynjr
-
Posts
849 -
Joined
-
Last visited
Content Type
Profiles
Forums
Articles
Gallery
Downloads
Events
Everything posted by larrynjr
-
Welcome Ken, you'll find a great group here. Go up to the User CP and add your location to your profile. Perhaps we're neighbors!
-
 I bought mine from a gas bbq place, it's a bit spendy but has a pressure gage as well. Propane Regulator for Propane Gas Regulation It's the COMRI-20 model. Click for photo Copyrighted photo removed and a link placed into the text
 -
Atmospheric or Blown? Advantages/Disadvantages?
larrynjr replied to DC712001's topic in Blacksmithing, General Discussion
I've heard, but do not know for sure that the atmospheric do not get as hot as blown. High end temp depends partly on what you are using for refactory. Blown gas forge should be in the 2000+ F range. -
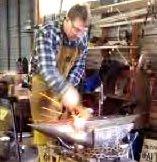
Having just come from a class on forge welding, I'll weigh in with my newly acquired experience. After getting the scarfed pieces up to temp, we removed them, wire brushed the area and fluxed them quite thoroughly. for the flat stock scarfs we also used a welding compound called ez flux, that has metal shavings and other interesting but unknown items in it. Darryl called it "GLUE" you put it on after the regular flux then when you put the two pieces together before your first strike, they DO stick together, briefly, allowing you to get that first tap to set the weld. Centaur forge carries the EZ Weld compound. I'll be ordering some soon, though I don't have any major welding projects lined up.
-
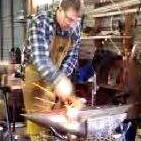
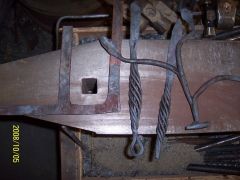
that is a picture of his classroom forging area. His working forge is still filled with tools, anvils, power hammers and product. We had him show us his working forge after the class. It is no doubt, the workshop of a busy blacksmith!
-
self made gas forges, and 20 mule team borax for most of the welds. With the scarf welds we also used EZ Weld, welding compound to help them pieces stick better. Here is a picture of the forging stations, you can't see the forge itself that well in this picture but they are basic, get the gas in to the forge, add air and go for it.
-
-
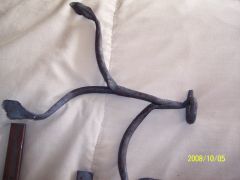
I took a 1 day forge welding class from Darryl Nelson of Meridian Forge in Eatonville, Wa. yesterday. Excellent class, great instructor. Showed the 5 of us how to do each step then had us do it! We started with cable welding, then a mid bar scarf weld then an end of bar corner scarf weld. Finally we welded branches onto a base stem. (by far the hardest element). I whole heartedly recommend Darryl as an instructor for anyone looking to advance their skills. Darryl is offer an animal head class later this month and has Mark Aspery doing 2 classes there next month. Training | NWBA Blacksmith Here are the pictures of what I did.
-
-
-
-
-
Great looking axe Sam! Keep up the great work! I took a forge welding class today so I'll have some pieces to take pictures of and show here tomorrow sometime. It was a great class, learned alot and was able to stick all the welds!
-
take a picture of the hammer, especially the touch mark and post it here. I'm sure Hofi would recognise one of his own.
-
Now that I've secured my place I checked with Ina at the Old Cedar Forge and she gave me the go ahead to announce that the Nov. 14,15 and 16th beginner, intermediate class is the LAST CLASS that they are going to offer, EVER. They have 4 slots remaining. Cost is $400 for the weekend. For anyone who has never had a class from The Master or were putting off that next one. This is your FINAL opportunity. Our workshops - Ornamental Hand Forged Iron Blacksmithing Workshops I plan on working on creating and building a gate during my time there. It'll be my 3rd class with Jerry and I highly recommend it for all. Even if you are an advanced / expert smith I'm sure Jerry can help you with a project that will advance your skills. Larry
-
The blades should be good carbon steel and could possibly be hammered into forge welded billets for knives. The "blade" part of the chain saw, can either be aluminum or a mild steel. You'd have to examine them to determine that. Not sure what you'd do if they are alum. but there are always future projects for random pieces of steel.
-
I've got a 100lb. and it works very well, no ice up. They cost around $70 for the tank at Ace Hardware, might be cheaper used though.
-
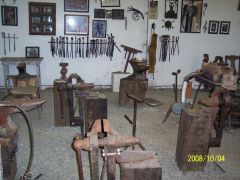
Items from an old Blacksmith's shop.
larrynjr replied to highlander's topic in Blacksmithing, General Discussion
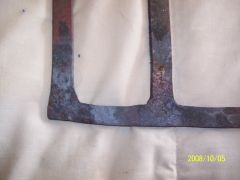
I didn't recognise any of the unusual items, are you sure that is a hardy tool and not a pry bar of some sort? -
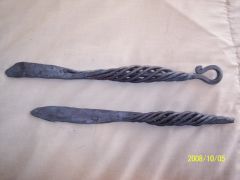
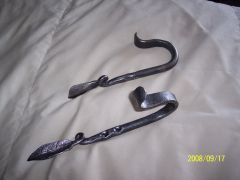
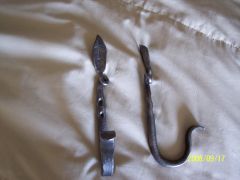
I used a wire wheel to remove the scale then wiped them with linseed oil while they were still warm. They were not punched, I dimpled them with a tiny ball peen, using tongs between the legs to hold them. Before I curled the hook. After normalizing and descaling I used a drill press to finish the hole inside the dimple.
-
Well seeing I got my idea's from these; Product Listings It will have to be a twice stolen idea! Thank you all for you kind words, I could list all the "defects" but I'll leave you to your kind illusions of my adequacy and continue to pound on to "perfection"! I received the Hofi Egonomic hammering DVD the other day and tried using that technique. It is a very different method but I think I can get it and use it effectively with practice. Thanks Sam, the anvil is working out very nicely.
-
I've got a old friend coming this weekend that I haven't seen in over a year so I thought I'd make something for him and his wife and did these wall hooks based on some others that I have from Old Cedar Forge. As usual they didn't come out as well as I'd like (perfect that is!) but they are fairly similar looking and that will just have to do.
-
-
-
Tongs: Roll your own or Buy them?
larrynjr replied to KYBOY's topic in Blacksmithing, General Discussion
I've always made my own, it gives me the forge time I want and helps improve my skills. I would buy some at yard sales if I went to them but I rarely make the effort. -
I was burnt by scale, have you ever been
larrynjr replied to hibjib10987's topic in Blacksmithing, General Discussion
It's been a few weeks since I've had the joy of burning scale but tonight I just spent about 2 hours finishing a pair of scroll tongs and a few other small projects. I got 3 scale burns on my right index finger and one on my middle finger. Ahhhhhhhhhh, the memories :D