
David Einhorn
Members
-
Joined
-
Last visited
Everything posted by David Einhorn
-
That is a lot of money. My guess is that the gentleman may have purchased the wheels and that could account for as much as half, or even more, of that $5,000. Tom Alexander just finished his second reproduction Civil War era Traveling Forge, as well as at least one limber and at least one No.1 canon carriage. Tom is a genius at scrounging and making stuff with minimal tools. The wood for his first Traveling Forge wheels, if memory serves me, was second-hand wood donated by someone who had used the boards for trench work. His fireback was an old discarded disc from a farmer. Tom builds all his own wheels. My understanding is that he spent less than $500 to build his first one. I would not be surprised to find out that he spent less than $100 to build his first Traveling Forge. I too built my own wheels, saving myself massive cash. I guarantee that I have not spent $5000. The key is to scrounge, and improvise. You may be surprised at the amount of assistance your local blacksmith group might provide. Joining a local blacksmith group will give you access to sources of materials, information and physical assistance. Jim B. donated the heavy staples made from 1/2" thick by 3" wide steel flat stock for the underside of the carriage. Tom A. donated the wood that will become the 57" wheels for the forthcoming limber. Dwight N. donated 7 hours of sweaty labor putting the two tires on two 57" wheels. The local scrap yard has lots of iron at less than new prices. I took a handful of yellow pine flooring boards, split them lengthwise, and used them for the roof of the bellows house. Local woodworkers, and/or Amish, can help you acquire affordable wooden wheel and wooden carriage parts. The boxing (bearing) for the wheels are 2" schedule 40 pipe. And "gasp" even plywood if you don't have oak, you can always upgrade parts as better materials become available. And lets not forget the miracle of industrial adhesives from the local discount Megamart and lumber stores, and metal fasteners from a wholesale fastener supplier (fill in the socket on a 1/2" socket head bolt with weldment, and you have an authentic looking 1/2" tire bolt). All of the *successful* builders of Civil War Traveling Forges, that I have conversed with, used what materials they could afford. "Paint covers a multitude of sins", is an old and very true saying. Ron Hoke at Windyhill Woods, Windyhill Woods home page plans for decortive wagon wheels, buckboards, carts, chuckwagons has a book on making a 57" wheel using a "glue up" method (pine, yellow pine should work) that he offers to people doing reenactments. I used oak, hickory and the traditional method to build my wheels, but Mr. Hoke's method and cost effective materials should be fine for just rolling a piece of equipment gently on and off a trailer. I have yet to meet anyone that built a 100% absolutely authentic Traveling Forge. Everyone I talked to did what they could reasonably afford, with what materials they could find or scrounge... still their Traveling Forges looked real good, and nicely authentic, even close up. I have read postings to the Internet where individuals have made outrageous claims about the cost of building a good looking Traveling Forge. I don't know where their heads are at, maybe they just don't want the competition. Maybe they used the finest materials and/or paid other people for lots of the parts. Online suppliers of Civil War supplies offer cast steel reproductions: hasps for $95, a single hinge for $95-$100, and small hooks for $17, but I am confident you could make them for a lot less. Scrounge, improvise, get the assistance of members of your local blacksmithing guild, and you can build just about anything. Hummmm, if every smith in your area donated a part.... Dave, I would be happy to be of assistance in helping you figure out how to do it affordably. If your main frame and bellows house is done by the end of 2010, I will make and donate a pair of heavy T-hinges for your coal box. If your main frame, bellows house, coal box, and wheels are done by the end of 2010, I not only donate the two hinges, but will also cut down, and donate a leg vise for you to use as a "tongue vise" (unless you don't want the donated parts).
-
I agree, strive to represent your impression correctly! What do you want to educate the public about that time period? Your gear should reflect your knowledge. You built a absolutely beautiful *modern* looking blacksmith demonstration and teaching trailer. I am greatly impressed.
-
1) Personally, I don't consider the word I used rude. I regret that you thought it was. I have two masters degrees, and do not see why the word is offensive. 2) I hired an electrician, but he made *me* do all the work of coordinating, scheduling the various parties, including hiring the backhoe guy. 3) Electricians around here have turned down my offers to hire them to do stuff. And the jobs they did for me they charged $1,100 per day, and cut corners, and required that I go behind them to tighten wires they loosened in the breaker box, and redo things that were sloppy and/or junky. Not to mention that the electrician outright refused to put in more than 200 amp service, telling *me* that I did not need it (the result is that my wife says the lights dim in my house when I turn on the table saw). If I want quality around here, I have to do it myself. If you had asked me, I would have changed the word. Changing it for me was rude and disrespectful in my book. I'm not going to sign on to this conference for a few days. I am greatly insulted by this and by past action to delete a whole thread that I participated in. I am *never* going to again spend a half-hour or more writing a detailed response to a person's question, and put myself at risk of being insulted for a third time. last paragraph edited by admin Unicorn I have contacted you off line about the edit.
-
djhammerd is correct, you may have to do at least the trenching for the power company, and you need to find out if they will either: 1) "drop the line into your trench" and up to the meter base or 2) hook a wire coming out of your trench up to their pole. You can also find out if it is permissible to run a wire underground from your house's circuit breaker to a sub-panel in your shop. If you run a wire yourself, make sure it is the correct gauge and that it is designated for underground use in wet conditions. Ideally put it in pipe, especially where a vehicle may drive over it, and put sand or whatever recommended substance your area needs under and around the pipe to prevent rocks from puncturing the pipe and/or wire. Here are the steps I had to follow to run a line underground to our house: 1) Have an electrician attach a meter on the outside of the house 2) Ask the electrical company to install a pole to run the wire from, as there was no pole on our side of the road. You already have a pole. 3) Have a backhoe dig a trench from the pole to the meter base. The electric company had a photocopied sheet with specifications. 4) Have the electric and the other utility companies come by and drop their wires into the trench. 5) Hook up the wires to the house. 6) Have an inspection. 7) Close the trench. 8) Turn on the power from the pole. Yes the electric company was extremely childish and uncooperative. You would have thought I was asking to date his daughter. As for wire in your shop, everything should be in steel. The outlet and junction boxes should be steel, and all the wire should be run inside of conduit and/or pipe. The metal serves as an extra ground for safety, and protects against vermin. I don't recommend cutting corners with electricity.
-
I see four options: 1. Use a section of metal flex pipe for clothing dryers and jam an end into or over the end of the blower and an end into or over the end of the firepot air intake. 2. Forge a reducing fitting out of 2" pipe. Heat up one end in a forge and expand that end over the horn of an anvil or on the end of a floor mandrel. 3. Cut a 3 inch disc out of steel and then cut a 2" hole in the center. 4. Go to Fastenal.com and purchase a 2" flat washer with "plain finish" (no zinc coating, just oil finish) Product Details | 2" USS Flat Washer plain finish DOMESTIC | Fastenal and attach the flat washer as a reducer to the firepot. Your best solution depends on what tools you have available to you. If you are lacking in tools, then the flex pipe from a hardware store and duct tape may be your only option.
-
All my slack tubs kept rusting through, no matter what I used. I finally found a large 5 gallon, heavy walled, aluminum cooking pot at the local discount store. I tossed a few stainless steel pot lids in the bottom for extra protection of the bottom. I figure this one should last at least a few years.
-
The Blacksmith Guild of Central Maryland (BGCM) is having a smelt at Blacksmithing Days May 15th through 17th. One or more smiths from Williamsburg, VA museum are coming up to the Carroll Country Farm Museum to convert ore to wrought iron and then to a forged project that will be auctioned off. see: http://www.iforgeiron.com/forum/f81/welcome-11397/#post110187 for further information. :)
-
I hope the business arrangement works out for you. I have seen a number of smiths work at creating a business part-time and working a regular job to support themselves until they got their business going, and developed their product line and market. But doing it part-time for a while may not fit a person's needs. As far as finding tools, Pennsylvania has a long history of coal, iron and manufacturing, so blacksmithing tools are likely more plentiful here than other areas. I now have the fortitude to walk past equipment at antique malls and flea markets that I don't need. I didn't used to be able to do that. If a person attends the yearly blacksmithing gatherings hosted by the various guilds in this part of the country, that person can pretty easily find enough stuff to equip a shop. :D
-
My humble observation is that back in the 70s and 80s guilds around here started with someone: 1) Building or finding a shop either at their place or at a museum. 2) Inviting anyone and everyone to come over on specific date(s) each month. 3) Having a cooler full of soda, and hot dogs or sloppy joes (food works wonders at attracting blacksmiths). 4) Either demonstrating something at these get-togethers or finding someone to demonstrate something. Blacksmiths love the opportunity to learn something, as well as listening to the music of the anvil. 5) Sit back and watch the gathering of smiths become an organized guild! Smiths tend to be self-organizing. Just provide a place to gather, some food, and someone banging on the anvil, and people will come forward volunteering to do what is necessary to make a successful blacksmithing guild. Skill at demonstrating is not important, and the better you are at pretending that you are terrible at demonstrating and organizing, the sooner kind souls will come forward to take over your burdens. Smiths tend to help out, especially if you feed them. :D
-
Don't worry, I am not offended. I was just reflecting on the resistance of some poor souls to this useful technology. Hopefully, they will embrace this forum and the level of technology involved, in spite of the lack of apparent enthusiasm for the previous two or three (if you count the previous BGCM Forum, TWikipedia, and the BGCM Yahoo Group) attempts to offer electronic medium for sharing information. The membership of the Pennsylvanial Artist Blacksmith Guild don't seem to have embraced their web Forum either. I guess it will depend on the level of computer sophistication of the BGCM membership. Also, by Thursday evening of each week, I am so sleep deprived that I beg the readers of anything I type to (my mind has just lost its ability of think of words) . I guess I had better go to bed.
-
It seems like only yesterday that I was asked to delete the forum that I created for the Blacksmith Guild of Central Maryland (BGCM) because members voted against using a forum as a means of communication. :confused:
-
Up-to-date schedule of events may be found at BGCM 2008 Schedule May 2- 3 Civil War Living History Encampment May 14 Open Forge 6-9 PM May 17-18 BGCM Blacksmith Days, Contest Items: 1- Colonial Fire Shovel, 2- Kitchen Knife May 23 Maryland Heartland Sustainable Living Fair Jun 7 Spring Muster & Antique Fire Equipment Jun 14 Fiddler's Convention Jun 11 Open Forge 6-9 PM Jun 28 BGCM Monthly Meeting, Trade Item: Junk/Recycle Materials Item Jul 4 Old Fashioned 4th July Celebration Jul 6-10 Living History Camp Jul 9 Open Forge 6-9 PM Jul 11-12 Common Ground on the Hill Music and Art Festival Jul 13-17 Living History Camp Jul 18 Surf & Turf Summertime Fun Festival Jul 19 BGCM Monthly Meeting, Trade Item: BBQ Tool Jul 20-24 Living History Camp Aug 13 Open Forge 6-9 PM Aug 16 BGCM Monthly Meeting Ice Cream Freeze Off, Trade Item: Ice Cream Scoop Sep 5-6 MASA Metalsmiths Conference, Tuckahoe Steam & Gas Association Sep 10 Open Forge 6-9 PM Sep 11-13 Steam Show Days Sep 19-20 Maryland Wine Festival Sep 27 BGCM Monthly Meeting, Trade Item: Paper Towel Holder Oct 3-4 Fall Harvest Days Oct 8 Open Forge 6-9 PM Oct 18 BGCM Monthly Meeting, Trade Item: Something from Sheet, Plate, or Pipe Nov 12 Open Forge 6-9 PM Nov 15 BGCM Monthly Meeting,Trade Item: Cheese Cutter Dec 5-7 Holiday Tours Dec 10 Open Forge 6-9 PM Dec 11-13 Holiday Tours Dec 12 BGCM Holiday Party Bear Branch Nature Center 4pm Set-Up and Decorate 5:30 Dinner Trade Item: Ornament Hashawha Environmental Center, 300 John Owings Rd, Westminster Dec 19 - 20 Forge Welding Class, Instructor: Bill Clemens Information on blacksmithing courses offered by BGCM BGCM Events and classes take place at the Carroll County Farm Museum Carroll County Farm Museum 500 South Center Dr. Westminster, MD 21157-5615 (800) 654-4645 • (410) 386-3880 -- 848-7775
-
I highly suggest looking at wire from gunsmithing suppliers. My favorite supplier is Brownells: Categories These suppliers sell spring wire in a range of various dimensions, as well as coils of music wire. These wires have the advantage of being strong, flexible, and if I understand correctly, are designed to be made into desired shaped springs and in your application into vent picks. Equipment and supplies of other crafts can be very useful.
-
Definitely a saw set. I have one around here in one of the piles. ;-)
-
You could also consider making a roller mill, The McDonald Mill : Anvilfire Plans Review and putting different patterns, one each on replaceable rollers, if you have a lot of texturing to do.
-
Here is a photograph of my Buffalo Forge firepot. You will notice that the firepot says Buffalo Forge cast into it. Also I don't think that Buffalo Forge had a rib of cast iron across the air inlet. There were a number of brands of firepot that looked sort of similar. ;)
-
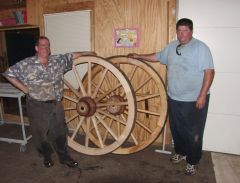
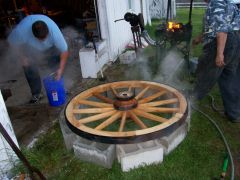
It has been a lot of work to build the Traveling Forge, and the wheels have been amongst the biggest challenge. I made a bunch of tooling to construct the wheels. It has been a good learning experience as I had to make a wide variety of parts for the project. The picture is perhaps a bit misleading. I am 5' 8" tall standing next to the wheels, but Dwight makes me look like a super-short person. The wheels are 57 inches in diameter; almost 5 feet high!
-
The 1861 Ordnance Manual as well as the Mordecai drawings show that by the 1850s fasteners including screws, bolts, nuts, washers, and rivets were standardized for use in military equipment. It would have been too difficult to repair equipment if non-standard fasteners were used. Fastenal.com carries square-headed bolts, and square nuts (plain finish) that appear pretty close to the specifications in the Ordinance manuals of that time period. According to a guy at the local Fastenal store, the Park Service buys fasteners from them to repair their canon carriages. For safety purposes, as well as for historical, I purchase "plain finish" (unplated) fasteners and threaded rod from them. Plain finish lag bolts are good for reforging into hooks to screw into overhead beams to hang the heavy examples of your work. I keep a supply of various sized plain finish square and hex-nuts in specially marked boxes so as to not accidentally weld on a plated fastener. I have made some of the fasteners for the Traveling Forge from plain-finished threaded rod, if the fastener was unavailable otherwise. Fasteners that needed to be made included the "vise-bolt" and bolt on the lunette for the prop-pole. So where smiths got their fasteners likely depended on the time period you are talking about. As the 1800s progressed, it became more likely that smiths bought their fasteners as well as wheel parts, etc. One smith said he was going to make everything including the fasteners from scratch for his group's Traveling Forge; their project did not get very far.
-
These are the same wheels that were used on Civil War canons. Building them has been a very educational experience that pushed the limits of my abilities. It has been an long-time desire to build a Traveling Forge as it will be very appropriate for presentations at the museums that the local blacksmithing groups support, as well as art and craft fairs, and just about anything else. A Traveling Forge is a complete shop carrying coal, bar stock, tools, bellows, fireplace, vise, and anvil. I am in the process of documenting the process of constructing the wheels, other Civil War era blacksmithing stuff, as well as the evolution of military traveling forges. So far I have 139 pages of information.
-
I have posted the images to IForge Iron gallery. The photos may be seen at: UnicornForge Gallery - Blacksmith Photo Gallery I hope that fixes everyone's ability to see the photos. Sorry for the confusion on my part.
-
 Making Wheels for Traveling Forge
 -
 Making Wheels for Traveling Forge
 -
 Making Wheels for Traveling Forge
 -
You can stick one or two "cow magnets" on the underside to help deaden noise. Cow magnets can be found at farm stores.
-
Check to make sure that your punch and anvil surface are flat, square, and meet evenly, and that your punch is perpendicular to the surface. You will need to reheat, harden and temper if your tool lost its hardness. Your anvil looks ok to me. Learning to work around an anvil's unique characteristics can be a useful skill.