

John Martin
-
Posts
1,324 -
Joined
-
Last visited
Content Type
Profiles
Forums
Articles
Gallery
Downloads
Events
Everything posted by John Martin
-
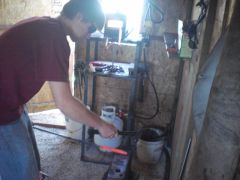
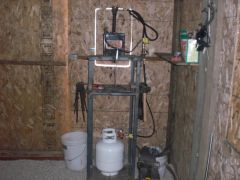 Looking at the front of the forge from back. When forging, door for forge exhaust is open, just closed it to reduce glare.
 -
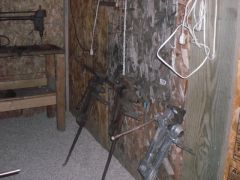 Three post vices there temporarily. One will be put on a 5x5 post, that's been sunk it no the ground, the other two will be turned into portable ones. Tool storage will be along this wall as well.
 -
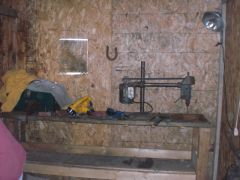 Pretty empty still need to add some bench tools, and welding equipment.
 -
-
-
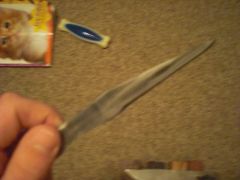
Very interesting knife to say the least, but I like it a lot.
-
I strongly advise you read the blueprint, and pick up the complete bladesmith by Jim Hrisoulas(sorry if I butchered you name JPH).
-
No advice from me either, as I'm still at the beginning of the learning process, but everything seems to be good with the HT. Good job. What kind of steel did you use?
-
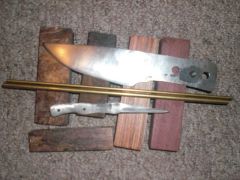
Great job Sam. Really like the stacked handle, btw, which number is this for finished knives?
-
Can't wait to see more, I like this approach a lot.
-
Appalachian Power hammer build...
John Martin replied to unkle spike's topic in Power Hammers, Treadle Hammers, Olivers
Great job Jeff. That thing looks to work well from the photos and videos. Only question I have, why not make that combination die into draw, flat die? Like I mean round the drawing side a lot more, it'd help with the moving of metal. Maybe I they are in the video, but I can't tell. Good job again. Best Regards, John -
-

-
-
-
-
-
Heat treating steel for japanese type anvil?
John Martin replied to aprayinbear's topic in Heat Treating, general discussion
aprayinbear, I would definatly HT. What kind of resources do you have? Coal forge, propane forge, large vertical tank for oil? If you do HT it, I'd just heat up the face, about 2-3" deep, do a dull cherry red (non-magnetic), and then quench in vertically in oil. Temper immediatly to either a dark gold to a light blue. Dark gold being harder, than light blue. This is justmy opinion, I have never HT an anvil, but will be this summer. Wait for someone who really knows what they are doing to answer this. Or go look up chuch robinson anvils, and send him an e-mail on how he does it. -
Making my own anvil.
John Martin replied to John Martin's topic in Anvils, Swage Blocks, and Mandrels
Bladesmtih anvil seems logical as that is what I do. And me or me and my buddy will move it around when I HT it. -
Making my own anvil.
John Martin replied to John Martin's topic in Anvils, Swage Blocks, and Mandrels
Still making my own anvil, but have done major re-designing, figuring out what I actually need and don't need. Since I already have a normal anvil, I am going to make post anvil now. I still have to weld the face to the body, but this will be easier and will weigh between 150-200lbs. It'll be 4" square, and 32" tall. 30" mild steel body, with 2" thick face plate of 4140. I'll keep you all updated on how this goes. Sorry, if my change of course is drastic, but it makes more sense and is more in my ability range. -
Making my own anvil.
John Martin replied to John Martin's topic in Anvils, Swage Blocks, and Mandrels
Well, I've been doing a fair-share of reading and research for this and I'm thinking I should use 6011 for the direct contact areas of the I, and then fill the gaps on both sides with 7018. 6011 is deep penetrating, and 7018 is easy to use, fills easily, and has a higher tensile strength which betters matches the anvils face plate. -
Making my own anvil.
John Martin replied to John Martin's topic in Anvils, Swage Blocks, and Mandrels
Thanks Frosty. Can I use 3/8" instead, less to weld, probably less chance of weld failure, and less money? Or is just easier and better to go with a 1/2" I? -
Making my own anvil.
John Martin replied to John Martin's topic in Anvils, Swage Blocks, and Mandrels
Thanks for the info frosty, btw what do you recommned being the bet way to chip it as we go? Bar with point on the end and a hammer? Cuz a normal welding hammer probably won't fit in there -
Making my own anvil.
John Martin replied to John Martin's topic in Anvils, Swage Blocks, and Mandrels
Okay, well I re-read that I think i understand what you are saying. Make an I that is less than and inch wide and long on all sides than the anvil body. Then tack it all into place. To prevent warping, stick 1/2" bars into all the area possible under the plate where I'm not welding. Start in the middle on both sides. Then the middle of the two halves on both sides and so on. Once the direct contact areas have been welded. Move the 1/2" sticks around while filling and plugging the gap. Also do you I could go 1/4" or 3/8"? Wow, third edit now, lol. Do you think that to prevent mushrooming of the welded area done the road due to use that I should do something like this instead of just an "I" |--|--|--|--|--| I could would still be able to get 100% weld, and I would have no to barely any warpage as well. Is that a better way to go? -
Making my own anvil.
John Martin replied to John Martin's topic in Anvils, Swage Blocks, and Mandrels
I'm going to finish the face plate before welding, and then when we do weld the face on, the face will line up because the hardy hole on the anvil body will have been made as well, I'll then put a 1" bar into the hardy slot, to help keep it all lined up as we go.